1
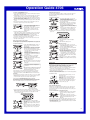
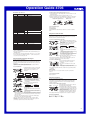
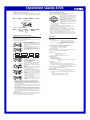
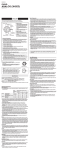
MA0904-EA Operation Guide 4706 Thank you for purchasing this CASIO watch. To ensure that it can provide you with the years of service for which it is designed, be sure to read this manual carefully and follow the instructions contained herein. Pay particular attention to the precautions at the end of this manual text. ••Your watch may differ somewhat from the one shown in the illustration. Modes and Indicators Selecting a Mode Each press of C sounds a confirmation tone and cycles through available modes in the sequence shown below. ••The watch will revert to normal timekeeping automatically if you leave it in the e-DATA MEMORY Mode without performing any operation for about two or three minutes. 4IMEKEEPING-ODE E$!4!-%-/29-ODE 7ORLD4IME-ODE !LARM-ODE (AND!DJUSTMENT-ODE 3TOPWATCH-ODE #OUNTDOWN4IMER-ODE ,IGHT 0RESS -ODE SWITCHING $ISPLAY SWITCHING Days of the Week SU: Sunday, MO: Monday, TU: Tuesday, WE: Wednesday, TH: Thursday, FR: Friday, SA: Saturday Reading the e-DATA MEMORY Mode Digital Display Screens 2ECORD3CREENS Switching between Display Screens In the Timekeeping Mode, each press of D toggles the digital display contents as shown below. #ALENDAR3CREEN 4IMEKEEPING-ODE 30LQGLFDWRU$IRU$0 0RQWK +RXU 'D\ 'DWD ••If a record contains more than five characters, the characters will scroll from right to left. The end of the record will be indicated by the mark. ••Press A to pause right-left scrolling. Press A again to resume scrolling. 2EMAINING-EMORY3CREEN 6HFRQG 5HPDLQLQJPHPRU\ 0LQXWH 'D\RIWKHZHHN Illumination SECONDINTERVAL ,IGHT Pressing B in any mode (except when a setting screen with a flashing setting is on the display) illuminates the face of the watch for about two seconds for easy reading in the dark. ••This screen will show “100%” when there are no records in memory and “0%” when memory is full. 0ASSWORD2EGISTRATION3CREEN Important! ••Illumination may be difficult to see under bright sunlight. 0ASSWORDNOTREGISTERED ••If you press any button besides B, or if an alarm or other beeper operation starts while the face is illuminated, illumination will turn off. Using e-DATA MEMORY Use C to enter the e-DATA MEMORY Mode. You can use the e-DATA MEMORY Mode to store e-mail addresses, Web site URLs, and other information for instant recall whenever you need it. ••The maximum number of records that can be stored depends on the number of characters contained in each record. ••If each record contains 63 characters, you can store up to five records. Note that 63 is the maximum number of characters allowed in one record. ••If each record contains seven characters, you can store up to 40 records. Note that 40 is the maximum number of records, even if each record contains fewer than seven characters. ••When you enter the e-DATA MEMORY Mode, the record displayed when you last exited the mode appears first. ••If you password protect your data, a password input screen will appear first whenever you enter the e-DATA MEMORY Mode. In this case, data will not be viewable unless the correct password is entered first. ••See “Using a Password to Protect Data” for information about password protection of data. To search for e-DATA MEMORY data In the e-DATA MEMORY Mode, press D to scroll through the data record-by-record. ••Holding down D will scroll the records at high speed. 3CROLL ••As shown in the example below, a screen showing remaining e-DATA MEMORY and a password registration screen appear following the e-DATA MEMORY records. If there is no data currently in e-DATA MEMORY, only the remaining memory and password registration screens appear. Example: When there are three e-DATA MEMORY records 2ECORD 0ASSWORD2EGISTRATION 2ECORD 2ECORD SECONDINTERVAL ••This screen will show “SET” to indicate that there is no password currently registered. ••If there is a password, this screen will show “CHANGE”. To create a new e-DATA MEMORY record 1. In the e-DATA MEMORY Mode, use D to display the remaining memory screen. ••If memory is full, delete one or more records you no longer need to make room for the new data. See “To delete record 5HPDLQLQJPHPRU\ data” for more information. 2. Hold down A for about two seconds until the display changes to a data input field with the flashing cursor at the first character position. This is the data input screen. 3. Use D (+) and B (–) to scroll through )LUVWUHFRUGFKDUDFWHU characters at the current input position. ••Holding down either button scrolls at high speed. Supported Characters ••Lower Case Alpha: a to z ••Upper Case Alpha: A to Z ••Numerals: 0 to 9 ••Symbols: *– _@˜⁄ \?#!% . : ; ’ , &=+() 4. When the character you want is at the current cursor position, press C to move the cursor one character to the right. Repeat steps 3 and 4 as many times as necessary to enter all of the characters for the record you are creating. 5. When the record data is the way you want, press A to exit the data input screen. ••The watch also will exit the input screen automatically if you do not perform any operation for about two or three minutes. ••If you want to create another record, repeat steps 1 through 5 above. ••Records are stored in the same sequence they are input. 2EMAINING-EMORY 1 Operation Guide 4706 To edit an e-DATA MEMORY record 1. In the e-DATA MEMORY Mode, use D to scroll through records and display the one you want to edit. 2. Hold down A for about two seconds until the flashing cursor appears at the first character of the record. This is the data editing screen. 3. Use C to move the cursor to the location of the character you want to change, and then use D and B to scroll through characters until the one you want to change to is displayed. 4. When the record is the way you want, press A to exit the data editing screen. ••The watch also will exit the editing screen automatically if you do not perform any operation for about two or three minutes. Changing the Password You can use the following procedure to change a previously registered password. Changing the password does not affect any of the data currently in memory. To change the password 1. Use the procedure under “To access the e-DATA MEMORY Mode with a password” to enter the e-DATA MEMORY Mode. 2. Use D to display the password registration screen shown nearby. 3. Hold down A for about two seconds until the first digit of the password starts to flash. This is the password editing screen. ••If you need to cancel password editing, press A again to exit the password editing screen. ••The watch also will exit the editing screen automatically if you do not perform any operation for about two or three minutes. To delete record data 1. In the e-DATA MEMORY Mode, use D to scroll through records and display the one whose data you want to delete. 2. Hold down A for about two seconds until the flashing cursor appears at the first character of the record. This is the data editing screen. 3. Press D and B at the same time. ••This causes “CLR” to appear on the display as the record is deleted. ••After you delete the data, the record’s blank data input screen will appear. You can enter new data into the record, if you want. 4.Press A to exit the data editing screen. ••The watch also will exit the editing screen automatically if you do not perform any operation for about two or three minutes. ••Deleting a record’s data deletes the record, and causes and records following it to shift upwards. 4. Perform steps 3 and 4 under “To register a password” to enter a new password. 6FUROOVQXPEHUVDWLQSXWSRVLWLRQ 0RYHVƃDVKLQJWRWKHULJKW 5. After entering all four password digits, press C. ••This will exit the editing screen. Using a Password to Protect Data You can register a password, which is a 4-digit number. Once you do, no one will be able to view your data unless they enter the correct password. To register a password 1. In the e-DATA MEMORY Mode, use D to display the password registration screen shown nearby. 2. Hold down A for about two seconds until the first digit of the password starts to flash. This is the password registration screen. ••If you need to cancel password registration, press A again to exit the password registration screen. ••The watch also will exit the password registration screen automatically if you do not perform any operation for about two or three minutes. 3. Use D (+) and B (–) to scroll through numbers at the current flashing digit. ••Holding down either button scrolls at high speed. Supported Characters ••Numerals: 0 to 9 4. When the number you want is at the flashing digit, press C to move the cursor one digit to the right. epeat steps 3 and 4 as many times as R necessary to enter all of the digits of the password. 5. After entering all four digits for the password, press C to register the password and exit the password registration screen. ••The password you enter will not be registered unless you press C. ••After registering a password, a password input screen will appear whenever you enter the e-DATA MEMORY Mode from another mode. Important! ••If you forget your password, you will not be able to access your e-DATA MEMORY Mode records. Be sure to keep a separate written record of your password in a safe place for reference when required. To access the e-DATA MEMORY Mode with a password If you password protect your data, a password input screen will appear first whenever you enter the e-DATA MEMORY Mode. In this case, data will not be viewable unless the correct password is entered first. To delete the password and unprotect data 1. Use the procedure under “To access the e-DATA MEMORY Mode with a password” to enter the e-DATA MEMORY Mode. 2. Use D to display the password registration screen shown nearby. 3.Hold down A for about two seconds until the first digit of the password starts to flash. This is the password editing screen. ••The watch also will exit the editing screen automatically if you do not perform any operation for about two or three minutes. 4.Press D and B at the same time to delete the password. ••This causes “CLR” to appear on the display as the password is deleted, which unprotects the data. World Time Use C to enter the World Time Mode. World time lets you display the current time in any one of 27 cities (29 time zones) around the world and Greenwich Mean Time (GMT). ••Entering the World Time Mode will display the city code that was displayed the last time you exited the World Time Mode. ••After you configure your Home City code and time, offsets are used to set the times in other World Time zones automatically. ••The seconds count in the World Time Mode is synchronized with the Timekeeping Mode seconds count. ••The same 12-hour/24-hour format you select for the Timekeeping Mode time is also used for World Time cities. To search for a city In the World Time Mode, press D to scroll through city codes. A short while after a city code appears, the display will change to show the current time in that city. ••Holding down D scrolls at high speed. ••If the currently selected time zone does not have a city code, the GMT offset appears instead of the city code. &LW\FRGH 0RGH LQGLFDWRU :RUOG7LPH 3CROLL Using Summer Time (DST) 3DVVZRUG,QSXW6FUHHQ !PPEARSONLYWHEN APASSWORDISREGISTERED 1. If the password input screen appears after you enter the e-DATA MEMORY Mode, perform steps 3 and 4 under “To register a password”. ••If you need to cancel password input, press A again to exit the password input screen. 6FUROOVQXPEHUVDWLQSXWSRVLWLRQ 0RYHVƃDVKLQJWRWKHULJKW 2. After entering all four password digits, press C. ••“OK!” will appear on the display and e-DATA MEMORY data will appear if the password matches. ••If the password does not match, “ERR” will appear, and then the password input screen will reappear. Enter the correct password. Summer time, or Daylight Saving Time (DST) as is it is called in some countries, calls for setting clocks ahead one hour during the summer season. Note that the use of summer time depends on the country and even the local area. To select standard time or daylight saving time 1. In the World Time Mode, use D to display '67LQGLFDWRU the city code whose setting you want to change. 2. Hold down A for about two seconds to toggle between summer time (DST indicator displayed) and standard time (no DST $GYDQFHGRQHKRXU indicator). ••Selecting summer time causes the time setting to advance by one hour. ••You can select summer time or standard time independently for each World Time Mode city. ••You cannot change the summer time/standard time setting for the GMT (Greenwich Mean Time) zone. 2 Operation Guide 4706 World Time City Code List City code ––– HNL ANC LAX DEN CHI NYC CCS* RIO ––– ––– GMT LON PAR CAI JRS JED THR DXB KBL KHI DEL DAC RGN BKK UTC Offset –11 –10 –9 –8 –7 –6 –5 –4 –3 –2 –1 0 0 +1 City Name Honolulu Anchorage Los Angeles Denver Chicago New York Caracas Rio de Janeiro London Paris Cairo Jerusalem Jeddah Tehran Dubai Kabul Karachi Delhi Dhaka Yangon Bangkok HKG Hong Kong TYO ADL SYD NOU WLG Tokyo Adelaide Sydney Noumea Wellington +2 +3 +3.5 +4 +4.5 +5 +5.5 +6 +6.5 +7 +8 +9 +9.5 +10 +11 +12 Applicable Cities Pago Pago Papeete Nome San Francisco, Las Vegas, Seattle El Paso, Edmonton Houston, Mexico City Montreal, Miami, Boston Santiago Sao Paulo, Buenos Aires Azores Greenwich Mean Time Dublin Rome, Madrid, Frankfurt Athens, Helsinki, Beirut To turn an alarm or the hourly time signal on or off 1. In the Alarm Mode, use D to display the screen for an alarm or for the hourly time signal. 2. Press A to toggle the alarm or hourly time signal on or off. ••Turning on an alarm causes the ALM indicator to appear on the display. Turning on the hourly time signal causes the SIG indicator to appear. (OURLY4IME3IGNAL3CREEN 6,*LQGLFDWRU To test the alarm In the Alarm Mode, hold down D for about two seconds to sound the alarm. Kuwait, Moscow Using the Countdown Timer Abu Dhabi Use C to enter the Countdown Timer Mode. You can set the start time of the Countdown Timer in units of one minute in the range of 1 minute to 24 hours. The watch beeps for 10 seconds when the end of the countdown is reached. Jakarta, Hanoi Singapore, Kuala Lumpur, Beijing, Taipei, Manila Seoul, Pyongyang Guam Port Vila Christchurch To set the Countdown Timer start time 1. In the Countdown Timer Mode, hold down A for about two seconds until the hour digits of the start time start to flash. This is the setting screen. 2. Use C to move the flashing between +RXU settings as shown below. (OUR Use C to enter the Alarm Mode. Your watch has five alarms, which can be configured independently of each other. The watch beeps for about 20 seconds when an alarm time is reached. The Hourly Time signal causes the watch to beep every hour on the hour. ••Alarms and the hourly time signal all operate in accordance with the digital time of the currently selected Home City. To set an alarm time 1. In the Alarm Mode, use D to cycle through the alarm screens in the sequence shown below until the one you want to set is displayed. !LARM (OURLY4IME3IGNAL !LARM +RXU (OUR +RXU !LARM 0LQXWH +RXU 0LQXWH Repeat steps 2 and 3 to set the Countdown start time you want. ••To configure the setting to countdown 24 hours, set the start time as 0:00. 4. After the setting is the way you want, press A to exit the setting screen. To use the Countdown Timer In the Countdown Timer Mode, press D. 6HFRQG ••Each press of D starts or stops the countdown. ••The time is counted down in one-second steps. ••Pressing A while the countdown is stopped 3TART +RXU 0LQXWH 3TOP will reset to the countdown start time. 2ESET ••Pressing D again while the timer countdown is stopped will restart the countdown. Time Up Alert The watch beeps for 10 seconds when the end of the countdown is reached. To stop the time up alarm Press any button. !LARM 2. Hold down A for about two seconds until the hour digits of the alarm time start to flash. ••The currently displayed alarm will turn on automatically at this point, which is indicated by the ALM indicator appearing on the display. 3. Use C to move the flashing between settings as shown below. $/0LQGLFDWRU -INUTE 3. Use D (+) and B (–) to change the flashing setting. ••Holding down either button scrolls at high speed. ••The watch also will exit the setting screen automatically if you do not perform any operation for about two or three minutes. Using the Alarm and Hourly Time Signal !LARM $/0LQGLFDWRU To stop the alarm beeper Press any button. ••The contents of the above table are current as of June 2005. ••Time differentials in the above table are in accordance with Universal Time Coordinated (UTC). ••The rules governing offsets and summer time are determined by each individual country. *In December 2007, Venezuela changed its offset from – 4 to – 4.5. Note, however, that this watch displays an offset of – 4 (the old offset) for the CCS (Caracas, Venezuela) city code. $ODUPQXPEHU !LARM3CREEN -INUTE 4. Use D (+) and B (–) to change the flashing setting. ••Holding down either button scrolls at high speed. Repeat steps 3 and 4 to set the alarm time you want. ••When setting the hour, make sure that AM (A) or PM (P) is specified correctly when using 12-hour timekeeping, or that the correct 24-hour time is specified. ••The same 12-hour/24-hour format you select for the Timekeeping Mode time is also applied in the Alarm Mode. 5. After the setting is the way you want, press A to exit the setting screen. ••The watch also will exit the editing screen automatically if you do not perform any operation for about two or three minutes. Using the Stopwatch Use C to enter the Stopwatch Mode. The stopwatch measures elapsed time in units of 1/100 second up to 59 minutes, 59.99 seconds (60 minutes). When the maximum limit is reached, the elapsed time returns to zero automatically and timing continues from there. To start or stop an elapsed time operation In the Stopwatch Mode, press D to start and VHFRQG stop elapsed time measurement. ••Pressing A while an elapsed time operation is in progress will freeze the current split time on the display and continue timing of the next split internally. This is indicated by the SPLIT 0LQXWH 6HFRQG 3TART indicator on the display. 3TOP ••Changing to another mode while a split time is displayed cancels the split time operation. 3PLIT 2ESET ••Pressing A while timing is stopped resets the stopwatch to all zeros. 4OMEASUREELAPSEDTIME 3TART 3TOP 2ESET 3 Operation Guide 4706 Cumulative Elapsed Time Measurement Pressing D to restart the stopwatch without resetting it to all zeros causes the elapsed time measurement to resume from where it was last stopped. 4OMEASURESPLITTIMES 3PLIT 3TART 2ELEASESPLIT 3TOP 2ESET 3PLIT4IME3CREEN 2ELEASESPLIT 63/,7LQGLFDWRU 4OTIMESTANDNDPLACEFINISHERS ST &INISHER 3TART $ISPLAYSTIME OFSTFINISHER ND &INISHER $ISPLAYS TIMEOF NDFINISHER 3ECOND RUNNER FINISHES 2ESET Configuring Time and Date Settings Perform the procedures in this section in the Timekeeping Mode. You should use these procedures to adjust the current time and date settings after having the battery replaced, etc. ••Whenever you adjust the digital time setting, always be sure to adjust the analog time setting as well. To adjust the digital time and date (for your Home City) 1. In the Timekeeping Mode, hold down A for about two seconds until the seconds digits start to flash on the digital display. This is the setting screen. 2. To restart the seconds count from 00, press 6HFRQG D on a time signal from a radio, TV, etc. ••Pressing D while the seconds count is in the range of 30 to 59 resets it to 00 and adds 1 to the minutes. 5HVHWVWR 3ECONDS $AY $34/./&& -ONTH 9EAR #ITY#ODE (OUR TIMEKEEPING (OURS -INUTES 3. Press C to advance to the summer time/ standard time setting screen. ••The current setting (DST ON or DST OFF) will be flashing on the display. '67212)) ••OFF: Standard Time ••ON: Summer time (Daylight Saving Time) 7ESTWARD 4. Press D to toggle the setting between standard time (DST OFF) and summer time (DST ON). 5. Press C advance to the Home City setting screen. %ASTWARD ••The currently selected city code will be &LW\FRGH flashing on the screen. 6. Use D (Eastward) and B (Westward) to scroll through the city codes until the one you want to use as your Home City is displayed. ••Holding down either button scrolls at high speed. 0LQXWH ••Be sure to select your Home City before +RXU 6HFRQG adjusting the time setting. ••See the “World Time City Code List” for a complete list of city codes. 7. Press C to select the time and date settings as described below, and adjust them as required. Adjusting the Analog Time Setting You can use the Hand Adjustment Mode to adjust the analog time manually when it does not match the digital time. 1. Use C to enter the Hand Adjustment Mode. 2. Hold down A for about two seconds until the current time starts to flash on the digital display. This is the setting screen. 3. Press D to move the minute hand forward by 20 seconds. ••Holding down D will advance the hands at high speed. Note that hands can be moved forward only. ••You can start high-speed forward hand movement by holding down D as you press B. ••Press any button to stop high-speed hand movement. ••High-speed hand movement also will stop automatically when the hands complete one full 12-hour revolution. 4. After the setting is the way you want, press A to exit the setting screen. ••The watch also will exit the setting screen automatically if you do not perform any operation for about two or three minutes. ••Taking too long to adjust the hand positions can cause the analog setting to be a bit behind. If this happens, perform the above procedure again to advance the minute hand by one or two 20-second steps. Specifications Accuracy: Within ±15 seconds average per month Basic Functions: Normal timekeeping screen: Analog: Hour, minute (two hands) Digital: Hour, minute, second, a.m. (A)/p.m. (P)/24-hour timekeeping Date Time Screen: Month, day, day of the week, full auto calendar (2000 to 2039) e-DATA MEMORY Mode: Storage of mail addresses, Web site addresses, and other data • 63 characters per record: 5 records max. • 7 characters per record: 40 records max. Password protection World Time: Current time in 29 time zones (27 cities) around the world; GMT display; summer/standard time Alarm: Daily Alarms: 5 Setting Units: Hour, minute Beeper: 20 seconds Hourly time signal: Beeps every hour on the hour Countdown Timer: Setting Unit: 1 minute Countdown Unit: 1 second Countdown range: 24 hours 10-second beeper when the end of the countdown is reached Stopwatch: Measuring unit: 1/100 second Measurement range: 59 minutes, 59.99 seconds (60 minutes) Measurement functions: Elapsed time; cumulative elapsed time; split times; first/second place finishers Other: Auto return to regular timekeeping; summer/standard time; 12/24 hour timekeeping; alarm test; LED light Battery: CR1616 Approximate Battery Life: 2 years (20 seconds beeper operation, 2 seconds light operation per day) • Approximate battery life can be shortened by more frequent light operation. • 6 seconds light operation per day: 17 months • 10 seconds light operation per day: 12 months ••Use D (+) and B (–) to change the currently flashing setting. ••Holding down either button changes the setting at high speed. ••While the 12/24-hour timekeeping setting is selected, press D to toggle the timekeeping format between 12-hour (“12H” displayed) and 24-hour (“24H” displayed). ••When setting the hour, make sure that AM (A) or PM (P) is specified correctly when using 12-hour timekeeping, or that the correct 24-hour time is specified. ••You can set a year in the range of 00 (2000) to 39 (2039). The day of the week is set automatically in accordance with the date you set. The watch’s full auto calendar makes adjustments for leap years and month lengths automatically. Because of this, there should be no need to change the date setting again, except after having the watch’s battery replaced. 8. When all the settings are the way you want, press A to exit the setting screen. ••The watch also will exit the setting screen automatically if you do not perform any operation for about two or three minutes. 4