1
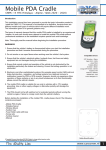
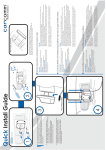
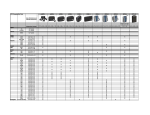
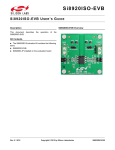
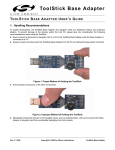
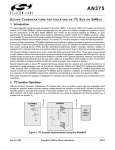
Mobile PDA Cradle
CMPC-22 Fujitsu-Siemens PocketLoox 410
Introduction
This installation manual has been prepared to provide the basic information needed to
install the CMPC-22. This manual is not intended to be definitive, because there are
different models and types of vehicles which will require different installation work.
The information given is for general guidance only.
The terms of warranty demand that this mobile PDA cradle is installed by an experienced
installer. An end-user should never attempt to install this mobile PDA cradle without
professional assistance as the installation requires special tools and knowledge.
Note: Thoroughly read the manual before beginning the installation procedure.
WARNINGS
1. Ensure that the vehicle’s battery is disconnected before you start the installation
procedure and that it remains disconnected during the procedure.
2. Do not smoke or use open flames when working near the vehicle’s fuel system.
Compatible devices
3. Ensure that the vehicle’s electrical cables, hydraulic lines, fuel lines and safety
equipment are not damaged during the installation.
4. Ensure that normal control and operation of the vehicle is not obstructed by the
installation,particularly the brakes and steering. Ensure that airbag operation is not
obstructed.
Fujitsu-Siemens PocketLoox 410
Fujitsu-Siemens PocketLoox 420
Fujitsu-Siemens PocketLoox N500
Fujitsu-Siemens PocketLoox N520
Fujitsu-Siemens PocketLoox C550
5. Electronic and other sophisticated systems (for example speed control, ABS anti-lock
brake,fuel injection-, navigation- and airbag systems) are relatively immune to
malfunction caused by PDA or GPS receiver. However, should you experience false
operation of these systems or are in any doubt whatsoever as to their functionality,
please consult the vehicle’s dealer.
6. The mobile PDA cradle is suitable for use only in vehicles with a 12V negative
grounding. Use on other supply voltages or alternative polarity will damage the
equipment.
7. The PDA should not be left switched on for extended periods without running the
vehicle’s engine. Failure to comply could drain the vehicle’s battery.
Before starting the installation of the mobile PDA cradle please check if the following
contents are present :
- Mobile PDA Cradle
- Rotating Swivel
- Window Mount
- Suction Cup
- Fuse Holder cable with fuse
- Screw sets
- Surface cleaner
- Manual
© Copyright Carcomm International BV 2006. Subject to change without previous notice.
All used brandnames are owned by their respective owners
Safety-Mount® pattern
www.carcomm.nl
1
Mobile PDA Cradle
CMPC-22 Fujitsu-Siemens PocketLoox 410
Installing the Mobile PDA Cradle
1. Mount the window suction mount or Safety-Mount® (sold seperataly, instructions
included with the product ) To mount the window mount please clean the window and
place the window mount in your preferred position. Tighten the nut on the base of the
mount to make it stick to the window. Place the window mount in a position where it
doesn’t interfere with the operation of the vehicle.
2. You can screw the cradle to your mounting part directly, or use the included swivel.
If you use a Safety-Mount® it may be necessary to drill holes in the Safety-Mount®
to be able to screw on the cradle with or without swivel. You can use the pattern on the
front page to see the positions where to drill the holes in the Safety-Mount®.
Adjust the swivel to optimize your view on the PDA screen and tighten it well.
Step 1
3. Align the cradle on the rotating swivel or Safety-Mount® and screw the cradle onto it
with the enclosed screws through the 4 holes. Tighten the screws well.
For permanent installation and connection to the cars ignition power move on to step 5.
4. Plug the Cigarette jack into the Cigarette plug adaptor, check if the red light of the
cigarette plug is lighted. Now you are able to charge your PDA in the mobile cradle.
Move on to step 7.
Step 2
5. Disassemble the Cigarette plug or cut it from the wiring loom and strip the wires.
(The cradle is also available with a fuse in the wiring loom instead of cigarette plug.)
6. Now the red wire (with fuse) needs to be connected to the red wire from the cradle
wiring loom. Then the other side of the fuse’s wire needs to be connected to the
vehicle’s 12V Ignition controlled voltage (+15) to avoid draining the vehicle’s battery
when the vehicle is not used for a long time.
The black wire needs to be connected to the Negative Ground of the vehicle.
Step 3
7. Slide the PDA into the cradle slowly and make sure the PDA is centred well
above the connector. Then press it over the connector gently.
When removing the PDA from the cradle use one hand to hold the cradle and other
hand to pull the PDA out of it.
Connecting a Carcomm Euro-Navigator wired GPS Receiver. (optional)
Connect the PS/2 plug from the GPS to the PS/2 Jack from the PDA cradle.
The PDA will get the data from the GPS receiver and the cradle will supply 5V. power to
the GPS Receiver. The GPS receiver can be connected, plug & play to the PDA Cradle.
Mount the GPS on the dashboard with supplied hook & loop tape or under the
dashboard with included dual sided tape. Make sure it has a clear unobstructed view to
the sky and make sure that the GPS is positioned so that the top is facing upwards.
Now you’re able to setup and use your navigation software. In cars with UV protected
windows the reception will be influenced and decreased.
Step 4
How to connect another brand GPS Receiver.
When connecting another brand GPS Receiver, please check the tables below for the pin
assignment of the PS/2 Female connector. Or check our website for adaptor cables.
Note; The TX and RX connections have to be twisted to the GPS connector.
Hands Free Carkit GPS Connections
PS/2 Female
Signal Name
Pin
Power Out 5V
4
TX
6
RX
2
Ground
3
Shielding
Housing
Step 7
PS/2 Female Frontview
6
5
4
3
2
1
www.carcomm.nl
2