1
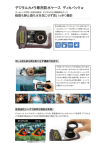
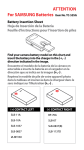
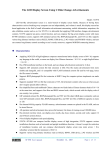
Handling Precautions
Please Read the following Safety Precaution before Using X-Loupe!
WARNING! To avoid the fire, electric shock, or severe injury, please obey the following
instructions.
1.Keep X-Loupe and its accessories away from children and infants. Contact a doctor if any dangerous
situation occurs.
2.Do not point X-Loupe directly at the sun or blazed light sources.
3.Keep X-Loupe away from water or other liquids. The usage of damped or drowned X-Loupe could result in fire or electric shock. Immediately turn off the power of X-Loupe and remove the battery, or unplug the battery charger or any electric adapter from the outlet.
4.Keep X-Loupe away from the heat source, and avoid its exposure to the direct flame or heat.
5.Do NOT disassemble, alter, or apply heat to the battery. Avoid any severe impacts which could damage the protective casing of the battery.
6.In case of any contact to the leaked substances from the battery, immediately flush the contacted skin, face, or cloth with large amount of water and ask for the medical assistance.
7.To avoid the fire, explosion, or injury, please keep battery terminals away from metal or magnetic
materials.
8.Before you discard a battery, please use the insulation tape to cover battery terminals to avoid direct
contact with other objects. Contac with metal or magnetic materials in waste container may result in
fire or explosions.
CAUTION! If potential hazards are not eliminated, it may result in body injury,
property/financial loss, and the malfunction of the product. The following instructions are
also applied to the warning of unsafe operation.
1.Avoid strong impacts or shocks of the equipment. Do NOT strongly push the objective lens.
2.Do NOT use, place or store the equipment in a place with strong sunlight or high temperatures.
3.Avoid using the equipment under the airtight or airless condition; otherwise, it may result in short
circuit, overheating, explosion, fire, burns, or other accidents. High temperature could deform the
shape of casing.
4.If not using the equipment for a long period of time, please remove the battery from the equipment
and the battery charger and store them in a safe place. Improper usage of the battery could make
the battery exhausted in a short time.
5.The battery of X-Loupe is specifically designed to be charged by Canon battery charger. Please
do not charge the battery with other branded chargers; otherwise, product breakdown, overheating
, fire, electric shock, or body injuries might occur.
6.Before you move the equipment rapidly from a cold place to a hot place, please place the equipment inside a sealed plastic bag to allow its gradual adaptation with the ambient temperature, as well
as to avoid the water condensation which might cause mechanical problems. Moving the equipment
rapidly from a cold place to a hot place may cause condensation (water droplet) to form in the inside
or on the surface of the equipment.
page26
Table of contents
‧About Lumos X-LOUPE G Series .....................................................................28
‧Components .....................................................................................................30
‧Attention/ Warning for the Battery Charging .....................................................33
‧Light Source .....................................................................................................34
‧Assembling .....................................................................................................38
‧Shooting Strategy ...........................................................................................40
‧Notice and Preparation before Using the X-LOUPE ........................................42
‧Basic Skills for Micro-Photography ...................................................................43
‧Canon Digital Camera Basic Setup – Micro - Photography ..........................47
‧Digital Magnification of X-LOUPE .....................................................................51
‧Basic Trouble Shooting ....................................................................................52
Please Keep the User Guide for the Future Reference.
★While every effort has been made to ensure that the information contained in this guide is
accurate and complete, no liability can be accepted for any errors or omissions.
★Lumos Technology reserves the right to change the specifications of hardware and software
described herein without prior notice.
★X-Loupe is protected by the following patents: Taiwan Patent No. M292708、M313792、
M315340、M315354;Germany Patent No. Nr.202006001999.5; Japan Patent No.31204
70; United States, China Patent Pending.
page27
About Lumos X-Loupe G Series
X-Loupe, a portable inspection microscope camera, is composed of
a digital camera and a microscope module. Three objective lenses
with different magnifications are supplied to support its utilization
under various circumstances. Each objective lens is equipped with
self-supportive LED lighting, which makes this portable inspection
microscope camera even more user-friendly. In addition to that, GSeries is equipped with high-end objective lens, low-angled lighting
projected from various quadrants and alternative functional
illumination…etc. G Series is also accompanied with the higher level
of Canon digital camera, IXUS 800IS/950IS. Enjoy photography and
micro-photography with one single X-Loupe.
For more information and downloading this user guide, please visit
our website at http://www.x-loupe.com.tw. Please read the copyright
declaration prior to the usage of any part of the content in this
booklet.
About Lumos X-Loupe G Series
【Attention】
Test-Shooting:Before taking pictures of any important subject, please do
the test-shooting to make sure that X-Loupe is perfectly normal without
any damage caused by shipping. In case of any problem, please
contact your local distributor immediately.
Canon IXUS series camera has different names from country to country,
and X-Loupe G Series currently runs well with following cameras:
Comparison of the same camera with different names
IXY
IXUS
Powershot SD Series
800IS
800IS
700IS
950IS
950IS
850IS
Wish you have a wonderful experience on using X-Loupe.
page28
page29
Components
Components
Front View
Digital Camera
Upper View
Exchangeable
Objective lens
Exchangeable
Objective lens
Light Source of
Objective Lens
LCD Monitor
Module Power Switch
Release Button of
Objective Lens
Canon IXUS 800IS/950IS
Back View
LCD Monitor
Tune Button
Battery Usage Display
Switch Button for
Coaxial Lighting
Quadrant Display for
Low-Angled Lighting
Coaxial Lighting Mode
W: White-Light Illumination
F: Functional Illumination/
White-Light Illumination
Coaxial Lighting: Brightness
Index 0~5
Low-Angled Lighting: Brightness
Index 0~5
Switch Button for Lighting Setting
(Coaxial Lighting Brightness/Low-Angled Lighting Brightness/
Quadrant Setting of Low-Angled Lighting)
page30
page31
Components
Attention/Warning for the Battery Charging
Bottom View
Please go by following steps to charge the battery:
Battery Cover
Tripod/Stand Socket
Camera Fixing Screw
1. Align the arrow of the battery(NB5L) with the arrow of Canon battery charger, and insert the battery into the battery charger.
2. Plug the battery charger (CB-2LX) into the power outlet, or attach the power
cord to the battery charger (CB-2LXE) and plug it into a power outlet. The
charger indicator will light on. (Orange: charging the battery; Green: charging
completed)
3. If the charger indicator does not light on after plugging the battery charger into
the power outlet, please check the following:
a.Battery loose from the battery charger?
b.Does the power outlet switch ON?
c.Check other factors which might affect the power supply of the outlet.
d.Ask for the expert to inspect the power outlet.
4. Remove the battery when charging process is done.
5. Do NOT use the battery charger in humid circumstances.
Side View
Switch Button for Coaxial Lighting
W: White Light Illumination
F: White Light Illumination (Standard)
/Functional Illumination (Optional)
page32
page33
Light Source
There are two different light sources provided by the objective lens of X-Loupe
G Series: coaxial lighting (MAIN) and low-angled lighting (SUB). The coaxial
lighting, located on the inner circle, is the direct-projection light coming out
from 8 LEDs; whereas the low-angled lighting, located on the outer circle, is the
lower-angled projection light coming out from the other 8 LEDs. The brightness
indexes of both lighting are adjustable from zero to 5. The factory default
setting of both lighting are ON and brightness index are set to 5.
Light Source
In conventional micro-photography, taking a good picture is so difficult that most
users have to be content with pictures of less-than-expected quality. G Series
change the situation. Equipped with 2 different light sources (coaxial lighting and
low-angled lighting), G Series provide more than 10 different lighting options. The
flexible lighting options provide the capability to capture high-quality pictures for
various and changeful subjects. Please refer to the following operation steps.
(1) Turn ON coaxial lighting; Turn OFF low-angled lighting.
Switch Button for Lighting Setting
【●】Coaxial Lighting (MAIN)
【○】Low-Angled Lighting (SUB)
【⊕】Quadrant Setting of Low-Angled Lighting (SUB)
Tune Button
Adjust the brightness index of lighting by tuning the button up and
down. By pressing the Tune Button, the brightness index becomes
`3´. The quadrant setting of Low-Angled Lighting (SUB) is also
controlled by the Tune Button when switch to Quadrant Setting of
Low-Angled Lighting ⊕. By pressing the Tune Button, the light of
upper left and right quadrants turns on.
Switch Button for Coaxial Lighting
Steps
1
2
3
4
5
Selection
Switch Button for
Lighting Setting
Tune Button
Switch Button for
Lighting Setting
Tune Button
Switch Button for
Coaxial Lighting
Switch to Quadrant
Turn off ligh of all
Setting of
quadrants
Low-Angled Lighting
Switch to Coaxial
Lighting (MAIN)
Illustration
Description
Tune the brightness To switch between 4 and
index as desired
8 LEDs.2
( 1 ~ 5)
(Check LCD monitor)
There are 3 kinds of light sources: W (White), F( Functional Illumination), and W+F (White + Functional Illumination).1
When the coaxial lighting is switched to W (White), `W´ is shown
on the LCD monitor; whereas `F´ is shown when switching to F (
Functional Illumination).1
1. F (Functional Illumination) is optional and for the special order only, such as Ultraviolet Light. Unless otherwise
mentioned, each objective lens is equipped with white-colored LED by default.
page34
The picture shown here is lighting
with 4 white-light LEDs.
2. By default, the coaxial lighting is supported by 8 LEDs. Switching to W+F will turn on all 8 LEDs, while W or F only
turns on 4 LEDs. By special order, the coaxial lighting can be equipped with 4 white-light LEDs and 4 Functional
Illumination LEDs.
page35
Light Source
Light Source
Upper and Lower
Left are ON
(2) Turn OFF coaxial lighting; Turn ON low-angled lighting(SUB).
Steps
1
2
3
4
5
6
Selection
Switch Button for
Lighting Setting
Tune Button
Switch Button for
Lighting Setting
Tune Button
Switch Button for
Lighting Setting
Tune Button
Upper Left and
Right are ON
Illustration
Upper Right is ON
Description
Switch to Coaxial Tune the brightness Switch to Low
Tune the
Switch to Quadrant
Select which
Lighting
index down to zero.
-Angled Lighting brightness index
Setting for
quadrants to
(Check LCD monitor)
as desired (1 ~ 5).
Low-Angled Lighting turn on
(Check LCD monitor)
Lower Right is ON
(3) Turn ON low-angled lighting. Nine different photo effects taken by turning on various
quadrants of light are shown below.
page36
All quadrants are ON
Picture looks FLAT;
useful when shooting
the flat object
Lower Left is ON
Upper and Lower
Right are ON
Upper Left is ON
Lower Right and
Left are ON
Light Source is OFF
No Image
page37
Assembling
Assembling
As picture shown on the left, tuck Canon digital camera
into X-Loupe module.
Hold the camera and module in one hand and take the
objective lens with the other hand. Align the red dot on
the objective lens with the other red dot on the module.
Make sure that the left and bottom edges of the Canon
digital camera are in close contact with X-Loupe module.
Attach the objective lens to the module.
Make sure that the screw hole on the bottom of the module
is aligned with the tripod socket of the camera. Insert the
screw into the hole.
Rotate the objective lens clockwise until the sound,`ka´,
is heard. Do not over-rotate the objective lens.
Rotate a coin clockwise to tightly lock the screw. Please
make sure that both Canon digital camera and the module
are well locked.
For the safety purpose, please make sure that the objective
lens is not loose.
To disassemble X-Loupe module from Canon digital camera, rotate a coin counterclockwise. Pay attention to both camera and module to prevent them from falling . Please store
the screw in a proper place, It is advised to put it back into the carrying case.
page38
To change the objective lens, press
the release button and rotate the
objective lens counterclockwise for
45 degrees. Easily and softly disassemble the objective lens from the
module. Do not over-rotate the
objective lens. Repeat above procedures to assemble another objective lens onto the
module.
page39
Shooting Strategy
Taking pictures for a flat subject
Shooting Strategy
Taking pictures for a non-flat subject (2)
Put the contact ring on the objective lens before shooting.
The barrel part of the objective lens can be removed by
rotating it counterclockwise and vice versa for the
assembling.
Have the contact ring closely touched the surface of the
subject. Slightly press X-Loupe on the subject to reach
the best working distance, and press the camera shutter
halfway to focus. The AF (autofocus) green frame(s)
should show up when the camera focuses. Fully press
the camera shutter to shoot. Any shaking or vibration
should be carefully prevented during shooting.
Keep rotating the barrel until it is removable from the
objective lens.
Taking pictures for a non-flat subject (1)
The contact ring is not essential in this scenario unless
the surface of the subject is vulnerable and easy to be
scratched.
To keep a stable pose without the assistance of the
contact ring and barrel, please use two fingers to uphold
the objective lens with another finger touching the
subject surface gently. Move the camera up and down
slightly to reach the best working distance. Press the
camera shutter halfway to focus. When the AF
(autofocus) green frame(s) is shown on the camera, fully
press the camera shutter to shoot. Any shaking or vibration should be carefully
prevented during shooting.
Aim the camera at the subject. Hold the objective lens
by two fingers. Slightly move around the camera up and
down to reach the best working distance, while pressing
the camera shutter halfway to focus. When the AF
(autofocus) green frame(s) is shown on the camera, fully
press the camera shutter to shoot. Any shaking or vibration should be carefully prevented during shooting.
page40
page41
Notice and Preparation before Using the X-Loupe
When the X-Loupe is assembled, please do the following procedures
to enjoy using the X-Loupe.
1. Insert the appropriable Canon IXUS battery and the memory card.
2. Select the objective lens as desired and assemble it onto the X-Loupe
module.
How to choose the objective lens?
◎Field of view: The larger magnification, the smaller field of view and vice versa.
◎Moving speed of the object: The faster the object is moving, the objective lens with smaller
magnification should be used in order to obtain clearer pictures. This strategy is useful when
taking pictures for a living thing such as insects and the earthworm.
◎Depth of focus: The larger magnification, the smaller depth of focus and vice versa.
3. Turn on X-Loupe and Canon IXUS camera. The lens of camera should
stretch out now, and what is observed from the LCD monitor on the rear
side of the camera will be a vignette image. Don’t worry, it’s normal. This
means that the assembling of X-Loupe module and the digital camera is
successful.
4. Zoom in Canon camera until 4.0X, the standard optical zoom value for
operating the X-Loupe G Series.(If digital zoom setting is turned off,the
sign of 4.0X will not display on LCD.)
Basic Skills for Micro-Photography
1. Except the Macro and Infinity Shots Mode, all functions of Canon digital
camera are compatible with X-Loupe and function well. To get the best
performance from X-Loupe, please take some time to get familiar with the
operation and functions of Canon digital camera.
2. Focus:
The auto-focus function of Canon camera at optical zoom factor 4X is
very sensitive and clever. However, while using a higher zoom factor, it
is getting harder to focus the subject automatically. This is because any
tiny vibration (such as your pulse) is magnified with the increasing of
the zoom factor. Please use a tripod stand if clear pictures can not be
obtained by following the instruction of X-Loupe G20 Shooting Strategy.
It may be difficult to focus on the following types of subjects.
- Subjects with extremely bright objects at the center of the composition.
- Subjects which are moving quickly.
- Subjects under/behind glass.
- Subjects which will reflect the light.
Basically, the focusing function of X-Loupe is Auto Focus as same as
Canon camera’s. Press the shutter button halfway to focus (Focus
Lock), keep the button pressed, re-aim the camera to compose the
shot as desired and press the shutter button fully.
●
●
AiAF Focusing Mode
Suggestion: Turn OFF
5. Please turn OFF the flash light of the camera while using X-Loupe.
6. Macro and Infinity Shots Mode of the camera is not compatible with X-Loupe.
page42
page43
Basic Skills for Micro-Photography
Reason: Take IXUS 950IS as example, please refer to the Advanced
Camera User Guide Shooting-Switching between Focusing Mode p.49. In
most cases, the purpose of micro-photography is to take pictures on a
specific part of a subject. During the shooting process, that specific part
is usually moved to the center of the LCD monitor. The camera will only
focus at a central AF (autofocus) frame area when AiAF is turned OFF.
This is convenient for focusing on a specific part of a subject with
greater certainty. Hence, all the user has to do is to move X-Loupe up and
down searching the best working distance and find the best focus. This
focusing mode is more appropriate for micro-photography. If AiAF is
turned ON, X-Loupe might find many auto-focusing spots which are not
necessarily wanted. This situation occurs frequently on taking pictures for
a non-flat subject.
Shooting with the Auto Focus Lock (AF Lock), press the shutter button
halfway and press the button
. The AFL icon will display on the right
of camera LCD monitor. The AF lock is convenient because you can let go
of the shutter button. In addition to that, the AF lock is still effective after
the picture is taken and it allows you to take the next picture with the same
focus. It is suitable to used when the X-Loupe is mounted on the stand,
just rotating the knob ofStand
the stand and taking the pictures as desired.
Please refer to IXUS 950IS Advanced Camera User Guide P.51and P.52.
page44
Basic Skills for Micro-Photography
3. Continuous Shooting and Self Timer:
To take pictures for a living thing such as insects, it is suggested to use
Continuous Shooting Mode, and then pick the best one from shooting. For
IXUS 950IS, please refer to Advanced Camera User Guide P.37.
Using the Self-Timer in micro-photography can prevent the shaking while
you press the shutter button. Besides 2sec and 10sec Self-Timer, you can
also change the delay time and number of shots (i.e. Customer Timer). For
IXUS 950IS, please refer to Basic Camera User Guide P.16~17.
4. Zoom:
A subject can be zoomed approximately up to 16X, using the combined
digital (4X) and optical (4X) zoom. When the zoom is set higher than the 4X
optical zoom (where the digital zoom will be used), there might be some
noises and the sawtooth-like stripes showing on the LCD monitor with only
0.23 mega-pixels resolution. It is better to inspect the subject from LCD
monitor when the digital zoom is used. When a picture with good quality is
need, please use only the optical zoom on shooting to get better result.
The Digital Tele-Converter, pp.33~34 in the Advance Camera User Guide
of Canon IXUS950IS, allows users to mimic the effect of telephoto by using
digital zoom. The focal length is 1.6X or 2.0X increased, which is good for
taking pictures both from the short and long distance. The Digital TeleCoverter
can also improve the magnification of X-Loupe. For example, with 300X
objective lens of X-Loupe and 2.0X Digital Tele-converter, the magnification is 600X.
5. Distance:
In micro-photography, any tiny minor vibration (such as the pulse) can
have some influences on picture quality. To acquire maximum stability, the
working distance of X-Loupe was designed to approach the subject, like
page45
Basic Skills for Micro-Photography
the conventional microscopy. Sometimes, moving X-Loupe up and down a
little bit can reach the best focus. The AF (autofocus) green frame(s) on the
LCD means good focus, whereas orange means close to the focus but not
good enough.
Working Distance
Depth of Focus
60x
4~4.43cm
1.8mm
150x
1.1~1.3cm
0.8mm
300x
0.8cm
0.25mm
Canon Digital Camera Basic Setup – Micro-Photography
Although X-Loupe G Series work together with Canon IXUS 800IS/
950IS digital cameras, the factory default setting of IXUS 800IS/950IS
is not meant to be used in the micro-photography. Therefore, the
camera settings have been altered to meet the micro-photography
requirement prior to its shipping. Please refer to the following list
and explanation.
Pictures shown here are based on Canon digital camera IXUS 800IS and for reference only.
Adjust the Zoom to its maximum optical value, 4.0X.
(This is the standard setting for X-Loupe.)
6. Movie:
Due to the large size of a movies file, please use 512MB SD card or above
to avoid losing the important scene. The 1.6X and 2.0X of Digital TeleConverter are not available for the movie function.
The Manual Mode is required for micro-photography.
Please do NOT use Macro or Infinity Shots Mode.
Set the Exposure Compensation to zero and the range
is from -2 to +2. The shutter speed (Long Shutter Mode)
can be set as high as 15 seconds.
page46
page47
Canon Digital Camera Basic Setup – Micro-Photography
Canon Digital Camera Basic Setup – Micro-Photography
Note: Turn OFF the flash light for micro-photography.
Using the Light Source of X-Loupe
The White Balance is set to Day Light Mode (5000~6000°K) in
accordance with the 6000°K light source of X-Loupe.
If using light sources other than X-Loupe, please refer to Canon
User Guide.
Please keep in mind that the flash light is easily
turned ON while the position shown here is
accidentally pressed by the thumb.
The image of a partial subject in micro-photography may have
difficulty to differentiate due to some special properties of that
subject. Using the Vivid Mode could improve the effect of image
to get better inspection result. If the Vivid Mode can not reach
the expected result, try other Modes.
Single shooting is the default setting. (IXUS
800IS/955IS is equipped with image stabilization
function) In a circumstance where stable posture is
hard to maintain or the subject is moving or
trembling, please choose Continuous Shooting
Mode to take more pictures to get better results.
In micro-photography, the camera has to approach closely to the
subject, and the focal area is magnified many times. Using Evalu
ative Metering Mode could help the system to grab more informat
ion and get more precise Shutter Speeds.
Canon IXUS series is not compatible with the
shutter cable release. To reduce the influence of
vibration during shooting, please use Self-Timer for
better performance. Please refer to Canon User
Guide for more details.
Please set the Compression to Fine. (Altering this setting would
change the image file size.)
Set the Recording Pixels value according to the output media.
For instance, choosing higher Recording Pixels value if the
picture is for printing. (Altering this setting would change the
image file size.)
page48
1. Only under the Postcard
Mode can the information of
date and time be embedded
into the picture.
2. Turn ON the Date Stamp to
have the information of time
and date embedded into the
lower-right corner of the
picture.
page49
Canon Digital Camera Basic Setup – Micro-Photography
Suggestion: Turn OFF
Explanation:In most cases, the purpose of micro-photography is to take
pictures on a specific part of a subject. If AiAF is turned off, the camera will
find its focus at a central AF (autofocus) frame, and the best focal distance
can be found by simply moving the camera up and down. The camera will
automatically find more than one focal positions while AiAF is turned on, but
some of the focal positions may not be necessarily wanted. Nevertheless,
AiAF can be utilized depends on the practical demand.
Suggestion: Turn OFF
Explanation:AF-assist Beam is located at the front side of the camera, and
is used in the dim environment by pressing the shutter halfway. Since AFassist Beam is blocked by X-Loupe module and X-Loupe is equipped with its
own light source, AF-assist Beam should be turn off.
Digital Magnification of X-Loupe
The digital magnification of X-Loupe is calculated based on 17 inch
LCD monitor with the resolution of 1024 X 768 dpi, and the digitalized picture displayed at 1:1 (100%) ratio. Please refer to some
tests shown below:
Camera Unit: X-Loupe G Series module + 150X objective lens + IXUS950IS
Monitor: ViewSonic VE720m 17 inch LCD
Monitor Resolution: 1024 X 768 dpi
Camera Recording Pixels: 2592 X 1944 dpi (5.2 mega pixels)
Optical Zoom: 4X
Subject: 1mm Ruler (The smallest scale is 0.25mm)
Suggestion: Turn ON
Explanation: For inspection purpose, the bigger digital zoom you use, the
less picture quality you get. However, it helps users to view the subject in an
easy way. For micro-photography purpose, suggest to use optical zoom only
(i.e. 4.0X for IXUS 800IS/950IS) to have better picture quality. Then inspect
the digitalized picture with larger magnification on the PC monitor.
Suggestion: Set as desired
Explanation:In some circumstances, it could help to decide the composi-
Camera Recording Pixels: 2592 X 1944 dpi
(5.2 mega pixels)The length of 1mm on the
picture showing on the monitor is 19cm→
Magnification = 190X
Camera Recording Pixels: 2592 X 1944 dpi (5.2 mega pixels)
Digital Tele-Converter: 2.0X
The length of 0.5mm on the picture showing on the monitor
is 19cm→Magnification = 380X
Camera Recording Pixels: 3264 X 2448 dpi
(7.99 mega pixels)The length of 1mm on the
picture showing on the monitor is 25cm →
Magnification = 250X
Camera Recording Pixels: 3264 X 2448 dpi (7.99 mega pixels)
Digital Tele-Converter: 2.0X
The length of 0.5mm on the picture showing on the monitor
is 25cm→Magnification = 500X
tion of an image with Grid Lines ON.
Suggestion: Hold
Explanation:The micro-photography is utilized on the inspection and
photography of a tiny part of a subject; hence, the review of every picture is
very important. If the review is not set to Hold, pictures can only be inspected
or deleted after switching to Play Mode.
page50
page51
Basic Trouble Shooting
1. For the troubleshooting of IXUS camera, please refer to the Adva
-nced Camera User Guide of IXUS.
2. The LED in the objective lens is not bright:
a. Check the battery power.
b. Disassemble the objective lens and assemble it back to the module again. Make sure
that the assembling of the objective lens with X-Loupe module is correct.
c. Check the brightness index of both coaxial lighting and low-angled lighting. Make
sure that they are not set to zero.
d. In order to inspect, make sure that all quadrants of the low-angled lighting are turned
on.
3. Error message shown on the IXUS camera monitor and the lens of
Canon camera can not stretch out or retract:
a. Turn off the camera power to make the lens retract. Disassemble Canon camera from
the X-Loupe module, and turn on the power of the camera again. The lens of the
camera should be able to stretch out.
b. Do NOT try to fix the camera lens by force because it might void the warranty. Please
contact your local distributor if the problem could not be solved by yourself.
Basic Trouble Shooting
5. Could not see the full field of view on the camera monitor:
a. Please adjust the Zoom of the camera to 4.0X so that the full field of view can be
obtained.
b. Check the camera lens and make sure that the lens is able to stretch out and the
function of Zoom is working.
6. Out of Focus:
a. X-Loupe is a contact-based digital microscope; please do not try to take the picture
outside its working distance.
b. Adjust the direction or posture while shooting pictures.
c. Press the shutter halfway and adjust the distance between the subject and objective
lens to reach the best focus.
7. The battery is fully charged, but lasts for shorter and shorter time:
The lithium battery can only be recharged for certain amount of times. Please purchase
a new battery from your local distributor.
8. Hardware malfunctions such as slipped power switch or fatigue pin:
Please contact your local distributor or call our customer service for assistance.
4. No display on the LCD monitor of X-Loupe module:
a. Please re-press the power switch of the module again.
b. Remove the battery and insert it into the module again.
c. Check the battery power of the module.
d. Disassemble the objective lens from the module, and press the power switch again.
In case of any question, please contact your X-LOUPE dealer, or email : [email protected]
page52
page53
page54
page55