1
Canon
SmartBase MPC600F/400
Fax Guide
This equipment conforms with the essential requirements of
EC Directive 1999/5/EC.
We declare that this product conforms with the EMC requirements
of EC Directive 1999/5/EC at nominal mains input 230V, 50Hz
although the rated input of the product is 200V-240V, 50/60Hz.
If you move to another EU country and are experiencing trouble
please call the Canon Help Desk.
(For Europe Only)
Using Your Documentation
Your machine includes the following documentation. This documentation has been designed so that you can
easily use your machine to suit your particular needs.
Setting up the machine ........................................
Software installation ............................................
Components of the machine ...............................
Basic operation of the machine ..........................
Summary of settings ............................................
Quick Start Guide
Document and paper handling ............................
Making copies .......................................................
Maintenance ..........................................................
Troubleshooting feed and copy issues ..............
Reference Guide
Sending and receiving faxes ...............................
Speed dialling .......................................................
Troubleshooting fax issues .................................
Fax Guide
MPC600F model only
Controlling the machine from your PC...............
MultiPASS Suite for
Windows® Software
User’s Guide
Documentation is included on the CD-ROM in PDF form.
Copyright
Copyright © 2002 by Canon, Inc. All rights reserved. No part of this publication may be reproduced,
transmitted, transcribed, stored in a retrieval system, or translated into any language or computer language in
any form or by any means, electronic, mechanical, magnetic, optical, chemical, manual, or otherwise, without
the prior written permission of Canon, Inc.
Model Name
• H12219 (MPC600F)
i
Trademarks
Canon and BJ are registered trademarks. BCI, Bubble Jet, MultiPASS, and UHQ are trademarks of Canon Inc.
All other product and brand names are registered trademarks, trademarks or service marks of their respective
owners.
Super G3 is a phrase used to describe the new generation of fax machines that use ITUT V.34 standard 33.6 Kbps* modems. Super G3 High Speed Fax machines allow
transmission time of approximately 3 seconds* per page which results in reduced
telephone line charges.
* Approximately 3 seconds per page fax transmission time based on Canon FAX Standard Chart No. 1
(Standard Mode) at 33.6 Kbps modem speed. The Public Switched Telephone Network (PSTN) currently
supports 28.8 Kbps modem speeds or lower, depending on telephone line conditions.
ii
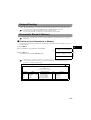
Contents
Chapter 1: Introduction
Chapter 4: Sending Faxes
Customer Support ...................................... 1-1
Operation Panel ......................................... 1-1
Standby Display ......................................... 1-2
Methods of Registering Information in the
Machine...................................................... 2-1
Guidelines for Entering Numbers, Letters,
and Symbols .............................................. 2-1
Correcting a Mistake............................... 2-2
Registering Sender Information ................. 2-3
What is Sender Information? ................. 2-3
Entering the Date and Time.................... 2-4
Registering Your Fax/Telephone Number
and Name ............................................... 2-4
Printing a List to Check Information
Registered in Your Machine ................... 2-5
Setting the Telephone Line Type .............. 2-6
Dialling Through a Switchboard ................ 2-6
Preparing to Send a Fax............................. 4-1
Documents You Can Fax........................ 4-1
Adjusting the Quality of Your Faxes ....... 4-1
Dialling Methods ..................................... 4-3
Sending Methods........................................ 4-6
Memory Sending..................................... 4-6
Manual Sending Via the Handset ........... 4-8
Cancelling Sending..................................... 4-9
Redialling When the Line is Busy ............. 4-10
Manual Redialling ................................. 4-10
Automatic Redialling ............................ 4-10
Sequential Broadcasting........................... 4-11
Delayed Sending ..................................... 4-13
Documents Stored in Memory ................. 4-13
Printing a List of Documents in
Memory ................................................ 4-13
Printing a Document in Memory ........... 4-14
Deleting a Document from Memory ...... 4-15
Checking a Document’s Details ........... 4-15
Chapter 3: Speed Dialling
Chapter 5: Receiving Faxes
What is Speed Dialling? ............................ 3-1
Speed Dialling Methods.......................... 3-1
One-Touch Speed Dialling ........................ 3-2
Registering Numbers for One-Touch
Speed Dialling ........................................ 3-2
Changing/Deleting a One-Touch Speed
Dialling Entry .......................................... 3-3
Coded Speed Dialling................................. 3-4
Registering Numbers for Coded Speed
Dialling.................................................... 3-4
Changing/Deleting a Coded Speed
Dialling Entry .......................................... 3-5
Group Dialling ............................................ 3-7
Creating Groups ..................................... 3-7
Speed Dialling Lists ................................... 3-9
Printing Speed Dialling Lists................... 3-9
Different Ways to Receive a Fax ............... 5-1
Setting the Options for FAX⁄TEL
AUTO SW ............................................... 5-2
Receiving Faxes Manually.......................... 5-4
Receiving Faxes to the MultiPASS Suite.... 5-5
Polling Receiving ........................................ 5-5
Receiving While Performing Other Tasks .. 5-6
Receiving Faxes in Memory When a
Problem Occurs .......................................... 5-6
Cancelling Receiving ................................. 5-6
Chapter 2: Registering Information
Chapter 6: Special Features
Special Dialling .......................................... 6-1
Dialling an Overseas Number
(With Pauses) ......................................... 6-1
Switching Temporarily to Tone Dialling .. 6-2
Confirming a Dial Tone ........................... 6-2
Dialling Through a Switchboard ............. 6-3
Restricting Use of Your Machine ................ 6-3
iii
Chapter 7: Reports and Lists
Summary of Reports and Lists .................. 7-1
ACTIVITY REPORT ................................... 7-2
TX (Transmission) REPORT ...................... 7-3
MULTI TX/RX (Transaction) REPORT ... 7-4
RX (Reception) REPORT .......................... 7-4
Chapter 8: Troubleshooting
LCD Messages .......................................... 8-1
Faxing Problems ........................................ 8-3
Sending Problems .................................. 8-3
Receiving Problems................................ 8-4
Telephone Problems .................................. 8-6
If a Power Cut Occurs ............................... 8-7
If You Cannot Solve the Problem ............... 8-7
Chapter 9: Summary of Settings
Understanding the Menu System .............. 9-1
Accessing the Menus ............................ 9-1
Menus in FAX Mode ............................... 9-2
Appendix: Specifications
Facsimile ................................................... A-1
Telephone .................................................. A-1
Index ........................................................... I-1
iv
Type Conventions Used in This Guide
Please read the list below of symbols, terms, and abbreviations used in this guide.
• Indicates a warning concerning operations that may lead to death or injury to persons or damage to property
if not performed correctly. In order to use the machine safely, always pay attention to these warnings.
• Indicates operational warnings and restrictions. Be certain to read these items to operate the machine correctly, and
to avoid damage to the machine.
• Indicates notes for operation or additional explanations. Reading these is highly recommended.
(→ p. n-nn)
A number preceded by an arrow and enclosed in parentheses references a page
number in this guide which contains more information on the topic of the previous
sentence.
→ Quick Start Guide
Refer to the Quick Start Guide for details on the topic of the previous sentence.
→ Reference Guide
Refer to the Reference Guide for details on the topic of the previous sentence.
→ MultiPASS Suite
User’s Guide
Refer to the MultiPASS Suite for Windows® Software User’s Guide for details
on the topic of the previous sentence.
machine
The word “machine” is the general term used to represent the MPC600F.
default
A setting that remains in effect unless you change it.
document or fax
The original sheet(s) of paper you send or receive with the machine.
menu
A list of settings from which you select an item to set up or change. A menu has a
title which appears in the LCD.
Available menus and the display differ depending on the current mode (Copy,
Fax, or Scan Mode). This guide shows the display in Fax Mode as an example.
transaction number
When you send or receive a document, your machine automatically assigns the
document a unique transaction number. A transaction number is a four-digit
number that will help you keep track of documents you send and receive.
TX/RX NO.
TX/RX NO. is the abbreviation used for Transaction number.
TX
Denotes Sending.
RX
Denotes Receiving.
In addition, this guide uses distinctive typefaces to identify buttons and information in the LCD:
• The buttons you press appear in this typeface: Stop/Reset.
• Information in the LCD appears in this typeface: USER SETTINGS.
v
Chapter 1
Introduction
Customer Support
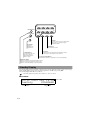
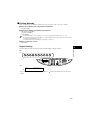
Operation Panel
This section describes buttons used when sending and receiving faxes. For buttons not described here, →
Reference Guide.
ON/OFF Button
Turns the machine on and off.
Resume Button
Resumes sending or receiving faxes after an error is corrected. Also ejects
a document remaining in the ADF.
LCD
Displays messages and selections, and prompts during operation.
In Use/Memory Light
Blinks when the machine is using the telephone line. Lights
when there are documents in memory.
Alarm Light
Flashes when an error
occurs, or when the machine
is out of paper or ink.
Copy
In Use/ Memory
ON/OFF
Alarm
Resume
Fax
Scan
Colour/B&W Button
Sets the machine for colour or black
& white transmission. For colour
transmission, press this button to
turn on its light.
Colour /B&W
Enlarge/
Reduce
ABC
1
Paper Select
2
4
Contrast
PQRS
Image Quality
DEF
JKL
GHI
Menu
OK
Fax Button
Switches the standby
display to Fax Mode.
TUV
7
3
01
02
03
04
Redial/Pause
MNO
5
05
6
Coded Dial
WXYZ
8
06
07
D.T.
Polling
08
R
09
9
Hook
→ P. 1-2
0
T
Numeric Buttons
Enter numbers when dialling or
registering fax/telephone
numbers. Also enter charaters
when registering names.
Paper Select Button
Selects the paper
size for received
faxes (→ Reference
Guide.
OK Button
Selects and confirms
settings.
T ( ) Button
Connects to information
services that accept tone
dialling only, even if you are
using a rotary pulse.
(Stop/Reset) Button
Cancels sending/receiving faxes and other
operations, and returns the machine to standby
mode.
(Start) Button
Starts sending or receiving faxes.
Image Quality Button
Selects the fax resolution.
▼
▲
▼
▲
Contrast Button
Adjusts the fax contrast.
(-),
(+) Buttons
Scroll through selections. Also,
clears an entry and
enters a space between characters.
Menu Button
Displays the menu to customise operation of your machine.
1-1
1
Introduction
Your machine is designed with the latest technology to provide trouble-free operation. If you encounter a
problem with the machine’s operation, try to solve it by using the information in Chapter 8. If you cannot solve
the problem or if you think your machine needs servicing, contact your local authorised Canon dealer or the
Canon help line.
01
02
03
04
Redial/Pause
05
Coded Dial
06
07
D.T.
Polling
08
R
09
Hook
R Button
Dials the outside line access number when
the machine is connected through a
switchboard (PBX).
Hook Button
Engages or
disengages the
telephone line.
Coded Dial Button
Press this button and a twodigit code to dial a preregistered fax/telephone
number or group.
Polling Button
Polls another fax machine.
D.T. Button*
Confirms the dial tone when dialling a fax/telephone number
* This feature is only available for some countries
One-Touch Speed Dial Buttons
Dial fax/telephone numbers pre-registered for one-touch speed dialling
Redial/Pause Button
Redials the last number that was dialled with the numeric
buttons. Also enters pauses between or after the fax/
telephone number when dialling or registering numbers.
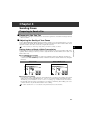
Standby Display
The standby display differs depending on which mode is selected. When the machine is turned on, the Copy
Mode standby display appears. You can switch Copy Mode to Fax Mode by pressing Fax.
The standby display in Fax Mode is as follows:
• The standby display in Copy Mode and Scan Mode are, → Reference Guide.
■ Fax Mode
20/12 2002 FRI 15:30
FaxOnly
STANDARD
Receive Mode
1-2
Image Quality
Date & Time
Chapter 2
Registering Information
Methods of Registering Information in the Machine
To customise the machine to your particular needs, you can adjust the general operation, sending, receiving,
printing, system settings, and speed dialling settings. There are two methods of adjusting these settings:
■ Method 2: Using the MultiPASS Suite Software
You can adjust settings using the MultiPASS Suite software included with your machine. For instructions,
→ MultiPASS Suite User’s Guide.
Guidelines for entering Numbers, Letters, and
Symbols
When you come to a step that requires you to enter a name or number, refer to the table below to determine
which numeric button to press for the character you want:
Button
Uppercase Letter
Mode (:A)
Lowercase Letter
Mode (:a)
Number Mode (:1)
1
1
ABC
2
ABCÅÄÁÀÃÂÆÇ
abcåäáàãâæç
2
3
D E F -D Ë É È Ê
defdëéèê
3
4
GHIÏÍÌÎ
ghiïíìî
4
5
JKL
jkl
5
MNOÑØÖÓÒÕÔ
mnoñøöóòõô
6
7
PQRS
pqrs
7
8
TUVÜÚÙÛ
tuvüúùû
8
WXYZY
wxyzy
9
DEF
GHI
JKL
MNO
6
PQRS
TUV
WXYZ
9
0
0
#
T
– . A # ! " , ; : ^ ` _ = ⁄ | ’ ? $ @ % & + ( ) [ ] { } < >
Uppercase Letter
Mode (:A)
Lowercase Letter
Mode (:a)
Number Mode (:1)
• If you pause for more than two minutes between entering data, the machine will automatically return to standby
mode.
2-1
2
Registering Information
■ Method 1: Using the Operation Panel
You can adjust settings directly via the operation panel of the machine. Detailed instructions are described
in this guide. Adjusting settings through the operation panel is convenient when you do not have your
machine connected to a PC.
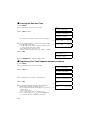
■ Entering Letters
1 Press
to switch to uppercase letter mode (:A) or
lowercase letter mode (:a).
UNIT NAME
:A
UNIT NAME
C
:A
Ex:
UNIT NAME
CA
:A
Ex:
UNIT NAME
:1
UNIT NAME
1
:1
Ex:
UNIT NAME
10
:1
Ex:
UNIT NAME
#
:1
Ex:
UNIT NAME
#-
:1
Ex:
Ex:
2 Press the numeric button that contains the letter you want.
• Press repeatedly until the letter you want appears. Each button
cycles through the letters it contains.
• If you are unsure which button to press for the letter you want,
→ p. 2-1.
3 Continue entering other letters using the numeric buttons.
▼
▼
• If the next letter you want to enter is under a different numeric
button, simply press that button until the letter you want
appears.
-orIf the next letter you want to enter is under the same numeric
button you pressed in step 2, use
to move the cursor to the
right. Then press that same numeric button repeatedly until the
letter you want appears.
• Use
to enter a space and move the cursor to the right.
■ Entering Numbers
1 Press
to switch to number mode (:1).
Ex:
2 Press the numeric button that contains the number you
want.
to enter a space and move the cursor to the next digit.
▼
• Use
3 Continue entering other numbers using the numeric
buttons.
■ Entering Symbols
repeatedly until the symbol you want appears.
2 If you want to enter another symbol, use
cursor to the right, then press
symbol you want appears.
to move the
repeatedly until the
▼
1 Press
If you make a mistake while entering letters or numbers, you can correct it by using
▲
■ To Delete the Last Letter/Number
Press
once to delete the last letter or the last number you entered.
▲
■ To Delete All Letters/Numbers
Press and hold
to delete all letters or all numbers you entered.
2-2
▲
■ Correcting a Mistake
.
2
Registering Sender Information
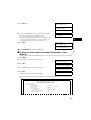
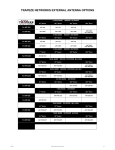
■ What is Sender Information?
When you receive a fax, the name of the person or company who sent you the fax, their fax/telephone number,
and the date and time of transmission may be printed in small type at the top of each page. This information is
called the Sender information or the Transmit Terminal Identification (TTI). Similarly, you can register your
details in your machine so that whenever you send a fax, the other party knows who sent it, and when it was
sent. Below is an example of how your sender information would print on a fax sent from your machine:
27/12 2002 15:33 FAX 123 4567
CANON CANADA
001
2
THE SLEREXE COMPANY LIMITED
Registering Information
DATE AND TIME
Date and time of
transmission.
CANON
SAPORS LANE•BOOLE•DORSET•BH25 8ER
TELEPHONE BOOLE (945 13) 51617 – FAX 1234567
FAX/TELEPHONE
NUMBER
Your fax/telephone
number.
You can select FAX or
TEL to be displayed in
front of the number.
(→ TELEPHONE #
MARK, p. 9-4)
Our Ref. 350/PJC/EAC
UNIT NAME
Your name or
company name.
DESTINATION
If you used memory sending and dialled the fax
number using one-touch or coded speed
dialling, the other party’s name appears here.
PAGE NUMBER
The page number
of the fax.
• You can set the sender information to print inside or outside the image area. (→ TTI POSITION, p. 9-4)
• You can enter the sender information from the operation panel (→ following page) or from the MultiPASS Suite.
(→ MultiPASS Suite User’s Guide)
2-3
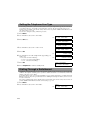
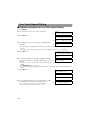
■ Entering the Date and Time
▼
▲
1 Press Menu.
2 Use or to select FAX SETTINGS.
Ex:
3 Press OK three times.
MENU
5.FAX SETTINGS
FAX SETTING
1.USER SETTINGS
USER SETTINGS
1.DATE & TIME
The date and time currently set for the machine are displayed.
Ex:
DATE & TIME
20/12 2002
15:10
Ex:
DATE & TIME
27/12 2002
22:30
4 Use the numeric buttons to enter the correct day, month,
▼
▲
year, and time in this order.
• Use
or
to move the cursor under the number you want
to change, then press the numeric button.
• Enter only the last two digits of the year.
• Use the 24-hour format for the time (e.g., 1:00 p.m. as 13:00).
5 Press OK.
DATE & TIME
DATA ENTRY OK
USER SETTINGS
2.DATE SETUP
6 Press Stop/Reset to return to standby mode.
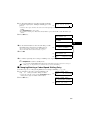
■ Registering Your Fax/Telephone Number and Name
▼
▲
1 Press Menu.
2 Use or to select FAX SETTINGS.
Ex:
3 Press OK twice.
MENU
5.FAX SETTINGS
FAX SETTINGS
1.USER SETTINGS
or
▼
4 Use
▲
USER SETTINGS
1.DATE & TIME
to select UNIT TELEPHONE #.
USER SETTINGS
3.UNIT TELEPHONE #
5 Press OK.
Ex:
UNIT TELEPHONE #
TEL=
Ex:
UNIT TELEPHONE #
TEL=
123 4567
6 Use the numeric buttons to enter your fax/telephone
number (max. 20 digits, including spaces).
▲
▲
▼
• If your fax/telephone number has already been registered, the
number appears.
• Use
to enter a space.
• To enter a plus sign (+) before the number, press .
• If you make a mistake, press to delete the last number or
press and hold to delete all numbers you entered.
2-4
2
7 Press OK twice.
UNIT TELEPHONE #
DATA ENTRY OK
USER SETTINGS
4.UNIT NAME
UNIT NAME
:A
UNIT NAME
CANON
:A
Ex:
8 Use the numeric buttons to enter your name or company
name (max. 24 characters, including spaces).
2
9 Press OK.
Ex:
UNIT NAME
DATA ENTRY OK
:A
USER SETTINGS
5.TX TERMINAL ID
10 Press Stop/Reset to return to standby mode.
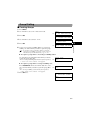
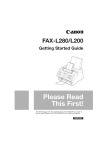
■ Printing a List to Check Information Registered in Your
Machine
You can print the USER’S DATA LIST to check the sender information and current settings of your machine.
▼
▲
1 Press Menu.
2 Use or to select REPORTS/LISTS.
Ex:
or
REPORTS/LISTS
1.ACTIVITY REPORT
▼
4 Use
▲
3 Press OK.
MENU
3.REPORTS/LISTS
to select USER DATA LIST.
REPORTS/LISTS
3.USER DATA LIST
5 Press OK.
PRINTING REPORT
• The machine prints the USER’S DATA LIST.
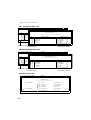
The sender information is shown at the beginning of the list. The current settings of the machine are listed after
this.
27/12 2002 16:40 FAX 123 4567
CANON
001
✱✱✱✱✱✱✱✱✱✱✱✱✱✱✱✱✱✱✱✱✱✱✱✱✱✱✱
USER’S DATA LIST
✱✱✱
✱✱✱
✱✱✱✱✱✱✱✱✱✱✱✱✱✱✱✱✱✱✱✱✱✱✱✱✱✱✱
FAX SETTINGS
USER SETTINGS
DATE SETUP
UNIT TELEPHONE #
UNIT NAME
TX TERMINAL ID
TTI POSITION
TELEPHONE # MARK
OFFHOOK ALARM
DD/MM YYYY
123 4567
CANON
ON
OUTSIDE IMAGE
FAX
ON
2-5
Registering Information
▲
• If you are unsure how to enter characters, → p. 2-1.
• If you have already registered your name or company name, the
previous entry will be displayed. To change your name, press
and hold to delete the previous entry and re-enter.
Ex:
Setting the Telephone Line Type
Before using your machine, you need to make sure it is set for your telephone line type. If you are unsure of
your telephone line type, check with your local telephone company. The factory default setting of your
machine varies depending on the current country selection. You can print the USER’S DATA LIST to check
the current setting. (→ p. 2-5)
If you need to change the setting, follow this procedure.
▼
▲
1 Press Menu.
2 Use or to select FAX SETTINGS.
Ex:
3 Press OK twice.
MENU
5.FAX SETTINGS
FAX SETTINGS
1.USER SETTINGS
or
▼
4 Use
▲
USER SETTINGS
1.DATE & TIME
to select TEL LINE TYPE.
USER SETTINGS
9.TEL LINE TYPE
5 Press OK.
6 Use
▼
▲
or
want to set.
Ex:
TEL LINE TYPE
TOUCH TONE
Ex:
TEL LINE TYPE
ROTARY PULSE
to select the telephone line type setting you
• You can select from the following:
- ROTARY PULSE (For pulse dialling)
- TOUCH TONE (For tone dialling)
7 Press OK.
USER SETTINGS
10.R-KEY SETTING
8 Press Stop/Reset to return to standby mode.
Dialling Through a Switchboard
A PBX (Private Branch Exchange) is an on-site telephone switchboard. If your machine is connected through
a PBX or other telephone switching system, you have to dial the outside line access number first, and then the
number of the party you are calling.
To facilitate this procedure, you can register the PBX access type and the outside line access number under the
R button so that you only need to press this button before dialling the fax/telephone number you want to reach.
See below for details.
The settings available and the factory default setting vary depending on the current country selection. You can
print the USER’S DATA LIST to check the current setting. (→ p. 2-5)
▼
▲
1 Press Menu.
2 Use or to select FAX SETTINGS.
Ex:
2-6
MENU
5.FAX SETTINGS
2
3 Press OK twice.
FAX SETTINGS
1.USER SETTINGS
or
▼
4 Use
▲
USER SETTINGS
1.DATE & TIME
to select R-KEY SETTING.
USER SETTINGS
10.R-KEY SETTING
5 Press OK.
R-KEY SETTING
or
▼
6 Use
▲
PSTN
to select PBX.
2
R-KEY SETTING
7 Press OK.
PBX
EARTH CONNECTION
or
▼
8 Use
▲
Ex:
to select the access type of your switching
system.
PBX
HOOKING
Ex:
❚ If you selected HOOKING or EARTH CONNECTION in step 8:
9 Press OK.
FAX SETTINGS
2.REPORT SETTINGS
10 Press Stop/Reset to return to standby mode.
❚ If you selected PREFIX in step 8:
9 Press OK.
PREFIX
10 Use the numeric buttons to enter the outside line access
number (max. 19 digits).
PREFIX
11 Press Redial/Pause to enter a pause.
PREFIX
Ex:
12 Press OK.
1234576
Ex:
1234576P
FAX SETTINGS
2.REPORT SETTINGS
13 Press Stop/Reset to return to standby mode.
2-7
Registering Information
PBX
2-8
Chapter 3
Speed Dialling
What is Speed Dialling?
Speed dialling allows you to simplify dialling procedures by registering a fax/telephone number(s) and name
under a button or code. You can then dial that number by pressing only one or a few buttons.
■ Speed Dialling Methods
The three speed dialling methods available with your machine are as follows:
■ One-Touch Speed Dialling (→ p. 3-2)
Allows you to dial a fax or telephone number by pressing only one button. You can register up to nine
destinations for one-touch speed dialling.
■ Coded Speed Dialling (→ p. 3-4)
Allows you to dial a fax or telephone number by pressing Coded Dial followed by a two-digit code of your
choice. You can register up to 100 different destinations.
■ Group Dialling (→ p. 3-7)
Allows you to dial a group of registered one-touch and/or coded speed dialling fax numbers. By registering
a group for one-touch or coded speed dialling, you press only one or a few buttons to send the same
document to several destinations.
The following pages describe how to register numbers for speed dialling.
• For instructions on dialling using the speed dialling methods, → p. 4-3.
• You can also register numbers for speed dialling from the MultiPASS Suite. (→ MultiPASS Suite User’s Guide)
3-1
Speed Dialling
3
One-Touch Speed Dialling
■ Registering Numbers for One-Touch Speed Dialling
▼
▲
1 Press Menu.
2 Use or to select TEL REGISTRATION.
Ex:
4 Use
▲
or
(01 to 09).
▼
3 Press OK twice.
MENU
4.TEL REGISTRATION
TEL REGISTRATION
1.1-TOUCH SPD DIAL
Ex:
1-TOUCH SPD DIAL
01=
905 795 1111
Ex:
1-TOUCH SPD DIAL
04=
to select a one-touch speed dialling button
• If a one-touch speed dialling button has already been registered, the number registered under that button
appears.
• If a group is already registered under a one-touch speed dialling button, GROUP DIAL appears.
5 Press OK twice.
1-TOUCH SPD DIAL
1.TELEPHONE NUMBER
TELEPHONE NUMBER
TEL=
6 Use the numeric buttons to enter the fax/telephone number
Ex:
TELEPHONE NUMBER
TEL=2 50921
▼
you want to register (max. 120 digits, including spaces and
pauses).
▲
▲
• Use
to enter a space and move the cursor to the next digit. Spaces are optional and are ignored during
dialling.
• Press Redial/Pause to enter a pause.
• If you make a mistake, press
to delete the last number, or press and hold
to delete all numbers you
entered.
7 Press OK twice.
TELEPHONE NUMBER
DATA ENTRY OK
1-TOUCH SPD DIAL
2.NAME
8 Use the numeric buttons to enter the name that goes with
the number (max. 16 characters, including spaces).
• If you do not want to register a name, ignore this step.
• If you are unsure how to enter characters, → p. 2-1.
3-2
Ex:
NAME
:A
NAME
Canon ITALIA
:A
3
9 Press OK.
Ex:
NAME
DATA ENTRY OK
Ex:
1-TOUCH SPD DIAL
05=
:A
10 To continue registering other one-touch speed dialling buttons, repeat the procedure from step 4.
-orPress Stop/Reset to return to standby mode.
• You can use the destination labels. Stick these labels on your machine for easy reference when dialling.
■ Changing/Deleting a One-Touch Speed Dialling Entry
assigned to the entry you want to change or delete.
Ex:
3 Press OK twice.
06=
1 432 2015
1-TOUCH SPD DIAL
1.TELEPHONE NUMBER
Ex:
TELEPHONE NUMBER
TEL=1 432 2015
Ex:
TELEPHONE NUMBER
TEL=1 432 2060
❚ To Change a One-Touch Speed Dialling Entry:
4 Use
▲
to delete the previous entry, then re-enter the fax/
telephone number.
▲
▼
• If you do not want to change the fax/telephone number, ignore
this step.
• Use to enter a space and move the cursor to the next digit. Spaces are optional and are ignored during
dialling.
• Press Redial/Pause to enter a pause.
• Press and hold to delete all numbers you entered.
5 Press OK twice.
TELEPHONE NUMBER
DATA ENTRY OK
6 Press and hold
▲
1-TOUCH SPD DIAL
2.NAME
NAME
Canon OPTIX
:A
Ex:
NAME
Canon OPTICS
:A
Ex:
to delete the previous entry, then re-
enter the name.
• If you do not want to change the name, ignore this step.
• If you are unsure how to enter characters, → p. 2-1.
3-3
3
Speed Dialling
▼
▲
1 Follow steps 1 to 3 of “Registering Numbers for One-Touch Speed Dialling”. (→ p. 3-2)
2 Use or to select the one-touch speed dialling button
1-TOUCH SPD DIAL
7 Press OK.
Ex:
NAME
DATA ENTRY OK
Ex:
1-TOUCH SPD DIAL
07=
:A
8 Press Stop/Reset to return to standby mode.
4 Press and hold
▲
❚ To Delete a One-Touch Speed Dialling Entry:
to delete the fax/telephone number.
TELEPHONE NUMBER
TEL=
5 Press OK.
TELEPHONE NUMBER
ERASING END
1-TOUCH SPD DIAL
2.NAME
6 Press Stop/Reset to return to standby mode.
• The registered name is automatically cleared when you clear the fax/telephone number.
Coded Speed Dialling
■ Registering Numbers for Coded Speed Dialling
▼
▲
1 Press Menu.
2 Use or to select TEL REGISTRATION.
Ex:
or
TEL REGISTRATION
1.1-TOUCH SPD DIAL
▼
4 Use
▲
3 Press OK.
to select CODED SPEED DIAL.
TEL REGISTRATION
2.CODED SPEED DIAL
or
▼
▲
5 Press OK.
6 Use
MENU
4.TEL REGISTRATION
Ex:
CODED SPEED DIAL
00=
2131 1250
Ex:
CODED SPEED DIAL
02=
to select a coded speed dialling code (00 to
99).
• If a coded speed dialling code has already been registered, the number registered under that code appears.
• If a group is already registered under a coded speed dialling code, GROUP DIAL appears.
• You can also select a code by pressing Coded Dial and then entering a two-digit code with the numeric
buttons.
7 Press OK twice.
CODED SPEED DIAL
1.TELEPHONE NUMBER
TELEPHONE NUMBER
TEL=
3-4
3
8 Use the numeric buttons to enter the fax/telephone number
Ex:
TELEPHONE NUMBER
TEL=1 49 39 25 25
▼
you want to register (max. 120 digits, including spaces and
pauses).
▲
▲
• Use
to enter a space and move the cursor to the next digit. Spaces are optional and are ignored during
dialling.
• Press Redial/Pause to enter a pause.
• If you make a mistake, press
to delete the last number or press and hold
to delete all numbers you
entered.
9 Press OK twice.
TELEPHONE NUMBER
DATA ENTRY OK
NAME
:A
3
NAME
Canon FRANCE
:A
Ex:
:A
Ex:
NAME
DATA ENTRY OK
Speed Dialling
CODED SPEED DIAL
2.NAME
Ex:
CODED SPEED DIAL
03=
516p488 6700
10 Use the numeric buttons to enter the name that goes with
the number (max. 16 characters, including spaces).
• If you do not want to register a name, ignore this step.
• If you are unsure how to enter characters, → p. 2-1.
11 Press OK.
12 To continue registering other coded speed dialling codes, repeat the procedure from step 6.
-orPress Stop/Reset to return to standby mode.
• You can print the CODED SPEED DIAL LIST showing all the numbers and names registered for coded speed
dialling (→ p. 3-9). Keep this list near your machine for easy reference when dialling.
■ Changing/Deleting a Coded Speed Dialling Entry
▼
▲
1 Follow steps 1 to 5 of “Registering Numbers for Coded Speed Dialling”. (→ p. 3-4)
2 Use or to select the coded speed dialling code
CODED SPEED DIAL
assigned to the entry you want to change or delete.
• You can also select the code by pressing Coded Dial and then
entering the two-digit code with the numeric buttons.
Ex:
3 Press OK twice.
32=
81 773 3115
CODED SPEED DIAL
1.TELEPHONE NUMBER
Ex:
TELEPHONE NUMBER
TEL=81 773 3115
3-5
❚ To Change a Coded Speed Dialling Entry:
4 Use
▲
to delete the previous entry, then re-enter the fax/
telephone number.
Ex:
TELEPHONE NUMBER
TEL=81 773 3137
▲
▼
• If you do not want to change the fax/telephone number, ignore this step.
• Use
to enter a space and move the cursor to the next digit. Spaces are optional and are ignored during
dialling.
• Press Redial/Pause to enter a pause.
• Press and hold
to delete all numbers you entered.
5 Press OK twice.
TELEPHONE NUMBER
DATA ENTRY OK
6 Press and hold
▲
CODED SPEED DIAL
2.NAME
NAME
Canon UC
:A
Ex:
NAME
Canon UK
:A
Ex:
NAME
DATA ENTRY OK
:A
Ex:
Ex:
CODED SPEED DIAL
33=
to delete the previous entry, then re-
enter the name.
• If you do not want to change the name, ignore this step.
• If you are unsure how to enter characters, → p. 2-1.
7 Press OK.
8 Press Stop/Reset to return to standby mode.
4 Press and hold
▲
❚ To Delete a Coded Speed Dialling Entry:
to delete the fax/telephone number.
5 Press OK.
TELEPHONE NUMBER
TEL=
TELEPHONE NUMBER
ERASING END
CODED SPEED DIAL
2.NAME
6 Press Stop/Reset to return to standby mode.
• The registered name is automatically cleared when you clear
the fax/telephone number.
3-6
3
Group Dialling
■ Creating Groups
▼
Ex:
or
TEL REGISTRATION
1.1-TOUCH SPD DIAL
▼
4 Use
▲
3 Press OK.
MENU
4.TEL REGISTRATION
to select GROUP DIAL.
TEL REGUSTRATION
3.GROUP DIAL
5 Press OK.
Ex:
GROUP DIAL
01=1-TOUCH SPD DIAL
6 Select a one-touch speed dialling button or coded speed
dialling code under which you want to register the group.
• If you wish to register a group under a button or code already
registered for speed dialling, or you want to re-enter a group, you
must delete the previous information first. (→ pp. 3-3, 3-5)
❚ To register a group under a one-touch speed dialling button:
▼
▲
Use
or
to select the button under which you want to
register the group (01 to 09).
• If a one-touch speed dialling button has already been registered,
1-TOUCH SPD DIAL or GROUP DIAL appears.
Ex:
GROUP DIAL
03=
Ex:
GROUP DIAL
21=
❚ To register a group under a coded speed dialling code:
Press Coded Dial, then use the numeric buttons to enter
the code under which you want to register the group (00 to
99).
• If a coded speed dialling code has already been registered,
CODED SPEED DIAL or GROUP DIAL appears.
7 Press OK twice.
GROUP DIAL
1.TELEPHONE NUMBER
TEL=
3-7
3
Speed Dialling
▲
1 Press Menu.
2 Use or to select TEL REGISTRATION.
8 Enter the one-touch and/or coded speed dialling numbers you want to register in the group.
▼
▲
▲
▲
• You cannot register numbers in groups that have not been registered for speed dialling.
• You can review the numbers registered under the group by pressing
or .
- If you want to delete one of these numbers from the group, press and hold
(ERASING END is
displayed).
- If you want to delete all numbers in the group, press and hold until all numbers are deleted. Deleting all
numbers will cancel the group. (The registered names are automatically cleared when you cancel a group.)
- If you want to add a number to the group, press the one-touch speed dialling button or the coded speed
dialling code to which the number is assigned.
• You can cancel registering numbers and return to standby mode by pressing the Stop/Reset anytime before
pressing OK in step 9.
❚ To enter a destination registered for one-touch speed dialling:
Press the one-touch speed dialling button assigned to each
number you want to register in the group. Repeat for other
buttons.
Ex:
TEL=
2 50921
04 Canon ITALIA
❚ To enter a destination registered for coded speed dialling:
9
Press Coded Dial, then use the numeric buttons to enter
the two-digit code assigned to the number you want to
register in the group. Repeat for other codes.
Press OK twice.
Ex:
TEL=
1 49 39 25 25
02 Canon FRANCE
GROUP DIAL
2.NAME
NAME
10 Use the numeric buttons to enter a name for the group
(max. 16 characters, including spaces).
• If you do not want to register a name, ignore this step.
• If you are unsure how to enter characters, → p. 2-1.
:A
Ex:
NAME
:1
Canon GROUP 2
Ex:
NAME
DATA ENTRY OK
Ex:
GROUP DIAL
04=1-TOUCH SPD DIAL
11 Press OK.
:1
12 To continue registering other groups, repeat the procedure
from step 6.
-orPress Stop/Reset to return to standby mode.
• You can print the GROUP DIAL LIST showing all the numbers and names registered for group dialling (→ p. 3-9).
Keep this list near your machine for easy reference when dialling.
3-8
3
Speed Dialling Lists
You can print lists of fax/telephone numbers registered for speed dialling. Keep these lists near your machine
so you can refer to them when dialling.
■ Printing Speed Dialling Lists
▼
Ex:
or
REPORTS/LISTS
1.ACTIVITY REPORT
▼
4 Use
▲
3 Press OK.
to select SPEED DIAL LIST.
SPEED DIAL LIST
1.1-TOUCH LIST
▼
▲
or
3
REPORTS/LISTS
2.SPEED DIAL LIST
5 Press OK.
6 Use
MENU
3.REPORTS/LISTS
Speed Dialling
▲
1 Press Menu.
2 Use or to select REPORTS/LISTS.
to select the list you want to print.
• You can select from the following:
- 1-TOUCH LIST
- CODED DIAL LIST
- GROUP DIAL LIST
7 Press OK.
• If you selected 1-TOUCH LIST or CODED DIAL LIST
above, select in what order you want the destinations to be
printed:
Press to print the list with the names of the destinations in
alphabetical order.
-orPress to print the list in code or button order.
• The machine prints the list.
Ex:
SPEED DIAL LIST
2.CODED DIAL LIST
SORTED OUTPUT
YES=( )
NO=(#)
3-9
Samples of the lists are shown below:
■ 1-TOUCH SPD DIAL LIST
27/12 2002 17:02 FAX 123 4567
CANON
27/12 2002 17:03 FAX 123 4567
NO.
01]
03]
04]
06]
09]
[
[
[
[
[
905 7
GROUP
2 509
1 432
2 887
001
CANON
001
************************************************
***
1-TOUCH SPD DIAL LIST
***
************************************************
[
[
[
[
[
NO.
09]
01]
03]
04]
06]
CONNECTION TEL
CONNECTION ID
Canon AUSTRALIA
Canon CANADA
Canon GROUP 2
Canon ITALIA
Canon OPTICS
2 887 0166
905 795 1111
GROUP DIAL
2 50921
1 432 2060
UNSORTED LIST: DESTINATIONS LISTED
IN BUTTON ORDER.
SORTED LIST: DESTINATIONS LISTED IN
ALPHABETICAL ORDER.
■ CODED SPEED DIAL LIST
27/12 2002 17:04 FAX 123 4567
CANON
27/12 2002 17:05 FAX 123 4567
NO.
00]
02]
03]
21]
32]
[
[
[
[
[
2131
1 49 3
516p4
GROUP
81 77
001
CANON
001
***********************************************
***
CODED SPEED DIAL LIST
***
***********************************************
[
[
[
[
[
NO.
00]
02]
21]
03]
32]
CONNECTION TEL
CONNECTION ID
Canon DEUTSCH.
Canon FRANCE
Canon GROUP 1
Canon U.S.A.
Canon UK
2131 1250
1 49 39 25 25
GROUP DIAL
516p488 6700
81 773 3173
UNSORTED LIST: DESTINATIONS LISTED
IN BUTTON ORDER.
SORTED LIST: DESTINATIONS LISTED IN
ALPHABETICAL ORDER.
■ GROUP DIAL LIST
27/12 2002 17:06 FAX 123 4567
CANON
001
********************************************
***
GROUP DIAL LIST
***
********************************************
3-10
[
03]
Canon GROUP 2
[
[
[
[
04]
00]
02]
32]
2 50921
2131 1250
1 49 39 25 25
81 773 3173
[
21] Canon GROUP 1
[
[
01] 905 795 1111
03] 516p488 6700
Canon ITALIA
Canon DEUTSCH.
Canon FRANCE
Canon UK
Canon CANADA
Canon U.S.A.
Chapter 4
Sending Faxes
Preparing to Send a Fax
■ Documents You Can Fax
For information on the types of documents you can fax, their requirements, and details on loading documents,
→ Reference Guide.
■ Adjusting the Quality of Your Faxes
Canon’s Ultra High Quality (UHQ™) imaging technology enables you to send documents that are very close
to the quality of the original. The machine allows you to send a document in colour or black & white, and to
adjust the resolution and contrast to best suit your particular document.
Setting Colour or Black & White Transmission
Your machine can send faxes in black & white. It can also send faxes in colour to fax machines with colour
capability. Before sending a document, you need to adjust whether the document will be sent in colour, or in
black & white only.
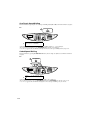
■ Colour/B&W Button and Light
Press Colour/B&W to switch between colour mode and black & white mode. When the machine is in
colour mode, the Colour/B&W light is turned on. When the machine is in black & white mode, the light is
turned off.
Colour mode
Black & White mode
Scan
Scan
Colour /B&W
Colour /B&W
01
01
02
02
Redial/Pause
Redial/Pause
05
06
05
06
■ Notice for Colour Faxing
If you attempt to send a colour document to a fax machine that does not support colour faxing, the document
will not be sent and the LCD will display TRY AGAIN IN B&W. Try sending again in black & white.
Alternatively, you can enable the COLOUR DIRECT TX setting (→ p. 9-6) that converts colour faxes to
black & white if the other party’s fax machine does not support colour faxing, thus enabling you to send
colour documents to any fax machine without an error occurring.
• When a transmission is over or cancelled, the setting automatically reverts to black & white.
4-1
Sending Faxes
4
• Please note that you cannot change settings while your machine is scanning a document.
Setting the Scanning Resolution
Resolution is a measure of the fineness or clarity of a printout. Low resolutions may cause text and graphics
to have a jagged appearance, while higher resolutions provide smoother curves and lines, crisp text and
graphics, and a better match to traditional typeface designs.
• The higher the resolution, the higher the output quality, but the slower the scanning and transmission speed.
1 Press Image Quality.
Ex:
FAX RESOLUTION
B&W STANDARD
(black & white mode)
Ex:
FAX RESOLUTION
COLOUR STANDARD
or
▼
▲
(colour mode)
2 Use
to select the resolution.
• In black & white mode, you can select from the following:
- B&W STANDARD
Suitable for most text-only documents.
- B&W FINE
Suitable for fine-print documents.
- B&W PHOTO
Suitable for documents that contain images such as photos. With this setting, areas of the document that
contain photos are automatically scanned with 64 levels of grey, rather than just two (black & white).
• In colour mode, you can select from the following:
- COLOUR STANDARD
Suitable for normal colour documents.
- COLOUR FINE
Suitable for fine colour documents.
3 Press OK.
Ex:
27/12 2002 FRI 15:30
FaxOnly
FINE
Setting the Scanning Contrast
Contrast is the difference in brightness between the lightest and darkest parts of a printed document. You can
select from three levels of scanning contrast the machine uses to send faxes. Select according to how light or
dark/deep the document is.
• You can also set the scanning contrast for sending from the MultiPASS Suite. (→ MultiPASS Suite User’s Guide)
1 Press Contrast.
2 Use
▼▲
3
4-2
SCAN CONTRAST
-LT
DK+
Ex:
SCAN CONTRAST
-LT
DK+
▼
▲
or
to select SCAN CONTRAST. For a lighter
scanning contrast, press . For a darker or deeper
scanning contrast, press
.
Press OK.
Ex:
4
■ Dialling Methods
There are several ways of dialling the number of the party you want to send to. They are as follows:
■ When the Fax Number is Not Registered in the Machine
• Regular Dialling
■ When the Fax Number is Registered in the Machine
• One-Touch Speed Dialling
• Coded Speed Dialling
• Group Dialling
• By registering numbers for speed dialling, you can use the sequential broadcasting feature. (→ p. 4-11)
• If you are unsure of the registered fax numbers, check the destination labels, or print each list and check the numbers.
(→ Printing Speed Dialling Lists, p. 3-9)
• For details on registering a fax number for speed dialling, → Chapter 3.
■ When You Dial from Your PC
• PC Dialling
Regular Dialling
4
Sending Faxes
Dial a fax number by using the numeric buttons, just like dialling a telephone number.
Ex:
~
9
0
5
7
9
5
1
1
1
1
Copy
In Use/ Memory
ON/OFF
Alarm
Resume
Fax
ABC
1
Paper Select
GHI
Menu
OK
Scan
Colour /B&W
Enlarge/
Reduce
Contrast
2
JKL
4
PQRS
Image Quality
DEF
01
02
03
04
Redial/Pause
MNO
5
TUV
7
3
6
05
Coded Dial
WXYZ
8
9
06
07
D.T.
Polling
08
R
09
Hook
0
T
Ä Press Start.
TEL=
9057951111
• If you enter the wrong number, press Stop/Reset or use
number.
▲
Ex:
to delete the number, then enter the correct
4-3
One-Touch Speed Dialling
Dial a fax number by pressing the one-touch speed dialling button (01 to 09) to which the number is assigned.
Ex:
1
Copy
In Use/ Memory
ON/OFF
Alarm
Resume
Fax
Scan
Colour /B&W
Enlarge/
Reduce
ABC
1
Paper Select
GHI
Contrast
3
JKL
PQRS
01
02
03
04
Redial/Pause
MNO
5
05
6
TUV
7
Image Quality
DEF
2
4
Menu
OK
01
Coded Dial
WXYZ
8
06
07
D.T.
Polling
08
R
09
9
Hook
0
T
Ex:
TEL=
905 795 1111
01 Canon CANADA
• The number registered under that one-touch speed dialling button (01-09) is displayed.
• If you press the wrong button, press Stop/Reset, then press the correct button.
• NO TEL # appears if no fax number is assigned to the one-touch speed dialling button you pressed.
Coded Speed Dialling
Dial a fax number by pressing Coded Dial followed by the two-digit code (00 to 99) to which the number is
assigned.
Ex:
1
Coded Dial
2
2
0
Copy
In Use/ Memory
ON/OFF
Alarm
Resume
Fax
ABC
1
Paper Select
GHI
Menu
OK
Scan
Colour /B&W
Enlarge/
Reduce
Contrast
JKL
4
PQRS
Image Quality
DEF
2
01
02
03
04
Redial/Pause
MNO
5
TUV
7
3
6
05
Coded Dial
WXYZ
8
9
06
07
D.T.
Polling
08
R
09
Hook
0
T
Ex:
TEL=
1 49 39 25 25
02 Canon FRANCE
• The number registered under that coded speed dialling code is displayed.
• If you enter the wrong code, press Stop/Reset. Then press Coded Dial and enter the correct code.
• NO TEL # appears if no fax number is assigned to the coded speed dialling code you entered.
4-4
4
Group Dialling
Dial a group of fax numbers registered under a one-touch speed dialling button or coded speed dialling code.
❚ To enter a group registered under a one-touch speed dialling button:
Press the one-touch speed dialling button assigned to the group you wish to fax. (→ p. 4-4)
Ex:
TEL=GROUP DIAL
03 Canon GROUP 2
• The name of the group is displayed.
• If you press the wrong button, press Stop/Reset, then press the correct button.
• NO TEL # appears if no fax number is assigned to the one-touch speed dialling button you pressed.
❚ To enter a group registered under a coded speed dialling code:
Press Coded Dial, then use the numeric buttons to enter the two-digit code assigned to the group you wish to
fax. (→ p. 4-4)
TEL=GROUP DIAL
21 Canon GROUP 1
4
Sending Faxes
Ex:
• The name of the group is displayed.
• If you enter the wrong code, press Stop/Reset. Then press Coded Dial and enter the correct code.
• NO TEL # appears if no fax number is assigned to the coded speed dialling code you entered.
PC Dialling
Dial a fax number from your PC using the MultiPASS Suite. (→ MultiPASS Suite User’s Guide)
4-5
Sending Methods
This section describes the methods and advantages of the two main sending methods: Memory sending and
manual sending via the handset.
■ Memory Sending
Memory sending is a quick and easy way to send a document. As the first page of a multipage document is
being scanned into the machine’s memory, the machine begins calling the other party and transmitting the
information even as the remaining pages are being scanned.
Since the machine is multitasking, you can perform other operations while the machine is sending a fax.
The machine has enough memory to store up to approximately 270 pages* (fewer if the document contains
many graphics or particularly dense text).
* Based on Canon FAX Standard Chart No. 1, standard mode.
■ Memory Sending Using the ADF
1 Press Fax to set Fax Mode.
Ex:
2 Prepare the document and load it into the ADF.
(→ Reference Guide)
• For colour sending, press Colour/B&W to turn on its light.
(→ p. 4-1)
• To adjust the resolution and contrast, → p. 4-2.
27/12 2002 FRI 15:30
FaxOnly
STANDARD
MEMORY USED
0%
Ex:
(Currently used memory)
DOCUMENT READY
(Standby to scan)
3 Dial the other party’s fax number.
• For dialling methods, → p. 4-3.
• If you enter the wrong number, press Stop/Reset, then enter
the correct number.
• If you must first dial a digit to get an outside line (“9”, for
example), add a pause after that digit by pressing Redial/
Pause.
TEL=
9057951111
Ex:
4 Press Start to begin scanning for sending.
• When you use speed dialling, scanning starts automatically
after a few seconds if the TIME OUT setting is on. (→ p. 9-5)
• To cancel sending once dialling has started, press Stop/Reset
then . (→ p. 4-9)
• You can scan a document up to 1 metre long.
• You can scan up to 30 different documents for memory sending.
• When an error occurs during sending, the document is automatically deleted from memory, even if it was not sent
completely.
• If you send a colour document to a fax machine that does not support colour faxing, or TRY AGAIN IN B&W
displays in the LCD, → p. 4-1.
4-6
4
■ Memory Sending Using the Platen Glass
• When documents are loaded into the ADF, the machine will scan documents not on the platen glass but in the ADF.
You need to remove documents from the ADF in advance.
1 Press Fax to set Fax Mode.
Ex:
27/12 2002 FRI 15:30
FaxOnly
STANDARD
2 Prepare the document and place it on the platen glass.
(→ Reference Guide)
• For colour sending, press Colour/B&W to turn on its light.
(→ p. 4-1)
• To adjust the resolution and contrast, → p. 4-2.
3 Dial the other party’s fax number.
4 Press Start to begin scanning.
• When you use speed dialling, scanning starts automatically
after a few seconds if the TIME OUT setting is on. (→ p. 9-5)
• If you want to scan other documents, set the next document on
the platen glass and press Start.
TEL=
9057951111
Ex:
4
NEXT PAGE
:START
END SCANNING:OK
Sending Faxes
• For dialling methods, → p. 4-3.
• If you enter the wrong number, press Stop/Reset, then enter
the correct number.
• If you must first dial a digit to get an outside line (“9”, for
example), add a pause after that digit by pressing Redial/
Pause.
5 Press OK to send.
• To cancel sending after dialling has started, press Stop/Reset
then . (→ p. 4-9)
• You can scan up to 30 different documents for memory sending.
• When an error occurs during sending, the document is automatically deleted from memory, even if it was not sent
completely.
• If you send a colour document to a fax machine that does not support colour faxing, or TRY AGAIN IN B&W
displays in the LCD, → p. 4-1.
4-7
■ Manual Sending Via the Handset
Manual sending via the handset allows you to talk to the other party before sending a document. This method
is useful if the other party must manually set their fax machine to receive before they can receive a fax.
• For this mode, you need to connect a telephone to your machine. (→ Quick Start Guide)
• In this mode, sending from the platen glass is unavailable.
1 Press Fax to set Fax Mode.
Ex:
2 Prepare the document and load it into the ADF.
(→ Reference Guide)
• For colour sending, press Colour/B&W to turn on its light.
(→ p. 4-1)
• To adjust the resolution and contrast, → p. 4-2.
27/12 2002 FRI 15:30
FaxOnly
STANDARD
MEMORY USED
0%
Ex:
(Currently used memory)
DOCUMENT READY
(Standby to scan)
3 Press Hook.
TEL=
• You can also lift the handset instead of pressing Hook.
4 Dial the other party’s fax number.
• For dialling methods, → p. 4-3.
• If you make a mistake during dialling, press Hook and start
again from step 3.
TEL=
9057951111
Ex:
5 When you hear the other party answer the call, pick up the handset to start talking.
• If you pressed Hook in step 3 instead of lifting the handset, you will hear the other party’s voice but they
will not be able to hear you through the speaker. Pick up the handset to talk to the other party.
• If you hear a high-pitched signal instead of the other party’s voice, press Start. If you picked up the handset
to dial, press Start and hang up the handset. The machine will begin sending the document.
6 When you are ready to send the document, ask the other party to press the start button on their fax
machine.
7 When you hear the high-pitched signal of the other party’s fax machine, press Start on the
machine and then hang up the handset.
• The machine begins sending the document.
• Be sure to hang up the handset after you press Start on the machine; otherwise the call will be disconnected.
• The machine will beep if the handset is not hung up properly. Make sure the handset is seated properly in its cradle.
If you do not want the machine to beep, disable the OFFHOOK ALARM setting. (→ p. 9-4)
• If you send a colour document to a fax machine that does not support colour faxing, or TRY AGAIN IN B&W
displays in the LCD, → p. 4-1.
4-8
4
Cancelling Sending
Cancelling Memory Sending
■ Using the ADF
❚ While a document is scanning:
1 Press Stop/Reset.
• The transmission is cancelled.
• The machine prints an ERROR TX REPORT. (→ p. 7-3)
• When a document remains in the ADF, remove the other documents from the ADF, and then press Resume. The
document remaining in the ADF will be ejected automatically.
❚ After scanning is completed:
1 Press Stop/Reset.
• The machine asks you to confirm that you want to cancel
sending.
CANCEL?
YES=( )
4
NO=(#)
to cancel sending.
Sending Faxes
2 Press
Ex:
• If you change your mind and want to continue sending, press .
• To cancel transmission of a document waiting to be sent, you
will have to delete it from memory. (→ p. 4-15)
• The machine prints an ERROR TX REPORT. (→ p. 7-3)
■ Using the Platen Glass
1 Press Stop/Reset.
• The transmission is cancelled.
• If dialling had begun, the machine prints an ERROR TX
REPORT. (→ p. 7-3)
Cancelling Manual Sending Via the Handset
Refer to “Using the platen glass” above.
4-9
Redialling When the Line is Busy
There are two methods of redialling: Manual redialling and Automatic redialling. This section explains these
two methods.
■ Manual Redialling
Press Redial/Pause to dial the last number you dialled with the numeric buttons. (This starts redialling
regardless of whether automatic redialling is enabled.)
Cancelling Manual Redialling
To cancel manual redialling, press Stop/Reset.
■ Automatic Redialling
The fax automatically redials after the first attempt at sending fails (e.g., the line is busy).
The number of redialling attempts and the time interval between attempts can be adjusted by changing the
settings in the AUTO REDIAL setting. Automatic redialling can also be set off and on. (→ p. 9-5)
If all attempts are unsuccessful, the machine cancels the transmission and prints an ERROR TX REPORT.
(→ p. 7-3)
• You can also set the automatic redialling feature from the MultiPASS Suite. (→ MultiPASS Suite User’s Guide)
When automatic redialling is in use, the LCD alternately displays AUTO REDIAL and the transaction number
(TX/RX NO.) while it is waiting to redial.
Cancelling Automatic Redialling
• If you want to cancel a transmission while the machine is waiting to redial, you will have to delete the document from
memory. (→ p. 4-15)
1 Wait until the machine begins redialling.
2 Press Stop/Reset.
• The machine asks you to confirm that you want to cancel.
3 Press
to cancel redialling.
• If you change your mind and want to continue redialling, press
.
• The machine prints an ERROR TX REPORT. (→ p. 7-3)
4-10
Ex:
27/12 2002 FRI 15:30
DIALLING
Ex:
27/12 2002 FRI 15:30
20 545 8545
CANCEL?
YES=( )
NO=(#)
4
Sequential Broadcasting
Sending a Document to More Than One Destination
This feature allows you to scan a document once and send it to several destinations. You can send the
document to a maximum of 110 destinations using a combination of the following dialling methods:
• One-touch speed dialling: up to 9 destinations
• Coded speed dialling: up to 100 destinations
• Regular dialling (using the numeric buttons): one destination
You can enter the destinations in any order. (Be sure to press OK after your entry with the numeric buttons.)
• If you frequently send documents to the same group of destinations, you can group them and register these numbers
for group dialling. You can register up to 108 fax numbers with group dialling and send the same document to these
numbers at the press of one or three buttons. (→ p. 3-7)
1 Press Fax to set Fax Mode.
Ex:
2 Prepare the document and place it on the platen glass or
• If you use the platen glass, the LCD displays the standby mode.
• For colour sending, press Colour/B&W to turn on its light.
(→ p. 4-1)
• To adjust the resolution and contrast, → p. 4-2.
MEMORY USED
0%
Ex:
(Currently used memory)
DOCUMENT READY
(Standby to scan)
3 Enter up to 110 fax numbers using any of the following
methods:
❚ One-touch speed dialling:
Press the desired one-touch speed dialling button(s).
Ex:
TEL=
2 50921
04 Canon ITALIA
Ex:
TEL=
1 49 39 25 25
02 Canon FRANCE
❚ Coded speed dialling:
Press Coded Dial, then use the numeric buttons to enter the
two-digit code. Repeat for other codes.
❚ Regular dialling:
Use the numeric buttons to enter the fax number, then press OK.
TEL=
9057951111
Ex:
▼
▲
• If you enter an incorrect destination, press and hold
to delete it.
• You must enter the second fax number within five seconds of entering the first one. All subsequent fax numbers must
be entered within 10 seconds. If you wait longer than these times, the machine automatically begins scanning the
document for sending. If you prefer the machine not to do this, disable the TIME OUT setting. (→ p. 9-5)
• If you want to review the numbers you entered, use
or
to scroll through the numbers.
▲
4
Sending Faxes
load it into the ADF.
27/12 2002 FRI 15:30
FaxOnly
STANDARD
4-11
4 Press Start to begin scanning for sending, or wait a few seconds for the machine to begin scanning
automatically.
• The machine will first send the document to the one-touch speed dialling destinations, then the coded speed
dialling destinations, and finally to the destination dialled using regular dialling.
• If you prefer the machine never to scan a document automatically after a few seconds, disable the TIME OUT
setting. (→ p. 9-5)
• To cancel sending, press Stop/Reset then . Sending to all destinations you specified in step 3 will be
cancelled (you cannot cancel only one destination), and the machine will print a MULTI TX/RX REPORT.
(→ p. 7-4)
• If a number is busy, the machine will continue sending to the other destinations and then redial the number that was
busy.
• If the machine’s memory becomes full while scanning your document, MEMORY FULL will appear in the LCD. If
this happens, remove the other documents from the ADF, and then press Resume. The document remaining in the
ADF will be ejected automatically. Divide the documents into several sections and send each section separately.
• If you send a colour document to a fax machine that does not support colour faxing, or TRY AGAIN IN B&W
displays in the LCD, → p. 4-1.
4-12
4
Delayed Sending
You can use your machine to send faxes at a preset time. This feature is called Delayed sending or Timer
sending. By using this feature, you can take advantage of lower long distance rates at night, for example.
• You can only set this feature from the MultiPASS Suite. (→ MultiPASS Suite User’s Guide)
• To use this feature, your PC must be turned on and connected to the machine.
• You can perform other tasks even when you have set the machine for delayed sending.
Documents Stored in Memory
• If there are no documents stored in memory, the machine will return to standby mode when you select MEMORY
REFERENCE.
■ Printing a List of Documents in Memory
The machine can print a list of documents stored in memory, along with the transaction number (TX⁄RX NO.)
of each document.
Ex:
3 Press OK twice.
• The machine prints the DOC. MEMORY LIST.
MENU
2.MEMORY REFERENCE
MEMORY REFERENCE
1.DOC. MEMORY LIST
PRINTING REPORT
• Alternatively, you can select DOC. MEMORY LIST in the REPORTS/LISTS menu. (→ pp. 9-2, 9-3)
• Once you know the transaction number of a document stored in memory, you can print it or delete it. These
procedures are described later in this chapter.
27/12 2002 17:15 FAX 123 4567
CANON
001
**************************************
*** DOC. MEMORY LIST
***
**************************************
TX/RX NO
0046
0047
0048
MODE
TRANSMIT
TRANSMIT
B’CAST
0049
B’CAST
[
COL [
[
[
[
CONNECTION TEL/ID
01] Canon TOKYO
04] Canon ITALIA
01] Canon CANADA
02] Canon FRANCE
03] Canon GROUP 2
PGS.
SET TIME
3 27/12 16:30
2 27/12 16:37
1 27/12 16:42
1 27/12 16:55
4-13
Sending Faxes
4
▼
▲
1 Press Menu.
2 Use or to select MEMORY REFERENCE.
■ Printing a Document in Memory
▼
▲
1 Press Menu.
2 Use or to select MEMORY REFERENCE.
Ex:
or
MEMORY REFERENCE
1.DOC. MEMORY LIST
▼
4 Use
▲
3 Press OK.
to select PRINT DOCUMENT.
MEMORY REFERENCE
2.PRINT DOCUMENT
5 Press OK.
6 Use
Ex:
PRINT DOCUMENT
TX/RX NO.
5001
Ex:
PRINT DOCUMENT
TX/RX NO.
5003
▼
or
to select the transaction number (TX/RX
NO.) of the document you want to print.
▲
MENU
2.MEMORY REFERENCE
• If you want to confirm the details of a document displayed in the
LCD, → p. 4-15.
7 Press OK.
8 Press
to print the first page only, or press
pages of the document.
1ST PG ONLY?
YES=( )
NO=(#)
to print all
• The machine prints the document.
9 To continue printing other documents in memory, repeat
the procedure from step 6.
-orPress Stop/Reset to return to standby mode.
4-14
4
■ Deleting a Document from Memory
▼
▲
1 Press Menu.
2 Use or to select MEMORY REFERENCE.
Ex:
or
MEMORY REFERENCE
1.DOC. MEMORY LIST
▼
4 Use
▲
3 Press OK.
to select DELETE DOCUMENT.
MEMORY REFERENCE
3.DELETE DOCUMENT
5 Press OK.
6 Use
Ex:
DELETE DOCUMENT
TX/RX NO.
5001
Ex:
DELETE DOCUMENT
TX/RX NO.
5004
▼
or
to select the transaction number (TX/RX
NO.) of the document you want to delete.
▲
MENU
2.MEMORY REFERENCE
4
7 Press OK.
• The machine asks you to confirm that you want to delete the
document.
8 Press
Sending Faxes
• If you want to confirm the details of a document displayed in the
LCD, → below.
OK TO DELETE?
YES=( )
NO=(#)
to delete the document.
• If you change your mind and want to keep the document in
memory, press .
• The machine deletes the document.
9 To continue deleting other documents in memory, repeat
the procedure from step 6.
-orPress Stop/Reset to return to standby mode.
■ Checking a Document’s Details
Before you print or delete a document in memory, you can check the details of the document.
Ex:
PRINT DOCUMENT
TX/RX NO.
5001
• The transaction number (TX/RX NO.) means the following:
- 0001 to 4999: A sent document
- 5001 to 9999: A received document
• The marks before the transaction number (TX/RX NO.) mean the following:
- (No mark): Black & white document
- : Colour document
- : Black & white document being sent or printed
- &: Colour document being sent or printed.
• Use or to display details of the transaction (destination, for example).
• If you are unsure of the transaction number (TX/RX NO.), print the DOC. MEMORY LIST. (→ p. 4-13)
4-15
4-16
Chapter 5
Receiving Faxes
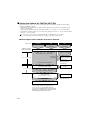
Your machine automatically receives faxes in colour from fax machines with colour capability. When
receiving a fax, the machine detects if the incoming fax is a colour or black & white transaction and prints the
fax accordingly.
Different Ways to Receive a Fax
The machine provides you with several modes for receiving faxes. Once you have decided which mode is
suitable for your needs, set the mode as described in the Quick Start Guide. You can change the mode when
the machine is in standby mode. To determine which mode best suits your requirements, refer to the table
below:
Receive Mode Main Use
Operation
Requirements
FAX ONLY
Fax
Machine answers all calls as fax calls. Separate telephone line for fax use
only.
MODE*
It receives faxes automatically and
disconnects voice calls.
Machine rings for every call, whether Telephone connected to the
machine.
a fax call or a voice call. For a fax
call, you have to manually activate
reception of the fax.
ANS.MACHINE Fax/Tel
MODE
Receives faxes automatically and
routes voice calls to the answering
machine.
Answering machine connected to
the machine. (→ Quick Start
Guide)
FAX/TEL
AUTO SW
Fax/Tel
Automatically switches between fax
calls and voice calls. Receives faxes
automatically and rings for voice
calls. To set the details, → p. 5-2.
Telephone connected to the
machine.
MultiPASS
Suite
PC Fax
Directs faxes to your PC.
PC connected to the machine and
MultiPASS Suite installed.
(→ MultiPASS Suite User’s Guide)
* Factory default setting
You can confirm which receive mode is set by checking the standby display. The receive mode is displayed
in the lower left of the LCD.
Ex:
27/12 2002 FRI 15:30
FaxOnly
STANDARD
5-1
Receiving Faxes
5
MANUAL MODE Tel
■ Setting the Options for FAX/TEL AUTO SW
If you set FAX/TEL AUTO SW, you can control precisely how the machine handles incoming calls by
adjusting the following settings:
• Adjust the time the machine takes to check whether a call is from a fax machine or a telephone (RING
START TIME setting).
• Adjust the length of time the machine rings when the call is a voice call (F/T RING TIME setting).
• Set whether the machine switches to receive mode after the ring time set in F/T RING TIME has elapsed
(DEFAULT ACTION setting).
• You can also set these options from the MultiPASS Suite. (→ MultiPASS Suite User’s Guide)
• The default settings and selectable settings vary depending on the current country selection.
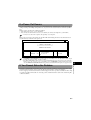
■ What Happens When FAX/TEL AUTO SW is Selected
Type of call
Telephone charges
begin for the caller.
Telephone
Fax
Fax
Sending document
manually
Sending document
automatically
The machine answers without ringing.
The machine listens for the fax tone.
The fax tone
is detected.
RING START TIME
The fax tone is not detected.
The machine starts ringing.
The document is
received automatically.
The fax tone is
detected and the
machine switches to
receive mode.
Pick up the handset
to talk.
F/T RING TIME
If you don’t pick up the handset.
DEFAULT ACTION
Choose between:
RECEIVE and DISCONNECT.
DISCONNECT
The machine
disconnects the call.
RECEIVE
Not all fax machines are capable of sending a fax
tone. For those cases if you set the DEFAULT
ACTION to RECEIVE, the machine switches to
receive mode automatically and starts receiving the
document. If no document comes in, it disconnects
the call after approximately 40 seconds.
5-2
5
1 Make sure FaxTel is displayed in the LCD.
• To set FAX/TEL AUTO SW, → Quick Start Guide.
27/12 2002 FRI 15:30
FaxTel
STANDARD
Ex:
MENU
5.FAX SETTINGS
▼
or
FAX SETTINGS
1.USER SETTINGS
▼
5 Use
▲
4 Press OK.
to select RX SETTINGS.
FAX SETTINGS
4.RX SETTINGS
or
RX SETTINGS
1.ECM RX
▼
7 Use
▲
6 Press OK.
to select FAX/TEL AUTO SW.
RX SETTINGS
2.FAX/TEL AUTO SW
8 Press OK twice.
FAX/TEL AUTO SW
1.RING START TIME
5
RING START TIME
8SEC
Ex:
9 Use
▼
▲
or
to set the time the machine waits before
ringing when it receives a call.
RING START TIME
9SEC
Ex:
10 Press OK twice.
FAX/TEL AUTO SW
2.F/T RING TIME
F/T RING TIME
22SEC
Ex:
11 Use
▼
▲
or
to set the time the machine rings while
waiting for someone to pick up the handset.
F/T RING TIME
or
▼
▲
12 Press OK twice.
13 Use
FAX/TEL AUTO SW
3.DEFAULT ACTION
Ex:
DEFAULT ACTION
RECEIVE
Ex:
DEFAULT ACTION
DISCONNECT
to select RECEIVE or DISCONNECT.
• This setting tells the machine what to do if no one picks up the
handset within the specified ring time set in step 11.
14 Press OK.
30SEC
Ex:
RX SETTINGS
3.INCOMING RING
15 Press Stop/Reset to return to standby mode.
• The default settings and selectable settings vary depending on the current country selection.
5-3
Receiving Faxes
▲
2 Press Menu.
3 Use or to select FAX SETTINGS.
Ex:
Receiving Faxes Manually
In MANUAL MODE, if you connect a telephone to your machine, you can receive voice calls as well as manually
activate reception of faxes. You can activate reception from the machine or from the telephone connected to
the machine (this is called Remote receiving).
• For this mode, you need to connect a telephone to your machine. (→ Quick Start Guide)
• Make sure there are no documents in the ADF or on the platen glass.
• Make sure the REMOTE RX setting is enabled. (→ p. 9-7)
1 Make sure Manual is displayed in the LCD.
• To set MANUAL MODE, → Quick Start Guide.
Ex:
27/12 2002 FRI 15:30
Manual
STANDARD
2 Make sure you have connected a telephone to the machine.
3 When you hear the telephone ring, pick up the handset.
4 ❚ If you hear a person’s voice:
Start your conversation. If the caller wants to send a fax after talking to you, ask them to press the start button
on their fax machine.
When you hear a slow beep, press Start on the machine to begin receiving the fax. Hang up the handset.
❚ If you hear a slow beep tone or silence:
Someone is trying to send you a fax.
If the telephone is close to your machine, press Start on the machine to begin receiving the fax. Hang up the
handset.
• When the multi-purpose tray is empty, the LCD displays LOAD PAPER. Load paper in the multi-purpose tray and
then press Resume. (→ Quick Start Guide)
• If the telephone is located away from your machine, dial 25 (the remote receiving ID) on your telephone and hang up.
• You can change the number for the remote receiving ID (00 to 99), or disable remote receiving. (→ REMOTE RX,
p. 9-7)
• If you have an answering machine connected to your machine that can carry out remote-control operations
(controlling your answering machine from a remote telephone), the security code for this function may be the same
as the remote receiving ID. If so, make sure you change the machine’s remote receiving ID to make it distinct from
the answering machine’s security code. (→ REMOTE RX ID, p. 9-7)
• The machine will beep if the handset is not hung up properly. Make sure the handset is seated properly in its cradle.
If you do not want the machine to beep, disable the OFFHOOK ALARM setting. (→ p. 9-4)
5-4
5
Receiving Faxes to the MultiPASS Suite
When your PC is on, you can set the MultiPASS Suite to automatically upload incoming faxes from the
machine to your PC. (→ MultiPASS Suite User’s Guide)
When Your PC is Off
If you have set the MultiPASS Suite to upload received faxes from the machine to your PC, but your PC is off,
the machine stores the received faxes in its memory. When you turn on your PC, the faxes will automatically
be uploaded to your PC.
If you want to print a fax stored in memory instead of uploading it to your PC, follow this procedure:
• If there are no documents stored in memory, the machine will return to standby mode when you select MEMORY
REFERENCE.
▼
Ex:
or
MEMORY REFERENCE
1.DOC. MEMORY LIST
▼
4 Use
▲
3 Press OK.
MENU
2.MEMORY REFERENCE
to select FILE PRINT.
MEMORY REFERENCE
4.FILE PRINT
5 Press OK.
• The machine prints all received faxes that were to be uploaded to your PC.
• The faxes you print are erased from memory and can no longer be transferred to the PC.
Polling Receiving
In normal faxing, a fax machine sends a document to another fax machine. With polling however, a fax
machine calls another fax machine and requests that a document be sent to it; in other words, it “polls” that fax
machine. Your machine has the capability of polling another fax machine to retrieve a document from it.
• Your machine can only poll fax machines that support polling.
• The document you want to retrieve must be ready to be polled on the other party’s fax machine. If necessary call the
other party to check.
• If the other party is using a Canon fax machine that has the Polling ID feature, ask them to set the Polling ID of their
fax to 255 (1111 1111 binary). Ask them to refer to their user’s guide for details.
• You can poll several fax machines in one operation. Each polling operation can retrieve documents from as many as
110 fax numbers.
1 Press Fax to set Fax Mode.
Ex:
2 Press Polling.
5
Receiving Faxes
▲
1 Press Menu.
2 Use or to select MEMORY REFERENCE.
27/12 2002 FRI 15:30
FaxOnly
STANDARD
POLLING RX
TEL=
5-5
3 Enter up to 110 fax numbers using any of the following methods:
❚ One-touch speed dialling:
Press the desired one-touch speed dialling button(s).
Ex:
TEL=
2 50921
04 Canon ITALIA
Ex:
TEL=
1 49 39 25 25
*02 Canon FRANCE
❚ Coded speed dialling:
Press Coded Dial, then use the numeric buttons to enter the
two-digit code. Repeat for other codes.
❚ Regular dialling:
to delete it.
or
to
▼
• If you enter an incorrect destination, press and hold
• If you want to review the numbers you entered, use
scroll through the numbers.
▲
▲
Use the numeric buttons to enter the fax number, then press OK.
TEL=
9057951111
Ex:
4 Press Start to begin polling the fax machine(s).
Cancelling Polling Receiving
To cancel polling receiving, follow the same procedure as for cancelling receiving. (→ below)
Receiving While Performing Other Tasks
Since the machine is a multitasking device, it can receive faxes and voice calls while you are performing other
tasks. If you receive a fax while you are performing certain tasks, the machine stores the incoming fax in
memory. Then, as soon as you finish your task, the machine automatically prints the fax.
Receiving Faxes in Memory When a Problem Occurs
If the machine encounters a problem when it is receiving a fax, the machine automatically stores the unprinted
pages of the fax in memory, and the LCD displays REC’D IN MEMORY as well as one or more messages.
For an explanation of the message(s) and details on the action to take, → p. 8-1.
• The machine memory can store up to approximately 270 pages.*
• Once the pages are printed, they are deleted from memory.
• If the memory becomes full, you will not be able to receive the remaining pages. Contact the other party and ask them
to resend the remainder of the fax.
* Based on Canon FAX Standard Chart No. 1, standard mode.
Cancelling Receiving
Follow this procedure if you want to stop receiving a fax before reception is completed:
1 Press Stop/Reset.
CANCEL?
YES=(*)
• The machine asks you to confirm that you want to cancel.
2 Press
to cancel receiving.
• If you change your mind and want to continue receiving, press
.
5-6
NO=(#)
Ex:
27/12 2002 FRI 15:30
TX/RX CANCELLED
Ex:
27/12 2002 FRI 15:30
TX/RX NO.
5003
Chapter 6
Special Features
Special Dialling
This section explains special dialling features, such as dialling an overseas number, switching temporarily to
tone dialling, and confirming a dial tone.
■ Dialling an Overseas Number (With Pauses)
When you dial or register an overseas number, you may need to insert a pause within and/or after the number.
The length and location of the pause depends on the telephone system of your country.
1 Press Fax to set Fax Mode.
Ex:
2 Prepare the document and place it on the platen glass or
• If you use the platen glass, the LCD displays the standby mode.
• For colour sending, press Colour/B&W to turn on its light.
(→ p. 4-1)
• To adjust the resolution and contrast, → p. 4-2.
MEMORY USED
0%
Ex:
(Currently used memory)
DOCUMENT READY
6
(Standby to scan)
3 Use the numeric buttons to dial the international access
code.
• If you enter the wrong number, press Stop/Reset, then enter
the correct number.
• For details on international access codes, contact your local
telephone company.
4 If necessary, press Redial/Pause to enter a two-second*
pause (p).
TEL=
00
TEL=
00P
TEL=
00p81123
TEL=
00p81123P
Ex:
Ex:
• For a longer pause, press Redial/Pause again for another twosecond* pause. Alternatively, you can change the length of the
pause. (→ MID PAUSE SET, p. 9-5)
* The pause length varies depending on the current country selection.
5 Use the numeric buttons to dial the country code, the area
code, and the fax/telephone number of the other party.
• If you enter the wrong number, press Stop/Reset and start
again from step 3.
Ex:
6 If necessary, press Redial/Pause to enter a pause.
• A pause at the end of a number (P) is fixed to ten seconds.
Ex:
6-1
Special Features
load it into the ADF.
27/12 2002 FRI 15:30
FaxOnly
STANDARD
7 Press Start to begin scanning for sending.
• To cancel the transmission once dialling has started, press Stop/Reset then
. (→ p. 4-9)
• To take advantage of the speed dialling features of your machine, register frequently used overseas numbers for onetouch or coded speed dialling. (→ pp. 3-2, 3-4)
■ Switching Temporarily to Tone Dialling
Many information services for banks, airline reservations, hotel reservations, etc., require tone dialling for
their services. If your machine is connected to a rotary pulse line, follow this procedure to set the machine
temporarily for tone dialling:
1 Press Fax to set Fax Mode.
Ex:
2 Press Hook.
TEL=
• You can also lift the handset instead of pressing Hook.
3 Use the numeric buttons to dial the telephone number of
the information service.
• The machine connects using the pulses required by your
telephone line.
) to switch to tone dialling.
• When T ( ) is pressed, T is displayed in the LCD.
• If you pressed Hook in step 2, you can pick up the handset if
you need to talk to the other party.
• Numbers entered after pressing T (
tone dialling.
) will be dialled using
7654321
TEL=
7654321T
TEL=
7654321T 34
Ex:
5 Use the numeric buttons to enter the numbers requested by
the information service.
TEL=
Ex:
4 When the recorded message of the information service
answers, press T (
27/12 2002 FRI 15:30
FaxOnly
STANDARD
Ex:
6 When you have finished, press Hook to disconnect the call.
• If you used the handset, hang up to disconnect the call.
• Tone dialling is cancelled when you disconnect the call.
■ Confirming a Dial Tone*
* This feature is only available for some countries.
This feature allows you to set your machine to listen for and detect a dial tone in the middle of a fax/telephone
number before dialling the rest of the number. This is called Dial tone detection.
Follow this procedure for dial tone detection during regular dialling or when registering a number for speed
dialling:
6-2
6
1 When you come to a step that requires you to enter the fax/
telephone number, use the numeric buttons to enter the
number up to where dial tone detection is required.
2 Press D.T. for dial tone detection.
• A small dot indicates where the machine will wait for the dial
tone.
▲
• If you enter the wrong number, press and hold
again from step 1.
, then start
345
TEL=
345.
TEL=
345.1234
Ex:
3 Continue entering the rest of the fax/telephone number
with the numeric buttons.
TEL=
Ex:
Ex:
4 Continue with the operation you are performing.
■ Dialling Through a Switchboard
For details on dialling through a switchboard, → p. 2-6.
Restricting Use of Your Machine
By enabling this feature, you can prevent unauthorised use of your machine to make calls and send faxes.
Enabling Restriction of Your Machine
6
▼
▲
1 Press Menu.
2 Use or to select SYSTEM SETTINGS.
Ex:
3 Press OK three times.
Special Features
Follow this procedure to enable restriction of your machine:
MENU
7.SYSTEM SETTINGS
SYSTEM SETTINGS
1.UN/LOCK PHONE
UN/LOCK PHONE
1.LOCK PHONE
LOCK PHONE
OFF
or
▼
4 Use
▲
Ex:
to select ON.
LOCK PHONE
ON
5 Press OK twice.
UN/LOCK PHONE
2.PASSWORD
PASSWORD
_
6 Use the numeric buttons to enter a four-digit password.
• This password prevents unauthorised access to the LOCK
PHONE setting that enables or disables restriction of your
machine. If you do not want to enter a password, ignore this
step.
PASSWORD
Ex:
1234
6-3
7 Press OK.
Ex:
SYSTEM SETTINGS
2.DISPLAY LANGUAGE
8 Press Stop/Reset to return to standby mode.
Restriction of your machine is now enabled. No one can make calls or send faxes. (This setting does not
restrict incoming calls or faxes.)
Cancelling Restriction of Your Machine
Follow this procedure to cancel restriction of your machine:
▼
▲
1 Press Menu.
2 Use or to select SYSTEM SETTINGS.
Ex:
3 Press OK twice.
MENU
7.SYSTEM SETTINGS
SYSTEM SETTINGS
1.UN/LOCK PHONE
UN/LOCK PHONE
PASSWORD
4 Use the numeric buttons to enter the four-digit password
_
UN/LOCK PHONE
PASSWORD
you registered when you enabled restriction.
• If you did not register a password, ignore this step.
5 Press OK twice.
UN/LOCK PHONE
1.LOCK PHONE
LOCK PHONE
or
▼
6 Use
▲
ON
to select OFF.
LOCK PHONE
OFF
7 Press OK three times.
UN/LOCK PHONE
2.PASSWORD
PASSWORD
1234
Ex:
SYSTEM SETTINGS
2.DISPLAY LANGUAGE
8 Press Stop/Reset to return to standby mode.
Restriction of your machine is now disabled. Anyone can make calls or send faxes.
6-4
Chapter 7
Reports and Lists
Summary of Reports and Lists
The table below shows the reports and lists that can be printed from your machine. Refer to the pages indicated
for more details.
Description
Details
USER’S DATA LIST
Lists the current settings of your machine and the
registered sender information.
p. 2-5
p. 9-3
ACTIVITY REPORT
Shows recent facsimile transactions performed by your
machine.
You can enable or disable automatic printing of this
report after every 20 transactions. You can also
manually set the machine to print it.
p. 7-2
p. 9-2
TX (Transmission) REPORT
Prints after transmission of a document.
You can enable or disable this feature, or set the
machine to print a report only when an error occurs.
You can also set the machine to print the first page of the
document under the transmission report to remind you
of the contents of the document.
p. 7-3
p. 9-4
RX (Reception) REPORT
Prints after reception of a document.
You can enable or disable this feature, or set the
machine to print a report only when an error occurs.
p. 7-4
p. 9-5
MULTI TX/RX (Transaction)
REPORT
Prints after sequential broadcasting of a document.
p. 7-4
DOC. MEMORY LIST
Lists the documents currently stored in the machine’s
memory.
p. 4-13
p. 9-3
MEMORY CLEAR REPORT
Prints automatically when power is restored to the
machine after a power cut. Lists the documents deleted
from memory.
p. 8-7
1-TOUCH SPD DIAL LIST
Lists the numbers and names registered under one-touch
speed dialling buttons.
p. 3-9
p. 9-2
CODED SPEED DIAL LIST
Lists the numbers and names registered under coded
speed dialling codes.
p. 3-9
p. 9-3
GROUP DIAL LIST
Lists groups registered under one-touch speed dialling
buttons and coded speed dialling codes.
p. 3-9
p. 9-3
7
Reports and Lists
Report or List
7-1
ACTIVITY REPORT
The machine is factory-set to automatically print an ACTIVITY REPORT after every 20 transactions. If you
want to print an ACTIVITY REPORT before it is automatically printed, follow this procedure:
• If you prefer the machine not to print an ACTIVITY REPORT after every 20 transactions, disable the ACTIVITY
REPORT setting. (→ p. 9-5)
▼
▲
1 Press Menu.
2 Use or to select REPORTS/LISTS.
Ex:
3 Press OK twice.
MENU
3.REPORTS/LISTS
REPORTS/LISTS
1.ACTIVITY REPORT
• The machine prints an ACTIVITY REPORT.
PRINTING REPORT
Transactions in an ACTIVITY REPORT are listed chronologically.
27/12 2002 17:28 FAX 123 4567
CANON
001
******************************************
***
ACTIVITY REPORT
***
******************************************
ST. TIME
27/12 15:10
27/12 15:14
27/12 15:22
27/12 15:45
27/12 16:10
27/12 16:16
27/12 16:27
27/12 16:30
27/12 16:53
27/12 17:08
CONNECTION TEL
905 795 1111
905 795 1111
03 3758 2111
2 887 0166
905 795 1111
2 887 0166
20 545 8545
20 545 8545
03 3758 2111
2 887 0166
27/12 17:20
CONNECTION ID
Canon CANADA
Canon CANADA
Canon TOKYO
Canon AUSTRALIA
Canon CANADA
Canon AUSTRALIA
Canon EUROPE
Canon EUROPE
Canon TOKYO
Canon AUSTRALIA
NO.
5001
5002
0001
0001
5003
5004
0002
0003
5005
0004
1 432 2060 CANON OPTICS
MODE
AUTO RX
AUTO RX
B’CAST
B’CAST
AUTO RX
AUTO RX
TRANSMIT
TRANSMIT
AUTO RX
TRANSMIT
0005 TRANSMIT
ECM
ECM
ECM
ECM
ECM
ECM
COL
COL
ECM
COL
PGS.
1
1
3
3
1
4
1
1
1
3
COL
0
RESULT
OK 00’33
OK 00’24
OK 01’18
OK 01’18
OK 00’18
OK 00’59
OK 01’20
OK 04’12
OK 01’16
NG 00’51
3 STOP
NG 00’01
0
018
TRANSACTION (TX/RX) NUMBER
INDICATES AN
ENTRY THAT HAS
APPEARED ON A
PREVIOUS REPORT.
TRANSACTION MODE
COLOUR TRANSACTION
ERROR CORRECTION MODE TRANSACTION
ERROR PAGE
ERROR CODE (→ p. 8-1)
Stop/Reset WAS PRESSED DURING TRANSACTION
TRANSACTION DURATION
7-2
7
TX (Transmission) REPORT
The machine is factory-set to print a TX (transmission) REPORT only when an error occurs during sending.
To change this setting, → TX REPORT, p. 9-4.
If you set the machine to print a report, a TX REPORT or an ERROR TX REPORT, similar to the ones below,
will be printed depending on the setting you select.
27/12 2002 17:47 FAX 123 4567
CANON
001
*****************************
***
TX REPORT
***
*****************************
TRANSMISSION OK
TX/RX NO
CONNECTION TEL
0003 :COLOUR TX
1 432 2060
27/12 2002 17:21 FAX 123 4567
CANON
001
************************************
*** ERROR TX REPORT ***
************************************
TX FUNCTION WAS NOT COMPLETED
TX/RX NO
CONNECTION TEL
CONNECTION ID
ST. TIME
USAGE T
PGS. SENT
RESULT
0004
20 545 8545
Canon EUROPE
27/12 17:21
00’18
1
NG
Reports and Lists
7
•
THE SLEREXE COMPANY LIMITED
SAPORS LANE•BOOLE•DORSET•BH25 8ER
TELEPHONE BOOLE (945 13) 51617 - FAX 1234567
OUR Ref. 350/PJC/EAC
December 27, 2002
Dr. P. N. Cundall,
Mining Suerveys Ltd.,
Holroyd Road
Reading
Berks
OK: TRANSMISSION SUCCESFULL
NG: SOME OR NO PAGES SENT
“COLOUR TX”INDICATES A COLOUR
TRANSMISSION
NUMBER OF PAGES SENT
TRANSMISSION DURATION
TRANSMISSION TIME
IF YOU ENABLE THE PRINT WITH IMAGE SETTING (→ p. 9-4), THE
FIRST PAGE OF THE DOCUMENT WILL PRINT ON THE REPORT TO
REMIND YOU OF THE CONTENTS OF THE DOCUMENT (FOR BLACK
& WHITE DOCUMENTS ONLY).
7-3
■ MULTI TX/RX (Transaction) REPORT
If the transmission was a sequential broadcast, a MULTI TX/RX (transaction) REPORT, similar to the one
below, will be printed.
27/12 2002 18:16 FAX 123 4567
CANON
001
********************************************
***
MULTI TX/RX REPORT
***
********************************************
TX/RX NO
PGS.
TX/RX INCOMPLETE
TRANSACTION OK
ERROR INFORMATION
0054
1
_____
[ 01] 905 795 1111
[ 00] 2131 1250
[ 02] 1 49 39 25 25
_____
Canon CANADA
Canon DEUTSCH.
Canon FRANCE
RX (Reception) REPORT
The machine is factory-set not to print an RX (reception) REPORT even if an error occurs during reception.
To change this setting, → RX REPORT, p. 9-5.
If you set the machine to print a report, an RX REPORT, similar to the one below, will be printed.
27/12 2002 17:52 FAX 123 4567
CANON
001
***********************************
***
RX REPORT
***
***********************************
RECEPTION OK
TX/RX NO
CONNECTION TEL
CONNECTION ID
ST. TIME
USAGE T
PGS.
RESULT
OK: RECEPTION SUCCESFULL
NG: SOME OR NO PAGES RECEIVED
NUMBER OF PAGES RECEIVED
RECEPTION DURATION
RECEPTION TIME
7-4
5004 :COLOUR RX
905 795 1111
Canon CANADA
27/12 17:52
01’59
4
OK
“COLOUR TX” INDICATES A COLOUR
RECEPTION
Chapter 8
Troubleshooting
LCD Messages
The following messages are displayed in the LCD when the machine is performing a function or encounters
an error.
This section describes messages related to fax functions. For other messages, → Reference Guide.
• The error code appears in the ACTIVITY REPORT. (→ p. 7-2)
Cause
Action
AUTO REDIAL
The machine is waiting to redial the other
party’s number because the line was busy or
the other party did not answer when you
tried to send the document.
Wait for the machine to automatically
redial the number. If you want to cancel
automatic redialling, wait until the
machine starts dialling the number, press
Stop/Reset then . (→ p. 4-10)
BUSY/NO SIGNAL
( 018)
The telephone number you dialled is busy.
Try sending the document at a later time.
The fax number dialled was incorrect.
Check the fax number and dial again.
The other party’s fax machine is not
working.
Contact the other party and have them
check their fax machine.
The other party is not using a G3 machine.
Contact the other party and ask them to
send or receive the document using a G3
machine.
The touch tone/rotary pulse setting on your
machine is incorrect.
Set your machine to the setting that
matches your telephone line. (→ p. 2-6)
The receiving fax machine did not answer
within 55 seconds (after all automatic
redialling attempts).
Contact the other party and have them
check their fax machine. You can try to
send the document using manual sending
via the handset (→ p. 4-8). For an
overseas call, add pauses to the
registered number. (→ p. 6-1)
CHANGE
PAPERSIZE:FAX
The paper size setting is set to a size other
than A4, letter, or legal.
Set the paper size setting to A4, letter, or
legal (→ Reference Guide). The received
fax will then be printed automatically.
DOC. TOO LONG ( 003)
The document is longer than 1 metre.
Reduce the length of the document to
within 1 metre, and then re-send it.
There is a document jam in the ADF.
Clear the document jam (→ Reference
Guide) and reload the document in the
ADF.
The machine is receiving a fax using Error
Correction Mode (ECM).
ECM receptions may take longer than
normal receptions. Turn off ECM if you
need to receive quickly, or if you know
your local lines are in good condition.
(→ ECM RX, p. 9-6)
ECM RX
8-1
8
Troubleshooting
Message (Error Code)
Message (Error Code)
Cause
Action
ECM TX
The machine is sending a fax using Error
Correction Mode (ECM).
ECM transmissions may take longer than
normal transmissions. Turn off ECM if
you need to transmit quickly, or if you
know your local lines are in good
condition. (→ ECM TX, p. 9-5)
MEMORY USED nn %
Shows the percentage of memory
currently in use.
If you need more space, wait for the
machine to send any faxes. Also, print or
delete any documents in memory you no
longer need. (→ pp. 4-14, 4-15)
NO RX PAPER ( 012)
The other party’s fax machine is out of
paper or its memory is full.
Contact the other party and have them
load paper in their fax machine or free up
space in their fax machine’s memory.
NO TEL # ( 022)
The one-touch speed dialling button or
coded speed dialling code you entered has
not been registered.
Register the one-touch speed dialling
button or coded speed dialling code.
(→ pp. 3-2, 3-4)
NOT AVAILABLE
In manual sending via the handset, you
entered a speed dialling number that is
assigned to a group.
Use regular dialling, or enter a one-touch
speed dialling button or coded speed
dialling code that only has one fax/
telephone number registered.
REC’D IN MEMORY
The machine received the fax in memory
because paper or ink ran out, or a paper
jam occurred.
Load paper in the multi-purpose tray
(→ Quick Start Guide), replace the Ink
Tank(s) (→ Reference Guide), or clear
the paper jam. (→ Reference Guide)
RECEIVED IN FILE
Your PC was off and a document was
received in the machine’s memory.
Upload the document to your PC, or print
the document. (→ pp. 4-14, 5-5)
The MultiPASS Status Monitor is not
running. (Windows 95/98/Me)
On the Windows® desktop, click Start
and point to Programs. On the Programs
menu, point to MultiPASS Suite, then
click MultiPASS Status Monitor.
TRY AGAIN IN B&W
( 085)
You tried sending a colour document to a
machine that does not support colour
faxing.
Try sending again in black & white
(→ p. 4-1). Alternatively, enable the
COLOUR DIRECT TX setting.
(→ p. 9-6)
TX/RX CANCELLED
You pressed Stop/Reset to cancel the
transmission.
If required, try sending or receiving
again.
TX/RX NO. nnnn
When the machine sends or receives a fax,
it assigns it a unique identification number
(nnnn).
Write the number down if you will need it
later.
TX nnnn
SCANNING P. nnn
MEMORY FULL
PLEASE WAIT
The machine is sending a document and its
memory is full.
The machine continues to send the
document as memory becomes available.
8-2
8
Faxing Problems
■ Sending Problems
❚ You cannot send a fax.
The machine may not be set for the type of telephone line in use (pulse/tone).
• Make sure the machine is set for the correct telephone line type. (→ p. 2-6)
The document may not have been loaded.
• Remove the document, stack it if necessary, and place it on the platen glass or load it into the ADF correctly.
(→ Reference Guide)
• Make sure the feeder cover is closed.
The one-touch speed dialling button or coded speed dialling code you entered may not be registered for
the feature you want to use.
• Check the one-touch speed dialling button or coded speed dialling code and make sure it is registered
correctly. (→ Chapter 3)
You dialled or have been provided with an incorrect number.
• Dial the number again, or check that you have the correct number.
The other party’s fax machine may be out of paper.
• Call the other party and ask them to make sure paper is loaded in their fax machine.
You may have sent a document in colour to a fax machine that does not support colour faxing.
• If you attempt to send a colour document to a fax machine that does not support colour faxing, the document
will not be sent and the LCD will display TRY AGAIN IN B&W. Try sending again in black & white.
Alternatively, you can enable the COLOUR DIRECT TX setting (→ p. 9-6) that converts colour faxes to
black & white if the other party’s fax machine does not support colour faxing, thus enabling you to send
colour documents to any fax machine without an error occurring.
There may be other documents being sent from memory.
• Allow time for those documents to finish sending.
An error may have occurred during sending.
• Print an ACTIVITY REPORT and check for an error. (→ p. 7-2)
The telephone line may not be working properly.
• Make sure there is a dial tone when you press Hook or when you lift the handset of the telephone connected
to the machine. If there is no dial tone, contact your local telephone company.
The receiving fax machine may not be a G3 fax machine.
• Make sure the receiving fax machine is compatible with the machine (which is a G3 fax machine).
❚ Faxes sent from the machine are spotted or dirty.
The receiving fax machine may not be working properly.
• Check the machine by making a copy (→ Reference Guide). If the copy is clear, the problem may be in the
receiving fax machine. If the copy is spotted or dirty, clean the scanner components. (→ Reference Guide)
The document may not have been loaded.
• Remove the document, stack it if necessary, and place it on the platen glass or load it into the ADF correctly.
(→ Reference Guide)
8-3
Troubleshooting
8
❚ Cannot send using Error Correction Mode (ECM).
The other party’s fax machine may not support ECM.
• If the other party’s fax machine does not support ECM, then the document is sent in normal mode without
error checking.
ECM may be disabled.
• Make sure ECM is on. (→ ECM TX, p. 9-5)
❚ Errors occur frequently while sending.
The telephone lines may be in poor condition, or you may have a bad connection.
• Lower the transmission speed. (→ TX START SPEED, p. 9-5)
■ Receiving Problems
❚ Cannot receive a fax automatically.
The machine may not be set to receive automatically.
• For the machine to receive faxes automatically, the receive mode must be set to FAX ONLY MODE, FAX/
TEL AUTO SW, or ANS.MACHINE MODE (→ Chapter 5). If you have set ANS.MACHINE MODE, confirm
that an answering machine is connected to the machine and that it is turned on with an outgoing message
properly recorded. (→ Quick Start Guide)
The machine’s memory is full.
• Print or delete any documents stored in memory (→ pp. 4-14, 4-15) to free up space in the machine’s
memory. Then ask the other party to resend the fax.
An error may have occurred during reception.
• Check the LCD for an error message. (→ p. 8-1)
• Print an ACTIVITY REPORT and check for an error. (→ p. 7-2)
The telephone line may not be connected properly.
• Make sure all line connections are secure. (→ Quick Start Guide)
❚ The machine does not switch automatically between telephone and fax reception.
The machine may not be set to switch automatically between telephone and fax reception.
• For the machine to switch automatically, the receive mode must be set to FAX⁄TEL AUTO SW or
ANS.MACHINE MODE (→ Chapter 5). If you have set ANS.MACHINE MODE, confirm that an answering
machine is connected to the machine and that it is turned on with an outgoing message properly recorded.
(→ Quick Start Guide)
An error may have occurred during reception.
• Check the LCD for an error message. (→ p. 8-1)
• Print an ACTIVITY REPORT and check for an error. (→ p. 7-2)
The sending fax machine cannot send the CNG signal that tells the machine that the incoming signal is
a fax.
• Some fax machines cannot send the CNG signal that tells your machine the incoming call is from a fax
machine. In such cases, you will have to receive the fax manually. (→ p. 5-4)
8-4
8
❚ Cannot receive a document manually.
You may have disconnected the call by pressing Start or dialling the remote receiving ID after hanging
up the handset.
• Always press Start or dial the remote receiving ID before hanging up the handset. Otherwise you will
disconnect the call.
❚ Print quality is poor.
You may not be using the correct type of paper.
• Make sure you load paper that meets the paper requirements for the machine. (→ Reference Guide)
The printhead may need cleaning.
• Refer to the flow chart and clean the printhead if necessary. (→ Reference Guide)
The sending fax machine may not be functioning properly.
• The sending fax machine usually determines the fax’s quality. Call the sender and have them make sure the
top cover and scanning glass of their fax machine are clean.
Error Correction Mode (ECM) may be disabled.
• Make sure ECM is on. (→ ECM RX, p. 9-6)
❚ Faxes do not print.
The Printhead (Cartridge) or Ink Tanks may not be installed properly.
• Make sure the Printhead (Cartridge) and Ink Tanks are installed properly. (→ Reference Guide)
• Be sure to remove the orange protective cap from the Printhead (Cartridge) before you install it.
(→ Quick Start Guide)
The printhead may need cleaning.
• Refer to the flow chart and clean the printhead if necessary. (→ Reference Guide)
The Ink Tanks may need to be replaced.
• Determine if the problem is with the Ink Tanks, and replace if necessary. (→ Reference Guide)
The telephone lines may be in poor condition, or you may have a bad connection.
• Error Correction Mode (ECM) sending/receiving should eliminate such problems. However, if the telephone
lines are in poor condition, you may have to try again.
The sending fax machine may not be functioning properly.
• The sending fax machine usually determines the fax’s quality. Call the sender and have them make sure the
top cover and scanning glass of their fax machine are clean.
❚ Cannot receive using Error Correction Mode (ECM).
The other party’s fax machine may not support ECM.
• If the other party’s fax machine does not support ECM, then the document is received in normal mode
without error checking.
ECM may be disabled.
• Make sure ECM is on. (→ ECM RX, p. 9-6)
8-5
Troubleshooting
8
❚ Faxed images are blotched or uneven.
❚ Errors occur frequently while receiving.
The telephone lines may be in poor condition, or you may have a bad connection.
• Lower the reception speed. (→ RX START SPEED, p. 9-7)
The sending fax machine may not be functioning properly.
• Call the sender and have them check that their fax machine is functioning properly.
Telephone Problems
❚ You cannot dial.
The telephone line may not be connected properly.
• Make sure all line connections are secure. (→ Quick Start Guide)
The power cord may not be plugged in securely.
• Check that the power cord is plugged securely into the machine and into the wall outlet, and that the power
is turned on (→ Quick Start Guide). If the machine is plugged into a power strip, make sure the power strip
is plugged in and turned on.
The machine may not be set for the type of telephone line in use (pulse/tone).
• Make sure the machine is set for the correct telephone line type. (→ p. 2-6)
❚ The telephone disconnects while you are talking.
The power cord may not be plugged in securely.
• Check that the power cord is plugged securely into the machine and into the wall outlet, and that the power
is turned on (→ Quick Start Guide). If the machine is plugged into a power strip, make sure the power strip
is plugged in and turned on.
8-6
8
If a Power Cut Occurs
If power is suddenly lost due to an outage or accidental unplugging, a built-in battery retains the user data
settings and the speed dialling settings. However, any sent or received documents stored in memory will be
lost.
During a power cut, functions are limited as follows:
• You cannot send, receive, or copy documents.
• You can only use the machine to receive voice calls if you connected a telephone to your machine.
• You may not be able to make telephone calls depending on your telephone.
When power is restored to the machine, the machine will automatically print a list of documents that were
stored in memory at the time of the power cut.
27/12 2002 15:38 FAX 123 4567
CANON
001
********************************************
*** MEMORY CLEAR REPORT ***
********************************************
MEMORY FILES DELETED
MODE
B’CAST
0024
TRANSMIT
[
[
COL [
CONNECTION TEL/ID
01] Canon CANADA
05] Canon OPTICS
32] Canon UK
PGS.
SET TIME
3 27/12 14:23
1 27/12 14:28
• The MEMORY CLEAR REPORT is not printed if the paper size setting is set to a size other than A4, letter, or legal.
To change the paper size setting, → Reference Guide.
• If the ink in the Ink Tank is empty or there is no paper in the multi-purpose tray when power is restored, the LCD
displays CMYK INK EMPTY or LOAD PAPER. If this occurs, press Resume to return to standby mode. In these
cases, the MEMORY CLEAR REPORT will not be printed even after the Ink Tank is replaced or paper is loaded.
If You Cannot Solve the Problem
If you have a problem with your machine and you cannot solve it by referring to the information in this chapter
and in the Reference Guide, contact your local authorised Canon dealer or the Canon help line.
Canon’s support personnel are trained in the technical support of Canon’s products and should be able to help
you with your problem. The details on contacting your local authorised Canon dealer or the Canon help line,
→ Reference Guide.
8-7
8
Troubleshooting
TX/RX NO
0023
8-8
Chapter 9
Summary of Settings
Understanding the Menu System
The machine menu system allows you to customise the way your machine operates. It consists of various
menus, each containing settings that control different functions of your machine.
Available menus and the LCD display differ depending on the current mode (Copy, Fax, or Scan Mode). This
section explains the procedure to access the menus related only to Fax Mode.
Press Fax to select Fax Mode.
• For the menus related to all modes in common, and menus related only to Copy and Scan Modes, → Reference Guide.
• Before adjusting any settings, you may want to print the USER’S DATA LIST to check the current settings.
(→ p. 2-5)
■ Accessing the Menus
The following illustrates the menu items in hierarchical order.
Menu
To select the desired menu, complete the
procedure as shown on the left.
FAX ONLY MODE
MANUAL MODE
OK
1.DOC.MEMORY LIST
2 Use
or
to select the menu you
want to make a change to.
▼
FAX/TEL AUTO SW
2.MEMORY REFERENCE
1 Press Menu to display the menus.
ANS. MACHINE MODE
Menu
▲
1.RECEIVE MODE
OK
2.PRINT DOCUMENT
3.DELETE DOCUMENT
Menu
3 Press OK.
4.FILE PRINT
4.DOC.MEMORY LIST
OK
1.1-TOUCH SPD DIAL
2.CODED SPEED DIAL
Menu
3.GROUP DIAL
5.FAX SETTINGS*
OK
1.USER SETTINGS
2.REPORT SETTINGS
Menu
3.TX SETTINGS
4.RX SETTINGS
6.PRINTER SETTINGS
or to select the sub menu you
want to make a change to.
3.USER DATA LIST
Menu
Menu
4.TEL REGISTRATION*
4 Use
5 Press OK.
• For details on sub menus, → p. 9-2.
• Press Stop/Reset to exit from menu
system.
For details on these menus, → following
pages.
For details on these menus and SPECIAL
COPY, → Reference Guide.
Menu
7.SYSTEM SETTINGS
* If your machine is connected to a PC, you can access these settings using the MultiPASS Suite.
(→ MultiPASS Suite User’s Guide)
9-1
9
Summary of Settings
2.SPEED DIAL LIST
▼
1.ACTIVITY REPORT
▲
3.REPORTS/LISTS
OK
■ Menus in FAX Mode
• The default settings and selectable settings vary depending on the current country selection. The values shown here
are average values. Print the USER’S DATA LIST to check the current settings. (→ p. 2-5)
RECEIVE MODE
Name
FAX ONLY MODE
MANUAL MODE
ANS.MACHINE MODE
FAX/TEL AUTO SW
Description
Switches the receive mode to FAX ONLY MODE.
(→ p. 5-1)
Switches the receive mode to MANUAL MODE.
(→ p. 5-1)
Switches the receive mode to ANS.MACHINE
MODE. (→ p. 5-1)
Switches the receive mode to FAX/TEL AUTO
SW. (→ p. 5-1)
Settings
-
MEMORY REFERENCE
Name
1.DOC. MEMORY LIST
2.PRINT DOCUMENT
3.DELETE DOCUMENT
4.FILE PRINT
Description
Prints the DOC. MEMORY LIST. (→ p. 4-13)
Selects a document in memory and prints the
document. (→ p. 4-14)
Selects a document in memory and deletes the
document. (→ p. 4-15)
Prints a document in memory instead of uploading
it to your PC. (→ p. 5-5)
Settings
-
REPORTS/LISTS
Name
1. ACTIVITY REPORT
2. SPEED DIAL LIST
1. 1-TOUCH LIST
SORTED OUTPUT
9-2
Description
Prints the ACTIVITY REPORT. (→ p. 7-2)
Print the lists of fax/telephone numbers registered
for speed dialing (→ p. 3-9)
Settings
-
Prints the 1-TOUCH SPD DIAL LIST. (→ p. 3-9) Selects the order you want the destinations to be
printed.
YES: Prints the list in alphabetical order.
NO: Prints the list in button order.
YES
NO
9
Name
2. CODED DIAL LIST
SORTED OUTPUT
3. GROUP DIAL LIST
3. USER DATA LIST
4. DOC. MEMORY LIST
Description
Settings
Prints the CODED SPEED DIAL LIST.
(→ p. 3-9)
Selects the order you want the destinations to be
printed.
YES: Prints the list in alphabetical order.
NO: Prints the list in button order.
-
Prints the GROUP DIAL LIST. (→ p. 3-9)
-
Prints the USER’S DATA LIST. (→ p. 2-5)
Prints the DOC. MEMORY LIST. (→ p. 4-13)
-
YES
NO
TEL REGISTRATION
Name
1.1-TOUCH SPD DIAL
2.CODED SPEED DIAL
3.GROUP DIAL
Description
Registers information on One-Touch Speed
Dialling. (→ p. 3-2)
Registers information on Coded Speed Dialling.
(→ p. 3-4)
Registers information on Group Dialling.
(→ p. 3-7)
Settings
-
FAX SETTINGS
Name
1. USER SETTINGS
1. DATE & TIME
Description
Settings
-
Sets the current date and time. (→ p. 2-4)
-
Selects the date format displayed in the LCD and DD/MM YYYY
printed on the faxes you send.
YYYY MM/DD
MM/DD/YYYY
3. UNIT TELEPHONE # Enters the fax/telephone number you want to
appear at the top of each fax page you send.
(→ p. 2-4)
2. DATE SETUP
Enters the name or company name you want to
appear at the top of each fax page you send.
(→ p. 2-4)
-
Summary of Settings
4. UNIT NAME
9
9-3
Name
5. TX TERMINAL ID
1. TTI POSITION
2. TELEPHONE #
MARK
6. OFFHOOK ALARM
7. VOLUME CONTROL
Description
Settings
Enables/disables printing of the sender
information (→ p. 2-3)
Selects the position of the identification header
(outside or inside the image area).*
ON
OFF
OUTSIDE IMAGE
INSIDE IMAGE
Selects the prefix for the identification header
number. (→ p. 2-3)
FAX
TEL
ON
Enables/disables the off hook alarm that alerts
you when the handset is not seated properly in its OFF
cradle.
Sets the volume of the machine sounds.
When the machine is set to FAX/TEL AUTO
SW, selects the ring volume when the machine
detects a voice call.
1/2/3
2. LINE MONITOR
VOL
8. RX CALL LEVEL
Selects the line monitor volume (sound during
dialling and on hook)
When the machine is set to FAX/TEL AUTO
SW, selects the tone of incoming calls.
0 (off)/
1/2/3
HIGH
STANDARD
9. TEL LINE TYPE
Selects the dialling method the machine uses for
your telephone line type. (→ p. 2-6)
TOUCH TONE
ROTARY PULSE
Enables dialling through a switchboard. If you
select PBX, you can select additional subsettings. (→ p. 2-6)
PSTN
PBX
Enables/disables automatic printing of a
transmission report. (→ p. 7-3)
PRINT ERROR ONLY:
Prints a report only when a transmission error
occurs.
OUTPUT YES:
Prints a report every time you send a document.
OUTPUT NO:
No report is printed.
PRINT ERROR
ONLY
OUTPUT YES
OUTPUT NO
If you select PRINT ERROR ONLY or OUTPUT
YES above, enables/disables printing of the first
page of the fax under the report (black & white
faxes only).
ON
OFF
1. CALLING
VOLUME
10. R-KEY SETTING
2. REPORT SETTINGS
1. TX REPORT
PRINT WITH IMAGE
* Can only be adjusted for black & white transmissions. For colour transmissions, the TTI information is
positioned inside the image area.
9-4
9
Name
Description
Enables/disables automatic printing of a reception
report. (→ p. 7-4)
OUTPUT NO:
No report is printed.
PRINT ERROR ONLY:
Prints a report only when a reception error occurs.
OUTPUT YES:
Prints a report every time you receive a document.
3. ACTIVITY REPORT Enables/disables automatic printing of an
ACTIVITY REPORT after every 20 transactions.
(→ p. 7-2)
2. RX REPORT
Settings
OUTPUT NO
PRINT ERROR
ONLY
OUTPUT YES
AUTO PRINT ON
AUTO PRINT OFF
3. TX SETTINGS
2. MID PAUSE SET
3. AUTO REDIAL
1. REDIAL TIMES
2. REDIAL
INTERVAL
4. TIME OUT
5. TX START SPEED
Enable/disables Error Correction Mode (ECM)
during transmission.
Selects the length of the pause entered when you
press Redial/Pause.
ON
OFF
2 SEC
(1 to 15)
Enables/disables automatic redialling if the other
ON
party’s line is busy on the first attempt. (→ p. 4-10) OFF
Selects the number of redial attempts.
2 TIMES
(1 to 10)
Selects the period of time between redial attempts.
2 MIN.
(1 to 99)
ON
OFF
Enbles/disables automatic scanning of documents
after entering a fax number using speed dialling or
redialling.
ON:
Scanning begins automatically five seconds after
entering the fax number (10 seconds if sending to
multiple destinations).
OFF:
Scanning does not start automatically. (You need to
press Start to begin scanning.)
Selects the speed at which the machine start
transmitting.
9
Summary of Settings
1. ECM TX
33600bps
14400bps
9600bps
7200bps
4800bps
2400bps
9-5
Name
6. COLOUR DIRECT
TX
Description
Settings
Enables/disables sending of colour documents from OFF
ON
the ADF to fax machines that do not have colour
faxing capability. (→ p. 4-1)
OFF:
Colour documents cannot be sent to fax machines
that do not support colour faxing.
ON:
Colour documents can be sent to fax machines that
do not support colour faxing. (The document is
converted to black & white.)
4. RX SETTINGS
1. ECM RX
Enables/disables Error Correction Mode (ECM)
during reception.
ON
OFF
2. FAX/TEL AUTO SW When the machine is set to FAX/TEL AUTO SW, you can set its details. (→ p. 5-2)
1. RING START
Selects the time the machine takes to check whether 8 SEC
TIME
a call is from a fax machine or a telephone.
(0 to 30)
2. F/T RING TIME Selects the length of time the machine rings when
the call is a voice call.
3. DEFAULT
ACTION
3. INCOMING RING
RING COUNT
Sets whether the machine switches to receive mode RECEIVE
DISCONNECT
after the ring time set in F/T RING TIME has
elapsed.
When the machine is set to FAX ONLY MODE or
FAX/TEL AUTO SW enables/disables ringing
when the machine receives a call.*
Selects the number of incoming rings before the
machine begins receiving.
4. MAN/AUTO SWITCH When the machine is set to MANUAL MODE,
determines if the machine switches to fax receive
mode after it rings for a specified time.
F/T RING TIME
22 SEC
(10 to 60)
OFF
ON
2 TIMES
(1 to 99)
OFF
ON
If you select ON above, selects the length of time the 15 SEC
(1 to 99)
machine rings before switching to fax receive
mode.
* Even if you have set INCOMING RING to ON, ringing will only occur if you have connected a telephone
to your machine.
9-6
9
REMOTE RX ID
6. RX REDUCTION
Description
Enables/disables remote receiving. (→ p. 5-4)
If you selects ON above, selects the remote
receiving ID.
Enables/disables reduction of faxes to fit on the
paper loaded in the multi-purpose tray.
ON
OFF
REDUCE DIMENSION Selects the direction of the reduction.
7. RX START SPEED
Settings
ON
OFF
25
(00 to 99)
Selects the speed at which the machine starts
receiving.
VERTICAL ONLY
HORIZ &
VERTICAL
33600bps
14400bps
9600bps
7200bps
4800bps
2400bps
9
Summary of Settings
Name
5. REMOTE RX
9-7
9-8
Appendix
Specifications
Specifications are subject to change without notice
■ Applicable Line
Public Switched Telephone Network (PSTN)
■ Compatibility
G3
■ Data Compressing System
MH, MR, MMR, JBIG, JPEG
■ Error Correction Mode
ITU-T ECM
■ Modem Speed
33600/14400/9600/7200/4800/2400 bps
Automatic fallback
■ Transmission Speed
• Black & White: Approx. 3 seconds/page* at
33.6 Kbps, ECM-MMR, transmitting from
memory
* Based on Canon FAX Standard Chart No. 1,
standard mode.
• Colour: Approx. 1 minute/page* at 33.6
Kbps, ECM-JPEG, transmitting from memory
* Based on Canon COLOUR FAX TEST
SHEET.
■ Scanning Image Processing
UHQ™ (Ultra High Quality) image
enhancement
■ Transmission/Reception Memory
• Transmission: 250 pages*
• Reception: 270 pages*
* Based on Canon FAX Standard Chart No. 1,
standard mode.
■ Fax Resolution
• Black & White:
B&W STANDARD: 8 pels/mm × 3.85 lines/mm
B&W FINE: 8 pels/mm × 7.7 lines/mm
B&W PHOTO: 8 pels/mm × 7.7 lines/mm
• Colour:
COLOUR STANDARD: 200 × 200 dpi
COLOUR FINE: 200 × 200 dpi
■ Dialling
• Automatic dialling
One-touch speed dialling (9 destinations)
Coded speed dialling (100 destinations)
Group dialling (Max. 108 destinations)
• Regular dialling (with numeric buttons)
• Automatic redialling
• Manual redialling (with Redial/Pause button)
■ Networking
• Sequential broadcast (Max. 110 destinations)
• Automatic reception
• Automatic Fax/Tel switchover
• Remote reception by telephone (Default ID:
25)
• Non-ring reception
• Polling reception
• ECM deactivation
• ACTIVITY REPORT (after every 20
transactions)
• Non-delivery report
• TTI (Transmit Terminal Identification)
■ Telephone
■ Connection
Telephone/answering machine (CNG detecting
signal)/data modem
■ Fax Scanning Speed
Approx. 5.3 seconds/page*
* Based on Canon FAX Standard Chart No. 1,
standard mode.
A-1
A
Specifications
■ Facsimile
A-2
Index
A
Accessing menus ................................................9-1
ACTIVITY REPORT
description ......................................................7-1
printing ...........................................................7-2
sample.............................................................7-2
setting ..................................................... 9-2, 9-5
Alarm light..........................................................1-1
ANS.MACHINE MODE
description ......................................................5-1
setting .............................................................9-2
AUTO REDIAL
message ..........................................................8-1
setting .............................................................9-5
Automatic redialling
cancelling......................................................4-10
description ....................................................4-10
B
Black & white sending
setting .............................................................4-1
setting resolution ............................................4-2
Broadcasting, sequential ...................................4-11
BUSY⁄NO SIGNAL message.............................8-1
Buttons (See also individual button names)
numeric...........................................................1-1
one-touch speed dial.......................................1-2
C
CALLING VOLUME setting ............................ 9-4
Cancelling
automatic redialling ..................................... 4-10
manual redialling ......................................... 4-10
polling receiving ............................................ 5-6
receiving ........................................................ 5-6
restriction ....................................................... 6-3
sending........................................................... 4-9
CHANGE PAPERSIZE:FAX message ............. 8-1
Coded Dial button .............................................. 1-2
CODED DIAL LIST setting .............................. 9-3
CODED SPEED DIAL LIST
description ..................................................... 7-1
printing........................................................... 3-9
sample.......................................................... 3-10
CODED SPEED DIAL setting .......................... 9-3
Coded speed dialling
changing, deleting.......................................... 3-5
description ..................................................... 3-1
registering ...................................................... 3-4
using............................................................... 4-4
Colour/B&W button .......................................... 1-1
COLOUR DIRECT TX setting.......................... 9-6
Colour sending
notice for........................................................ 4-1
setting............................................................. 4-1
setting resolution............................................ 4-2
Contrast
button ............................................................. 1-1
setting scanning ............................................. 4-2
Conventions, type ..................................................v
Customer support ............................................... 1-1
D
D.T. button ......................................................... 1-2
Date, entering..................................................... 2-4
DATE & TIME setting ...................................... 9-3
DATE SETUP setting ........................................ 9-3
DEFAULT ACTION setting ............................. 9-6
Delayed sending............................................... 4-13
I-1
I
Index
▼ ▲
(-) button.........................................................1-1
(+) (Menu) button...........................................1-1
1-TOUCH LIST setting ......................................9-2
1-TOUCH SPD DIAL LIST
description ......................................................7-1
printing ...........................................................3-9
sample.............................................................3-9
1-TOUCH SPD DIAL setting.............................9-3
DELETE DOCUMENT setting..........................9-2
Deleting document from memory.....................4-15
Dial tone, confirming..........................................6-2
Dialling
coded speed ..................................... 3-1, 3-4, 4-4
group................................................ 3-1, 3-7, 4-5
methods ..........................................................4-3
one-touch speed............................... 3-1, 3-2, 4-4
overseas number .............................................6-1
PC ...................................................................4-5
regular.............................................................4-3
speed (See Speed dialling)
switching temporarily to tone.........................6-2
through switchboard .......................................2-6
with pauses .....................................................6-1
DOC. MEMORY LIST
description ......................................................7-1
printing .........................................................4-13
sample...........................................................4-13
setting ..................................................... 9-2, 9-3
DOC. TOO LONG message...............................8-1
Document
checking details ............................................4-15
deleting from memory ..................................4-15
in memory.....................................................4-13
printing document in memory ......................4-14
printing list of documents in memory ..........4-13
E
ECM RX
message ..........................................................8-1
setting .............................................................9-6
ECM TX
message ..........................................................8-2
setting .............................................................9-5
ERROR TX REPORT, sample...........................7-3
F
F/T RING TIME setting .....................................9-6
Fax
button..............................................................1-1
Mode...............................................................1-2
FAX ONLY MODE
description ......................................................5-1
setting .............................................................9-2
FAX SETTINGS menu .............................. 9-1, 9-3
FAX/TEL AUTO SW
description ......................................................5-1
setting ..................................................... 9-2, 9-6
setting options for...........................................5-2
FILE PRINT setting............................................9-2
I-2
G
GROUP DIAL LIST
description ..................................................... 7-1
printing........................................................... 3-9
sample.......................................................... 3-10
setting............................................................. 9-3
GROUP DIAL setting........................................ 9-3
Group dialling
creating groups .............................................. 3-7
description ..................................................... 3-1
using............................................................... 4-5
H
Hook button ....................................................... 1-2
HORIZ & VERTICAL setting........................... 9-7
I
Image Quality button ......................................... 1-1
In Use/Memory light.......................................... 1-1
INCOMING RING setting................................. 9-6
INSIDE IMAGE setting..................................... 9-4
L
LCD ................................................................... 1-1
messages (See also individual message names) 8-1
Letters, entering ................................................. 2-2
LINE MONITOR VOL setting.......................... 9-4
List (See individual list names)
M
MAN/AUTO SWITCH setting.......................... 9-6
MANUAL MODE
description ..................................................... 5-1
receiving in .................................................... 5-4
setting............................................................. 9-2
Manual redialling............................................. 4-10
cancelling..................................................... 4-10
Manual sending via the handset......................... 4-8
cancelling....................................................... 4-9
Memory
deleting document from............................... 4-15
documents in................................................ 4-13
printing document in.................................... 4-14
printing list of documents in........................ 4-13
receiving when problem occurs ..................... 5-6
sending (See Memory sending)
MEMORY CLEAR REPORT
description ..................................................... 7-1
sample............................................................ 8-7
MEMORY REFERENCE menu................. 9-1, 9-2
I
N
NO
RX PAPER message ......................................8-2
TEL message ..............................................8-2
NOT AVAILABLE message..............................8-2
Numbers, entering ..............................................2-2
Numeric buttons .................................................1-1
O
OFFHOOK ALARM setting ..............................9-4
OK button ...........................................................1-1
ON/OFF button...................................................1-1
One-touch speed dial buttons .............................1-2
One-touch speed dialling
changing, deleting ..........................................3-3
description ......................................................3-1
registering.......................................................3-2
using ...............................................................4-4
Operation panel...................................................1-1
registering information via .............................2-1
OUTSIDE IMAGE setting .................................9-4
Overseas number, dialling ..................................6-1
P
Paper Select button ............................................ 1-1
Pauses, dialling with .......................................... 6-1
PC
dialling ........................................................... 4-5
when off ......................................................... 5-5
Polling
button ............................................................. 1-2
receiving ........................................................ 5-5
Power cut ........................................................... 8-7
PRINT
DOCUMENT setting ..................................... 9-2
WITH IMAGE setting ................................... 9-4
Printing
1-TOUCH SPD DIAL LIST.......................... 3-9
ACTIVITY REPORT .................................... 7-2
CODED SPEED DIAL LIST ........................ 3-9
DOC. MEMORY LIST ............................... 4-13
document in memory ................................... 4-14
GROUP DIAL LIST...................................... 3-9
list of documents in memory ....................... 4-13
list of information in machine ....................... 2-5
speed dialling lists ......................................... 3-9
USER’S DATA LIST .................................... 2-5
Problems
cannot solve ................................................... 8-7
receiving ........................................................ 8-4
receiving in memory when ............................ 5-6
sending........................................................... 8-3
telephone........................................................ 8-6
Q
Quality, adjusting............................................... 4-1
R
R button.............................................................. 1-2
R-KEY SETTING.............................................. 9-4
REC’D IN MEMORY message......................... 8-2
RECEIVE MODE menu ............................. 9-1, 9-2
RECEIVED IN FILE message .......................... 8-2
I
Index
Memory sending
cancelling........................................................4-9
using ADF ......................................................4-6
using platen glass............................................4-7
MEMORY USED nn % message.......................8-2
Menu
button..............................................................1-1
system, understanding ....................................9-1
Menus (See also individual menu names)
accessing.........................................................9-1
Messages, LCD (See also individual message
names ..................................................................8-1
MID PAUSE SET setting ...................................9-5
Mistake, correcting .............................................2-2
MULTI TX⁄RX (Transaction) REPORT ............7-4
MultiPASS Suite
receiving faxes to............................................5-5
registering information via .............................2-1
Software User’s Guide ....................................... i
I-3
Receiving (See also individual receive modes)
cancelling........................................................5-6
in memory when problem occurs ...................5-6
manually .........................................................5-4
methods ..........................................................5-1
polling.............................................................5-5
problems .........................................................8-4
to MultiPASS Suite ........................................5-5
when PC off....................................................5-5
while performing other tasks..........................5-6
REDIAL
INTERVAL setting ........................................9-5
TIMES setting ................................................9-5
Redial/Pause button ............................................1-2
Redialling
automatic ......................................................4-10
manual ..........................................................4-10
REDUCE DIMENSION setting .........................9-7
Registering
coded speed dialling .......................................3-4
machine name.................................................2-4
machine number .............................................2-4
methods ..........................................................2-1
one-touch speed dialling.................................3-2
sender information..........................................2-3
via MultiPASS Suite ......................................2-1
via operation panel .........................................2-1
Regular dialling ..................................................4-3
REMOTE
RX ID setting..................................................9-7
RX setting.......................................................9-7
Report (See individual report names)
REPORT SETTINGS sub menu.........................9-4
REPORTS/LISTS menu ............................. 9-1, 9-2
Resolution, setting scanning ...............................4-2
Restricting use of machine .................................6-3
Resume button ....................................................1-1
RING
COUNT setting...............................................9-6
START TIME setting.....................................9-6
ROTARY PULSE setting...................................9-4
RX
(Reception) REPORT.....................................7-4
CALL LEVEL setting ....................................9-4
REDUCTION setting .....................................9-7
REPORT setting .............................................9-5
SETTINGS sub menu.....................................9-6
START SPEED setting ..................................9-7
I-4
S
Scanning
contrast, setting .............................................. 4-2
resolution, setting........................................... 4-2
Sender information
description ..................................................... 2-3
printing list to check ...................................... 2-5
registering ...................................................... 2-3
Sending
cancelling....................................................... 4-9
delayed......................................................... 4-13
manual via handset ........................................ 4-8
memory .......................................................... 4-6
methods.......................................................... 4-6
preparing for .................................................. 4-1
problems ........................................................ 8-3
sequential broadcasting................................ 4-11
setting for black & white ............................... 4-1
setting for colour............................................ 4-1
setting scanning contrast................................ 4-2
setting scanning resolution ............................ 4-2
timer (See Delayed sending)
to more than one destination........................ 4-11
using coded speed dialling............................. 4-4
using group dialling ....................................... 4-5
using one-touch speed dialling ...................... 4-4
Sequential broadcasting ................................... 4-11
Settings, list of ................................................... 9-2
Software, MultiPASS Suite User's Guide...............i
SORTED OUTPUT setting ........................ 9-2, 9-3
Special dialling .................................................. 6-1
SPEED DIAL LIST setting................................ 9-2
Speed dialling
coded................................................3-1, 3-4, 4-4
description ..................................................... 3-1
group dialling...................................3-1, 3-7, 4-5
lists................................................................. 3-9
methods.......................................................... 3-1
one-touch .........................................3-1, 3-2, 4-4
Standby display, fax mode................................. 1-2
Start button......................................................... 1-1
Stop/Reset button............................................... 1-1
Support, customer .............................................. 1-1
Symbols, entering .............................................. 2-2
I
T
T ( ) button .......................................................1-1
TEL
LINE TYPE setting ........................................9-4
REGISTRATION menu ......................... 9-1, 9-3
Telephone
line, setting type .............................................2-6
problems .........................................................8-6
TELEPHONE MARK setting.........................9-4
Time, entering.....................................................2-4
TIME OUT setting..............................................9-5
Timer sending (See Delayed sending)
Tone dialling, switching to .................................6-2
TOUCH TONE setting .......................................9-4
TRY AGAIN IN B&W message ........................8-2
TTI POSITION setting .......................................9-4
TX
(Transmission) REPORT ...............................7-3
nnnn, SCANNING P. nnn, MEMORY FULL,
PLEASE WAIT message ...............................8-2
REPORT setting .............................................9-4
SETTINGS sub menu.....................................9-5
START SPEED setting ..................................9-5
TERMINAL ID setting ..................................9-4
TX/RX
CANCELLED message..................................8-2
NO. nnnn message..........................................8-2
Type conventions, this guide ................................. v
U
UNIT
NAME setting.................................................9-3
TELEPHONE setting..................................9-3
USER
DATA LIST setting........................................9-3
SETTINGS sub menu.....................................9-3
USER’S DATA LIST
description ......................................................7-1
printing ...........................................................2-5
sample.............................................................2-5
I
V
Index
VERTICAL ONLY setting.................................9-7
Volume
CALLING VOLUME setting.........................9-4
LINE MONITOR VOL setting ......................9-4
RX CALL LEVEL setting..............................9-4
VOLUME CONTROL setting .......................9-4
I-5
I-6