1
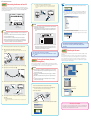
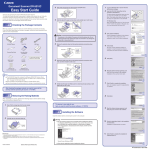
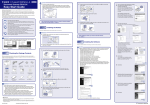
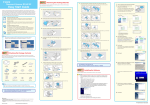
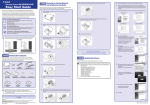
Document Scanner DR-3080CII
3.
Peel off the orange tape from all the places marked ▼ below.
3.
Easy Start Guide
Click [Typical Installation].
[Typical Installation] installs all of the software.
If you want to select which parts of the
software to install, click [Custom Installation].
Thank you for purchasing the Canon DR-3080CII Document Scanner.
This Easy Start Guide describes the procedure for setting up the scanner for use. Follow the
procedures outlined in this Easy Start Guide to set up the scanner. Details on using the
scanner are described in the User’s Guide packaged with the scanner. Before you start using
the scanner, make sure to thoroughly read the User’s Guide.
4.
4.
Checking the Package Contents
Click [Install].
All of the currently displayed software is
installed. To install only selected software,
click [Back] and select [Custom Installation].
Peel off the orange tape indicated by the ▼ mark, and carefully open the upper
unit.
Upper Unit
When you unpack your scanner, make sure all of the following accessories are included.
If any of the items listed below are missing or damaged, contact your local authorized Canon
dealer or service representative.
5.
Click [Next].
6.
Read the software license agreement, and click
[Yes] if you consent to its conditions.
Remove the protective sheet.
USB Cable
Power Cord
DR-3080CII Scanner
5.
Doc
um
en
tS
ca
nn
er
Installation of the scanner driver starts.
Document Eject Guide
Easy Start Guide
(This Manual)
Auxiliary Paper
Support Plate
User’s Guide
6.
Gently close the upper unit. Make sure the upper unit is closed securely by
pressing down on it until you hear it click into place.
The DR-3080CII Setup Disc is
inserted in the User's Guide.
Quick Reference Guide
DR-3080CII
Setup Disc
7.
Click [Finish] to complete the installation.
Next, the installation wizard for CapturePerfect
3.0 appears.
Adobe Acrobat
Setup Disc
0880281099-L5T1P7-BR01
CANON CANADA INC.
6390 DIXIE RD
MISSISSAUGA
ON
L5T
Warranty Card
(U.S.A and Canada only)
9Z9
Registration Card
(U.S.A and Canada only)
Shading Sheet
8.
Click [Next].
9.
Read the software license agreement, and click
[Yes] if you consent to its conditions.
10.
Check the destination folder for the installation,
and click [Next].
The scanner is now ready for use.
Next, you need to install the scanner software. (☞STEP3)
Note
●
The DR-3080CII Setup Disc contains the Softwares (DR-3080CII Scanner Driver
and CapturePerfect3.0) and PDF manuals. For details, refer to “About the Setup
Disc” on page 16 of the User’s Guide.
●
Items included in this package are subject to change without notice.
●
Keep the package and packing materials for storing or transporting the scanner.
Installing the Software
Install the software before connecting the scanner to the computer.
After checking the package contents, you need to remove all the
packing materials protecting the scanner. (☞STEP2)
Warning
❏ Do not connect the scanner to the computer before installing the software.
In a Windows 98SE/Me/2000/XP environment, if you connect the scanner and
turn it ON before you install the software, a wizard screen will appear.
If this wizard appears, click [Cancel] to exit the wizard, and then turn the
scanner OFF.
Removing the Packing Materials
After unpacking the scanner, perform the following steps to remove all the orange
tape and protective materials from it.
1.
Installation of CapturePerfect 3.0 starts.
Peel off all the orange tape from the outer casing.
Wizard Screen (Windows 2000)
11.
Click [Finish] to complete the installation of
CapturePerfect 3.0.
12.
When all installations are complete, the
installation completed screen appears.
❏ Close all other applications before installing the software.
2.
Carefully open the document feed tray.
1.
Log on to Windows.
Be sure to log on with Administrator privileges
when logging on to Windows NT/2000/XP.
Document Feed Tray
2.
Insert the DR-3080CII Setup Disc into the
computer’s CD-ROM drive.
The setup wizard automatically starts up when
you insert the CD-ROM into the CD-ROM
drive. If the setup wizard does not start up, run
the setup.exe application on the CD-ROM.
Click [Exit] to exit the installer. Click [Back] to
return to the menu screen.
■ Trademarks
• Canon and the Canon logo are registered trademarks of Canon Inc. in the United States and may also be trademarks or
registered trademarks in other countries.
• Microsoft Windows® is a registered trademark of Microsoft USA in the United States and other countries.
• Other brands and product names used in this manual may be trademarks or registered trademarks of their respective
companies.
This completes the software installation.
Next, you need to connect the scanner to your computer. (☞STEP4)
PUB. CE-IE-519
©2006 CANON ELECTRONICS INC.
☞Continued on back side
☞Continued from front side
Connecting the Scanner to Your PC
6-2 Connect the scanner to your computer with the SCSI cable.
SCSI cable is not supplied. Acquire a SCSI cable beforehand that
matches the shape of the connectors on your SCSI card and the
scanner.
The scanner can be connected to a computer in two ways: by USB connection to a
standard USB port on the computer, or by SCSI connection to a SCSI card installed in
one of the computer’s expansion slots. Select a connection method appropriate to
your computing environment.
SCSI ID Dip Switches
Note
●
For Windows XP, a balloon help pop-up appears when installation is finished.
●
The installation finished message does not appear in Windows 98SE/Me/2000.
●
The scanner is registered on the computer as “CANON DR-3080CII USB” (or
“CANON DR-3080CII SCSI”) in the “Imaging Device” directory of the Device
Manager.
●
When you restart your computer, the scan panel icon remains resident in the task
tray. For details, refer to “About the scan panel” on page 35 of the User’s Guide.
USB Connector
Power Connector
Warning
❏ When using the scanner in a daisy chain connection with other SCSI devices,
pay attention to the following points:
SCSI Connector
(Half-pitch 50-pin, pin-type)
● The default setting for the SCSI ID is “SCSI ID=2.” Set the dip switches so
that the scanner’s SCSI ID is different from all other SCSI devices on the
chain.
Warning
❏ Windows NT does not support the USB interface. Use a SCSI connection with
Windows NT.
Dip Switches
❏ Do not use both a USB connection and a SCSI connection at the same time.
❏ Use only the supplied power cord.
Default Position (SCSI ID=2)
❏ Connect the scanner to your computer while the scanner is turned OFF.
1 2
❏ Before connecting the scanner with a SCSI cable, turn your computer OFF.
ON
❏ A SCSI cable is not supplied. Acquire a SCSI cable beforehand that matches
the shape of the connectors on your SCSI card and the scanner.
OFF
SCSI ID
2
3
4
5
SW1
OFF
ON
OFF
ON
Scan Panel
SW2
OFF
OFF
ON
ON
The scanner is now correctly recognized by your computer.
1.
When connecting the scanner with a SCSI cable, turn your computer OFF.
2.
Make sure the scanner’s power switch is in the OFF position.
If the power switch is in the ON position, press the switch to turn it to the OFF
position.
Power Switch
OFF Position
● The scanner has a built-in SCSI terminator that is permanently set to [ON].
When using the scanner in a daisy chain connection, make sure that it is
connected as the terminating device and that the terminators of all other
SCSI devices in the chain have been set to [OFF].
Selecting the Scanner
The scanner is now connected to your computer.
Next, you need to turn on the scanner and ensure Windows recognizes
it. (☞STEP5)
Turning On the Power (Scanner
Recognition)
ON Position
3.
1).
Plug the power cord into the power connector on the rear of the scanner (1
4.
2).
Plug the power cord into the power outlet (2
Next, you need to select the scanner with the scanning software.
(☞STEP6)
When you turn on the DR-3080CII in a Windows 98SE/Me/2000/XP environment, Windows
uses the Plug and Play feature to recognize the scanner and automatically installs the necessary driver. (Windows NT does not have a scanner recognition feature.)
You must select your scanner before using it with an ISIS- or TWAIN-compatible scanning
application.
The menus and procedures for selecting the scanner are different for each application.
For details, refer to the manual for your scanning application when selecting the scanner.
This section explains the procedure for selecting the scanner with “CapturePerfect 3.0”.
For details on how to use CapturePerfect 3.0, refer to the “CapturePerfect 3.0 Operation
Guide” in the Programs menu of Windows.
1.
Launch CapturePerfect 3.0 from the Programs menu in Windows.
2.
Select [Select Scanner] from the Scan menu.
Warning
❏ When the scanner is connected by a SCSI cable, always turn on the scanner
before the computer. Turning on the computer first may prevent it from recognizing the scanner properly.
❏ Be sure to log on with Administrator privileges when logging on to Windows
NT/2000/XP.
❏ Wait at least 10 seconds before turning the scanner on again after turning it
off.
❏ If the scanner will not be used for an extended period, be sure to unplug it
from the power outlet for safety.
5.
When connecting the scanner with a USB cable, use the supplied USB cable.
Type A
1.
Check the connection between the scanner and the computer.
2.
Press the power switch to turn the scanner ON (when connecting by SCSI).
The power indicator and start key indicator both light green.
3.
6.
Power indicator
mark facing down.
3.
Select [Canon DR-3080CII] and click [OK].
Turn ON your computer.
Type B
Insert the plug with the
The Scanner Selection dialog box appears.
Power Switch
Follow the steps below when connecting the scanner to your computer with a
SCSI cable.
On Position
6-1 Turn OFF your computer.
Make sure your computer is turned OFF before connecting the SCSI
cable.
4.
Windows recognizes the DR-3080CII as new hardware and performs installation
automatically.
(Windows98/Me/2000)
(WindowsXP)
The setup is now complete
This completes the setup of the DR-3080CII. Details on how to use the DR-3080CII are
described in the User’s Guide packaged with the scanner. Before you start using the
scanner, make sure to thoroughly read the User’s Guide.