1
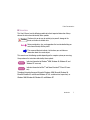
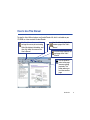
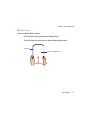
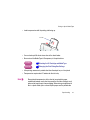
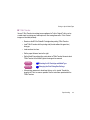
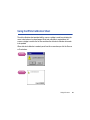
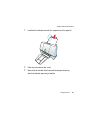
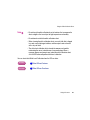
Color Bubble Jet™ Printer
BJC-2100
Series
User’s Manual
Contents
Introduction
Welcome
Printer Documentation
How to Use This Manual
Copyright
Disclaimer
Trademarks
FCC Regulations
Canadian Radio Interference Regulations
Safety Precautions
Basic Printing Procedures
Examining the Printer
Printing Your Document
Loading Plain Paper
Paper Handling
Paper and Other Print Media
Notes on Handling Print Media
Setting the Paper Thickness Lever
Printing on Special Media Types
Printing Photographs
Using BJ Cartridges
Types of BJ Cartridges
BJ Cartridge Guidelines
Replacing Ink Tanks
Replacing the BJ Cartridge
Contents
2
Using the Windows Printer Driver
Printer Driver Basics
Opening the Printer Properties Dialog Box
Selecting the Print Mode
Setting the Page Size
Confirming the Paper Feed
Using Online Help
Closing the Printer Properties Dialog Box
Using the Macintosh Printer Driver
Printer Driver Basics
Selecting a Printer Driver
Changing the Page Setup Dialog Box Settings
Changing the Print Dialog Box Settings
Using Balloon Help
Using Background Printing
Using the Printer With a Network
Maintaining the Printer
Cleaning the Printer
Printing a Nozzle Check Pattern
Cleaning the Print Head
Cleaning the Paper Feed Rollers
Transporting the Printer
Contents
3
Troubleshooting
Printout Is Unsatisfactory
Printer Does Not Start or Stops Mid-job
Paper Jams or Does Not Feed
An Error Message Appears
Other Problems
Before You Call for Help
Getting Help From Canon
Specifications
Printing Specifications
Printing Area
Using the Optional IS-22 Color Image Scanner Cartridge
Using the Scanner
Using the Scanner With Windows
Using the Scanner With Macintosh
Scanner Problems
Contents
4
Introduction
Welcome
Printer Documentation
How to Use This Manual
Copyright
Disclaimer
Trademarks
FCC Regulations
Canadian Radio Interference Regulations
Safety Precautions
Introduction
5
Welcome
Thank you for purchasing the BJC-2100 Series Color Bubble Jet Printer.
Printer Documentation
The documentation for your printer consists of these items:
■ Quick Start Guide
Shows you how to set up the printer and prepare it for operation according to your computer
system. You may also need your computer manual for reference during setup.
■ User’s Manual (this manual)
Shows you everything you need to know about using the printer efficiently and safely. A
detailed troubleshooting section provides step-by-step guidance for identifying and solving
printing problems.
This User’s Manual provides complete explanations of the features and functions of the
printer. To maximize the life of your printer, it’s a good idea to familiarize yourself fully with
all of its functions.
Introduction
6
Printer Documentation
■ Conventions
This User’s Manual uses the following symbols to indicate important information. Always
observe the instructions indicated by these symbols.
Cautions alert you to ways to avoid injury to yourself, damage to the
Caution printer, or the loss of valuable data.
Note
Notes provide advice, tips, and suggestions that are intended to help you
work more efficiently with the printer.
This arrow and blue text indicate a link to where you can find more
information about the current subject.
This manual uses the following symbols depending on the computer system you are using.
Always observe the instructions indicated by these symbols.
Windows
Indicates information for Windows® 2000, Windows 98, Windows 95, and
Windows NT users only.
Macintosh
Indicates information for iMacTM and Power Macintosh® G3 and G4 users
only.
Throughout this guide the names Microsoft® Windows® 2000, Microsoft Windows 98,
Microsoft Windows 95, and Microsoft Windows NT 4.0, are abbreviated, respectively, as
Windows 2000, Windows 98, Windows 95, and Windows NT.
Introduction
7
How to Use This Manual
To view this User’s Manual, please use Acrobat Reader 4.0, which is included on your
CD-ROM, or a later version of Acrobat Reader.
Use this button when you wish to
enlarge the screen you are viewing.
Select this button in the tool bar, and
then click within the screen of the
User’s Manual.
Use this button to display the
previous page of the User’s
Manual.
Use this button to display the
next page of the User’s
Manual.
Use this button to
return to the page
you were viewing
previously. This
button moves you
back from another
page.
Introduction
8
How to Use This Manual
Use this button
when you wish to
search for a word.
This arrow and blue text
indicate a jump to another
location in the User’s
Manual where the topic
shaded in blue is
discussed.
▼
This column displays a table of contents for the User’s Manual.
Click the desired item to jump to the topic.
Click the + (or ) symbol when you wish to see detailed headings for each chapter.
Click the – (or ▼) symbol when you wish to return to the original (condensed) display.
Introduction
9
Copyright
This manual is copyrighted by Canon Computer Systems, Inc. (CCSI)
with all rights reserved. Under the copyright laws, this manual may not
be reproduced in any form, in whole or part, without the prior written
consent of CCSI.
© 2000 Canon Computer Systems, Inc.
Disclaimer
Canon Computer Systems, Inc. has reviewed this manual thoroughly in
order to make it an easy to use guide for your Canon BJC-2100 Series
Color Bubble Jet Printer. All statements, technical information, and
recommendations in this guide and in any guides or related documents are
believed reliable, but the accuracy and completeness thereof are not
guaranteed or warranted, and they are not intended to be, nor should they
be understood to be, representations or warranties concerning the
products described.
Your printer and the software media included with your printer have been
sold to you subject to the limited warranties set forth in the warranty card
and license agreement enclosed with the respective products. All software
is licensed AS IS, as described in the license agreement enclosed with the
software media. Further, CCSI reserves the right to make changes in the
specifications of the products described in this guide at any time without
notice and without obligation to notify any person of such changes.
Introduction
10
Trademarks
Canon, BCI, BJ, and Bubble Jet are trademarks, and SelectExchange is a service mark of
Canon Inc. Print Planet is a service mark of Canon Computer Systems, Inc.
Microsoft and Windows are registered trademarks of Microsoft Corporation in the U.S. and
other countries.
Mac and the Mac logo are trademarks of Apple Computer, Inc., registered in the U.S. and
other countries. All other product and brand names are trademarks or service marks of their
respective owners.
ENERGY STAR® COMPLIANT
As an ENERGY STAR® Partner, Canon U.S.A., Inc. has determined that this product meets the
ENERGY STAR® guidelines for energy efficiency.
Introduction
11
FCC Regulations
Color Bubble Jet Printer, Model BJC-2100
This device complies with Part 15 of the FCC Rules. Operation is subject to the following
two conditions: (1) This device may not cause harmful interference, and (2) this device must
accept any interference received, including interference that may cause undesired
operation.
Note: This equipment has been tested and found to comply with the limits for Class B digital
device, pursuant to Part 15 of the FCC Rules. These limits are designed to provide
reasonable protection against harmful interference in a residential installation. This
equipment generates, uses and can radiate radio frequency energy and, if not installed and
used in accordance with the instructions, may cause harmful interference to radio
communications. However, there is no guarantee that interference will not occur in a
particular installation. If this equipment does cause harmful interference to radio or
television reception, which can be determined by turning the equipment off and on, the user
is encouraged to try to correct the interference by one or more of the following measures:
• Reorient or relocate the receiving antenna.
• Increase the separation between the equipment and receiver.
• Connect the equipment into an outlet on a circuit different from that to
which the receiver is connected.
• Consult the dealer or an experienced radio/TV technician for help.
Introduction
12
FCC Regulations
FCC Regulations
Use of shielded cable is required to comply with Class B limits in Subpart B of Part 15 of
FCC Rules.
Do not make any changes or modifications to the equipment unless otherwise specified in
the manual. If such changes or modifications should be made, you could be required to
stop operation of the equipment.
Canadian Radio Interference Regulations
This digital apparatus does not exceed the Class B limits for radio noise emissions from
digital apparatus as set out in the interference-causing equipment standard entitled “Digital
Apparatus,” ICES-003 of the Industry and Science Canada.
Cet appareil numérique respecte les limites de bruits radioélectriques applicables aux
appareils numériques de Classe B prescrites dans la norme sur le matériel brouilleur:
“Appareils Numériques,” NMB-003 édictée par l’Industrie et Sciences Canada.
Introduction
13
Safety Precautions
Please read the safety warnings provided in this manual to ensure that you use the printer
safely. Do not attempt to use the printer in any way not described in this manual as this
could result in unforeseen printer faults or cause a fire or electric shock.
Printer Location
Power Supply and Power Cord
Cleaning and Maintaining the Printer
Working Around the Printer
BJ® Cartridges and Ink Tanks
Introduction
14
Safety Precautions
■ Printer Location
Do not place the printer close to flammable solvents such as
alcohol or thinners. If flammable solvents come in contact with
electrical components inside the printer, such substances could
cause a fire or electric shock.
Do not use flammable sprays near the printer. Gases in the spray
could cause a fire or electric shock if they come in contact with
electrical components inside the printer.
Do not install the printer in a location that is unstable or subject to
excessive vibration. The printer could tip over or fall and cause
injury.
Do not install the printer in locations that are very humid or dusty,
in direct sunlight, or close to a heating appliance or fireplace. To
avoid the risk of fires or electric shocks, install the printer in a
location with an ambient temperature range of 41 to 95°F
(5 to 35°C) and humidity of 10 to 90% (condensation free).
Introduction
15
Safety Precautions
Do not place the printer on a thick rug or carpet. Fibers or dust
entering the printer could cause a fire.
Keep the power outlet for the printer free of all obstacles so you
can unplug the power cord at any time. Such obstacles could
prevent you from unplugging the printer when a printer fault occurs
and cause a fire or electric shock.
When you are carrying the printer, always use both hands and hold
the printer by both ends. When you are moving the printer to
another location, keep it stable so that you do not drop it and cause
injury.
Introduction
16
Safety Precautions
■ Power Supply and Power Cord
The socket-outlet shall be installed near the equipment and shall be easily accessible.
Do not attempt to plug the power cord into the power outlet or
unplug the power cord when your hands are wet. This could cause
an electric shock.
Always push the plug all the way into the power outlet. A loose or
poorly inserted plug could cause a fire or electric shock.
Do not damage, modify, stretch or excessively bend or twist the
power cord. Do not place heavy objects on the power cord. Power
leaking from a damaged power cord could cause a fire or electric
shock.
Introduction
17
Safety Precautions
Do not use the printer while the power cord is bundled or knotted.
This could cause a fire or electric shock.
If you detect smoke, unusual smells or strange noises around the
printer, immediately unplug the power cord. Continuing to use the
printer in these circumstances could cause a fire or electric shock.
Call the Canon Customer Care Center.
Getting Help From Canon
Always grasp the plug when you unplug the power cord.
Unplugging the power cord by pulling on the cord can damage the
cord and cause a fire or electric shock.
Do not use a power supply voltage other than that supplied in the
country of purchase. Using incorrect voltage could cause fire or
electric shock. The correct power supply voltage and frequency is
as follows:
USA/Canada: AC 120V, 60Hz
Introduction
18
Safety Precautions
■ Cleaning and Maintaining the Printer
Use a damp cloth to clean the printer. Do not use flammable
solvents such as alcohol, benzene or thinners. If flammable
solvents come in contact with electrical components inside the
printer, such substances could cause a fire or electric shock.
Always unplug the printer from the power outlet when you are
cleaning the printer. If you mistakenly plug in the printer while
cleaning it, you could touch moving internal printer components
and suffer injury.
Do not attempt to disassemble or modify the printer. There are no
user serviceable parts inside the printer. The printer contains highvoltage components that could cause a fire or electric shock. Never
attempt any maintenance procedure other than the ones described
in this guide.
Introduction
19
Safety Precautions
■ Working Around the Printer
Do not put your hands or fingers in the printer while it is printing.
The printer contains moving parts that could cause injury.
Do not place metal objects (paper clips, staples, etc.) or containers
of flammable solvents (alcohol, thinners, etc.) on top of the printer.
Such objects could fall or spill into the printer and cause a fire or
electric shock.
If any foreign object (metal or liquid) enters the printer, unplug the
power cord and call the Canon Customer Care Center. Continued
use of the printer when a foreign object has fallen into the printer
could cause fire or electric shock.
Getting Help From Canon
Introduction
20
Safety Precautions
■ BJ® Cartridges and Ink Tanks
For safety reasons store BJ cartridges and ink tanks out of the
reach of small children. If a child inadvertently licks a BJ cartridge
or ink tank or ingests any ink, consult a physician immediately.
Do not subject BJ cartridges or ink tanks to shocks or excessive
vibration. This could cause the ink to leak out and stain your
clothing or the surroundings.
Do not touch the metal contacts on a BJ cartridge after printing.
The metal parts may be very hot and could cause burns.
Introduction
21
Basic Printing Procedures
Examining the Printer
Printing Your Document
Loading Plain Paper
Basic Printing Procedures
22
Examining the Printer
This section describes the parts of the printer and how they function.
■ Front View
RESUME Button
After you have resolved a sheet feeding problem, press
this button to resume printing. You can also press this
button twice to start a Nozzle Check Pattern.
You can start print head cleaning or reset the printer by
pressing and holding down the RESUME button for
more than two seconds. To avoid wasting ink, do not
press and hold the RESUME button for more than two
seconds unless necessary.
Paper Guide
Align this guide with the
edge of the sheet loaded
into the auto sheet feeder.
Paper Output Tray
Holds the printed sheets when they
are fed out of the printer. Fold this
tray down before you start printing.
It can be folded up while the printer
is not in use.
Paper Rest
Supports the media
loaded in the auto sheet
feeder.
Auto Sheet Feeder
Holds sheets of paper or other
media for printing. The auto
sheet feeder holds multiple
sheets which are automatically
fed into the printer one sheet at a
time.
Front Cover
Open this cover to install or replace
the BJ cartridge, change the paper
thickness lever, or clear a paper
jam.
Basic Printing Procedures
23
Examining the Printer
Note
To ensure optimum performance of the print head, the printer
automatically cleans the print head every time it is plugged in or the front
cover is closed after being open for more than a few seconds. Avoid
unplugging the printer and opening the front cover unnecessarily as print
head cleaning consumes ink.
■ Back View
Power Cord
Connect the power cord to the back
of the printer then connect the other
end to a power outlet. The printer
switches on automatically after you
connect the power cord. There is no
power button or power light
on the printer.
Parallel Interface
Connector
Connect the printer cable
here and connect the
other end of the printer
cable to your computer.
USB Interface
Provides a connection
point for connecting a USB
interface cable to the
printer.
Basic Printing Procedures
24
Examining the Printer
■ Inside the Printer
Paper Thickness Lever
Adjust the gap between the
print head and the paper.
Set this lever for the type of
media that you are using.
Cartridge Holder
Holds the BJ cartridge
or the optional IS-22
Color Image Scanner
Cartridge.
Cartridge Lock Lever
Unlocks the cartridge
holder so you can
remove and replace the
BJ cartridge. Raise the
cartridge lock lever to
release the BJ cartridge
and lower it to lock the
BJ cartridge.
Basic Printing Procedures
25
Printing Your Document
After you set up the printer, you can start printing. This section describes how to print a
document on plain paper.
1
Create a document using an application program. (Or, open the file you
wish to print.)
Specify the paper size in the application program you are using.
2
Make sure that the printer is set up properly.
• Make sure that the printer is plugged in.
• Load a stack of plain paper into the auto sheet feeder.
Now you define settings in the printer driver dialog box.
For Windows users
For Macintosh users
Basic Printing Procedures
26
Printing Your Document
Windows
1
For Windows users
Open the Printer Properties dialog box.
Select the command used for printing, make sure the Canon BJC-2100 is
selected as the default printer, and then click the Properties button.
(Depending on the application program you use, the print operation
procedure may be different. Refer to the documentation for your application
program.)
Basic Printing Procedures
27
Printing Your Document
Windows
2
Specify the necessary print settings in the printer driver.
Using the Windows Printer Driver
3
Click the OK button to close the Printer Properties dialog box.
Basic Printing Procedures
28
Printing Your Document
Windows
4
Start printing from the application program.
Click the OK button. Printing begins.
Click Here
Basic Printing Procedures
29
Printing Your Document
Windows
The following screen appears during printing.
BJ Backgrounder
BJ Background Monitor
BJ Printer Status Monitor
BJ Backgrounder
The BJ Backgrounder is displayed in the lower right corner of the screen.
You can cancel or pause the print job.
BJ Background Monitor
The BJ Background Monitor is launched automatically and is minimized on
the Windows Taskbar. You can cancel the print job, change the order of the
documents you print, or even switch the priority of background printing over
the processing of another application program.
BJ Printer Status Monitor
The BJ Printer Status Monitor checks the status of the printer. If an error
occurs, the BJ Printer Status Monitor displays the cause of the error and a
solution. The BJ Printer Status Monitor also detects the remaining ink in the
BJ cartridge and displays a warning message when the ink is low.
Basic Printing Procedures
30
Printing Your Document
Macintosh
1
For Macintosh users
Select the command used for printing to open the dialog box.
Normally select Print or Page Setup from the File menu.
2
Specify the necessary print settings in the printer driver.
Using the Macintosh Printer Driver
Basic Printing Procedures
31
Printing Your Document
Macintosh
3
Start printing from the application program.
Click the Print button. Printing begins.
The following screen appears during printing.
When a single Macintosh computer is connected to the printer, and while
printing from the print server in a network environment, the print progress is
displayed.
While printing from a client unit in a network environment, the data
transmission progress to the print server is displayed.
Basic Printing Procedures
32
Loading Plain Paper
This section describes how you load plain paper.
1
Lower the paper output tray.
Paper Output Tray
Note
The paper output tray can be raised while you are not printing.
Basic Printing Procedures
33
Loading Plain Paper
2
To avoid paper jams, fan the stack to remove static cling, then align the
edges of the stack by tapping it on a flat surface.
3
Load the stack of paper.
• Align the stack with the right side of the auto sheet feeder and insert it
into the auto sheet feeder. (You can print on either side of plain paper.)
• Slide the paper guide to the left side of the stack until it is snug.
Load Limit Mark
Print Side
Paper Guide
Note
Make sure that the top of the stack is not higher than the load limit mark.
Basic Printing Procedures
34
Paper Handling
Paper and Other Print Media
Notes on Handling Print Media
Setting the Paper Thickness Lever
Printing on Special Media Types
Artist Canvas
Back Print Film
Banner Paper
Glossy Photo Cards
Glossy Photo Paper
Greeting Cards
High Gloss Film
High Resolution Paper
Magnet Sheets
Transparencies
T-Shirt Transfer
Envelopes
Printing Photographs
Paper Handling
35
Paper and Other Print Media
This section describes the types of print media you can use with the printer.
■ Ordinary Paper
• Plain Paper
You can use standard photocopier paper. The paper weight must be from 17 to
28 lb (64 to 105 g/m2). You can also use Canon Bubble Jet Paper.
Note
To prevent paper jams and other problems, never use media heavier than
28 lb (105 g/m2).
Specifications
• Envelopes
You can use the standard US Commercial #10 and European DL sizes. You can
also use the envelopes that come with Canon Greeting Cards. Do not use other
envelope sizes.
■ Canon Specialty Paper
• Artist Canvas
Use this media to add an artistic touch to your images and artwork. In the printer
driver, select High Resolution Paper for Media Type and Custom 9.5 × 14 inch for
Paper Size.
Paper Handling
36
Paper and Other Print Media
• Back Print Film
This white translucent film is ideal for displays that use backlighting to show a
printed image in the same way as slides and stained glass. The original image
is reversed (mirrored) when printed. You cannot print on this media using the
BC-22e Photo BJ Cartridge.
• Banner Paper
This banner paper allows you to print on up to six connected sheets of letter-size
paper to create party or advertising banners.
• Brilliant White Paper
Canon’s unique paper formulation gives you a bright white printing surface that
produces incredibly brilliant colors and dark, crisp black text. This paper works
great for everyday use, as well as proposals, color presentations, color charts
and graphs, flyers, and newsletters. You can print on both sides of the sheet. In
the printer driver, select Plain Paper for the Media Type when you load this
paper.
• Bubble Jet Paper (water resistant)
The Canon Bubble Jet Paper has been developed for high quality printing with
minimal or no smearing or running when in contact with water or damp surfaces,
making it a good choice for damp or rainy environments. The paper is specially
coated and printable on both sides. (In the printer driver, select Plain Paper for
the Media Type when you load this paper.)
Paper Handling
37
Paper and Other Print Media
• Glossy Photo Cards
A special 4.75 × 8.5 inch sheet made of the same stock as Glossy Photo Paper.
You can obtain a Photo Card printed over its entire area by printing the image so
that it extends beyond the perforations and then trimming off the unwanted white
margins. Use this card when you want to print a full 4 × 6 inch photo.
• Glossy Photo Paper
This paper is slightly heavier than High Resolution Paper because a gloss
coating is applied to the print side of the paper. This paper provides nearphotographic quality images with the glossy feel of a photographic print.
• Greeting Cards
Get the most out of your card making software with Canon Greeting Cards.
These cards give your unique, personalized cards the look and feel of
professional cards. You can create cards, invitations, announcements, and more.
These cards come in 1/4-fold and 1/2-fold sizes. In the printer driver, select High
Resolution Paper for the Media Type.
• High Gloss Film
A film sheet with a higher gloss than Glossy Photo Paper. To obtain the highest
quality reproduction of photographs, use this media with the BC-21e Color BJ
Cartridge. You cannot print on this media using the BC-22e Photo BJ Cartridge.
Paper Handling
38
Paper and Other Print Media
• High Resolution Paper
Provides more vivid colors than plain paper. Ideal for printing photographs
or business documents that include large numbers of color illustrations and
graphs. For best results, use the optional BC-22e Photo BJ Cartridge to produce
images comparable to your favorite photographs.
• Magnet Sheets
Printable magnets can be cut to any desired shape or size. In the printer driver,
select Glossy Photo Paper for the Media Type.
• Transparencies
Use transparencies to prepare materials for use with an overhead projector.
To avoid paper jams and other problems, do not use transparencies intended for
use with other Canon BJ printers, laser printers, or photocopiers. You cannot
print on this media using the BC-22e Photo BJ Cartridge.
• T-Shirt Transfer
This is a media for creating iron-on prints for T-shirts. You can make an original
T-shirt simply by printing your favorite photograph or illustration onto this media.
The original image is reversed (mirrored) when printed. You cannot print on this
media using the BC-22e Photo BJ Cartridge.
Paper Handling
39
Notes on Handling Print Media
■ Media You Can Use With This Printer
Before you execute a print job, open the printer driver and select the settings that match the
media loaded in the printer.
Using the Windows Printer Driver
Using the Macintosh Printer Driver
Media
Load Limit
Print Side
Printer Driver Settings
Page Size
Media Type
Letter, A4, B5, A5 Plain Paper
Legal
Plain Paper
9.5 × 14 in.
High Resolution Paper
Letter, A4
Back Print Film
Letter, A4
Plain Paper
Letter, Legal
Plain Paper
Letter, A4
Plain Paper
Letter, A4
Glossy Photo Cards
Letter, A4
Glossy Photo Paper
Letter, A4
Other Paper
Letter, A4
High Gloss Film
Letter, A4
High Resolution Paper
Letter
Glossy Photo Paper
Letter, A4
Transparency
Letter, A4
T-Shirt Transfer
Plain Paper
50 sheets
See package
Legal Paper
10 sheets
See package
Artist Canvas
1 sheet
Coated/smooth
Back Print Film
10 sheets*
Matte side
Banner Paper
1 (2 to 6 sheets) See package
Brilliant White Paper
50 sheets
Either side
Bubble Jet Paper
50 sheets
See package
Glossy Photo Cards
1 sheet
Glossy side
Glossy Photo Paper
1 sheet
Glossy side
Greeting Cards
1 sheet
See package
High Gloss Film
1 sheet
Film side
High Resolution Paper 40 sheets
Whiter side
Magnet Sheets
1 sheet
Whiter side
20 sheets*
Either side
Transparencies
T-Shirt Transfer
1 sheet
Unlined side
Envelopes
US Com. No. 10
5 envelopes
Front side
#10 Env.
Envelope
European DL
5 envelopes
Front side
DL Env.
Envelope
*Stack one sheet of plain paper behind the media before loading in the sheet feeder.
Paper Handling
40
Notes on Handling Print Media
■ Paper Handling Guidelines
To avoid poor print quality and possible damage to the printer, do not use the types of
media listed below.
• Folded paper
• Curled paper
• Creased or crumpled paper
• Damp or wet paper
• Excessively thin media (weight less than 17 lb—64 g/m2)
• Excessively thick media (weight more than 28 lb—105 g/m2)
• Continuous feed paper (tractor feed)
• Punched paper (such as loose-leaf folder inserts)
• Reply-paid postcards (double postal card)
• Postcards with a photograph printed on the reverse side
• Postcards with a photograph or sticker pasted on
• Envelopes with overlapping flaps
• Envelopes with pressure seals
• Envelopes with embossed or treated surfaces
• To avoid touching the print surface, always handle media by the edges. Unclean
or scratched print surfaces can adversely affect print quality.
Paper Handling
41
Notes on Handling Print Media
• When storing the print media, put the print media back in its original packaging
and avoid locations that are exposed to direct sunlight or that are subject to high
temperatures or humidity. To avoid curling or wrinkling the paper, store it in a
level place.
• With the following media, remove each printed sheet from the paper output tray
as it is ejected, and do not touch the print side until the ink is dry. Guidelines on
how long ink takes to dry on each media are as follows.
Artist Canvas
Back Print Film
Glossy Photo Cards
Glossy Photo Paper
High Gloss Film
Magnet Sheets
Transparencies
About 15 minutes
About 15 minutes
About 2 minutes
About 2 minutes
About 2 minutes
About 30 minutes
About 15 minutes
• When large amounts of ink are being used, certain types of media may curl
during printing. If this occurs, move the paper thickness lever to the right. Such
types of media are most suited for printing of text, and should not be used for
printing documents that consist mainly of graphics or photographs.
Paper Handling
42
Notes on Handling Print Media
■ Media Sizes
Paper
Width × Length (mm)
Letter
8.5 × 11.0 in.
Legal
8.5 × 14.0 in.
A4
210.0 × 297.0 mm
A5
148.0 × 210.0 mm
B5
182.0 × 257.0 mm
Glossy Photo Cards
4.65 × 8.43 in. (118.0 × 214.0 mm) Perforation size
4.02 × 5.98 in. (102.0 × 152.0 mm) Finished size
US Commercial #10 envelope
9.5 × 4.1 in.
European DL envelope
220 × 110 mm
Canon Greeting Card envelope
4 × 6 in.
Non-standard sizes must be within the following limits:
Minimum: 3.94 × 3.94 in. (100.0 × 100.0 mm)
Maximum: 9.5 × 23.0 in. (241.3 × 584.2 mm)
Paper weight must be 17 to 28 lb (64 to 105 g/m2).
Paper Handling
43
Setting the Paper Thickness Lever
Set the paper thickness lever to match the media type.
Paper Thickness Lever
Paper Handling
44
Setting the Paper Thickness Lever
Media
Paper thickness lever
Plain paper
Left
Artist Canvas
Right
Back Print Film
Left
Banner Paper
Left
Brilliant White Paper
Left
Bubble Jet Paper
Left
Glossy Photo Cards
Left
Glossy Photo Paper
Left
Greeting Cards
Right
High Gloss Film
Left
High Resolution Paper
Left
Magnet Sheets
Right
Transparencies
Left
T-Shirt Transfer
Right
Envelopes
Right
Paper Handling
45
Printing on Special Media Types
Artist Canvas
Back Print Film
Banner Paper
Glossy Photo Cards
Glossy Photo Paper
Greeting Cards
High Gloss Film
High Resolution Paper
Magnet Sheets
Transparencies
T-Shirt Transfer
Envelopes
Paper Handling
46
Printing on Special Media Types
■ Artist Canvas
• Load the Artist Canvas with the print side (coated side) up.
• Load one sheet at a time.
• Set the paper thickness lever to the right.
• Set the Media Type setting in the printer driver to High Resolution Paper.
Windows
Selecting the BJ Cartridge and Media Type
Macintosh
Changing the Print Dialog Box Settings
• Set the Page Size setting to Custom in the printer driver. Then set the Custom page
size to 9.5" × 14".
• Remove each printed sheet as it is ejected from the printer.
• Do not touch the printed side until the ink is completely dry. About 15 minutes are
required for drying.
• Return unused sheets to the original package. Store the sheets in a flat, dry, cool
location away from direct sunlight, high temperature, and high humidity.
• Do not use the BC-22e Photo BJ Cartridge when printing an Artist Canvas.
Paper Handling
47
Printing on Special Media Types
■ Back Print Film
This is semi-transparent film used for backlit display. Printed images are reversed
(mirrored).
• Do not use the BC-22e Photo BJ Cartridge when printing back print films.
• Load back print film with the printing side (the rougher side) facing up.
Print Side
(Rough Side)
• You can load up to 10 sheets at one time in the sheet feeder.
• Select Back Print Film as the Media Type setting in the printer driver.
Windows
Selecting the BJ Cartridge and Media Type
Macintosh
Changing the Print Dialog Box Settings
• After printing, remove each sheet from the output tray as it is ejected.
• Allow about 15 mi