1
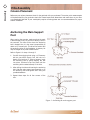
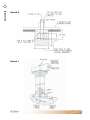
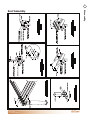
LTR20091034, Rev. A
12/16/08
Delivery and Set-Up
Read This First!
Planning the Best Location for Your Villa . . . . . . . . 1
Carefully read and follow all safety instructions.
Preparing a Good Foundation . . . . . . . . . . . . . . . . . 1
When installing and assembling your villa, it
is recommended that two or more people be
involved.
Size Specifications . . . . . . . . . . . . . . . . . . . . . . . . . . 1
Villa Assembly
Column Placement . . . . . . . . . . . . . . . . . . . . . . . . . . 2
Anchoring the Main Support Post . . . . . . . . . . . . . . 2
Roof Assembly . . . . . . . . . . . . . . . . . . . . . . . . . . . . . 5
Appendix
Cleaning . . . . . . . . . . . . . . . . . . . . . . . . . . . . . . . . . . 6
Maintenance . . . . . . . . . . . . . . . . . . . . . . . . . . . . . . . 6
Warranty Information . . . . . . . . . . . . . . . . . . . . . . . 6
Do not use the unit during an electrical storm.
Do not climb on top of the villa. While the villa is
made out of high-quality material and is extremely
durable, it is not meant to support weight. In
addition, falling off of the villa while climbing on it
can result in serious injury or death.
Do not attempt any repair without consulting the
manufacturer first. Unauthorized repairs will void
the manufacturer’s warranty (within the first 90
days).
CONTACT INFORMATION
Copyright 2008-2009 LMS, Inc. All rights reserved. Duplication without
written consent is strictly prohibited.
Cal Spas™ and Cal Enclosures™ are registered trademarks.
Due to continuous improvement programs, all models, operation, and/or
specifications are subject to change without prior notice.
LTR20091034, Rev. A
12/16/08
For customer service, please contact
your authorized dealer immediately. If
you need additional information and/
or assistance, please contact:
LMS Customer Service Department
1462 East Ninth Street
Pomona, CA 91766.
Toll Free: 1-800-CAL-SPAS
Fax: 1-909-629-3890
Delivery and Set-Up
Most cities and counties require permits for exterior
construction and electrical circuits. In addition, some
communities have codes requiring residential barriers
such as fencing and/or self-closing gates on property
to prevent unsupervised access to the property by
children under the age of five. Your dealer can provide
information on which permits may be required and
how to obtain them prior to the delivery of your
equipment.
The following are some of the things that you will
need to consider when determining the placement of
your new villa.
Preparing a Good Foundation
Your villa needs a solid and level foundation. The area
that it sits on must be able to support the weight of the
villa and the occupants who use it. If the foundation
is inadequate, it may shift or settle after the villa is
in place, causing stress that could DAMAGE YOUR
VILLA.
Place the villa on an elevated foundation (preferably
a 3” concrete slab). Be sure that the concrete slab is
at least 12” wider than the outside dimension on the
villa.
•
If you are installing a spa or villa on an elevated
wood deck or other structure, we strongly
recommend that you consult a structural engineer
or contractor to ensure the structure will support
the weight of 150 Lbs./ sq. ft.
•
It is strongly recommended that a qualified,
licensed contractor prepare the foundation for
your villa.
Consider How You Will Use Your Villa
How you intend to use your villa will help you determine
where you should position it. For example, will you
use your villa for recreational purposes? If your villa
is mainly used for family functions, be sure to leave
plenty of room around it for activity.
Consider Your Privacy
In a cold weather climate, bare trees won’t provide
much privacy. Think of your villas surroundings during
all seasons to determine your best privacy options.
Consider the view of your neighbors as well, when you
plan the location of your villa.
Provide A View With Your Villa
Think about the direction you will be facing when
sitting in your villa. Do you have a special landscaped
area in your yard that you find enjoyable? Perhaps
there is an area that catches a soothing breeze during
the day and lovely sunset in the evening. Consider
these things when you plan your location.
Size Specifications
Length
12’
12’
14’
14’
16’
Width
12’
16’
14’
18’
16’
NOTE: We recommend that the foundation extend
beyond the dimension of the villa. For example, if
the villa you purchased is 12’x12’, you will want your
foundation to be 12’x12’. The reason for this is because
it will be easier to maintain the area around the villa
(mowing the lawn, edging, etc.) without damaging or
scarring the villa. Also, in doing this, you will eliminate
any potential problems, foundation-wise, in the
future.
NOTE: This owner’s manual applies to the various
sizes that are included in the villa line. While the sizes
will vary from villa to villa, the assembly instructions
will be the same, unless otherwise noted.
2009 Villa
LTR20091034, Rev. A
www.calspas.com
Delivery and Set-Up
Planning the Best Location
for Your Villa
1
Assembly
2
Villa Assembly
Column Placement
Reference your column placement chart for the particular villa you purchased. The center point measurements
will be described for your particular sized villa. Please locate these dimensions and mark them on your floor
or professionally laid slab. If your municipality requires a footing please see our recommendations for proper
column installation.
Anchoring the Main Support
Post
When scoring the concrete, make sure that the mark
is dark enough to see, as you will be drilling a hole in
the concrete. This hole will be where the anchoring
bolt is located. Also, it is the owner’s responsibility to
obtain a 1/2” masonry bit. This bit will be used to drill
the anchoring holes in the foundation. A masonry bit
may be bought at any local hardware store.
Refer to Figure 1 for steps 1 through 3.
1. Pre-drill the anchoring hole using a 1/2”masonry
drill bit (see NOTE above). Drill the hole to a
depth of no less than 3”. Using a hammer, insert
the anchoring bolt by gently tapping the bolt
into place. Continue to tap into place until the
anchoring bolt is seated securely in the hole.
2. After drilling the hole and inserting the anchoring
bolt, slide the main support post assembly on to
the anchoring bolt and tighten down using the
provided hardware.
3. Repeat these steps for all four corners of the
villa.
Figure 1. Anchoring the main support post
www.calspas.com
2009 Villa
LTR20091034, Rev. A
3
Assembly
The final placement of the main support posts is shown
in Figure 2. The main support posts should be mounted
no less than 1” from the side of the spa. If the villa is
touching the spa, and any damage is incurred due to
contact, the warranty on the spa siding is void.
The total distance between each main support post
will be determined by the size of the spa and villa that
was purchased. The list below will tell you what each
distance should be for each model:
If the spa is:
The distance between each villa
main support post is:
7’ x 7’
± 7’ - 2” x 7’ - 2”
7.5’ x 7.5’
± 7’ - 8” x 7’ - 8”
8’ x 8’
± 8’ - 2” x 8’ - 2”
Figure 2. Placement of the support posts
Method A
2009 Villa
LTR20091034, Rev. A
www.calspas.com
Assembly
4
Method B
Method C
www.calspas.com
2009 Villa
LTR20091034, Rev. A
5
2009 Villa
LTR20091034, Rev. A
Assembly
Roof Assembly
www.calspas.com
Appendix
6
Appendix
Cleaning
Your villa was designed with low cleaning and maintenance in mind. We recommend that the surround package
be cleaned at least twice a month (or more, if needed). When cleaning your villa, do not use cleaning solvents
-- using a sponge and water will be fine. For ground-in dirt and grime, refer to the following section.
Maintenance
Maintaining your villa is an easy task. We recommend that every six months you inspect your surround package.
Take note of any deformities in the wood (i.e. cracking, peeling, dirt, grime, etc.). Wipe the stained area clean
and reapply until the sanded area matches the rest of the villa.
Warranty Information
See your Cal Enclosures villa dealer for a copy of the applicable warranty, details and any questions you may
have regarding the warranty coverage on your villa.
Warranty Limitations
The Limited Warranty is void if the villa has been subject to negligence, alteration, misuse, abuse, repairs by
non-LMS authorized representatives, acts of God and any other cases beyond the control of LMS. Examples of
common acts invalidating this warranty include but are not limited to:
•
Use of the villa in a non-residential application
•
Scratches caused by normal use
•
Damage caused by extreme weather conditions (heat, cold, etc.)
•
Damage caused by dirt, sand, and/or water damage
•
Damage caused by direct sunlight
•
Damage caused as a result of failure to follow the assembly instructions as defined in this owner’s manual
This Limited Warranty applies only to villas normally used for personal, family, or household purposes.
This Limited Warranty is obsolete 90 days after the original purchase date.
Warranty Exclusions
LMS warranties the villa from defects in material and workmanship for a period of 90 days from the
original date of purchase.
DON’T FORGET TO REGISTER YOUR NEW PRODUCT AT WWW. CALSPAS.COM.
www.calspas.com
2009 Villa
LTR20091034, Rev. A
7
Appendix
2009 Villa
LTR20091034, Rev. A
www.calspas.com
CONTACT INFORMATION
For customer service, please contact
your authorized dealer immediately. If
you need additional information and/
or assistance, please contact:
LMS Customer Service Department
1462 East Ninth Street
Pomona, CA 91766.
Toll Free: 1-800-CAL-SPAS
Fax: 1-909-629-3890
Villa Model: ____________________________________________________________________________
Villa Serial Number: _____________________________________________________________________
Date Purchased: ________________________________________________________________________
Date Installed: _________________________________________________________________________
Cal Spa Dealer’s Phone Number: ___________________________________________________________
Cal Spa Dealer’s Address: _ _______________________________________________________________