1
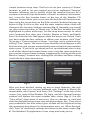
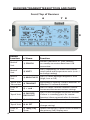
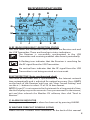
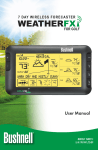
7 D AY W I R E L E S S F O R E C A S T E R
WEATHERFX
Instruction Manual
with Quick Start Guide
Model# 960900C
Lit. #: 98-1352/03-09
Thank you for purchasing the Bushnell Weather FXi, an Internet
based 7-day weather forecaster. Designed and engineered with
state-of-art wireless technology, this instrument will provide
accurate and reliable weather forecast information for today
and the next six days, in any of over 20,000 cities worldwide.
No external sensors or subscriptions are required, and the Wireless
Receiver may be placed anywhere in your home. Weather data is
automatically updated from the Internet throughout the day via
AccuWeather.com and sent to the Weather FXi unit using a wireless
USB Transmitter connected to the user’s PC. Setup is easy – simply
install and run the software, select your home location and up to 4
other cities, plug in the Transmitter and power up the Receiver. Read
this manual carefully to fully explore the features and functions of
your new Weather FXi forecaster.
THE BUSHNELL WEATHER FXi FEATURES:
Automatically Updated 7-DAY Forecast
As long as your PC is connected to the Internet, and the Bushnell
Weather FXi software is active (it can be left running in the background
with minimal CPU usage, while you use your computer for other
tasks), the 7-day forecast and weather data displayed on the unit will
be automatically updated from the Internet throughout the day via
AccuWeather.com and sent to the Receiver unit wirelessly via the USB
Transmitter. The Receiver may be placed anywhere in your home, up
to about 245 feet (75 meters) away from the Transmitter.
The Forecast Data includes:
-Weather forecast
-Current temperature with “RealFeel®”
-High & low temperature
-Relative humidity
-Chance of precipitation
-Maximum UV index
-Average wind speed & direction
-Auto-synchronized (Internet) clock
-Alarm function with snooze
-Color backlight –color indicates current temp range
2
Forecast Data is available for over 20,000 cities worldwide,
including:
-Europe: Over 9,200 cities selection
-North America: Over 10,900 cities selection
-Asia/Pacific: Over 300 cities selection in Japan, Asia and Australia
-Latin America: Selected cities
Quick Start Guide
1) Install the Software
Insert the CD, click the “Weather FXi Setup Wizard” button and follow
the onscreen directions to install the Weather FXi software on your PC
(Windows 2000 or later, with an “always on” internet connection).
2) Connect the Transmitter
Connect the USB Transmitter to your PC’s USB port.
3) Launch the Weather FXi application, Set Locations and Units
Double click the “Weather FXI” icon on your desktop. When the application
opens, move the cursor into the far left box at the top, then click “Edit
Location” when it appears. Set your current location by selecting from the
four drop down lists, then click “Save”. Follow the same process to setup
any or all of the remaining four location boxes. Next, click the “Settings”
button and set your preferences for temperature, wind speed units
and time format, then click “Save”. In the main Weather FXi application
window, you can click in any of the other “location boxes” you set up to
see the forecast for that city.
4) Setup the Receiver Unit (Remote Display)
Insert 4xAA batteries into the Receiver, or connect its supplied AC
adapter. The Receiver’s display initializes and reads “Searching for PC”
(press the SEARCH button on the back of the unit if this does not appear).
Attach the easel stand to the Receiver and place it near the PC so you can
see its display while you complete the setup.
5) Transmit Weather Data from the PC Application to the Receiver
Click “Send to Receiver” on the Weather FXi program window. The red
LED on the USB Transmitter will glow, then blink while data is transferred
from the PC software to the Receiver. The Receiver will indicate “PC
FOUND-PLS WAIT 5 MINS” When the Transmitter’s light stops flashing,
check to see that the Receiver’s display matches the weather data shown
on the PC screen. Make sure the location box selected on the Weather
FXi application and the “Favorite” location # on the Receiver display are
the same (use the +/- buttons on the Receiver to change locations). Also
be sure the units for temperature, wind speed, etc. are set the same
(click “Settings” on the software screen, press UNITS on back of the Receiver
and change them using the +/- buttons if necessary-press UNITS again to
change other displayed units). Keep the Weather FXi application running
in the background and keep your PC powered on and connected to
the internet, so the Receiver can provide you with the latest up-to-date
forecast information.
Problems? Questions?
Please read the following detailed Instructions and Troubleshooting.
3
INSTALLATION and SETUP INSTRUCTIONS
STEP 1: INSTALL THE SOFTWARE
Before connecting or operating the Transmitter or Receiver hardware,
you should install the Weather FXi software program on your PC, as
they will not function without the software. The software automatically
connects to a special weather data server on the internet, displays the
data on your PC screen (when the Weather FXi program window is
open), and transmits the data via the connected USB Transmitter to
the wireless Receiver unit. Before installation, ensure that:
• Your PC is connected to the Internet. Try browsing through a couple
of websites to make sure. An “always on” internet connection (not
via dialup or phone modem) is recommended.
• You are using Windows 2000, XP or Vista (Windows 98 and Macs are
not supported).
Insert the supplied CD into your CD ROM drive and click the “Weather
FXi Setup Wizard” button when it appears to start the installation (Fig.
1). Follow the on-screen directions, clicking “Next” until the installation
is complete (Fig. 2). A “Weather FXi” shortcut icon (
) is added to
your PC desktop screen during the installation.
Fig. 1
Fig. 2
STEP 2: CONNECT THE USB Transmitter
Connect the USB Transmitter to your PC via one of its main USB ports.
As the Transmitter is powered by the USB port (it does not require
batteries), avoid connecting it to unpowered USB “hubs”, USB ports
located on a PC keyboard, or others that may not deliver adequate
power. When using the Transmitter with a laptop, power the computer
with its AC power supply to reduce battery drain and ensure reliable
USB power. Raise the Transmitter’s antenna to the upright position to
ensure maximum range and signal strength to the Receiver.
STEP 3: START THE WEATHER FXi APPLICATION and SET LOCATIONS
Double click the Bushnell “Weather FXi” icon on your desktop to start
the program. After it opens to the main weather data screen (this may
take a minute or so the first time the program is launched), there are two
4
simple, onetime setup steps. The first is to set your current, or “home”
location, as well as (at your option) up to four additional “Favorite”
locations (allowing you to quickly check the weather forecast for a
vacation or business trip destination, a friend’s or relative’s hometown,
etc), using the five location boxes at the top of the Weather FXi
software screen. Move your cursor into the first (far left) location box,
then move the cursor down to the “Edit Location” button that pops up
below it (Fig. 3)-click on this, and the main weather data screen will
change to the Location Settings window (Fig. 4). Normally you should
set your current location or “home city” in the first location box (still
highlighted in yellow at the top). Use the drop down arrows to select
your Continent first, then your Country, Region or State, and finally
your City from the lists that appear when the arrows are clicked. Once
you have made the four settings to define your location, click “Save”
(if you get a “Cannot connect to server...” message, wait a minute and try
clicking “Save” again). The name of your location should appear in the
first box now, and you are automatically returned to the main weather
data screen. If you wish, go ahead and set up additional cities in any
or all of the other four location boxes now, using the same procedure
you used to set your home location, beginning by clicking on the next
blank or “empty” location box, clicking Edit Location and then setting
it with the four drop down boxes.
Fig. 3
Fig. 4
After you have finished setting up one or more locations, the only
other setup step is to set your preferred units (English or Metric) for
temperature, wind speed, and time. Click “Settings” at the top of the
screen (just right of the Weather FXi logo), and the General Settings
window will replace the main weather data screen (Fig. 5). Use the
“Time offset” drop down if necessary (due to changes in start/end
dates for daylight savings time, time zone boundaries, etc). Then select
your preferences for how other types of data will be displayed using
the remaining drop downs for temperature units, etc. When finished,
click “Save” to store these settings and return to the main screen (Fig.
6). The Weather FXi application is now setup and ready to use.
5
INSTALLATION and SETUP INSTRUCTIONS
Fig. 5
Fig. 6
STEP 4: SETTING UP THE RECEIVER UNIT
The Receiver may be powered by batteries or from the included AC
adapter. To use the AC adapter, insert the round plug into the jack
on the lower left side of the unit, then connect it to a wall outlet. To
install batteries, slide the battery door down in the direction of the
arrow to remove it, and insert four AA batteries (alkaline or lithium) in
the indicated direction. Replace the battery door. Insert the included
easel stand into the key slot (above the battery door) on the back of
the Receiver unit, then rotate it (clockwise) into place so the stand
will prop up the Receiver unit and allow it to stand upright. Note: as
soon as batteries are installed or the AC adapter is connected, the unit
will power on, and run through a display test routine, cycling through the
various backlight colors, then displaying letters and numbers in various
sections of the display-this is normal, and takes less than a minute. When
completed, the display will show a “Searching for PC” message (press
SEARCH on the back of the Receiver if it does not). Keep the Receiver
near the PC until the setup is complete-then you may move it anywhere
in your home, up to about 245 ft (75m) from the Transmitter.
6
STEP 5: TRANSMIT DATA FROM PC SOFTWARE TO THE RECEIVER
This is a simple process, in fact it’s normally completely automatic after
the initial setup. First, make sure the Receiver displays the “Searching
for PC” message. If it isn’t, press the SEARCH button on the back of
the Receiver-you should then see the “Searching...” message, and the
Signal strength icon (
)on the top left corner of the display should
be blinking. All you need to do now is click “Send To Receiver” on
the Weather FXi software screen (Fig. 7) (make sure the first or “home”
location box is selected), and within a few seconds, the data on the
Receiver display will be synchronized to the data currently seen on
the PC. The LED light on the USB Transmitter will glow red when you
click “Send To Receiver”, then blink while the data is being transmitted
(if this does not happen, the Transmitter is not getting power via USB-
INSTALLATION and SETUP INSTRUCTIONS
try connecting it to a different USB port). The message on the Receiver
changes to “PC FOUND-PLS WAIT 5 MINS” as the data is transmitted-it
may take several minutes for all the data to be transmitted the first
time, but is typically fairly fast. When the Transmitter’s light stops
flashing, the Receiver unit should now display the same weather
forecast data as the Weather FXi software screen. If the temperature or
other data does not match, press the UNITS button on the back of the
Receiver and then use the + / - buttons on the front of the Receiver to
make sure the temperature and other units are set to your preference
(for example, if you set the temperature units on the software Settings
screen to “F”, but the Receiver temperature units are set to “C”, the
numbers will not match). If all the data display areas on the Receiver
are blank, you may have a “Favorite Location” selected that has not yet
been setup in the Weather FXi software application. If that’s the case,
either follow the procedure in Step 3 to set the “blank” location on
your PC, or press the + or - button on the Receiver to select a Favorite
Location # which already has a corresponding location box in the PC
software.
Receiver/Transmitter
BUTTONS AND PARTS
(see table on next page)
1
3
Stand
Keyhole
Fig. 7
USB Transmitter
Antenna
2
Battery
Compartment
Back of Receiver
4
LED
7
RECEIVER/TRANSMITTER BUTTONS AND PARTS
Front/ Top of Receiver
6
7 8
5
9
Button
Location
8
#/ Name
Function
Back of
Unit
1) SEARCH
Initiates search for PC -puts receiver
on standby to receive data from USB
transmitter
Back of
Unit
2) UNITS
Press (repeatedly) to select hour format,
wind speed and temperature units (use +/to change setting)
Back of
Unit
3) BRIGHTNESS
Press to select backlight brighness level
(High, Low or Off )
Top of USB
Transmitter
4) TRANSMIT
Equivalent to clicking “Send to Receiver” in
Weather FXi software window
Front of
Unit
5) + and -
Press to select Favorite Locations and to
increment/decrement various settings
Top of Unit
6) SNOOZE/
BACKLIGHT
Press to turn backlight on for few seconds.
If alarm is sounding, press for snooze
function (alarm resounds after 9 minutes)
Top of Unit
7) ALARM
Turns alarm on/off
Top of Unit
8) AL SET
Press to set the alarm time (use +/- to
change setting)
Front of
Unit
9) Today, Day
2, etc
Selects which day is shown with full data in
the primary (left) display area
RECEIVER DISPLAY GUIDE
A
B C
D
E
F
G
N
H
I
J
K
L M
A) RF (RADIO FREQUENCY) RECEPTION STATUS
This icon shows the connection status between the Receiver unit and
the USB Transmitter. There are three basic status indications:
The Receiver is successfully synchronized to the USB
Transmitter and receiving weather data from it periodically.
A flashing icon indicates that the Receiver is searching for
the RF signal from the USB Transmitter.
No vertical bars indicates that the RF signal from the USB
Transmitter is not being received or is too weak.
B) NETWORK TIME (Auto-synchronized clock)
The clock on the main unit is synchronized to the Internet network
time automatically and is adjusted for optimal accuracy. Press UNITS
on the back of the Receiver until you see “Hour Format Setting” and
use the + / - buttons to select 12 or 24 Hr time format.
NOTE: If your PC is not connected to the internet for a long period of time,
the clock display may not be accurate. Once you reconnect to the internet,
exit and then relaunch the Weather FXi software, then click “Send to
Receiver”.
C) ALARM ON INDICATOR
Icon appears confirming the alarm has been set by pressing ALARM.
D) WEATHER FORECAST SYMBOLS (ICONS)
Please see the “Forecast Icons Reference” at the back of this manual
9
RECEIVER DISPLAY GUIDE
for a complete table of the forecast icons for the Weather FXi software
screen and the Receiver display, along with the weather conditions
they indicate.
E) FAVORITE LOCATION INDICATOR
All the displayed weather data is for the location currently selected on
the Receiver. The numbers 1-5 shown here correspond to the location
boxes (from left to right) across the top of the screen in the Weather FXi
application. “Favorite #1” is your home or current location, same as the
first box on the left in the Weather FXi software screen. Use the + or buttons on the left side of the Receiver to change the Receiver’s display
to show the weather forecast for the other cities (you will see the names
of locations 2-5). Note: if you select an “empty” location on the Receiver,
which does not have a location set for it in the corresponding box in the
software (the box is blank in the Weather FXi application), no data will be
displayed on the Receiver.
F) HI / LO TEMPERATURE FORECAST (Today)
Indicates the forecasted high and low temperatures for the current
day.
G) CURRENT TEMPERATURE WITH RealFeel®
The current temperature at the selected location, and the Exclusive
AccuWeather RealFeel Temperature®, an index that evaluates everything
that affects how warm or cold a person feels, measuring the combined
effects of temperature, wind, humidity, sunshine intensity, cloudiness,
precipitation and elevation. Press UNITS on the back of the Receiver
until you see “Temperature Unit Setting” and use the + / - buttons to
select oF or oC (this affects all displayed temperature data).
H) WEATHER MESSAGE
Updated text messages regarding upcoming weather conditions,
including any storm alerts or other warnings.
I) RELATIVE HUMIDITY FORECAST
The relative humidity forecast for the current day.
J) CHANCE OF PRECIPITATION
The chance of precipitation is displayed (as a percentage).
10
K) WIND SPEED AND DIRECTION
The average wind speed & direction forecast. Press UNITS on the back of
the Receiver until you see “Wind Unit Setting” and use the + / - buttons
to select your preferred wind units (km/h, mph, m/s or knots).
L) MAXIMUM UV INDEX FORECAST
The maximum UV (ultraviolet radiation) index forecast is shown here.
The displayed index levels indicate:
UVI 1 to 2: Maximum UV level is low. There is only a low level of danger
to the average person.
UVI 3 to 5: Maximum UV level is moderate. There is a moderate risk of
harm from unprotected sun exposure.
UVI 6 to 7: Maximum UV level is high. There is a high risk of harm from
unprotected sun exposure.
UVI 8 to 10: Maximum UV level is very high. There is a very high risk of
harm from unprotected sun exposure.
UVI 11 to 15: Maximum UV level is extreme. There is an extreme risk of
harm from unprotected sun exposure.
M) INDOOR TEMPERATURE
An internal sensor on the back of the Receiver provides a reading of
the current indoor temperature where the Receiver is located.
N) FORECAST CONDITIONS AND HIGH/LOW TEMPERATURE FOR
ADDITIONAL DAYS OR MORNING/AFTERNOON/EVENING
The right frame area of the Receiver’s display is capable of displaying
different information, depending on which buttons are pressed next
to it, on the right side of the unit. Normally it will display the forecast
for the next three days (if “Today” is Thursday, it shows the predicted
weather for Friday, Saturday and Sunday at the selected Favorite
Location). Press the TODAY button to display the Morning, Afternoon
and Evening forecast details for the current day (press it again or wait
10 sec. to return to the next three day display). Press DAY 2 or DAY 3
or to see the details for those days. Press the DAY 4/5,6,7 button to
see the details for Day 4. Hold the DAY 4/5,6,7 button to display the
forecast for Days 5, 6 and 7 (using the previous example, Sunday would
be Day 4, so holding the button would show the forecasts for Monday,
Tuesday and Wednesday). Note: The “DETAILS” buttons on the Weather
FXi software screen have the same function. Morning/Afternoon/Evening
details for Days 5, 6 and 7 are not available (both software and Receiver).
Forecast details for
one day in right
display frame.
11
FORECAST ICONS REFERENCE
BACKLIGHT COLOR REFERENCE : Temperature Range
12
TROUBLESHOOTING
1. Be sure that you are using Windows 2000, XP or Vista and your PC is
connected to the Internet. You need to have Microsoft .NET Framework
1.1 driver installed in your PC in order to complete the installation of
the Weather FXi program. Most PCs purchased after 2005 will already
have this-if you have an older PC, click “Help and Support” in your Start
menu, and then select “Windows Update”.
Or, you can download the driver by going to www.microsoft.com and
entering “1.1 net framework” in the search box at the top of the page,
then clicking the magnifying glass to search the site. The name of the
file you need to install is “dotnetfx.exe”.
2. Check that the USB transmitter is properly connected to the USB
port of your PC, so you are able to run the Weather FXi software and
access the forecast data updates from the internet. If the Transmitter
is disconnected while the Weather FXi program is running, you will
see a “Usb Disconnected” pop up window, with options to reconnect
the Transmitter and retry sending data to the Receiver, or you may opt
to continue to run the Weather FXi program
without automatic updates to the Receiver, or
Exit the program.
3. If “PC Not Found-Try Searching Again”
appears on the Receiver display (or “PC Lost”), your PC was shut down
or its power interrupted. Make sure the USB Transmitter is connected,
and restart the PC. The Weather FXi application should automatically
launch after startup (if not, double click its desktop icon). If you see the
“Usb Disconnected” message, unplug then reconnect the Transmitter,
and click “Retry”. Make sure the Weather FXi application has the current
weather data ready to send to the Receiver by clicking “Update” (it
may take a few minutes to gather all the 7-Day forecast data from the
internet server, especially if you have multiple locations setup. Press
the SEARCH button on the back of the Receiver to change its display
message to “Searching for PC”, then click “Send to Receiver” in the
Weather FXi window. The Transmitter LED should light, then blink as
the updated data is sent, and the Receiver display should indicate “PC
Found...”
4. Be sure all 4 batteries in the Receiver are fresh. Replace the batteries
when the low battery indicator appears.
5. If the toolbar icon for the Weather FXi program disappears (in the
lower right of your PC screen), the application was terminated and
13
TROUBLESHOOTING
is no longer accessing the forecast from the internet. Restart the
program again. Instead of exiting the program if you don’t want its
window open, click the “-” on the top right of the application window.
To restore the Weather FXi window, right click its icon in the system
tray on the bottom right of your PC screen, and then click “Open”.
6. In the first few minutes of RF reception from the USB Transmitter,
the Receiver may show data on only part of the screen-this is normal.
The rest of the screen display data will gradually appear in the next 10
minutes or more. If you have waited 1 hour or more without seeing the
rest of the weather data, shorten the distance between the Transmitter
and Receiver, also check the Receiver’s battery condition. Then repeat
the setup procedure in the TRANSMIT DATA FROM PC SOFTWARE TO
THE RECEIVER section.
7. If the RF indicator is showing full strength (
) but one or more
of the next 3 days’ forecast is missing on the Receiver and Weather FXi
program screen, your PC may be offline, or the internet connection
was interrupted earlier. Connect your PC to the internet again to
receive the latest forecast update.
8. If all forecast information appears except the UV Index, your PC may
have been offline for more than 1 day. Connect your PC to the internet
again to receive the latest UVI forecast update.
9. If the forecast reading of the Weather FXi software does not match
with the Receiver, click “SEND TO RECEIVER” to re-transmit the signal
again and wait for at least 10 minutes.
10. If your time on the Weather FXi software window and Receiver
display is off by half an hour or more, click “SETTINGS” in the Weather
FXi application and set the hour offset until the proper time is set.
11. If your city does not appear in the location list, select the one
nearest to your home location.
12. Heavy internet traffic may slow down the response time of the
weather data server temporary. Try again later if you wish to update
the forecast manually by clicking “UPDATE” on the Weather FXi
program screen.
14
For any other problems or questions,
please contact Bushnell Customer Service at:
(800) 423-3537 • www.bushnell.com
TWO-YEAR LIMITED WARRANTY
Your Bushnell® product is warranted to be free of defects in materials and workmanship
for two years after the date of purchase. In the event of a defect under this warranty, we
will, at our option, repair or replace the product, provided that you return the product
postage prepaid. This warranty does not cover damages caused by misuse, improper handling, installation, or maintenance provided by someone other than a Bushnell Authorized Service Department.
Any return made under this warranty must be accompanied by the items listed below:
1) A check/money order in the amount of $10.00 to cover the cost of postage and handling
2) Name and address for product return
3) An explanation of the defect
4) Proof of Date Purchased
5) Product should be well packed in a sturdy outside shipping carton, to prevent damage in transit,
with return postage prepaid to the address listed below:
IN U.S.A. Send To:
Bushnell Outdoor Products
Attn.: Repairs
8500 Marshall Drive
Lenexa, Kansas 66214
IN CANADA Send To: Bushnell Outdoor Products
Attn.: Repairs
25A East Pearce Street, Unit 1
Richmond Hill, Ontario L4B 2M9
For products purchased outside the United States or Canada please contact your local
dealer for applicable warranty information. In Europe you may also contact Bushnell at:
Bushnell Germany GmbH
European Service Centre
Mathias-Brüggen-Str. 80
D-50827 Köln
GERMANY
Tel: +49 221 995568-0
Fax: +49 221 995568-20
This warranty gives you specific legal rights.
You may have other rights which vary from country to country.
©2009 Bushnell Outdoor Products
FCC Note:
This equipment has been tested and found to comply with the limits
for a Class B digital device, pursuant to Part 15 of the FCC Rules.
These limits are designed to provide reasonable protection against
harmful interference in a residential installation. This equipment
generates, uses and can radiate radio frequency energy and, if not
installed and used in accordance with the instructions, may cause
harmful interference to radio communications. However, there
is no guarantee that interference will not occur in a particular
installation. If this equipment does cause harmful interference to
radio or television reception, which can be determined by turning
the equipment off and on, the user is encouraged to try to correct
the interference by one or more of the following measures:
·Reorient or relocate the receiving antenna.
·Increase the separation between the equipment and receiver.
·Connect the equipment into an outlet on a circuit
different from that to which the receiver is connected.
·Consult the dealer or an experienced radio/TV
technician for help.
Shielded interface cable must be used with the equipment in order
to comply with the limits for a digital device pursuant to Subpart B
of Part 15 of FCC Rules.
NOTE: THE MANUFACTURER IS NOT RESPONSIBLE
FOR ANY RADIO OR TV INTERFERENCE CAUSED BY
UNAUTHORIZED MODIFICATIONS TO THIS EQUIPMENT.
SUCH MODIFICATIONS COULD VOID THE USER AUTHORITY
TO OPERATE THE EQUIPMENT.
Specifications and designs are subject to change without any notice
or obligation on the part of the manufacturer.
15
For further questions or additional information please contact:
Bushnell Outdoor Products
9200 Cody, Overland Park, Kansas 66214
(800) 423-3537 • www.bushnell.com
©2008 Bushnell Outdoor Products