1
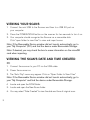
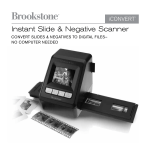
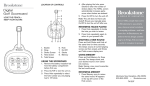
i-Convert®
Portable Document
and Photo Scanner
Scan receipts, letters, recipes,
photos and more
Table of contents
Warnings and Cautions . . . . . . . . . . . . . . . . . . . . . . . . . . . . . . . . . . . . . . . . . . . . . . . . . . . . . . . . . 2
Location of Parts and Controls . . . . . . . . . . . . . . . . . . . . . . . . . . . . . . . . . . . . . . . . . . . . . . . . . . 3
LCD Screen Icons . . . . . . . . . . . . . . . . . . . . . . . . . . . . . . . . . . . . . . . . . . . . . . . . . . . . . . . . . . . . . 4
Included Accessories . . . . . . . . . . . . . . . . . . . . . . . . . . . . . . . . . . . . . . . . . . . . . . . . . . . . . . . . . . 4
Installing the Battery . . . . . . . . . . . . . . . . . . . . . . . . . . . . . . . . . . . . . . . . . . . . . . . . . . . . . . . . . . . 5
Formatting Your microSD Card . . . . . . . . . . . . . . . . . . . . . . . . . . . . . . . . . . . . . . . . . . . . . . . . . . 5
Calibrating the Scanner . . . . . . . . . . . . . . . . . . . . . . . . . . . . . . . . . . . . . . . . . . . . . . . . . . . . . . . . 6
Setting the Resolution . . . . . . . . . . . . . . . . . . . . . . . . . . . . . . . . . . . . . . . . . . . . . . . . . . . . . . . . . 6
Setting the Time and Date . . . . . . . . . . . . . . . . . . . . . . . . . . . . . . . . . . . . . . . . . . . . . . . . . . . . . . 7
Setting the Scan Mode . . . . . . . . . . . . . . . . . . . . . . . . . . . . . . . . . . . . . . . . . . . . . . . . . . . . . . . . . 8
Scanning . . . . . . . . . . . . . . . . . . . . . . . . . . . . . . . . . . . . . . . . . . . . . . . . . . . . . . . . . . . . . . . . . . . . . . 8
Viewing Your Scans . . . . . . . . . . . . . . . . . . . . . . . . . . . . . . . . . . . . . . . . . . . . . . . . . . . . . . . . . . . . 9
Viewing the Scan’s Date and Time Created . . . . . . . . . . . . . . . . . . . . . . . . . . . . . . . . . . . . . . 9
Editing and Saving After Scanning . . . . . . . . . . . . . . . . . . . . . . . . . . . . . . . . . . . . . . . . . . . . . 11
Specifications . . . . . . . . . . . . . . . . . . . . . . . . . . . . . . . . . . . . . . . . . . . . . . . . . . . . . . . . . . . . . . . . 12
Computer System Minimum Requirements . . . . . . . . . . . . . . . . . . . . . . . . . . . . . . . . . . . . . . 14
Troubleshooting . . . . . . . . . . . . . . . . . . . . . . . . . . . . . . . . . . . . . . . . . . . . . . . . . . . . . . . . . . . . . . . 15
Warranty . . . . . . . . . . . . . . . . . . . . . . . . . . . . . . . . . . . . . . . . . . . . . . . . . . . . . . . . . . . . . . . . . . . . . 17
1
BATTERY PRECAUTIONS
• D
ispose of the old batteries properly. Do not dispose of the old batteries
in a fire.
• D
o not leave the batteries where a child or pet could play with or swallow
them. If the batteries are swallowed, contact a physician immediately.
• T
he batteries may explode if mistreated. Do not attempt to recharge or
disassemble the batteries.
• U
se only fresh batteries of the required size and type. Do not mix old and
new batteries, different types of batteries, or rechargeable batteries of
different capacities.
Save these instructions
2
Location of parts and controls
1.
Battery Door
7.
Scan LED Indicator
2.
Power/Scan Button
8. Time Set Button
3.
Error LED Indicator
9.
4.
LCD Screen
10. microSD Card Slot
5.
DPI Resolution Button
11. Format Button
6.
C/BW Button
12. Scan Guides
USB Port
12
1
9
8
10
2
3
7
6
3
11
4
5
LCD screen icons
1.
Selected Effect Indicator (Color/Mono [Black and White])
2.
microSD Card Indicator
3.
Battery Indicator
4.
Selected Resolution Indicator (High 600dpi/Low 300dpi)
5.
Scan Count/Time/Date Indicator
1
2
5
3
4
Included accessories
1. Scanner
4. Mini USB Cable
2. White Balance Calibration Sheet
5. Software CD
3. Lens Cleaning Cloth
6. Scanner Drawstring Bag
4
Installing the battery
1. S
lide open and remove the BATTERY DOOR and insert 2 AA alkaline
batteries according to the polarity indicators inside the compartment.
2. Replace the BATTERY DOOR and slide closed.
Note: The BATTERY INDICATOR on the LED screen will reveal if the
batteries need to be replaced.
Formatting your microsd card
Important: The microSD card must be formatted before scanning.
Note: All content on the microSD card will be erased during formatting.
1. W
ith the Scanner off, insert a microSD card (not included) into the
microSD CARD SLOT on the Scanner until it has clicked into place.
Note: Do not force the microSD card into place. Forcing the card may
damage the microSD card or the scanner. See the diagram on the scanner
to insert the microSD card correctly.
2. Turn the Scanner on by pressing the POWER/SCAN button for 2 seconds.
3. U
sing a thin, blunt object, press the FORMAT button once. An “F” will show
on the LCD screen.
4. Press the POWER/SCAN button once to begin formatting the microSD card.
5. T
he microSD CARD INDICATOR will blink until the formatting process
is complete.
5
Calibrating the scanner
1. P
lace the Scanner on the White Balance Calibration Sheet and press
the POWER/SCAN button for two seconds to turn the unit on.
ress and hold the C/BW button. While holding the C/BW button,
2. P
press the POWER/SCAN button once to enter into auto-calibration
mode. The microSD CARD INDICATOR will flash and stop when
the internal memory clearing process is complete.
3. T
he green and red LED light will then turn on. Do not move the
Scanner until the red LED light turns off. The green LED will remain lit.
4. S
tart rolling the Scanner over the White Balance Calibration Sheet slowly
and evenly until the green light turns off (you may have to roll the Scanner
backwards if necessary).
5. W
hen the green LED light turns off, the calibration is complete.
Press and hold the POWER/SCAN button to turn the Scanner off.
Setting the resolution
1. Turn the Scanner on by pressing the POWER/SCAN button for two seconds.
2. B
y pressing the DPI RESOLUTION button on the scanner, you may choose
between high resolution (600 dpi) and low resolution (300 dpi).
3. T
he high or low resolution mode will be displayed on the LCD screen
to reflect your choice.
6
Setting the time and date
1. Turn the Scanner on by pressing the POWER/SCAN button for two seconds.
2. U
sing a thin, blunt object, such as a paper clip, press the TIME/SET
button on the scanner.
3. The LCD SCREEN will read 1 XX for the year.
4. P
ress the C/BW or DPI button to locate the current year and press the
SCAN button to select.
5. T
he LCD SCREEN will now read 2 XX for the month. Repeat step 4 to
select the Month, Day, Hour and Minute.
Indicator
Set
1 XX
Year
2 XX
Month
3 XX
Day
4 XX
Hour
5 XX
Minute
5. A
fter you set 5 XX (Minute), press the TIME/SET button on the scanner
again to save TIME/SET settings.
7
Setting the scan mode
1. Turn the Scanner on by pressing the POWER/SCAN button for two seconds.
2. By pressing the C/BW button, you may choose between Color and Mono.
3. T
he Color or Mono icon will be displayed on the LCD screen to reflect
your choice.
Scanning
1. W
ith a microSD card inserted into the Scanner, turn the Scanner on by
pressing the POWER/SCAN button for two seconds.
2. Hold the document you wish to scan securely on a flat surface.
3. P
lace the Scanner flat against the document, scanning screen side down,
making sure the info you want to scan is between the SCAN GUIDES.
4. P
ress the POWER/SCAN button once. The green SCAN LED INDICATOR
light will illuminate to show the Scanner is scanning.
5. R
oll the Scanner over the document you wish to scan slowly and evenly.
This will allow you to get the best quality scan possible.
6. W
hen you reach the end of the document, press the POWER/SCAN button
again to stop scanning.
7. T
he COUNTING INDICATOR on the LCD screen will tell you the number
of saved scans you have completed.
8
Viewing your scans
1. C
onnect the mini USB to the Scanner and then to a USB 2.0 port on
your computer.
2. Press the POWER/SCAN button on the scanner for two seconds to turn it on.
3. Y
our computer should recognize the Scanner as a removable disk.
Click “open folder to view files” to view and import scans.
Note: If the Removable Device window did not launch automatically, go to
your “My Computer” (PC) and find the device under Removable Storage.
Note: If desired, you may check the box to erase information on the microSD
card when importing.
Viewing the Scan’s date and time created
PC
1. Connect the scanner to your PC via the USB cable.
2. Power the scanner on.
3. The “Auto Play” menu may appear. Click on “Open Folder to View Files.”
Note: If the Removable Device window did not launch automatically, go to
your “My Computer” and find the device under Removable Storage.
4. Locate and open the DCIM folder.
5. Locate and open the New Scans folder.
6. You may select “Date Created” to view the date and time of original scan.
9
Mac®
1. Connect the scanner to your Mac via the USB cable.
2. Power the scanner on.
3. Locate and open the scanner’s microSD folder on your desktop.
Note: Ignore iPhoto or Image Capture if they appear automatically.
4. Locate and open the DCIM folder.
5. Locate, but do not open, your scanned image.
6. H
old down the “control” button and click on the image file. A list of scanned
images will appear.
7. H
ighlight a scanned image and click “get info” to see the date and
time of the original scan.
10
Editing and saving after scanning
You may edit and save your scans using the included software (Windows® PC only).
1. Load the included software CD into your CD/DVD-ROM drive. The installation
program should launch automatically.
2. Follow the on-screen instructions to install the software on your computer.
Note: If the installation program is not launched automatically, double-click
the setup.exe file located on the CD-ROM.
Extra: If you are not using the included software, go to www.picasa.google.com
and download a free version of their software to edit your scans. Follow the
instructions for editing in the editing software and save to your computer.
11
Specifications
Image Sensor . . . . . . . . . . . . . . . . . . . . . . . . . . . . . . . . . . L
etter Size Color Contact
Image Sensor
Number of Sensor . . . . . . . . . . . . . . . . . . . . . . . . . . . . . . 5
136 dots (1st~5104
dots available)
Resolution . . . . . . . . . . . . . . . . . . . . . . . . . . . . . . . . . . . . . L
ow resolution:
300x300dpi (default)
High resolution: 600x600dpi
Maximum Scanning Speed for
Letter Size Documents . . . . . . . . . . . . . . . . . . . . . . . . . . C
olor high res. 13 seconds
Mono high res. 6 seconds
Color low res. 3 seconds
Mono low res. 2 seconds
Capacity (Based on 1 GB microSD card.
Scan Letter size file, the quantity of scans
00dpi Color – 220 Photos (min)
varies depending on the content complexity.) . . . . . . 6
600dpi Mono – 290 Photos (min)
300dpi Color – 780 Photos (min)
300dpi Mono – 1280 Photos (min)
Scan Width . . . . . . . . . . . . . . . . . . . . . . . . . . . . . . . . . . . . . 8.27"
Scan Length . . . . . . . . . . . . . . . . . . . . . . . . . . . . . . . . . . . 3
00dpi – 50" (max),
600dpi –25" (max)
File Format . . . . . . . . . . . . . . . . . . . . . . . . . . . . . . . . . . . . . JPEG
12
Specifications (continued)
LCD . . . . . . . . . . . . . . . . . . . . . . . . . . . . . . . . . . . . . . . . . . . Scanning Status Display
Auto Power Off . . . . . . . . . . . . . . . . . . . . . . . . . . . . . . . . . 3 Minutes
USB Port . . . . . . . . . . . . . . . . . . . . . . . . . . . . . . . . . . . . . . USB 2.0 High Speed
External Memory . . . . . . . . . . . . . . . . . . . . . . . . . . . . . . . . microSD Card
Standard Battery . . . . . . . . . . . . . . . . . . . . . . . . . . . . . . . . 2 AA Alkaline Batteries
13
Computer System Minimum Requirements
Computer Requirements . . . . . . . . . . . . . . . . . . . . . . . . P
C with Windows® XP SP2/
Vista/7 and Mac® OS X 10.4
or higher
Operating System for Use
indows® XP SP2/Vista/7
with OCR Software . . . . . . . . . . . . . . . . . . . . . . . . . . . . . W
Not Mac® compatible
CPU . . . . . . . . . . . . . . . . . . . . . . . . . . . . . . . . . . . . . . . . . . . Pentium® II or above
RAM . . . . . . . . . . . . . . . . . . . . . . . . . . . . . . . . . . . . . . . . . . . 64MB
Interface . . . . . . . . . . . . . . . . . . . . . . . . . . . . . . . . . . . . . . . USB 2.0 Port
Windows is a registered trademark of Microsoft Corporation.
Mac is a trademark of Apple Inc., registered in the U.S. and other countries.
Pentium is a trademark of Intel Corporation in the U.S. and other countries.
14
Troubleshooting
15
Problem
Possible cause
Cannot turn on
the scanner.
Low battery or the
battery was not
installed properly.
Replace or install
the battery properly.
Pictures cannot be
saved when you are
scanning them.
The microSD card has
not been inserted or
formatted properly,
or the memory is full.
Insert a microSD card.
Download the pictures already
on the card to your computer.
Format the microSD card
following the instructions on
page 5.
Computer does not
recognize the scanner
when connected
(you cannot find the
removable disk).
Connection failure.
Make sure the Scanner is
compatible with your computer
operating system. Make sure
all cable connections are secure.
Restart the computer if
necessary.
The battery life
is very short.
Using the wrong
type of battery.
Replace batteries with
2 new AA alkaline batteries.
Solution
Troubleshooting
Problem
Possible cause
Solution
Blurry images.
The lens of the scanner
is dirty, or the scanner
is not being held still
while scanning.
Clean the lens with a soft,
dry cloth and try scanning
again with a steadier motion.
ERR. is on the
LED screen when
scanning a document.
Scanning speed
is too fast.
Press the POWER/SCAN
button again and try
re-scanning the document
more slowly.
16
One (1) Year Limited Warranty
Brookstone® warrants this product against defects in materials and/or workmanship
under normal use for a period of ONE (1) YEAR from the date of purchase by the
original purchaser (“Warranty Period”). If a defect arises and a valid claim is received
within the Warranty Period, at its option, Brookstone will either 1) repair the defect
at no charge, using new or refurbished replacement parts, or 2) replace the product
with a new product that is at least functionally equivalent to the original product, or
3) provide a store credit in the amount of the purchase price of the original product.
A replacement product or part, including a user-installable part installed in accordance
with instructions provided by Brookstone, assumes the remaining warranty of the
original product. When a product or part is exchanged, any replacement item becomes
your property and the replaced item becomes Brookstone’s property. When a store
credit is given, the original product must be returned to Brookstone and becomes
Brookstone’s property.
Obtaining Service: To obtain warranty service, call Brookstone Limited Warranty Service at
1-800-292-9819. Please be prepared to describe the product that needs service and
the nature of the problem. A purchase receipt is required. All repairs and replacements
must be authorized in advance. Service options, parts availability and response times
will vary. You are responsible for delivery and the cost of delivery of the product or any
parts to the authorized service center for replacement, per our instructions.
Limits and Exclusions: Coverage under this Limited Warranty is limited to the United
States of America, including the District of Columbia and the U.S. Territories of
Guam, Puerto Rico, and the U.S. Virgin Islands. This Limited Warranty applies only
to products manufactured for Brookstone that can be identified by the “Brookstone”
trademark, trade name, or logo affixed to them or their packaging. The Limited
Warranty does not apply to any non-Brookstone products. Manufacturers or
suppliers other than Brookstone may provide their own warranties to the purchaser,
17
but Brookstone, in so far as permitted by law, provides these products “as is.”
This warranty does not apply to: a) damage caused by failure to follow instructions
relating to product’s use or the installation of components; b) damage caused by
accident, abuse, misuse, fire, floods, earthquake or other external causes; c) damage
caused by service performed by anyone who is not a representative of Brookstone;
d) accessories used in conjunction with a covered product; e) a product or part
that has been modified to alter functionality or capability; f) items intended to be
periodically replaced by the purchaser during the normal life of the product including,
without limitation, batteries or light bulbs; g) any product sold “as is” including, without
limitation, floor demonstration models and refurbished items; or h) a product that is
used commercially or for a commercial purpose.
Brookstone SHALL NOT BE LIABLE FOR INCIDENTAL OR CONSEQUENTIAL
DAMAGES RESULTING FROM THE USE OF THIS PRODUCT, OR ARISING
OUT OF ANY BREACH OF THIS WARRANTY. TO THE EXTENT PERMITTED BY
APPLICABLE LAW, BROOKSTONE DISCLAIMS ANY AND ALL STATUTORY OR
IMPLIED WARRANTIES, INCLUDING, WITHOUT LIMITATION, WARRANTIES
OF MERCHANTABILITY, FITNESS FOR A PARTICULAR PURPOSE AND
WARRANTIES AGAINST HIDDEN OR LATENT DEFECTS. IF BROOKSTONE
CANNOT LAWFULLY DISCLAIM STATUTORY OR IMPLIED WARRANTIES, THEN
TO THE EXTENT PERMITTED BY LAW, ALL SUCH WARRANTIES SHALL BE
LIMITED IN DURATION TO THE DURATION OF THIS EXPRESS WARRANTY.
Some states disallow the exclusion or limitation of incidental or consequential damages
or how long an implied warranty lasts, so the above exclusions or limitations may not
apply to you. This warranty gives you specific legal rights and you may also have other
rights, which vary from state to state.
18
Merrimack, New Hampshire USA 03054 • 800-846-3000 • www.Brookstone.com
653782