1
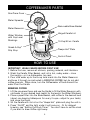
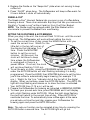
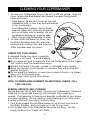
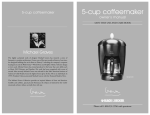
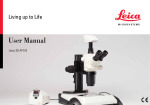
10-cup
coffeemaker
owner's manual
SAVE THIS USE AND CARE BOOK
MGD300
*
Please call 1-800-231-9786 with questions.
IMPORTANT SAFEGUARDS
When using electrical appliances, in order to reduce the risk of fire, electric
shock, and/or injury, basic safety precautions should always be followed,
including the following:
PLEASE READ ALL INSTRUCTIONS.
■ Do not touch hot surfaces. Use handles or knobs.
■ To protect against fire, electric shock, or injury, do not place cord, plug
or Coffeemaker base in water or other liquid.
■ WARNING: To reduce the risk of fire or electric shock, do not remove
the bottom cover from the Coffeemaker. There are no user-serviceable
parts inside. Repairs should be done by authorized personnel only.
■ Close supervision is necessary when any appliance is used by or near children.
■ Unplug when Coffeemaker is not in use and before cleaning. Allow to cool
before putting on or taking off parts and before cleaning the Coffeemaker.
■ Do not operate Coffeemaker without water in the reservoir before brewing.
■ Do not operate any appliance with a damaged cord or plug or after the
appliance malfunctions or is dropped or damaged in any manner. If
the product requires attention within the warranty period, call the tollfree number listed on the cover of this manual for information on
examination, repair, or electrical or mechanical adjustment.
■ To avoid an electrical overload, do not operate another high-wattage
appliance on the same circuit with this Coffeemaker.
■ The use of an accessory not approved for operation with this
Coffeemaker may result in fire, electric shock, or injury.
■ Do not use outdoors.
■ Do not let cord hang over the edge of table or counter, or come in
contact with hot surfaces.
■ Do not store anything directly on top of the appliance surface.
■ Keep the lid on the serving carafe when in use.
■ Do not place carafe on or near a hot gas or electric range top burner or
in a heated oven.
■ Use the “Keeps Hot” plate only. Do not heat the carafe on a range top
or in a microwave oven.
■ Do not set a hot carafe down on a wet or cold surface.
■ Do not use the carafe if the glass is cracked or has a loose or weakened handle.
■ Allow basket to cool before removing it from the Coffeemaker.
■ Do not clean the carafe with cleansers, steel wool, or other abrasives.
■ Do not use this Coffeemaker for anything other than its intended use.
■ Do not pour liquid other than water or the cleaning solution specified in
this manual into the water reservoir.
2
■ Remember to place the carafe on the “Keeps Hot” plate before brewing
and when using the automatic timer on clock models.
■ Do not operate any electric appliance in the presence of explosive
and/or flammable fumes.
■ This product is intended for household use ONLY and not for
commercial or industrial use. Use for anything other than intended will
void the warranty.
SAVE THESE INSTRUCTIONS
POLARIZED PLUG
This appliance has a polarized plug—one blade is wider than the other. As
a safety feature, this plug will fit into a polarized outlet only one way. If the
plug does not fit fully into the outlet, reverse it and try again. If it still does
not fit, contact an electrician. Do not attempt to defeat this safety feature.
SOFT-GRIP HANDLES
NOTE: The rubberized handles are free of natural rubber and latex. They
are safe for use by individuals allergic or sensitive to these materials.
TAMPER-RESISTANT SCREW
This appliance is equipped with a tamper-resistant screw to prevent
removal of the bottom cover. To reduce the risk of fire or electric shock,
do not attempt to remove the bottom cover. There are no user serviceable
parts inside. Repair should be done only by authorized service personnel.
ELECTRICAL CORD
The cord length of this Coffeemaker was selected to reduce safety hazards
that may occur with a longer cord. If more cord length is needed, an
extension cord with a polarized plug may be used. It should be rated not
less than 10 amperes, 120 Volts, and have Underwriters Laboratories
listing. When using a longer cord, be sure it does not drape over a
working area or dangle where it could be pulled on or tripped over.
Handle cord carefully for longer life; avoid jerking or straining it at outlet
and appliance connections.
WARNING
RISK OF FIRE OR ELECTRIC SHOCK. DO NOT OPEN.
The lightning symbol refers to “dangerous voltage;” the exclamation symbol
refers to maintenance instructions. See below.
WARNING: To reduce the risk of fire or electric shock, do not remove the cover of
the coffeemaker. There are no user-servicable parts inside. Repair should be done
by authorized service personnel only.
3
COFFEEMAKER PARTS
One-Piece Cover
Water Spreader
Removable Brew Basket
Water Reservoir
Hinged Carafe Lid
Water Window
with Cup Level
Markings
10-Cup/50 oz. Carafe
Sneak-A-Cup®
Drip Stop
"Keeps Hot" Plate
Control Panel
HOW TO USE
IMPORTANT: WASH CARAFE BEFORE FIRST USE!
1. Before first use, remove all stickers, packing material, and literature.
2. Wash the Carafe, Filter Basket, and Lid in hot, sudsy water—rinse
thoroughly—or in a dishwasher, top rack.
3. Pour cold water up to the 8-cup level mark into the Water Reservoir
and brew it through as instructed in BREWING COFFEE, but do not add
coffee grounds. When done, turn the Coffeemaker off and discard the
water from the Carafe.
BREWING COFFEE
1. Lift the one-piece Cover and use the Carafe to fill the Water Reservoir with
cold water to your desired level (watch for the level in the Water Windows).
2. Place a paper filter into the Brew Basket, add coffee to the desired level
(about one heaping tablespoon for every 2 cups—adjust to your taste)
and close the Cover.
3. Sit the Carafe with its Lid on the “Keeps Hot” plate and plug the unit in.
4. Press “On/Off” and the light under it will come on. Or for delayed
brewing, see “Setting the Clock Timer.” You don’t have to set the clock
if you want to brew coffee right away.
4
5. Replace the Carafe on the “Keeps Hot” plate when not serving to keep
coffee hot.
6. Press “On/Off” when done. The Coffeemaker will keep coffee warm for
2 hours before it shuts off automatically.
SNEAK-A-CUP®
The Sneak-a-Cup® Interrupt Feature lets you pour a cup of coffee before
brewing is done. There is an automatic drip stop that lets you remove the
Carafe to "sneak-a cup" without leaking from the Filter Basket.
NOTE: The Carafe must be replaced under the Filter Basket within
one minute to prevent the Basket from overflowing.
SETTING THE CLOCK/TIMER & AUTO BREWING
When you plug in the unit, the clock will flash 12:00 a.m. until the correct
time is set. The Coffeemaker will work without setting the clock.
1. To set the current time of day: press the HOUR button until you
reach the correct hour. Watch for the
little dot in the top left corner of
the display that indicates "p.m."
time. Press the MINUTES
button to set the correct
minutes. (A) Once set, the
clock will continue to keep
time unless the Coffeemaker
is unplugged or there is a
power failure. If not set, the clock
A
will continue flashing 12:00 a.m.
2. To set the auto on time: press the PROGRAM button and the light
under the AUTO ON button will start flashing indicating it is being
programmed. Press the HOUR, then MINUTES buttons to set the time
you’d like coffee to automatically begin brewing (for example 7:15
a.m.). Watch for the "p.m." indicator dot at the top left of the digital
display. When you’re done, press the AUTO ON button. The AUTO ON
light will stop flashing and remain on to show the timer is activated.
Your AUTO ON time (7:15 a.m.) will be set.
3. Prepare the Coffeemaker for brewing as instructed in BREWING COFFEE.
4. To check your pre-set auto time, press PROGRAM and it will display
with a light flashing under AUTO ON. When the light stops flashing,
the clock will return to the current time of day. Press AUTO ON to
reactivate the timer. To automatically brew coffee again at the same
pre-set auto-on time the next day, prepare your Coffeemaker for
brewing again and press the AUTO ON button.
Note: The auto-on function can be canceled at any time by pressing the
AUTO ON button a second time. The AUTO ON light will go out.
5
CLEANING YOUR COFFEEMAKER
1. To clean your Coffeemaker, be sure the unit is OFF and cooled. Open the
Cover, remove the Brew Basket, and discard the paper filter/grounds.
Clean as follows:
• Filter Basket, Carafe, and Lid are all top rack
dishwasher-safe; or they may be hand washed
in hot, sudsy water.
• The Coffeemaker’s exterior, Control Panel
area and “Keeps Hot” plate may be cleaned
with a soft damp cloth or sponge. Do not
use abrasive cleansers or scouring pads.
Never immerse the Coffeemaker in water.
2. To clean inside the Reservoir Cover, pull
the Water Spreader down (B), wipe the
surfaces with a damp cloth, and snap the
Water Spreader back into place.
B
CARING FOR YOUR CARAFE
A damaged Carafe may result in possible
burns from a hot liquid. To avoid breaking:
■ Do not allow all liquid to evaporate from the Carafe while on the “Keeps
Hot” plate or heat the Carafe when empty.
■ Discard the Carafe if chipped, cracked, or damaged in any manner.
■ Never use abrasive scouring pads or cleansers, they will scratch and
weaken the glass.
■ Do not place the Carafe on or near a gas or electric burner, in a heated
oven, or in a microwave oven.
■ Avoid rough handling and sharp blows.
NOTE: TO ORDER A REPLACEMENT OR ADDITIONAL CARAFE, CALL
1-800-258-6003.
MINERAL DEPOSITS AND CLOGGING
Mineral deposits left by hard water can clog your Coffeemaker. Excessive
steaming or a prolonged brewing cycle are signs that a cleaning is
needed. The frequency of flushing out deposits is affected by your usage
and water hardness. During cleaning, more steaming occurs than when
brewing coffee and there may be some spitting.
1. Pour white vinegar into the Water Reservoir up to the 4-cup level on
the Water Window. Add cold water up to the 10-cup mark.
2. Put a paper filter in the Filter Basket and close the Cover. Set the
empty Carafe on the “Keeps Hot” Plate.
6
3. Turn the Coffeemaker on and let half the cleaning solution brew into the
Carafe (till water level goes down to around “2”). Turn the Coffeemaker
off and let it soak for at least 15 minutes to soften the deposits.
4. Turn the Coffeemaker on and brew the remaining cleaning solution
into the Carafe.
5. Turn the Coffeemaker off; empty the Carafe and discard the soiled filter.
6. Fill the Reservoir with cold water to the 10-cup line, replace the empty
Carafe, then turn on the Coffeemaker for a complete brew cycle to flush
out the remaining cleaning solution. You may have to repeat this to
eliminate the vinegar smell/taste.
7. Wash the Filter Basket and Carafe as instructed in “Cleaning
Your Coffeemaker.”
SERVICE OR REPAIR
Need Help?
For service, repair, a replacement Carafe, or any questions regarding your
appliance, call the “800” number on the cover of this book. Do NOT
return the product to the place of purchase. Do NOT mail the product
back to the manufacturer nor bring it to a service center. You may also
want to consult the website listed on the cover of this manual.
FULL ONE-YEAR WARRANTY
Applica warrants this product against any defects that are due to faulty
material or workmanship for a one-year period after the original date of
consumer purchase. This warranty does not include damage to the
product resulting from accident, misuse, or repairs performed by
unauthorized personnel. If the product should become defective within
the warranty period, or you have questions regarding warranty or service,
call Consumer Assistance and Information toll free at: 1-800-231-9786.
This warranty gives you specific legal rights and you may also have
other rights which vary from state to state.
UL
®
*
Listed by Underwriters Laboratories, Inc.
Copyright © 2000 Applica Consumer Products, Inc.
Pub No. 175557-00-RV00
Printed in People’s Republic of China
is a trademark of The Black & Decker Corporation, Towson, Maryland, U.S.A.
7
10-cup
coffeemaker
Michael Graves
The highly acclaimed work of designer Michael Graves has restored a sense of
humanity to modern architecture. Graves, one of the most noted architects of our
time, has designed buildings for such clients as Disney,TM including the company’s
corporate headquarters and the Walt DisneyTM World Swan and Dolphin Hotels.
Gifted in design at every scale, Michael Graves has created products for the home that
carry labels such as Alessi, FAO Schwarz, and Steuben. His work has been recognized
with scores of awards, including the 1999 National Medal of Arts presented by the
National Endowment for the Arts.
The Michael Graves Collection provides an inspired balance of form and function.
Sensible and sublime, practical and whimsical, the objects envisioned by this worldrenowned architect infuse our daily lives with joy.