1
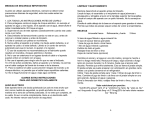
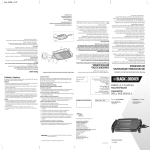
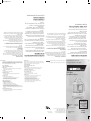
Printed on recycled paper. Impreso en papel reciclado. 2008/8-27-76E/S Copyright © 2008 Applica Consumer Products, Inc. Made in People’s Republic of China Printed in People’s Republic of China Fabricado en la República Popular de China Impreso en la República Popular de China Accessories/Parts (USA/Canada) Accesorios/Partes (EE.UU/Canadá) 1-800-738-0245 www.prodprotect.com/applica USA/Canada 1-800-231-9786 Mexico 01-800-714-2503 Model Modelo ❑ CJ630 Registre su producto por Internet en www.prodprotect.com/applica y tendrá la oportunidad de GANAR $100,000! Solamente para residentes de EE,UU Register your product online at www.prodprotect.com/applica, for a chance to WIN $100,000! For US residentes only How does state law relate to this warranty? • This warranty gives you specific legal rights, and you may also have other rights that vary from state to state or province to province. Esta garantía no cubre: • Los productos que han sido utilizados en condiciones distintas a las normales • Los daños ocasionados por el mal uso, el abuso o negligencia • Los productos que han sido alterados de alguna manera • Los daños ocasionados por el uso comercial del producto • Los productos utilizados o reparados fuera del país original de compra • Las piezas de vidrio y demás accesorios empacados con el aparato • Los gastos de tramitación y embarque asociados al reemplazo del producto • Los daños y perjuicios indirectos o incidentales. Citrus Juicer Exprimidor de cítricos ¿Cómo se puede obtener servicio? • Conserve el recibo original de compra. • Por favor llame al número del centro de servicio autorizado. ¿Por cuánto tiempo es válida la garantía? • Por un año a partir de la fecha original de compra. ¿Qué cubre la garantía? • La garantía cubre cualquier defecto de materiales o de mano de obra. Applica no se responsabiliza por ningún costo que exceda el valor de compra del producto. Un año de garantía limitada (No aplica en México, Estados Unidos o Canadá) Por favor lea este instructivo antes de usar el producto Please Read and Save this Use and Care Book IMPORTANT SAFEGUARDS Marca registrada de The Black & Decker Corporation, Towson, Maryland, E.U. is a trademark of The Black & Decker Corporation, Towson, Maryland, USA When using any electrical appliance, basic safety precautions should always be followed, including the following: ❑Read all instructions. ❑To protect against risk of electrical shock, do not immerse cord, plug or base unit in water or other liquid. ❑Close supervision is necessary when any appliance is used by or near children. ❑Unplug from the outlet when not in use, before putting on or taking off parts and before cleaning. ❑Avoid contact with moving parts. ❑Do not operate appliance if it has a damaged cord or plug, or after the appliance malfunctions or is dropped or damaged in any manner. Return this appliance to an authorized service center for examination, repair or electrical or mechanical adjustment. ❑The use of accessories or attachments not recommended by the manufacturer may cause fire, electric shock or injury. ❑Do not use outdoors. ❑Do not let cord hang over edge of the table or counter. ¿NECESITA AYUDA? Para servicio, reparaciones o preguntas relacionadas al producto, por favor llame al número del centro de servicio en el país donde usted compró su producto. NO devuelva el producto al fabricante. Llame o lleve el producto a un centro de servicio autorizado. POLARIZED PLUG (120V Models Only) This appliance has a polarized plug (one blade is wider than the other). To reduce the risk of electric shock, this plug is intended to fit into a polarized outlet only one way. If the plug does not fit fully into the outlet, reverse the plug. If it still does not fit, contact a qualified electrician. Do not attempt to modify the plug in any way. ELECTRICAL CORD a) A short power-supply cord (or detachable power-supply cord) is to be provided to reduce the risk resulting from becoming entangled in or tripping over a longer cord. b)Longer detachable power-supply cords or extension cords are available and may be used if care is exercised in their use. c) If a long detachable power-supply cord or extension cord is used, 1)The marked electrical rating of the detachable power-supply cord or extension cord should be at least as great as the electrical rating of the appliance, 2)If the appliance is of the grounded type, the extension cord should be a grounding-type 3-wire cord, and 3)The longer cord should be arranged so that it will not drape over the countertop or tabletop where it can be pulled on by children or tripped over. Note: If the power supply cord is damaged, it should be replaced by qualified personnel. In Latin America, by an authorized service center. SAVE THESE INSTRUCTIONS. This product is for household use only. INSTRUCCIONES IMPORTANTES DE SEGURIDAD Al utilizar cualquier aparato eléctrico siempre deben tomarse precauciones básicas de seguridad, incluyendo las siguientes: ❑Lea todas las instrucciones. ❑A fin de protegerse contra el riesgo de un choque eléctrico, no sumerja el cable, el enchufe o la base del aparato en agua o cualquier otro líquido. ❑La supervisión de un adulto es necesaria cuando el aparato es utilizado por niños o cerca de ellos. ❑Desconecte el aparato de la toma de corriente cuando no esté en funcionamiento, antes de instalar o retirar las piezas y antes de limpiarlo. ❑Evite el contacto con piezas o partes en movimiento. ❑No opere este artefacto si tiene el cable o enchufe dañado, después de un mal funcionamiento o si se ha caído o dañado de alguna manera. Lleve el aparato a un centro de servicio autorizado para su revisión, reparación o ajuste eléctrico o mecánico. ❑El uso de accesorios no recomendados por el fabricante del aparato podría ocasionar incendios, choques eléctricos o lesiones personales. ❑Este aparato no se debe utilizar a la intemperie. ❑No permita que el cable cuelgue del borde de la mesa ni del mostrador. What does your warranty not cover? • Damage from commercial use • Damage from misuse, abuse or neglect • Products that have been modified in any way • Products used or serviced outside the country of purchase • Glass parts and other accessory items that are packed with the unit • Shipping and handling costs associated with the replacement of the unit • Consequential or incidental damages (Please note, however, that some states do not allow the exclusion or limitation of consequential or incidental damages, so this limitation may not apply to you.) How do you get service? • Save your receipt as proof of the date of sale. • Check our on-line service site at www.prodprotect.com/applica, or call our toll-free number, 1-800-231-9786, for general warranty service. • If you need parts or accessories, please call 1-800-738-0245. What will we do to help you? • Provide you with a reasonably similar replacement product that is either new or factory refurbished. For how long? • One years after the date of original purchase. What does it cover? • Any defect in material or workmanship; provided; however, Applica’s liability will not exceed the purchase price of the product. One-Year Limited Warranty (Applies only in the United States and Canada) NEED HELP? For service, repair or any questions regarding your appliance, call the appropriate 800 number on the cover of this book. Do not return the product to the place of purchase. Also, please Do not mail product back to the manufacturer, nor bring it to a service center. You may also want to consult the website listed on the cover of this manual. ENCHUFE POLARIZADO (Solamente para los modelos de 120V) Este aparato cuenta con un enchufe polarizado (un contacto es más ancho que el otro). A fin de reducir el riesgo de un choque eléctrico, este enchufe encaja en una toma de corriente polarizada en un solo sentido. Si el enchufe no entra en la toma de corriente, inviértalo y si aun así no encaja, consulte con un electricista. Por favor no trate de alterar esta medida de seguridad CABLE ELÉCTRICO a) El producto debe proporcionarse con un cable corto (o uno desmontable)para reducir el riesgo de enredarse o de tropezar con un cable largo. b) Se encuentran disponibles cables desmontables o de extensión más largos, que es posible utilizar si se emplea el cuidado debido. c) Si se utiliza un cable desmontable o de extensión, 1) El voltaje eléctrico del cable desmontable o del cable de extensión debe ser, como mínimo, igual al del voltaje del aparato, 2) Si el aparato es del tipo que va connectado a tierra, el cable de extensión deberá ser un cable de tres alambres connnectado a tierra. 3) El cable más largo debe acomodarse de modo que no cuelgue del mostrador o de la mesa, para evitar que un niño tire del mismo o que alguien se tropiece. Nota: Si el cordón de alimentación esta dañado, en América Latina debe sustituirse por personal calificado o por el centro de servicio autorizado. CONSERVE ESTAS INSTRUCCIONES. Este aparato eléctrico es para uso doméstico únicamente. Size: 19.685" x 17.5" Size: 19.685" x 17.5" Product may vary slightly from what is illustrated. Este producto puede variar ligeramente del que aparece ilustrado. †1. Storage cover (Part # CJ630-01 ) †2. Large self-reversing cone (Part # CJ630-02 ) †3. Small self-reversing cone with stirrers (Part # CJ630-03 ) †4. Strainer with adjustable pulp control (Part # CJ630-04 ) 5. Handle †6. Clear-view, 1-Liter (34-oz.) container (Part # CJ630-05 ) 7. Base stem 8. Base 9. Built-in cord wrap Note: † indicates consumer replaceable/removable parts †1. Tapa de almacenamiento (Pieza N° CJ630-01 ) †2. Cono grande autorreversible (Pieza N° CJ630-02 ) †3. Cono pequeño autorreversible, con agitador (Pieza N° CJ630-03 ) †4. Colador con control de pulpa ajustable (Pieza N° CJ630-04 ) 5. Asa †6. Jarra transparente de 1 litro (34-oz.) (Pieza N° CJ630-05 ) 7. Soporte de la base 8. Base 9. Guardacable Nota: † indica piezas desmontables/reemplazables por el consumidor 5. Adjust the pulp control to the desired amount of pulp in your juice (F). Assembling your Juicer 1. Place the base stem through the container until the container rests on the base (A). 1.Inserte el soporte de la base a través del recipiente hasta que este último quede colocado sobre la base (A). 6. Cut fruit in half (examples: orange, lime, lemon or grapefruit). F 5. Ajuste el control de pulpa a la cantidad deseada en el jugo (F). Cómo armar el exprimidor 7. Place the cut-side of the fruit on top of the self-reversing cone. 6. Corte la fruta a la mitad (ejemplos: naranjas, limas, limones, toronjas o pomelos). F 8. Ejerciendo presión moderada a firme, presione la fruta hacia abajo para comenzar la extracción de jugo (G). 8. Using firm-to-moderate pressure, press down on the fruit to start the juicing action (G). 9. El exprimidor dejará de girar cuando se deje de ejercer presión. 9. Release pressure to stop the self-reversing cone from rotating. A Important: The motor stops automatically when the pressure is completely released. 2.Secure the container to the base (B). 3.Place the strainer on top of the container, with the pulp control tab directly on top of the handle (C). 10.Cuando presione la fruta nuevamente, el cono girará en dirección opuesta. G 11. Para continuar exprimiendo jugo, retire la fruta usada y repita los pasos 6 a 10. Important: The motor stops automatically when you remove the fruit from the cone. 12. Cuando termine de exprimir jugo, retire la fruta del cono. 14. To serve or pour the juice, remove the cone and strainer by lifting them straight up. Importante: El motor se detiene automáticamente al retirar la fruta del cono. B 3.Coloque el colador sobre el recipiente, de forma que el control de pulpa ajustable descanse sobre la parte superior del asa (C). 15. Lift the container straight up and pour the juice. Care and Cleaning Important: If choosing the large self-reversing cone, place it on top of the small self-reversing cone. Insert the notches of the large cone into the stirrers of the small cone until they snap into place (D). D Note: Small cone is recommended for small fruits such as lemons and large cone for larger fruits such as grapefruits. 5. Place the base stem through the cone until the cone rests on top of the strainer (E). 3. Immediately rinse the cone and strainer with water after each use. C 4. Lift the container straight up. 7. Wipe the base with a damp cloth or sponge; do not immerse in water or place in the dishwasher. D 8. Dry all parts before reassembling your juicer (see Assembling your Juicer section). To Store: 4.Seleccione un cono autorreversible. Nota: El cono pequeño se recomienda para frutas pequeñas, como limones, y el grande para frutas grandes, como toronjas o pomelos. 5.Inserte el soporte de la base a través del cono hasta que éste último quede colocado sobre el filtro (E). 2. Wrap the cord around the base of the unit. E 4. Place storage cover over the juicer to keep it dust free. 1. Desenchufe siempre el aparato antes de limpiarlo o cuando no lo esté utilizando. 2. Retire la tapa (en el primer uso), el cono y el filtro del recipiente. 3. Lave el cono y el filtro con agua inmediatamente después de cada uso. 4. Alce el recipiente sin inclinarlo. 5. Lave todas las piezas desmontables (tapa, conos, filtro y recipiente) en agua tibia o en la bandeja superior de la máquina lavaplatos. 6. Retire la pulpa pequeña que puede quedar en el filtro con un cepillo de cerdas. 7. Pase un paño húmedo o esponja a la base; no la sumerja en agua ni la coloque en la máquina lavaplatos. 8. Las piezas deben estar secas antes de volver a armar el exprimidor (consulte la sección Cómo armar el exprimidor). 1. Unplug the unit. 3. Before reassembling your juicer, make sure all parts are dry (see Assembling your Juicer section). 15. Levante el recipiente sin inclinarlo y sirva el jugo. Para limpiar: Importante: Si selecciona el cono grande, colóquelo sobre el cono pequeño. Inserte las muescas del cono grande en los agitadores del cono pequeño hasta que encajen en su lugar (D). 5. Use warm, sudsy water to wash all removable parts (cover, cones, strainer and container) or place them in the dishwasher — top rack ONLY. 6. Use a bristle brush to remove fine pulp that may remain on the strainer. 14. Para servir o verter el jugo, retire el cono y el colador alzándolos directamente hacia arriba. Este producto no contiene piezas reparables por el consumidor. Toda reparación se debe llevar a cabo por personal de servicio autorizado. 1. Always unplug the unit before cleaning or when not in use. 2. Remove the cover (first time use), cone and strainer from the container by liftingthem straight up. 13. Desconecte el cable del tomacorriente. Cuidado y limpieza To Clean: 4.Choose a self-reversing cone. Nota: Repita los pasos 8 a 10 varias veces para obtener los mejores resultados. 12. When done juicing, remove the fruit from the cone. This product contains no user serviceable parts. Refer service to qualified service personnel. C Importante: El motor se detiene automáticamente cuando no se ejerce más presión. 2.Asegure el recipiente a la base (B). 11.To continue juicing, remove used fruit and repeat steps 6-10. 13. Unplug the cord from the standard electrical outlet. B A 10.Press down on the fruit again and the self-reversing cone will start rotating in the opposite direction. Note: Repeat steps 8-10 several times for best juicing results. G 7. Coloque el lado cortado de la fruta sobre el cono autorreversible. Para guardar: E 1. Desenchufe el aparato. 2. Enrolle el cable alrededor de la base. How to Use Como usar 3. Antes de volver a armar el exprimidor asegúrese de las piezas estén secas (consulte la sección Cómo armar el exprimidor). This product is for household use only. Este producto está diseñado únicamente para uso doméstico. 4. Colóquele la funda al aparato para mantenerlo sin polvo. 1. Wash all parts as instructed in the Care and Cleaning section. 1. Lave todas las piezas según las instrucciones de la sección Cuidado y limpieza. 2. Assemble your juicer as instructed in the Assembling your Juicer section. 3. Unwrap the cord from the base. 2. Arme el exprimidor según las instrucciones de la sección Cómo armar el exprimidor. 4. Plug the cord into a standard electrical outlet. 3. Desenrolle el cable de la base. 4. Conecte el cable a un tomacorriente estándar.