1
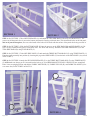
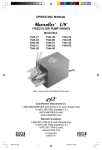
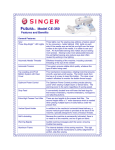
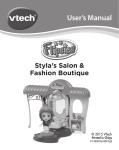
ASSEMBLY INSTRUCTIONS
Adult Assembly Required
Save these instructions for future use.
This item is a toy for dolls only.
For children ages three (3) years and older.
CARE INSTRUCTIONS:
MODEL #: 01835
NAME:
Wipe the cradle clean with a damp cloth and mild soap
as needed. Fabric parts are poly/cotton. We recommend
spot cleaning or hand wash and air dry as needed.
Heirloom Style Doll Cradle
TOOLS NEEDED:
Allen Wrench (included)
You can use your own power screwdriver
with allen head, but be careful not to strip
the screws or damage the product.
A
G
B
PARTS INCLUDED:
(A) 2 - End Panels
(B) 2 - Side Rails
(C) 14 - Bolts (not shown)
(D) 1 - Bottom Panel
(E) 2 - Side Panels
(F) 3 - Bottom Rails
(G) 1 - Fabric Mattress
(H) 1 - Fabric Pillow
(I) 1 - Fabric Blanket
D
F
H
BEFORE YOU BEGIN
ASSEMBLY:
Ensure that all the parts and
hardware listed above are included.
If anything is missing, please do
not return the product to the store.
Call or e-mail us for assistance.
I
E
PICTURE 5
WARNING !!
Not for children under three (3) years of age.
Please make sure children know that this
furniture is for dolls and stuffed animals
only. It is not to be used with real infants
or with pets. Children should NEVER
attempt to sit or stand on the cradle.
Visit us online at www.badgerbasket.com
Page 1 of 2
Toll-Free Customer Service: 1-800-236-1310 (Monday through Thursday 7:30 AM to 4:30 PM CST)
[email protected]
PLANT AND GENERAL OFFICE: PO Box 227, Edgar, WI 54426-0227 715-352-2311 Fax: 715-352-3163
CORPORATE OFFICE: 111 Lions Dr., Suite 220, Barrington, IL 60010
1.0/0605
A
B
D
B
PICTURE 1
A
PICTURE 2
STEP 1: See PICTURE 1. Take ONE END PANEL (A) and attach the TWO SIDE RAILS (B) using FOUR BOLTS (C). The
grooves on all the panels face in, are on the bottom, and must be lined up with each other. The countersunk holes on the end panel,
and on all panels throughout, face out so the heads of the bolts will be flush with the surface of the panel after being screwed in.
STEP 2: See PICTURE 2. Slide the BOTTOM PANEL (D) into the grooves on the SIDE RAILS (B) and END PANEL (A). Be
sure it is fully seated into the grooves on all three sides. The white side faces up. Attach the SECOND END PANEL (A) to the
TWO SIDE RAILS (B) using FOUR BOLTS (C).
STEP 3: See PICTURE 3. Take ONE SIDE PANEL (E) and attach the THREE BOTTOM RAILS (F) using THREE BOLTS (C).
Place the cradle assembly into position by inserting the peg on the SIDE PANEL (E) into the hole on the END PANEL (A) (circled
in PICTURE 3).
STEP 4: See PICTURE 4. Attach the SECOND SIDE PANEL (E) to the THREE BOTTOM RAILS (F) using THREE BOLTS
(C) AND make sure the peg on E is inserted into the hole on A. Your HEIRLOOM STYLE DOLL CRADLE is now assembled!
Place it into an upright position, and add the FABRIC MATTRESS (G), FABRIC PILLOW (H), and FABRIC BLANKET (I) for
even more fun (see PICTURE 5 on PAGE 1)!
A
F F
E
F
E
A
Page 2 of 2
PICTURE 3
PICTURE 4
1.0/0605