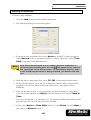
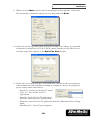
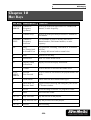
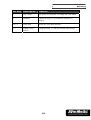
1
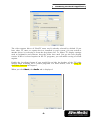
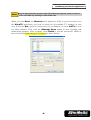
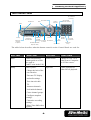
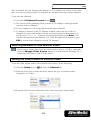
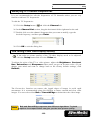
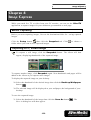
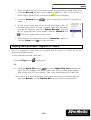
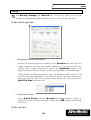
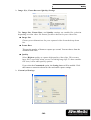
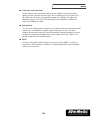
UltraTV 1500 MCE
User’s Manual
-English-
Table of Contents
Chapter 1 Introduction......................................................................................................................1
Chapter 2 Introducing the UltraTV Application..............................................................................2
Launching the UltraTV Application....................................................................................................................... 2
Introducing the User Interface............................................................................................................................... 5
The Control Panel ...................................................................................................................................................... 6
Setting for Power Option ......................................................................................................................................... 7
Resizing the TV Monitor Window............................................................................................................................ 8
Changing Skins........................................................................................................................................................... 9
Chapter 3 TV.....................................................................................................................................10
Selecting Between TV Signals (air/cable) or Channel Groups ................................................................... 10
Adding and Deleting Channel Groups............................................................................................................. 10
Memorizing TV Channels ....................................................................................................................................... 11
Excluding Unwanted Channels ........................................................................................................................... 12
Selecting a TV Channel ......................................................................................................................................... 12
Specifying a Channel Name or Description .................................................................................................... 13
Changing the TV Channel Order........................................................................................................................ 13
Locking and Unlocking a TV Channel ............................................................................................................... 14
Adjusting Volume .................................................................................................................................................... 16
Using the OverScan Function............................................................................................................................... 16
16-Channel Preview................................................................................................................................................ 16
Selecting Between TV and External Video....................................................................................................... 17
Setting the Video Format of External Video..................................................................................................... 17
Modifying TV Channel Frequencies ................................................................................................................... 18
Fine tuning Color and Display Quality ............................................................................................................... 18
Chapter 4 Image Capture.................................................................................................................19
Before Capturing ..................................................................................................................................................... 19
Capturing a TV/ Video Image ............................................................................................................................. 19
Multiple Image Sequence Capture ................................................................................................................... 21
Chapter 5 Teletext (for PAL System)..............................................................................................22
Overview.................................................................................................................................................................... 22
Toolbar Buttons......................................................................................................................................................... 23
LED Lamp ................................................................................................................................................................... 24
Using Teletext ............................................................................................................................................................ 24
Chapter 6 Time Shift ........................................................................................................................27
Time Shift Controls.................................................................................................................................................... 27
Customizing Time Shift Settings ............................................................................................................................ 27
Using the Time Shift Function ................................................................................................................................ 28
Chapter 7 DVR .................................................................................................................................30
DVR Controls ............................................................................................................................................................. 30
Recording Programs or Video.............................................................................................................................. 30
Playing the Recorded Programs or Video........................................................................................................ 31
Picture-in-Picture Display ....................................................................................................................................... 32
Setup ........................................................................................................................................................................... 33
Chapter 8 FM Radio.........................................................................................................................38
FM Radio Controls ................................................................................................................................................... 38
How to Auto Scan FM Radio Channels ............................................................................................................. 38
Manually Scanning Specific FM Channels ....................................................................................................... 39
Channel Versus Frequency Selection ................................................................................................................ 40
Selecting a Channel............................................................................................................................................... 40
Selecting a Radio Frequency............................................................................................................................... 40
Skipping Unwanted Channels.............................................................................................................................. 41
Saving a Radio Frequency to a Channel ......................................................................................................... 41
Modifying or Adding FM Radio Channels......................................................................................................... 42
Changing the FM Radio Channel Order .......................................................................................................... 42
Setting the Audio Mode ........................................................................................................................................ 43
Adding and Deleting Channel Groups............................................................................................................. 43
Tuning the FM Radio Frequencies....................................................................................................................... 44
Specifying the Tuning Increment ........................................................................................................................ 44
Recording FM Radio Broadcast .......................................................................................................................... 44
Playing the Recorded Audio................................................................................................................................ 45
Using the FM Time Shift Function.......................................................................................................................... 46
Customizing Audio Recording Settings ............................................................................................................. 46
Chapter 9 Scheduler.........................................................................................................................48
Adding Schedules ................................................................................................................................................... 49
Chapter 10 Hot Keys .......................................................................................................................52
Chapter 11 Customer Service .........................................................................................................54
Chapter 1
Introduction
Chapter 1
Introduction
Convert your computer system into a real multimedia entertainment center with
AVerMedia ® UltraTV series! Now you can watch television, video conference,
and capture still images and video on your PC. If you purchased UltraTV card with
FM capability, you can also listen to FM radio.
Surely, you’ll never miss your favorite ball games, soaps or game shows anymore.
Because AVerMedia ® UltraTV comes with a scheduler wherein you can configure
to show or record your preset TV programs or FM radio broadcasts whenever they are
aired.
-1-
Chapter 2
Introducing the UltraTV Application
Chapter 2
Introducing the UltraTV Application
The UltraTV application allows you to watch TV or video, record still or motion
video, and listen to FM radio on your PC while you work on your computer.
Launching the UltraTV Application
Run the UltraTV application from the Programs menu.
Quick TV Launcher
To run the application, click Start, select Programs, choose UltraTV, and then
click UltraTV. Another way is to double-click the UltraTV program icon on the
desktop. Or, double-click the Quick TV launcher located at the lower right corner of
the screen.
If you are running the application for the first time, a configuration dialog box will
appear, prompting you to adjust settings for your AVerMedia ® UltraTV card.
The configuration dialog box first displays the Video tab where you are prompted to
choose a video capture device driver.
-2-
Chapter 2
Introducing the UltraTV Application
The video capture driver of UltraTV tuner card is already selected by default. If you
have other TV tuner or capture devices installed in your system, you can switch to
another driver by selecting it from the drop-down list. To adjust TV display settings
such as brightness and contrast, drag the slider bars until you get the best display
results. If there is closed caption on the TV programs, you can enable saving of closed
caption.
Enable the OverScan feature if you would like to hide the borders of the TV/video
images while watching the TV/video programs. For more details, refer to Using the
OverScan Function in Chapter 3.
When you click Next, the Audio tab is displayed.
-3-
Chapter 2
Introducing the UltraTV Application
Note
If you purchase the product with DirectSound support, then you don’t
have to make any setting on the Audio tab
When you click Next, the Channel tab is displayed. If this is your first time to use
the UltraTV application, you need to search for all available TV channels in your
area. Select the Ant. option to search only for air channels, or select CATV to scan
for cable channels. Then click the Channel Scan button to start searching and
memorizing channels. After scanning, click Finish to exit the current tab. (Refer to
the section titled Memorizing TV Channels for more details.)
-4-
Chapter 2
Introducing the UltraTV Application
Introducing the User Interface
The TV monitor allows you to watch live TV or video.
Quit
Resize Window
Show/Hide
Panel
Volume
(+)/(-)
Channel
Up/Down
The Control Panel provides button controls for selecting channels, changing
between TV and external video source, capturing images, and more. It has a panel
display that shows the current active video source (e.g. TV, Composite or S-Video),
channel number, and other indicators.
To display the Control Panel, click the button located at the lower left corner of the
TV Monitor.
-5-
Chapter 2
Introducing the UltraTV Application
The Control Panel
16 Channel
Preview
Time Shift
iEPG
Setup
Teletext/
Closed
Caption
Snapshot
Play
Video
Source
Show/Hide
Numeric Panel
Switch
Mute
Audio
Record
Display
Channel
Signal
FM Mode
Up/Down
Strength Volume Scheduler
Radio
Control
Channel
Enable/Disable
Open File
Loop
Repeat Play
Enable/Disable
Playback
PIP Window
The table below describes what the button controls on the Control Panel are used for.
BUTTON
FUNCTION
BUTTON
iEPG
Link to an interactive
Video Source
content guide on a Web
site (such as
TitanTV.com in the U.S.)
Setup
Allows you to:
Open File
* Change the look of the
user interface.
* Fine tune TV display
and audio settings.
* Tune into air/cable
TV.
* Autoscan channels.
* Lock/unlock channel.
* Create channel groups.
* Configure snapshot
settings.
* Customize recording
settings.
* Select Time Shift video
Quality.
-6-
FUNCTION
Change to view TV or
video from a Composite
or S-Video source.
Create a playlist of
video files to playback.
Chapter 2
Introducing the UltraTV Application
BUTTON
FUNCTION
BUTTON
FUNCTION
Teletext/Closed
Caption
Launch Teletext
Application or display
closed caption.
Scheduler
Launch the Scheduler
application.
Enable/Disable
Playback PIP
Window
Playback recorded video
while watching TV in a
picture-in-picture
window. (Create a
playlist first by clicking
the Open File button.)
Show/Hide
Numeric Panel
Toggle between
displaying or hiding the
Numeric Panel.
Enable/Disable
Repeat Play
Continuously play back
the files in the playlist.
Switch Audio
Mode
Choose between the
available types of audio.
Mute
Turn off the sound.
FM Radio
Switch to listening to
FM radio.
Volume Control
Drag your mouse
up/down to
increase/decrease the
volume level.
16 Channel
Preview
Display 16 consecutive
TV channels on the TV
Monitor window.
Record
Record the current TV
show.
Channel Loop
Return to previously
accessed channel.
Time Shift
Performs background
recording of the live TV
program. This function
lets you view the
recorded parts, while at
the same time, recording
is in progress.
Channel
Up/Down
Go to the next upper or
lower active channel.
Snapshot
Capture a single image or Play
a sequence of images.
Play back recorded
video files.
Setting for Power Option
While you will be away from the computer, you can set the time to turn off the
computer or put your computer in Standby or Hibernate mode.
Note
Standby:
Standby is a state in which your monitor and hard disks turn off, so
that your computer uses less power.
Hibernate:
Hibernation is a state in which your computer shuts down to save
power but first saves everything in memory on your hard disk.
-7-
Chapter 2
Introducing the UltraTV Application
To complete the setting:
! Right-click on the TV monitor, point to
Sleep, and choose the power option and an
optimal execution time.
To abort the setting:
! Right-click on the TV monitor, point to Sleep, and choose Cancel Setting.
Description
Cancel Setting
Disable the Sleep function.
Stand by
Now!/30/60/90/120 min
Your computer will go into Standby mode in
Now!/30/60/90/120 minutes.
Hibernate mode
30/60/90/120 min
Your computer will go into Hibernate mode in 30/60/90/120
minutes.
Enter Power off mode
after 30/60/90/120 min
Your computer will be turned off in 30/60/90/120 minutes.
Resizing the TV Monitor Window
To enlarge or reduce the size of the TV Monitor window, click and drag the lower
right edge of the window.
Double-click the TV Monitor window to display it in full screen.
When in full screen mode, double-click anywhere on the
screen to revert to the normal TV window size.
To make the TV Monitor window float over the top of other
program windows, right-click on the TV Monitor, choose
Video Screen and make sure Always on Top is checked.
-8-
Chapter 2
Introducing the UltraTV Application
Changing Skins
If you want to change the look and appearance of the TV Monitor and Control Panel,
do the following:
1. Click the Setup button
.
2. In the Setup dialog box, click the Skin tab.
3. From the Skin drop-down list, select the design you prefer, then click OK.
-9-
Chapter 3
TV
Chapter 3
TV
Selecting Between TV Signals (air/cable) or Channel
Groups
Click the Setup button then click the Channel tab to choose whether to watch
air TV (Ant.) or cable (CATV). If you have added one or more channel groups,
you can also select a group. (Refer to the section titled Adding and Deleting
Channel Groups for more details.)
Adding and Deleting Channel Groups
Selecting a Channel Group allows you to switch between the channels of the selected
group only when pressing the Channel Up/Down button. If you want to add or
delete a channel group, do the following:
To add a new channel group:
1. Click the Setup button
. In the Setup dialog box, click the Group tab.
2. Select the Enable Group option. The New
Group Name dialog box will then appear.
3. Type in a group name and click OK.
4. Choose between Ant. (for air) or CATV (for
cable).
5. Available channels will then be listed in the
Channel column under the Original
Program section. Shift+click or Ctrl+click
channels from the list to select your own
channel line up.
Then, click
to add your selection to the Channel column under the Selected
Program section.
6. To add more groups, click Add and repeat steps 3 to 6.
-10-
Chapter 3
TV
To delete a channel group:
1. Click the Setup button
. In the Setup dialog box, click the Group tab.
2. From the Group Name drop-down list,
select the name of the group you want to
remove.
3. Click Delete to remove the selected group.
Memorizing TV Channels
Auto-scan will search and memorize all available channels in your area. In the
Channel tab of the Setup dialog box, all scanned and memorized channels are check
marked. If you haven’t done channel scanning when you first started using the
application, simply follow the auto-scan procedure below. (Refer to the section titled
Skipping Unwanted Channels for more detailed information to exclude selected
channels.)
To auto-scan TV channels:
1. Click the Setup button
and click the Channel tab.
2. In the Video Source drop-down list, make sure the TV option is selected. Then
select Ant. to search for air channels or select CATV to scan for cable channels.
3. From the Country drop-down list, choose your region.
4. Click Channel Scan to start the searching process.
The application has a default frequency table. When you click Channel Scan,
the application will use the frequencies in this table and search for active
channels. Active channels will then be memorized by the application.
5. You can terminate the searching process anytime. Just click Stop.
6. Check and verify that you can access all the TV channels. (Refer to the section
titled Selecting a TV Channel for more detailed information regarding channels
access.)
7. If there are channels missing from the channel memory, click All Frequency
Scan. The following message will appear:
-11-
Chapter 3
TV
8. Click Yes to start all frequency auto-scan. The application will then scan
frequencies starting from 54 MHz to over 800 MHz, increasing by 1 MHz at a
time. The application will check these frequencies for active channels,
memorizing those that are.
Wait for the application to finish the all channel scan process or in the All
Frequency Scan dialog box, click Stop to terminate the searching process.
9. If you change your mind and want to revert to the default frequency table, click
All Frequency Scan again and choose Restore.
Excluding Unwanted Channels
If you want to exclude undesirable channels from your channel list, do the following:
1. Click the
Setup
button
and click the
Channel
tab.
2. In the S etup dialog box, Channel column, click the
unwanted channel. The check mark will be
removed, indicating that the channel will be
excluded from your channel list and that you
won’t be able to access and watch them through
the Channel Up/Down button.
Selecting a TV Channel
There are three ways of switching between TV channels:
!
Click the Channel Up/Down buttons repeatedly until you
reach your desired channel.
!
Click
to open the Numeric Panel (as shown to the right).
Then click on the Numeric buttons to get your desired
channel number.
OR,
-12-
Chapter 3
TV
!
Click the Setup button
and click the Channel tab.
Under the Channel list, simply click on the desired channel.
You will need to perform fine-tuning only if the reception of the selected
channels is not clear. You can either click the Auto Tune button or manually
adjust the Fine Tune slider to get a clear TV picture.
Specifying a Channel Name or Description
To assign a channel name or specify a description:
1. Click the Setup button
and click the Channel tab.
2. Under the Name column, double-click the text box of the channel you want to
assign a name or description.
3.
Type in the channel name or description, then press Enter.
Changing the TV Channel Order
You may change the sequence of TV channels in the channel list as you prefer.
1. Click the Setup button
and click the Channel tab.
2. Click on the channel which you want to move upward or downward.
3. Click the UP or DOWN button at the right side until the selected channel
moves to the desired location.
4. Click OK to exit the dialog box.
-13-
Chapter 3
TV
Locking and Unlocking a TV Channel
You may lock out certain TV channels (e.g. adult channels) if you want to prevent
others from watching them.
To lock a TV channel:
5. Click the Setup button
and click the Channel tab.
6. Under the Lock column, double-click the “UnLock” item of a TV channel that
you want to be locked.
7. The Channel Lockout dialog box will then appear.
8. Choose the lock Type, that is, how often you would like to lock out the TV
channel. There are four types to choose from:
Choose Always if you want to lock out the TV channel all the time.
Choose Monthly to lock out the channel once a month, at a preset day.
Choose Weekly to lock out the channel once a week, at a preset day and
time.
Choose Daily to lock out the channel everyday at a preset time.
9. If you selected Monthly, Weekly or Daily, you will need to set the Time
Table:
Set the Day of the month or week for when to lock out the channel (only if
you selected Monthly or Weekly).
-14-
Chapter 3
TV
Choose the time to lock out the channel by adjusting the Hour and
Minute settings appropriately.
Set the Length of time (in units of minutes), that is, how long the TV
channel will be locked out.
10. Type a Password to use for unlocking the TV channel in the future.
11. Type the same password again to confirm.
12. Click OK to accept the new settings, or click Cancel to revert back to the
original settings.
To unlock a TV channel:
13. Click the Setup button
and click the Channel tab.
14. From the channel list, click the locked channel. The
Password Confirmed dialog box will then appear. (See figure
at the right.) In the Confirm text box, type in the password
for accessing the channel and click OK.
15. To unlock that channel, under the Lock column, double-click
the “Lock” item.
16. The Channel Lockout dialog box will appear:
17. Select Unlock, then click OK.
Note
!
!
Please use at least four alphabetical and/or numeric digits as your
password.
It is important to remember your password. You won’t be able to
unlock a channel or change the password without your current
password. If you forget your password, you must reinstall the
application.
-15-
Chapter 3
TV
Adjusting Volume
On the TV Control Panel, click and drag your mouse over the Volume
meter to increase or decrease the volume level. You can also press the +
and – keys to adjust the volume.
Using the OverScan Function
Sometimes the TV/video pictures may be distorted at the edges. You
can enable the OverScan feature to hide the four borders of the
TV/video frames.
To hide the edges of the picture:
!
Right-click on the TV Monitor and choose OverScan to have it
checked.
OR,
!
Click the Setup button
and click the Video tab. Then enable the Enable
OverScan check box and select the width (in pixels) you’d like to hide from
the Size (Pixels) drop-down list.
16-Channel Preview
-16-
Chapter 3
TV
The 16-channel preview function can display 16 TV channels on-screen at the same
time. You can see clearly which TV programs are currently showing on these channels.
To preview the channels:
18. Click the 16 Channel Preview button
.
19. The screen will be gradually filled up with 16 TV channels, starting from the
currently selected channel.
20. Click a channel to view it only and freeze the other channels.
21. To display a channel on the TV Monitor window, select any one of the 16
channels on-screen and double-click the left mouse button on that channel, or
use the arrow ↑,↓, ←, or → buttons of your keyboard then press Enter. You
will then be tuned in to that channel. (Or, Click the right mouse button or press
ESC to return to the originally selected TV channel.)
Selecting Between TV and External Video
If you want to watch video from an external source such as a VCR or camcorder,
click the Change Video Source button to switch between watching TV, a
Composite video source, and S-Video source.
Setting the Video Format of External Video
To set the video format used by the external video source, do the following:
22. Click the Setup button
and click the Channel tab.
23. From the Video Source drop-down list, choose the type of external source:
Composite or S-Video.
24. From the Video Standard drop-down list, select the proper video format.
-17-
Chapter 3
TV
Modifying TV Channel Frequencies
It is not recommended to edit the frequencies of TV channels unless you are very
familiar with local TV frequencies.
To edit the TV frequencies:
25. Click the Setup button
and click the Channel tab.
26. In the Channel List section, drag the horizontal slider rightward to the end.
27. Double click over the channel frequency that you want to modify, type the
desired frequency, and then press Enter.
28. Click OK to exit the dialog box.
Fine tuning Color and Display Quality
If the color or picture quality of the TV/video display needs to be adjusted,
click the Setup button and click the Video tab.
To adjust the color of the TV or video picture, adjust the Brightness, Contrast,
Hue, Saturation and Sharpness sliders until you get an accurate color. (If you
change your mind and want to change back to the factory default settings, click
Default.)
The Deinterlace function can remove the jagged edges of images in serial rapid
movements. It is recommended using this function to ensure smooth and clear video
images. You can select either Bob or SmoothEdge to deinterlace the video image.
Note
Bob and SmoothEdge represent two different algorithms. Try both
options to compare which can give you the best picture quality.
-18-
Chapter 4
Image Capture
Chapter 4
Image Capture
While you watch live TV or video from your PC monitor, you can use the UltraTV
application to capture images for your document, presentation or web page.
Before Capturing
Before you start capturing images, first set the destination folder for saving captured
images.
Click the Setup button
then click the Snapshot tab. Click
folder where you want to save captured images.
to choose a
Capturing a TV/ Video Image
To capture a still image, click the Snapshot button. The Album will then
appear, displaying thumbnails of the captured image.
To capture another image, click Snapshot again. New thumbnails and pages will be
added to the Album as you capture more images.
To display the captured image on your desktop:
29. Select the thumbnail of the desired image then click the Desktop Wallpaper
button
.
30. The selected image will be displayed as your wallpaper, the background of your
desktop.
To save the captured image:
31. Select the thumbnail of the image then click the Save As button
Save As dialog box will then appear.
-19-
. The
Chapter 4
Image Capture
32. From the File Format drop-down menu, select the format for saving
the captured image.
33. Choose the Color format.
Choose 24-bit to capture image in 16M colors.
Choose 8-bit to capture image in 256 colors.
34. Click Browse to scan for folders and select a
destination location for saving the image. Then
specify a file name for saving the captured
image.
35. Choose the image size.
In the Size section, select the Standard option
and choose a desirable image size from the
drop-down list.
If you want to set your own image size, select Customize and enter the
image Width and Height. If you want to maintain relative width and
height, select the Keep Proportion option. Choose a measurement
unit from the Unit drop-down list. You can specify any image size you
want. The maximum capture size can be 1600×1200.
-20-
Chapter 4
Image Capture
36. Click OK to save the image. Click Cancel if you do not want to save the
image.
Multiple Image Sequence Capture
To capture a continuous sequence of images, do the following:
37. Click the Setup button
then click the Snapshot tab.
38. In the Total Number of Pictures box, specify the number of images you want to
capture.
39. In the Time Interval (in seconds) box, specify the interval between captures. For
instance, if you specify 10 seconds, an image will be captured every 10 seconds.
40. Click OK to save the new settings. Click Cancel if you do not want to change
the settings.
41. Click the Snapshot button
to start capturing.
-21-
Chapter 5
Teletext (for PAL System)
Chapter 5
Teletext (for PAL System)
Teletext makes TV viewing a unique experience. It views teletext broadcast from your
television programs and get the most updated information on TV Schedules, News,
Stock Market Prices, Concert & Theatre information and so on. Teletext information
may not be available if there is no such service provided in your region or country.
Overview
Click the Teletext button
to evoke the Teletext application as shown below.
Title Bar
Menu Bar
Toolbar
Teletext
Browser
Status Bar
! Title Bar
This is located at the top of the window. It contains the current displayed page number
or in hexadecimal page number of an active window.
! Menu Bar
This contains the names of the available pull-down list option menus. To access any of
the menu items, simply click on it or press the Alt button and the underlined character.
! Toolbar
It includes buttons that gives quick access to perform certain frequently used functions
from the Menu Bar.
-22-
Chapter 5
Teletext (for PAL System)
! Teletext Browser
Teletext information is displayed in this area. The information would be the TV
schedules, news, stock market reports, concert & theater information and so on.
! Status Bar
Status bar is located at the lower left corner of the window. It contains a short text
message or explanation of the currently selected menu command.
Toolbar Buttons
!
Lock Subpage
Locks the current subpage. The upcoming transmitted subpages will be stored in the
Teletext Cache for later use.
!
Previous Subpage/ Next Subpage
Switches to the next or the previous subpage.
!
Home (Ctrl+H)
Connects to the teletext home page which always goes to page 100, but page 100 may
not be the primary teletext source.
!
Previous Page (-) / Next Page (+)
Displays the preceding or the succeeding teletext or in hexadecimal page number.
!
History Back / History Forward
Retrieves the previous page in the history list.
Moves a page forward in the history list. The command is usable after one or more
back steps in the history list.
!
TV Scale
Changes the proportion of the Teletext window to 4 by 3.
!
Always On Top
Makes Teletext Window float over the top of other applications.
!
Teletext File
Switches between the Teletext file which is opened from the previously saved file and
the most recent Teletext information.
-23-
Chapter 5
Teletext (for PAL System)
LED Lamp
Different LED color indicates different state.
! Left LED Lamp:
Green -- The cache in Teletext application is running less than 90% usage.
Yellow -- The cache in Teletext application is running over 90% usage.
Red -- The cache in Teletext application is running out.
! Right LED Lamp:
Gray -- The system does not receive the teletext broadcast data.
Green -- The system is receiving the teletext broadcast data.
Using Teletext
The following briefly describes how to use the Teletext feature.
! Teletext Page
There are two page numbers displayed on the first line of each teletext page. The page
number on the left is the page number that you have selected or keyed in. The one
appears in the middle of line is the page number of the currently displayed teletext
data.
The newly selected page number will appear on the upper left corner of the page.
Sometimes, this may take a short while to retrieve the newly selected teletext page.
There will be no changes on the page when there is no page data transmitted with the
number you have selected.
A teletext page can be selected with one of the following methods:
! Key in the hexadecimal or teletext page number using the numeric buttons of
your keyboard or AVerMedia TV remote control.
! Press the + (positive) or – (negative) button to move to the succeeding or
preceding teletext page.
! Copying a Teletext Page
1. Simply click and drag over the text or the area that you want to copy using the
mouse.
2. Choose Copy from the Edit menu (Alt+E, C) or press Ctrl+C.
-24-
Chapter 5
Teletext (for PAL System)
3. You can then paste the contents of the teletext page in TXT or BMP format to
a document you are working with.
! Saving a Teletext Page
Some teletext pages include a number of subpages. If the file has subpages, teletext
will also save the existing subpages.
1. A teletext page can be saved using one of the following ways:
● To automatically save the file using the displayed teletext page as the filename
and the default file format, choose Save from the File menu or press Ctrl+S.
● To save the file by specifying your own filename and different file format,
choose Save As from the File menu or press Ctrl+A.
2. A save as dialog box will appear:
3. Select the file format to use for saving the teletext page. You can save the
teletext page in :
TXT Text file format
BMP Windows bitmap file format
TLT Teletext file format
TLX Teletext file format
4. Enter a filename and click OK.
! Opening a Teletext Page
1. Choose Open from the File menu or press Ctrl+O.
2. From the Open dialog box, select the file containing the teletext page you want
and click OK.
-25-
Chapter 5
Teletext (for PAL System)
! Opening Another Teletext Window
To open another teletext window, choose New Window from the File menu or
press Ctrl+W.
! Closing the Active Teletext Window
Choose Close Window from the File menu or press Ctrl+L to close the active
teletext page window.
-26-
Chapter 6
Time Shift
Chapter 6
Time Shift
The Time Shift function performs background recording of a TV program, and lets you
return and watch any part of the recorded program. At the same time, the live TV
program continues to be recorded and played back so you won’t miss any part of the
show. You can also advance forward to skip commercials or rewind to replay scenes
one more time.
Time Shift Controls
Use the following button controls in the Control Panel to start recording a live TV
program, play back the program from where you left off, advance forward, rewind, and
more.
Forward
Time Shift
Click to skip forward
in intervals
Backward
Click to move
backward in
intervals
Click to perform background
recording of the live TV
program and play it
back simultaneously.
Playback Seek
Drag the slider tab to move
to any part of the recorded
TV program
Setup
Mute
Volume
Pause
Click to temporarily
freeze the playback.
Stop
Click to terminate recording
and return to the live TV program
Customizing Time Shift Settings
Before you start using the Time Shift function, first check its recording settings to see
if they fit your needs.
To check and customize settings:
1. Click the Setup button
the following settings.
then click the Time Shift tab. You will then see
-27-
Chapter 6
Time Shift
2. By default, Time Shift performs recording of the TV program by creating a
temporary video file and deletes this file once you click the Stop button to
switch off this function. If you want to save the video file, select the Save
recorded file to disk option.
3. Select the video Quality that you want for the recorded program. When you
click an option, details such as video size, frame rate, etc. will be displayed in
the box at the right. The minimum CPU speed required will also be shown for
your reference. Make sure that your computer’s CPU performance is fast
enough and meets the requirement.
4. If you choose to save TV recordings as video files in step 2, set a destination
folder for saving the files. Click the Record Storage tab, and under
Saved Folder, click
to choose a folder in which to save the video files.
5. Click OK to apply the new settings, or click Cancel to use the original settings.
Using the Time Shift Function
To pause the live TV program and then replay:
. You can now leave your computer and
1. Click the Time Shift button
let the application record the TV program.
2. When you’re back and want to replay, use the Playback Seek slider bar to
move back to the part where you left off. Click and drag the slider tab to the
left until you see the part of the show where you were watching earlier, then
release the mouse button to replay from there.
-28-
Chapter 6
Time Shift
3. You can also click the Backward button
to move backward in fixed
intervals until you reach the part where you left off.
4. To advance forward and skip some parts of the recording (for example TV
commercials), drag the slider tab to the right. You can also click the
Forward button to move forward in fixed intervals.
5. To temporarily pause the playback, click the
Pause button again to resume.
Pause button. Click the
6. To return to real-time viewing of the live TV program, click the
Stop
button. This switches off the Time Shift function and returns you to live TV.
Note
If the TV recording was saved as a video file in a specified folder, you
can play it back anytime you want. Refer to Chapter 7 DVR to know
more on how to open and play back recorded video files.
-29-
Chapter 7
DVR
Chapter 7
DVR
You can use your computer as a digital video recorder, and record your favorite TV
programs or capture video from an external source into your hard drive. Record
programs or video in high-quality AVI, MPEG-1 or MPEG-2 file format. You can also
save the recordings in VCD, SVCD or DVD format for burning on discs.
When playing back a recorded file, you can view it individually or simultaneously play
the recording while watching live TV in a picture-in-picture window.
DVR Controls
Use the following button controls for recording and video playback.
Forward
Click to skip forward
in intervals
Playback Seek
Click to go to
the previous/
next video file
in the playlist
Drag the slider tab to
Backward move to any part of
the recorded file
Click to move
backward in
intervals
Setup
Play Previous/ Open File
Click to create
Next File
a playlist of
Mute
Volume
Pause
Play
video files
to play back
Record
Click to start Stop
Click to
Click to recording
Click to stop
temporarily
play back
recording
freeze the
or playback
playback
Recording Programs or Video
Select a TV channel that is showing the TV program that you want to record. Whereas
to record video, click
to switch to the Composite or S-Video source. Then follow
the procedure below to record.
1. First, determine the length of recording you want and the destination folder
where to save the recording. Click the Setup button
and click the
Record Storage tab. Then specify a Duration or choose the Unlimited
recording option. Click
to choose a destination folder. (Refer to the section
titled Setup for more details.)
-30-
Chapter 7
DVR
2. Next, determine the video file format to use for saving the recorded video files.
Click the Record tab, then choose MPEG-1, MPEG-2, AVI, VCD, SVCD, or
DVD format. (Refer to the section titled Setup for more details.)
3. Click the Record button
video.
to start recording the current TV program or
4. If you want to hide both of the screen and sound of the TV
program/video which is being recorded, right-click anywhere
over the TV Monitor, and select Silent Record. To watch
the TV program/video again, double click the UltraTV icon
in the lower right corner of the screen.
5. Wait until the recording time preset in Duration expires or
click the Stop button
to end the recording.
Playing the Recorded Programs or Video
Each TV program or video that you recorded will be saved as a video file in the
assigned destination folder.
To play back the recorded video files:
Click the Play button
to play back.
OR,
(1)
, then select Open File List to display the
Click the Open File button
Open File List window. All the recorded video files are listed at the bottom
pane of the Open File List window. This is the default playlist of video files.
(2) To delete files from the playlist, select them from the list in the bottom pane
and click Delete, or click Delete All to delete all files in the playlist.
-31-
Chapter 7
DVR
(3) To add more video files to the playlist, first navigate the Look in field on the
top pane to find the folder that contains the desired video files. When you have
located the folder, the media files will then be displayed on the top pane.
Select the files that you want, then click Add, or click Add All to add all
media files in the folder to the playlist.
(4) To start playback, simply click OK. The application will start playing each of
the files in the playlist. (To move to the previous or next file in the playlist,
click the or button.)
Picture-in-Picture Display
With the picture-in-picture window feature, you will be able to play back recorded
video files, and at the same time, watch live TV.
If picture-in-picture window is disabled, you will see the
Click this icon to enable the picture-in-picture window.
icon on the Control Panel.
When you see the
icon on the Control Panel, it means that picture-in-picture
window is enabled. By default, you will be able to play back recorded video files on
the main window, and at the same time, watch live TV on the smaller picture-inpicture window. If you want to switch the video playback to the picture-in-picture
window and the live TV to the main window, just double-click the smaller window.
You can freely move the picture-in-picture window around the main window. Just drag
it to the position you want on the main window.
-32-
Chapter 7
DVR
Setup
The Record Storage and Record tabs in the Setup dialog box provide
settings for customizing capture duration, file size, video format, and more.
! Record Storage Tab
" Recording Duration and File Size
Specify the desired length of recording. Select Duration and enter the time
length in number of hours and minutes. Otherwise, if you do not have any
specific time length requirement, select the Unlimited option. The
application will record the largest clip that your hard disk can accommodate.
If you will be recording programs or video for burning to discs such as VCD
or DVD, select the appropriate video file size for the target disc capacity so
that each video file will not exceed the limit. Choose the file size from the
Split File Size drop-down list.
" Destination Folder
to choose a folder in
Under Saved Folder, click the Browse button
which to save the recorded video files. (Video files will be named with default
file names.)
! Record Tab
-33-
Chapter 7
DVR
" Video Format and Video Standard
Under Format, select a video file format that you want to use for saving
recorded programs or video. These are the available video formats:
!
MPEG-1
Choose MPEG-1 format for video files that are intended for CD-ROM playback
on a computer or for Internet transmission. MPEG-1 allows file compression and
offers VHS quality picture. Just about every system available today can play
MPEG-1 and does not need special software or hardware.
!
MPEG-2
Videos compressed using MPEG-2 have extremely high quality pictures and full
CD-quality sound. Choose MPEG-2 format for video files that are intended for
DVD-ROM playback on a computer or if you want broadcast quality videos.
!
VCD
When you choose this format, the recorded video file will be saved in MPEG-1
format that is compliant with VCD standards. Standard VCD frame size and
frame rate are 352 x 240 pixels at 29.97 fps for NTSC and 352 x 288 pixels at 25
fps for PAL.
-34-
Chapter 7
DVR
!
SVCD
When you choose this format, the recorded video file will be saved in MPEG-2
format that is compliant with SVCD standards. Standard SVCD frame size and
frame rate are 480 x 480 pixels at 29.97 fps for NTSC and 480 x 576 at 25 fps
for PAL.
!
DVD
When you choose this format, the recorded video file will be saved in MPEG-2
format that is compliant with DVD standards. Standard DVD frame size and
frame rate are 720 x 480 pixels at 29.97 fps for NTSC and 720 x 576 at 25 fps
for PAL.
!
AVI
AVI is the most common video file format for playback on the computer. It can
be saved in uncompressed form if you want high quality video, or compressed
using any of the available codecs if you want to minimize the file size.
From the Video Standard drop-down list, selecting Auto Selection allows
the application to automatically set the video standard for recorded video files
based on the video system used by the current video source (selected in the
Channel tab).
To customize AVI setting, click the Setting button at the bottom of the Setup
dialog box, and AVI’s Setup dialog box will appear. You can choose a Video or
Audio codec from the Encoder drop-down list.
" Record Audio Only
If you want to record only the audio
from a TV program or video, enable
Record Audio Only. Then click the
setting button at the bottom of the Setup
dialog box. In the Audio Setup dialog
box, select a file format from the
Encorer drop-down list.
-35-
Chapter 7
DVR
" Image Size, Frame Rate and Quality Settings
The Image Size, Frame Rate, and Quality settings are enabled for selection
depending on what video file format you have chosen for your video files.
! Image Size
Choose preset dimensions for your captured video from the drop-down
list.
! Frame Rate
This sets the number of frames to capture per second. You can choose from the
available frame rates.
! Quality
Select Highest quality to capture high quality video clips. This creates
large files, especially when you are recording long clips. To have smaller
file sizes, select other quality options.
If you select the Customized option, the Setting button will be enabled. Click
this button to customize advanced video and audio capture settings.
" Customized Settings
-36-
Chapter 7
DVR
! Video and Audio Bit Rate
Set the desired video and audio capture bit rate. Higher rate produces better
quality, but this will take up more space on your hard drive. If you plan to use
the clip for the Web, the recommended settings are 300Kbps for video and
64Kbps for audio. For Video CD authoring, use the standard 1150Kbps for
video and 224Kbps for audio.
! Sample Rate
To convert an analog signal to digital, your computer takes measurements of the
sound wave’s amplitude (a sample) at particular points in time. The more
samples the computer takes, the more information it obtains and thus, the closer
it comes to capturing something close to the original sound. 44.1 Khz is CD
quality sound and is the default setting.
! Mode
You have four audio channel choices to choose from for MPEG 1/2: Stereo,
Joint Stereo, Dual Channel, and Mono. To obtain high-fidelity and CD quality
sound, use Joint Stereo.
-37-
Chapter 8
FM Radio
Chapter 8
FM Radio
FM Radio Controls
Click the FM Radio button to listen to your favorite radio station programs.
Use the following button controls for selecting FM radio channels, adjusting volume,
scanning FM channels, recording radio programs and more.
Show/Hide
Numeric Panel
Play
Enable/Disable
Repeat Play
Setup
Previous File
Mute
Volume
Pause
Next File
Stop
Record
Memory
Channel Loop
Channel
Up/Down
Switch between
Channel and
Frequency
To change back to live TV, click the Change Video Source button.
How to Auto Scan FM Radio Channels
If this is your first time to use FM radio, perform auto scan to search and memorize
active FM radio stations in your area.
To auto scan FM radio stations:
1. If this is your first time to switch to FM radio, the FM Radio dialog box will
automatically appear.
-38-
Chapter 8
FM Radio
2. Click the Auto Scan button. All active channels will be automatically
scanned and memorized. Up to 99 preset channels can be memorized.
3. Click Finish.
Manually Scanning Specific FM Channels
Instead of scanning all channels, you can choose to manually scan one or a few
channels only. To do this, follow these procedures.
To manually rescan specific FM radio channels:
1. Click the Setup button
and click the FM Radio tab.
2. To manually scan two or more consecutive channels, you can enable the Save
and Next Channel Scan check box.
3. Click on the channel you want to rescan in the Channel List.
-39-
Chapter 8
FM Radio
4. Click
to scan upward or
to scan downward from the selected channel
frequency. The scanning will stop when the application finds the closest
ACTIVE FM frequency.
5. Click the Save button if you’d like to keep the newly scanned frequency.
6. If the Save and Next Channel Scan check box is enabled in Step 2, the
application will automatically scan the next succeeding channel each time after
the Save button is pressed. Click the Stop button when you want to stop the
scanning operation.
Channel Versus Frequency Selection
You can tune to FM radio by channel or frequency.
By default, the Numeric Panel allows you to select memorized radio channels, as
on the panel.
indicated by the Channel button
You can switch to selecting radio frequencies by clicking the
button. When you
see the button change into the Frequency button
, clicking on the number
buttons on the Numeric Panel allows you to select radio frequencies.
Selecting a Channel
To select a channel:
1. Click
to open the Numeric Panel.
2. There are a number of ways to select a channel:
! Click on the Numeric buttons to select a channel.
! Click the Channel Up/Down button until you reach your desired
channel.
OR,
! Use the numeric keys on your keyboard to select a channel.
Selecting a Radio Frequency
To select a radio frequency:
1. Click the Channel button
button
.
. The button then changes to the Frequency
2. There are a number of ways to select a radio frequency:
-40-
Chapter 8
FM Radio
! Click the Numeric buttons on the Numeric Panel.
! Click the Tuning (-)/(+) button
the radio frequency.
to increase/decrease
OR,
! Use the numeric keys on your keyboard to enter a radio
frequency.
You can save the selected radio frequency to a channel. Refer to the section titled
Saving a Radio Frequency to a Channel for details.
Note
When selecting a radio frequency, be sure that it is within the
acceptable range of FM radio frequencies in your area. If you entered a
frequency which is out of range, the UltraTV application will disregard
this invalid frequency. The application will then automatically tune the
FM radio back to the previous frequency.
Skipping Unwanted Channels
If you want to exclude undesirable channels from your FM channel list, do the
following:
1. Click the Setup button
and click the FM Radio tab.
2. In the Setup dialog box, Channel column,
click the unwanted channel. The check mark
will be removed, indicating that the channel
will be excluded from your channel list and
that you won’t be able to access and hear
them through the Channel Up/Down
button.
Saving a Radio Frequency to a Channel
To assign a selected radio frequency to a channel:
1. First, select a channel. Refer to the section titled Selecting a Channel for
details.
2. Now select a radio frequency. Refer to the section titled Selecting a Radio
Frequency for details.
3. Click the Memory button. The Input Channel Name dialog box will then
appear.
4. Enter a descriptive channel name and click OK.
-41-
Chapter 8
FM Radio
Modifying or Adding FM Radio Channels
You can manually add a new FM radio channel if the desired channel cannot be found
through scanning operation, or modify any existing FM radio channel.
1. Click the Setup button
, and then click the FM Radio tab.
2. Double click on the Frequency and/or Name column of the existing or
blank FM channel which you want to modify or add.
3. Enter the frequency and the name you want in the provided text box(es), and
then press Enter.
4. To add or modify more channels, repeat steps 2 to 3.
5. Click OK to exit the dialog box.
Changing the FM Radio Channel Order
You may change the sequence of FM radio channels in the channel list as you prefer.
1. Click the Setup button
, and then click the FM Radio tab.
2. Select the channel which you want to move upward or downward.
3. Click the UP or DOWN button at the right side until the selected channel
reaches the desired location.
-42-
Chapter 8
FM Radio
Setting the Audio Mode
The application will automatically set each FM radio channel to Mono or Stereo based
on the audio mode of the FM radio signals received. You can change the audio mode
of a stereo FM radio signal to Mono or vice versa.
To change the audio mode:
1. Click the Setup button
, and then click the FM Radio tab.
2. Click on the channel whose audio mode you want to change.
3. Select the Audio Mode option you want: Mono or Stereo.
Note
If the audio quality of a FM radio channel is found unstable or a bit
poor, you can also try to switch the audio mode between Mono and
Stereo to get a better audio quality.
Adding and Deleting Channel Groups
Selecting a Channel Group allows you to switch between the channels of the selected
group only when pressing the Channel Up/Down button. If you want to add or
delete an FM channel group, do the following:
To add a new channel group:
1. Click the Setup button
, and then click the FM Radio tab.
2. Click the Add Button.
3. The New Group Name dialog box will appear. Type the group name you want
and then click OK.
4. Now you can start to scan FM radio channels and manage the scanned FM data
for this new channel group. For more information, refer to How to Auto Scan
FM Radio Channels and other titles respectively.
5. To add more channel groups, repeat steps 2 to 4.
To delete a channel group:
1. Click the Setup button
, and then click the FM Radio tab.
-43-
Chapter 8
FM Radio
2. From the Group Name drop-down list,
select the name of the group you want to
remove.
3. Click Delete to remove the selected group.
Tuning the FM Radio Frequencies
You can tune the FM radio for better signal reception if the reception is not clear. First,
select or go to the channel which you want to tune. Then do one of these three ways.
# Click the Tuning (+)/(-) buttons
OR click the Setup button
following:
# Click
button.
or
on the FM Control Panel.
, choose the FM Radio tab, and do one of the
to increase/decrease the frequency and then click the Save
# Drag the slider (in the Frequency Scan section) to the location you want
and then click the Save button.
Specifying the Tuning Increment
You can choose to tune the FM frequency by 0.1, 0.05 or 0.01MHz.
1. Click the Setup button
, and then click the FM Radio tab.
2. Select 10K (0.01MHz), 50K (0.05MHz) or 100K (0.1MHz) as your tuning
increment.
3. Click OK.
Afterward when you click the Tuning (+)/(-) buttons
or
/
in the
FM Radio tab, the frequency will increase/decrease based on the Tuning Step you
have specified.
Recording FM Radio Broadcast
You can record FM radio broadcasts to your hard disk.
-44-
Chapter 8
FM Radio
To record an FM radio broadcast:
1. Specify audio recording settings. Refer to the section titled Customizing Audio
Recording Settings for details.
2. Click the Record button
3. Click the Stop button
.
to end the recording.
Playing the Recorded Audio
To play back the recorded audio files:
Click the Play button
to play back.
OR,
(1)
To play the recorded audio files one after another, click the Open File
button
to display the Open File List window. All the recorded audio files
are listed at the bottom pane of the Open File List window. This is the default
playlist of audio files.
(2) To delete files from the playlist, select them from the list in the bottom pane
and click Delete, or click Delete All to delete all files in the playlist.
(3) To add more audio files to the playlist, first navigate the Look in field on the
top pane to find the folder that contains the desired audio files. When you have
located the folder, the media files will then be displayed on the top pane.
Select files that you want and then click Add, or click Add All to add all
media files in the folder to the playlist.
-45-
Chapter 8
FM Radio
(4) To start playback, simply click OK. The application will start playing each
file in the playlist. (To move to the previous or next file in the playlist, click
the or button.)
Using the FM Time Shift Function
You can use the Time Shift function to perform background recording of an FM radio
program and even replay.
1. Click the Time Shift button
. You can now leave your computer and let
the application record the FM program.
2. When you’re back and want to replay, use the Playback Seek slider bar to
move back to the part where you left off. Click and drag the slider tab to the left
until you hear the part of the show where you were listening earlier, then release
the mouse button to replay from there.
3. You can also click the Backward button to move backward in fixed
intervals until you reach the part where you left off.
4. To advance forward and skip some parts of the recording (for example FM
commercials), drag the slider tab to the right. You can also click the Forward
button to move forward in fixed intervals.
5. To temporarily pause the playback, click the
Pause button again to resume.
Pause button. Click the
6. To return to real-time FM radio program, click the
Stop button. This
switches off the Time Shift function and returns you to live FM radio.
Customizing Audio Recording Settings
To customize audio recording settings:
1. Click the Setup button
and click the Record Storage tab.
2. Determine the length of recording you want to make. Specify a Duration or
choose the Unlimited recording option.
-46-
Chapter 8
FM Radio
3. Click
to choose a destination folder in which to save the recorded audio.
4. Next, click the Record tab.
5. Click the Setting button at the bottom of the Setup dialog box.
6. In the Audio Setup dialog box, choose an Audio Encoder from the Encoder dropdown list.
-47-
Chapter 9
Scheduler
Chapter 9
Scheduler
The Scheduler application allows you to create a list of preset schedules for
watching, recording your favorite TV programs or performing Time Shift function.
You can set the day and time to turn on the TV or FM radio program and the length of
recording.
To run this application, click Scheduler from the UltraTV program menu or rightclick the Quick TV launcher located at the lower right corner of the screen then in
the list menu, select Scheduler.
Preset schedules for tuning into live TV, FM radio broadcasts, as well as preset
recording that you’ve added will be saved to the Scheduler application.
! Schedule Listing
This displays a list of preset schedules you have created.
! Modify
Select a preset schedule and click this button to make changes.
! Delete / Delete All
Click this to delete selected / all schedules.
! Exit
Click this to exit Scheduler.
-48-
Chapter 9
Scheduler
Adding Schedules
To create a new schedule:
1. Click the Add button in the Scheduler dialog box.
2. The following dialog box will then appear:
3. From the Action drop-down list, select Active to watch TV/listen to radio or
select Record to save a program for future viewing. Otherwise, select Time
Shift to start the Time Shift function.
Note
If the Silent Record check box is enabled, when the application is
performing the recording task, the icon
will appear on the task bar
(the lower right corner of the screen). To immediately watch or listen
to the TV/FM program which is being recorded, just double-click this
icon.
4. From the Source drop-down list, select TV, FM, or an external video source.
5. In the Channel option, select the TV or FM radio channel where your favorite
program is on. (If you chose an external video source, this option will be
disabled.)
6. Then set the time to tune in a live program, perform recording or Time Shift.
You can set the schedule on a Daily or Weekly basis or on a specific Date &
Time.
7. Type in a description, e.g., the name of a TV program or FM radio station, in the
provided text box. Or, you may just leave it blank.
8. If you select Active or Time Shift in step 3, click Finish. Or click Next if
your choice is Record in step 3.
-49-
Chapter 9
Scheduler
9. When you click Next, the Record Format dialog box then appears. Choose the
file format and customized settings for recording and click Next.
10. In the Record Storage dialog box, specify the length of recording. If you intend
to burn the recorded files to VCD or DVD, choose whether to slice the file size
to fit the target disc capacity in the Split File Size list box.
11. In the After-Recording Schemes, it automatically switches to the selected power
control mode when the schedule recording is completed. Choose an appropriate
power control status listed below:
‧ Watch TV: Switch to real-time TV mode.
‧ Close TV: Turn off the AVerTV
Application.
‧ Stand by: Turn off AVerTV application
and enter Stand by Power Saving Mode.
‧ Hibernate: Turn off AVerTV application and enter Hibernate Power Saving
Mode.
‧ Shut Down PC: Turn off your computer
-50-
Chapter 9
Scheduler
12. Click Finish.
-51-
Chapter 10
Hot Keys
Chapter 10
Hot Keys
Hot Key
Description
Function
UP/DOWN
ARROW
Channel or
Frequency
Up/Down
Press to go to the next upper/lower TV channel, FM
channel, or radio frequency.
L
Channel Loop
Press to go to the previously accessed TV channel or
FM channel.
NUMERIC
KEYS
Channel or
Frequency
Selection
Use NUMERIC KEYS to directly enter the TV
channel number, FM channel number, or radio
frequency.
ESC
Stop
or, Change back
to Normal View
Stop (playback, recording, Time Shift, or 16-channel
preview).
Or, change full screen back to normal view.
F1
Help
Open the on-line help.
F5
Full Screen
Show TV/Video in full screen.
F6
Display (OSD)
information
Display On-Screen Display information.
+/-
Volume
Press to increase or decrease the volume level.
LEFT/
RIGHT
ARROW
Rewind/
Fast Forward
Press to rewind or fast forward (for playback and Time
Shift).
A
Audio Mode
Choose between the available audio types.
D
Show/Hide TV
Monitor Panel
Toggles between showing and hiding the panel on the
TV monitor window.
F
Freeze
Freeze the image of current TV program or video.
M
Mute
Turn off/on the sound.
Ctrl + N
Play Next File
Play the next file in the playlist.
Ctrl + P
Play Previous File Play the previous file in the playlist.
Ctrl + R
Record
Start recording.
-52-
Chapter 10
Hot Keys
Hot Key
Description
Function
P
Play / Pause
Play/pause (for playback, recording and Time Shift).
S
Snapshot
Capture an image (or a continuous sequence of
images).
Ctrl + T
Time Shift
Enable the Time Shift function.
V
Change Video
Source
Change between TV and the external video source.
-53-
Chapter 11
Customer Service
Chapter 11
Customer Service
The UltraTV utility provides a convenient tool, which allows users to contact
AVerMedia’s customer service department easily via the e-mail for any
troubleshooting requests.
To contact the customer service for troubleshooting:
1. Click the Setup button
and click the System Information tab.
2. You will see all of your system’s information is listed under this tab.
3. Select the e-mail address which is near or in your country from the Office dropdown list, and then click Send to e-mail the system information.
-54-