1
BCM Rls 6.0
Networking Essentials
Task Based Guide
Networking Essentials
Copyright © 2010 Avaya Inc.
All Rights Reserved.
Notices
While reasonable efforts have been made to ensure that the information in this document is complete and accurate
at the time of printing, Avaya assumes no liability for any errors. Avaya reserves the right to make changes and
corrections to the information in this document without the obligation to notify any person or organization of such
changes.
Documentation disclaimer
Avaya shall not be responsible for any modifications, additions, or deletions to the original published version of
this documentation unless such modifications, additions, or deletions were performed by Avaya. End User agree to
indemnify and hold harmless Avaya, Avaya’s agents, servants and employees against all claims, lawsuits, demands
and judgments arising out of, or in connection with, subsequent modifications, additions or deletions to this
documentation, to the extent made by End User.
Link disclaimer
Avaya is not responsible for the contents or reliability of any linked Web sites referenced within this site or
documentation(s) provided by Avaya. Avaya is not responsible for the accuracy of any information, statement or
content provided on these sites and does not necessarily endorse the products, services, or information described or
offered within them. Avaya does not guarantee that these links will work all the time and has no control over the
availability of the linked pages.
Warranty
Avaya provides a limited warranty on this product. Refer to your sales agreement to establish the terms of the
limited warranty. In addition, Avaya’s standard warranty language, as well as information regarding support for
this product, while under warranty, is available to Avaya customers and other parties through the Avaya Support
Web site: http://www.avaya.com/support
Please note that if you acquired the product from an authorized reseller, the warranty is provided to you by said
reseller and not by Avaya.
Licenses
THE SOFTWARE LICENSE TERMS AVAILABLE ON THE AVAYA WEBSITE,
HTTP://SUPPORT.AVAYA.COM/LICENSEINFO/ ARE APPLICABLE TO ANYONE WHO DOWNLOADS,
USES AND/OR INSTALLS AVAYA SOFTWARE, PURCHASED FROM AVAYA INC., ANY AVAYA
AFFILIATE, OR AN AUTHORIZED AVAYA RESELLER (AS APPLICABLE) UNDER A COMMERCIAL
AGREEMENT WITH AVAYA OR AN AUTHORIZED AVAYA RESELLER. UNLESS OTHERWISE
AGREED TO BY AVAYA IN WRITING, AVAYA DOES NOT EXTEND THIS LICENSE IF THE
SOFTWARE WAS OBTAINED FROM ANYONE OTHER THAN AVAYA, AN AVAYA AFFILIATE OR AN
AVAYA AUTHORIZED RESELLER, AND AVAYA RESERVES THE RIGHT TO TAKE LEGAL ACTION
AGAINST YOU AND ANYONE ELSE USING OR SELLING THE SOFTWARE WITHOUT A LICENSE. BY
INSTALLING, DOWNLOADING OR USING THE SOFTWARE, OR AUTHORIZING OTHERS TO DO SO,
YOU, ON BEHALF OF YOURSELF AND THE ENTITY FOR WHOM YOU ARE INSTALLING,
DOWNLOADING OR USING THE SOFTWARE (HEREINAFTER REFERRED TO INTERCHANGEABLY
AS "YOU" AND "END USER"), AGREE TO THESE TERMS AND CONDITIONS AND CREATE A
BINDING CONTRACT BETWEEN YOU AND AVAYA INC. OR THE APPLICABLE AVAYA AFFILIATE
("AVAYA").
Copyright
Except where expressly stated otherwise, no use should be made of the Documentation(s) and Product(s) provided
by Avaya. All content in this documentation(s) and the product(s) provided by Avaya including the selection,
arrangement and design of the content is owned either by Avaya or its licensors and is protected by copyright and
other intellectual property laws including the sui generis rights relating to the protection of databases. You may not
modify, copy, reproduce, republish, upload, post, transmit or distribute in any way any content, in whole or in part,
including any code and software. Unauthorized reproduction, transmission, dissemination, storage, and or use
without the express written consent of Avaya can be a criminal, as well as a civil offense under the applicable law.
Third Party Components
Certain software programs or portions thereof included in the Product may contain software distributed under third
party agreements ("Third Party Components"), which may contain terms that expand or limit rights to use certain
portions of the Product ("Third Party Terms"). Information regarding distributed Linux OS source code (for those
Products that have distributed the Linux OS source code), and identifying the copyright holders of the Third Party
Components and the Third Party Terms that apply to them is available on the Avaya Support Web site:
http://support.avaya.com/Copyright.
Trademarks
The trademarks, logos and service marks ("Marks") displayed in this site, the documentation(s) and product(s)
provided by Avaya are the registered or unregistered Marks of Avaya, its affiliates, or other third parties. Users
are not permitted to use such Marks without prior written consent from Avaya or such third party which may own
the Mark. Nothing contained in this site, the documentation(s) and product(s) should be construed as granting, by
implication, estoppel, or otherwise, any license or right in and to the Marks without the express written permission
of Avaya or the applicable third party. Avaya is a registered trademark of Avaya Inc. All non-Avaya trademarks
are the property of their respective owners.
2
NN40011-004 Issue 1.2 BCM Rls 6.0
Networking Essentials
Downloading documents
For the most current versions of documentation, see the Avaya Support. Web site: http://www.avaya.com/support
Contact Avaya Support
Avaya provides a telephone number for you to use to report problems or to ask questions about your product. The
support telephone number is 1-800-242-2121 in the United States. For additional support telephone numbers, see
the Avaya Web site: http://www.avaya.com/support
Copyright © 2010 ITEL, All Rights Reserved
The copyright in the material belongs to ITEL and no part of the material may
be reproduced in any form without the prior written permission of a duly
authorised representative of ITEL.
NN40011-004 Issue 1.2 BCM Rls 6.0
3
Networking Essentials
Table of Contents
Networking Essentials ...................................................... 5
Overview .......................................................................................... 5
Ping (Packet Internet Groper) .......................................................... 5
Windows XP / Vista & 7 .....................................................................................5
Configuring Network Settings .......................................................... 8
Windows XP.......................................................................................................9
Windows Vista & 7 ...........................................................................................11
IPConfig ......................................................................................... 14
Windows XP / Windows Vista & 7 ...................................................................14
Creating Shortcuts ......................................................................... 17
Windows XP.....................................................................................................17
Windows Vista & 7 ...........................................................................................18
Sharing Folders ............................................................................. 20
Windows XP.....................................................................................................21
Windows Vista & 7 ...........................................................................................22
Internet Browser Settings............................................................... 24
Windows XP / Windows Vista & 7 ...................................................................24
Configuring Java settings............................................................... 28
Java .................................................................................................................28
Netscape ..........................................................................................................31
Firefox ..............................................................................................................33
Copy and Paste ............................................................................. 35
Windows XP.....................................................................................................35
Windows Vista & 7 ...........................................................................................36
Firewall Settings ............................................................................ 37
Windows XP.....................................................................................................37
Windows Vista & 7 ...........................................................................................41
4
NN40011-004 Issue 1.2 BCM Rls 6.0
Networking Essentials
Networking Essentials
Overview
It is certain that at some point during the configuration and installation of the
BCM that some basic networking skills will be required. Though it is very
likely that some of those skills are already known and practised, this guide is
designed to provide assistance in configuring and using your PC to allow
communication and configuration between the BCM and other systems.
Note: This document describes processes for the Windows XP, Vista, and 7
Operating Systems.
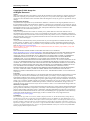
Ping (Packet Internet Groper)
When a physical connection has been made between two computer systems
via the Network Interface Cards, you may wish to test the connection by
“pinging” the IP address of the other system. Ping is a utility available only
with the TCP/IP protocol, and is used for diagnostic purposes only.
Windows XP / Vista & 7
1. For Windows XP go to the Start button on your Windows desktop, and
select Run. For Vista/Windows 7 click on Windows icon and in search
box type RUN and hit enter.
NN40011-004 Issue 1.2 BCM Rls 6.0
5
Networking Essentials
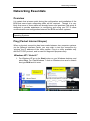
2. Type command (or cmd if command is not successful) and press OK.
This will bring up the MS-DOS prompt.
3. Type ping (leave a space) followed by the IP Address of the Network
Interface Card on the other computer (e.g. for BCM, the default IP
Addresses are OAM Port = 10.10.11.1, LAN Ports = 192.168.1.2 for
BCM50 or 192.168.2.2 for BCM450). Press Enter.
4. There are differing responses that may now be displayed.
a. If a Reply is received from the other computer (as displayed
below) the IP connection is working.
6
NN40011-004 Issue 1.2 BCM Rls 6.0
Networking Essentials
b. If any other response is displayed, check the IP settings of your
laptop/PC and the physical connection between the laptop/PC
and BCM.
Note: Pinging the IP Address 127.0.0.1 is a self-diagnostic test to confirm that
the Network Interface Card on your computer is functioning correctly. This
applies to whichever operating system is being used.
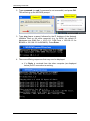
5. Adding further switches to the Ping command will allow other benefits.
For example, start by typing the ping command as shown earlier, then
leaving a space behind the IP Address and then type –t, finish by
pressing return. The ping will now run continuously until you stop it by
pressing the CTRL & C keys simultaneously.
NN40011-004 Issue 1.2 BCM Rls 6.0
7
Networking Essentials
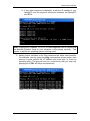
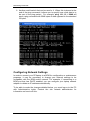
6. Another useful switch that can be used is -l. When this is placed at the
end of the ping command, it allows you to specify how much data is to
be sent in the ping packet. For example, ping 10.1.1.2 -l 2048 will
send a ping command with 2048 bytes of data opposed to the standard
32 bytes.
Configuring Network Settings
In order to connect your PC/laptop to a BCM for configuration or maintenance
purposes, it may be necessary to change your network settings to be
compatible with the BCM and/or network. For example, if connecting to a
BCM port that has DHCP enabled, you can configure your laptop network
adapter to obtain an IP address automatically.
To be able to make the changes detailed below, you must log-on to the PC
with Administrative rights. Contact the site network administrator for
information on how to do this.
8
NN40011-004 Issue 1.2 BCM Rls 6.0
Networking Essentials
Windows XP
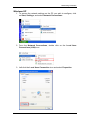
1. To access the network settings on the PC you wish to configure, click
on Start, Settings, and select Network Connections.
2. From the Network Connections, double click on the Local Area
Connections (LAN) icon.
3. Left-click the Local Area Connection icon and select Properties.
NN40011-004 Issue 1.2 BCM Rls 6.0
9
Networking Essentials
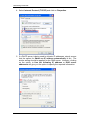
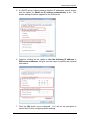
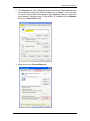
4. Select Internet Protocol (TCP/IP) and click on Properties.
5. If a DHCP server is being used to allocate IP addresses, simply ensure
that the option for Obtain an IP address automatically is set. The
similar setting should be applied for the DNS server. However, clicking
on the option to Use the following IP address or DNS server
addresses will give you the option to specify the required information.
10
NN40011-004 Issue 1.2 BCM Rls 6.0
Networking Essentials
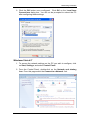
6. Click the OK button once configured. Click OK on the Local Area
Connections dialog box. You will not be prompted to reboot the PC
after configuring these settings.
Windows Vista & 7
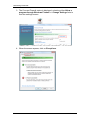
1. To access the network settings on the PC you wish to configure, click
on Start, Settings, and select Control Panel.
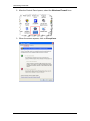
2. From the Control Panel, double-click on the Network and sharing
icon. From this page select the Connect to a Network link.
NN40011-004 Issue 1.2 BCM Rls 6.0
11
Networking Essentials
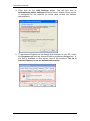
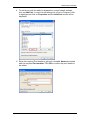
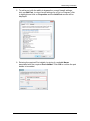
3. In the Local Area Connection Status screen select Properties.
4. In the Local Area Connections Properties screen, from the list in
This connection uses the following items: Select Internet Protocol
(TCP/IP) and click on Properties again.
12
NN40011-004 Issue 1.2 BCM Rls 6.0
Networking Essentials
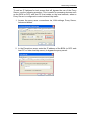
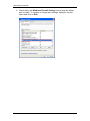
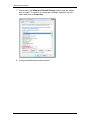
5. If a DHCP server is being used to allocate IP addresses, simply ensure
that the option for Obtain an IP address automatically is set. The
similar setting should be applied for the DNS server.
6. However, clicking on the option to Use the following IP address or
DNS server addresses will give you the option to specify the required
information.
7. Click the OK button once configured. You will not be prompted to
reboot the PC after configuring these settings.
NN40011-004 Issue 1.2 BCM Rls 6.0
13
Networking Essentials
IPConfig
To view the IP configuration settings of a computer, you can run the ipconfig
command. The IP Configuration settings will include information like your
computers IP Address, the Physical (MAC) address and whether or not a
DHCP Server is available on your network.
Windows XP / Windows Vista & 7
1. From the Start command on the computer desktop, select Run and in
the Run dialogue box, type cmd then press the Enter key. This will
launch the MS-DOS Screen.
2. At the command prompt type ipconfig /all. This will display the IP
configuration settings.
14
NN40011-004 Issue 1.2 BCM Rls 6.0
Networking Essentials
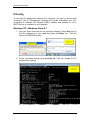
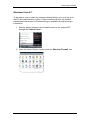
3. If a DHCP Server is being used, then it is possible to return the IP
Address that has been assigned to you back to the server. To do this,
type ipconfig /release at the command prompt.
4. After releasing the IP Address, it will be necessary to get another. In
order to do this, type the command ipconfig /renew at the command
prompt, again followed by the enter key. Your new IP Address will now
be assigned to you. Don’t be too concerned if this is the same as the
address previously assigned, remember that the IP Address will be
given out in order of whichever address is available first.
NN40011-004 Issue 1.2 BCM Rls 6.0
15
Networking Essentials
5. It may at times be necessary to see which computers have what IP
Address and MAC address. For those computers that use the DHCP
service, this can be achieved using ARP (Address Resolution
Protocol). At the command prompt, simply type arp –a followed by the
enter key. A table will be displayed showing the IP Addresses and
MAC addresses of all systems using DHCP.
16
NN40011-004 Issue 1.2 BCM Rls 6.0
Networking Essentials
Creating Shortcuts
It can be very useful to create shortcuts for specific programs and have these
placed on the computer desktop to allow quick and easy access. For the
example described in the following procedure, the creation of a shortcut to a
folder named BCM will be shown.
Windows XP
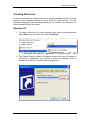
1. To create a shortcut on a user’s desktop, right click on the desktop and
select New from the menu, then select Shortcut.
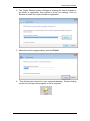
2. The Create Shortcut screen will appear allowing the user to browse to
the folder or application that requires a short cut creating. Click on
Browse to locate the required folder or application.
NN40011-004 Issue 1.2 BCM Rls 6.0
17
Networking Essentials
3. Name the shortcut appropriately, and click Finish.
4. This will place the shortcut on your computer desktop. Double clicking
on the icon will open that program or file as required.
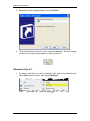
Windows Vista & 7
1. To create a shortcut on a user’s desktop, right click on the desktop and
select New from the menu, then select Shortcut.
18
NN40011-004 Issue 1.2 BCM Rls 6.0
Networking Essentials
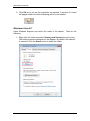
2. The Create Shortcut screen will appear allowing the user to browse to
the folder or application that requires a short cut creating. Click on
Browse to locate the required folder or application.
3. Name the shortcut appropriately, and click Finish.
4. This will place the shortcut on your computer desktop. Double clicking
on the icon will open that program or file as required.
NN40011-004 Issue 1.2 BCM Rls 6.0
19
Networking Essentials
Sharing Folders
It may be necessary to create a shared folder that is accessible to a device,
so that backup files can be sent across the network and stored within that
folder.
Folders can only be shared if the option has been chosen in the setting of the
network connection properties.
20
NN40011-004 Issue 1.2 BCM Rls 6.0
Networking Essentials
Windows XP
Open Windows Explorer and select the folder to be shared. Then do the
following:
1. Right click the folder and select Sharing from the menu. The folder
properties dialogue box will appear. Fill in the Share Name and
Comment text boxes. Then select the Security tag.
2. From here you can choose Add to select and specify user groups. As a
default Everyone will be added. You can also change the levels of
Permissions for that group.
NN40011-004 Issue 1.2 BCM Rls 6.0
21
Networking Essentials
3. Click OK once you set the properties as required. A symbol of a hand
will appear under the folder indicating that it is now shared.
Windows Vista & 7
Open Windows Explorer and select the folder to be shared. Then do the
following:
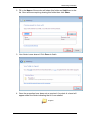
1. Right click the folder and select Sharing and Security from the menu.
The folder properties dialogue box will appear. By default “Not shared”
is selected. Click the Share button to share the folder.
22
NN40011-004 Issue 1.2 BCM Rls 6.0
Networking Essentials
2. Fill in the Name of those who will share this folder and Add them to the
list. Once all those requiring sharing this folder then click Share.
3. Your folder is now shared. Click Done to finish.
4. Once the properties have been set as required. A symbol of a hand will
appear under the folder indicating that it is now shared.
NN40011-004 Issue 1.2 BCM Rls 6.0
23
Networking Essentials
Internet Browser Settings
It may be necessary to alter the Internet browser settings for the Internet
connection.
Windows XP / Windows Vista & 7
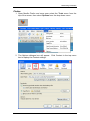
1. To configure Internet Explorer, right click on the Internet Explorer icon
of your desktop and select Properties, or open an Internet Explorer
window then select Tools and select Internet Options. This will then
launch the Internet Properties screen.
24
NN40011-004 Issue 1.2 BCM Rls 6.0
Networking Essentials
2. The General tab (first displayed) shows the Home Page address that
will be opened every time Internet Explorer is launched. You may wish
to ensure that the BCM web page is first displayed when you open the
web browser, therefore type in the BCM’s IP Address in the Address
field. (e.g. http://10.10.11.1)
3. Now click on the Connections tab.
NN40011-004 Issue 1.2 BCM Rls 6.0
25
Networking Essentials
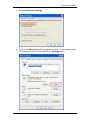
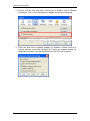
4. Then click on the LAN Settings button. The tick box next to
Automatically detect settings should be ticked, unless a Proxy server
is configured for the network (in which case consult the network
administrator).
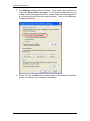
5. To set Internet Explorer as the default Web browser on your PC, select
the Programs tab from the Internet Explorer properties dialogue box. A
tick box is available on this screen next to the sentence Tell me if
Internet Explorer is not the default web browser.
26
NN40011-004 Issue 1.2 BCM Rls 6.0
Networking Essentials
To add an IP Address for local access that will bypass the use of the Proxy
Server, use the following procedure. This is useful for accessing devices such
as the BCM or RCC web host PC that reside on the local network, where a
Proxy Server is configured to control external http traffic.
1. Access the proxy server connections via, LAN settings, Proxy Server,
Advanced button.
2. In the Exceptions screen enter the IP address of the BCM (or RCC web
host PC or other local http server) to bypass the proxy server.
NN40011-004 Issue 1.2 BCM Rls 6.0
27
Networking Essentials
Configuring Java settings
To allow a connection to CallPilot Manager, Java console may need to be set
for whichever Internet browser you are using.
Java
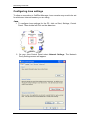
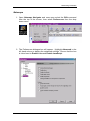
1. To configure Java settings for the PC, click on Start, Settings, Control
Panel. Then double left Click on the Java icon.
2. On your Java Control Panel select Network Settings. The Network
Proxy Settings screen will appear.
28
NN40011-004 Issue 1.2 BCM Rls 6.0
Networking Essentials
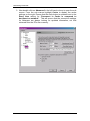
3. Click Use Browser Settings.
4. Click on the General tab of the properties screen. In the centre section
for Temporary Internet Files, click on the Settings button.
NN40011-004 Issue 1.2 BCM Rls 6.0
29
Networking Essentials
5. The Settings dialogue box will appear. Click on the radio button next
to the line Every visit to the page. This will ensure that there are up
to date versions being provided on a regular basis, and that information
is not being retrieved from the cached memory. Click on the OK button
to apply this setting.
6. Finally click on the OK button on the bottom of the Internet Properties
screen, and reboot your computer if necessary.
30
NN40011-004 Issue 1.2 BCM Rls 6.0
Networking Essentials
Netscape
1. Open Netscape Navigator and once open select the Edit command
from the top of the screen, then select Preferences from the drop
down menu.
2. The Preferences dialogue box will appear. Highlight Advanced in the
left hand column to display the advanced settings. Ensure that the box
is ticked next to Enable Java and Enable JavaScript.
NN40011-004 Issue 1.2 BCM Rls 6.0
31
Networking Essentials
3. Now double click on Advanced in the left hand column to open the sub
menus. From the sub menus highlight Cache to display the cache
settings on the right. Ensure that the radio button is selected next to the
Every time setting for “Document in Cache is compared to
document on network:”. This will ensure that the connection settings
for Netscape are always looking for updated information, not that
retrieved from the PCs own memory.
32
NN40011-004 Issue 1.2 BCM Rls 6.0
Networking Essentials
Firefox
1. Open Mozilla Firefox and once open select the Tools menu from the
top of the screen, then select Options from the drop down menu.
2. The Options dialogue box will appear. Click Content in the top menu
bar to display the Content settings.
NN40011-004 Issue 1.2 BCM Rls 6.0
33
Networking Essentials
3. Ensure that the box has been ticked next to Enable Java to Enable
JavaScript. Click on the Advanced to display the advanced settings.
4. From the sub menu highlight Disable or Replace context menus to
ensure that the connection settings for Firefox are always looking for
updated information, not that retrieved from the PCs own memory.
34
NN40011-004 Issue 1.2 BCM Rls 6.0
Networking Essentials
Copy and Paste
It may be necessary to copy documents or files and paste them into another
location. The procedure for this is quite straight forward although there are
other ways than the one described. When moving a file, you delete it from its
original location. When you copy a file, you duplicate it in another location.
Windows XP
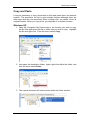
1. Open My Computer/ My Documents or the location you wish to copy
the file from and select the file or folder that you wish to copy. Highlight
the file and right click. From the menu select Copy.
2. Now open the destination folder. Again right click within the folder, and
from the menu select Paste.
3. The copied document will now be seen within the folder window.
NN40011-004 Issue 1.2 BCM Rls 6.0
35
Networking Essentials
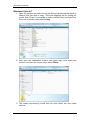
Windows Vista & 7
1. Open the location you wish to copy the file from and select the file(s) or
folder(s) that you wish to copy. Click and Highlight the file (Using the
mouse and Ctrl key it is possible to select multiple files) and right click.
From the on screen menu select Copy.
2. Now open the destination location and again right click within this
location, and from the screen menu select Paste.
3. The copied document(s) would then be seen within the new folder
window.
36
NN40011-004 Issue 1.2 BCM Rls 6.0
Networking Essentials
Firewall Settings
It could be necessary to change the firewall settings or add additional ports to
the firewall exceptions screen to allow communication between the BCM and
an application installed on a customer’s PC. Within the various operating
systems the procedure is quite straight forward. Although this is normally the
responsibility of the Network Administrator to ensure that these ports are not
blocked by any firewall. E.g. RCC installation
Windows XP
To be able to view or make the changes detailed below, you must log-on to
the PC with Administrative rights. If unsure, confirm with the site network
administrator that access to firewall settings is available through the logon
credentials.
1. Start by gaining access to the firewall screen on the required PC
through the Control Panel.
NN40011-004 Issue 1.2 BCM Rls 6.0
37
Networking Essentials
2. After the Control Panel opens, select the Windows Firewall Icon.
3. When the screen apears, click on Exceptions.
38
NN40011-004 Issue 1.2 BCM Rls 6.0
Networking Essentials
4. To add a port with the ability to bypass the current firewall settings,
click on Add Port, to view current settings for a Port or Program, click
to highlight and click on Properties and the Add Port screen will be
displayed.
5. Enter the required Port details by giving it a suitable Name associated
with the required Port number. Click OK to confirm the port details to
be added.
NN40011-004 Issue 1.2 BCM Rls 6.0
39
Networking Essentials
6. Check within the Windows Firewall Settings screen that the added
port is visible. To confirm or change port settings, highlight the port
name and click on Edit.
40
NN40011-004 Issue 1.2 BCM Rls 6.0
Networking Essentials
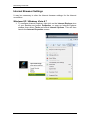
Windows Vista & 7
To be able to view or make the changes detailed below, you must log-on to
the PC with Administrative rights. If unsure confirm with the site network
administrator that access to firewall settings is available through the logon
information.
1. Start by gaining access to the firewall screen on the required PC
through the Control Panel.
2. Once the Control Panel is open select the Windows Firewall Icon.
NN40011-004 Issue 1.2 BCM Rls 6.0
41
Networking Essentials
3. The Ccurrent Firewall status is displayed, selecting either Allow a
program through Windows Firewall or Change Settings links to
view the settings screen.
4. When the screen apears, click on Exceptions.
42
NN40011-004 Issue 1.2 BCM Rls 6.0
Networking Essentials
5. To add a port with the ability to bypass the current firewall settings,
click on Add Port, to view current settings for a Port or Program, click
to highlight and click on Properties and the Add Port screen will be
displayed.
6. Entering the required Port details, by giving it a suitable Name
associated with the required Port number. Click OK to confirm the port
details to be added.
NN40011-004 Issue 1.2 BCM Rls 6.0
43
Networking Essentials
7. Check within the Windows Firewall Settings screen that the added
port is visible. To confirm or change port settings, highlight the port
name and click on Properties.
8. Configure additional ports as required
44
NN40011-004 Issue 1.2 BCM Rls 6.0