1
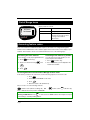
Business Communications Manager
NetVision Telephone and
NetVision Data Telephone
Feature Card
© 2002 Nortel Networks
P0988138 05
Trademarks
NORTEL NETWORKS and Business Communications Manager are
trademarks of Nortel Networks.
Symbol, Spectrum24, and NetVision are trademarks of Symbol
Technologies, Inc.
NetVision quick start call basics
A handset user guide is supplied with each Symbol® NetVision handset which describes, in detail,
how to use the buttons on the handset, including any data-related buttons found on the NetVision
Data phone. Note: The buttons described here are not located in the same place on all models.
Logging into and out of the network
Logging in:
Logging out:
SND
Press SND to turn the handset on.
END to turn the handset off.
Press and hold END
SND
Enter your PIN number, and press SND .
Quick start hints
You must be logged into the network:
SND
Make call: Enter number and press SND .
END .
End call or feature: Press END
SND
Answer Call: Press SND .
END to silence a ringing call, to
If you pressed END
<
SND
SND
To Hold or Unhold a call, or to toggle
retrieve the call, press
HOLD .
between two calls:Press HOLD
To Hold the call and drop the link so someone
choose FCT Off-hook, if it is programmed into
the menu.
Note: This sequence also produces a dial tone
on an idle telephone.
END .
END
HOLD
else can pick it up, press HOLD
To recover a held call from a dropped link,
press:
<
SND
SND
HOLD
HOLD
or
.
Active handset display
The handset display shown below is from the NetVision handset. If you have a NetVision data
telephone or a new version of the handset, the shape of the display may have a different
appearance, however, the icons on all handsets indicate the same thing:
Radio signal strength indicator
Active line indicator
Idle/alert icon
active call icon
Call information
NAME
XXX-XXXX
Battery strength
indicator
Page 3
Out of Range tones
Display reads: No network
NVPhone
No Network
Handset status
Tone
Idle
1 long beep and 2 short beeps
Active call
2 short beeps
You have 10 seconds to return
to range or the handset
disconnects.
Accessing feature codes
Some of the NetVision and NetVision Data telephone call features are configured through the
NetVision Phone Administrator. These features appear in the function menu on the display of your
handset. These features can be accessed from that menu in one of the following ways:
Accessing the menu features
Accessing menu features by number
If the feature is on the pre-programmed menu:
If you know the menu item number, you can
access it by the menu number:
1. Press
FCT
(Function key)
2. Scroll to the menu item using
#>.
< and
1. Press FCT (Function key)
2. Press the number(s) on the dialpad for the
feature menu number.
SND
3. Press SND .
Accessing Business Communication Manager feature codes
If the feature you want is not on the menu, use the following sequence to invoke the code:
1. Press FCT .
2. Find and select FEATURE on the menu.
3. Press SND .
4. Enter the feature code (listed below).
Or you can use one of the following shortcuts:
SND
1<feature code> (idle line or during call) OR
Note: 1 indicates the menu position of FEATURE.
FCT
< <feature code>
SND
SND
(idle line only)
END to end sessions for DTMF features which require user input
Ending a DTMF feature: Press END
after starting a call and providing dialtone.
Page 4
Telephone features
Some of these features may be programmed onto the FCT menu. Refer to Accessing the menu
features for directions about how to use features programmed on the menu. Note that you can also
manually activate menu features with the codes given below.
You use the following feature codes by selecting the Feature menu item, then by entering the feature
code. Refer to Accessing Business Communication Manager feature codes.
Call Center
Agent Login
9
WXY
0
QZ
4
GHI
Login and receive calls as an Call Center agent if the Call Center feature is active
on your system.
Call Center
Agent
Make Busy
Call Forward
9
WXY
0
QZ
8
TUV
Temporarily stop receiving calls from the Call Center system.
4
Cancel
GHI
#> 4
GHI
Send your calls to another telephone in your system.
Call Park
7
PRS
4
GHI
HOLD . The other two callers can still talk to
To put a conference on hold: Press HOLD
each other. If you were the one who initiated the conference, the link drops.
<
Press
SND
SND
to return to the conference. If off-hook is programmed on the
FCT menu, you can also choose
Conference
1
FCT
Off-hook to return to the conference.
Cancel
#> 1
HOLD . The other two callers can still talk to
To put a conference on hold: Press HOLD
each other. If you were the one who initiated the conference, the link drops.
<
Press
SND
SND
to return to the conference. If off-hook is programmed on the
FCT menu, you can also choose
DN query
< 0
FCT
Off-hook to return to the conference.
QZ
Display the directory number of the handset.
Do Not
Disturb
8
TUV
5
JKL
Cancel
#> 8
TUV
5
JKL
When you are not on a call, prevent all incoming calls, except priority calls, from
ringing at your telephone. When you are on a call, block an incoming priority call.
Page 5
Hunt
groups
If you are a hunt group member, you have access to Hunt group features.
Language
Choice
< 5
JKL
0
QZ
1
< 5
JKL
0
QZ
2
ABC
Select Alternate Language for the telephone display.
< 5
JKL
0
QZ
3
DEF
Select Alternate Language 2 for the telephone display.
< 5
JKL
0
QZ
4
GHI
Select Alternate Language 3 for the telephone display.
Select Primary Language for the telephone display.
Note: Alternate language choices only work for system-generated call features.
Last Number
Redial
5
JKL
Automatically redial the last external telephone number that you dialed.
Line pools
6
MNO
4
GHI
Line pools allow telephones to share several lines for making calls.
Enter the code, and then enter a line pool access code. (See your System
Administrator for a list.)
Link
7
PRS
1
Generate a Link signal ‹ to access a PBX or other host exchange.
Messages
< 0
QZ
Display the directory number of the handset.
Send a message to another telephone within your system.
To view and reply to your messages:
1. Press
<
2. Press
< and # > to view your message list.
3. Press
0
QZ
SND
SND
6
MNO
Note:
NetVision
handsets can
only send
Pages.
They cannot
receive Pages.
Page 6
6
MNO
0
QZ
JKL
.
to call the person who left you the message.
To erase a message: Press
Page
5
HOLD
HOLD
while viewing a message.
and digits 1, 2 or 3 and zone 0, 1, 2, 3, 4, 5, or 6.
Make a page announcement through either the internal (code 1) or external
(code 2) speakers, or both (code 3). Zone 0 pages all zones.
Page announcements are programmed to timeout after a pre-selected amount of
time. This is set by your System Administrator.
6
MNO
1
and zone 0, 1, 2, 3, 4, 5, or 6
Make a page announcement to all, or to a specific group of telephones, through
the telephone speakers. Zone 0 pages all zones.
External page
6
MNO
2
ABC
Make a page announcement through an external loudspeaker system.
Internal and external page
6
MNO
3
DEF
and zone 0, 1, 2, 3, 4, 5, or 6
Make a page announcement through both your telephone speakers and an
external loudspeaker system. Zone 0 pages all zones.
Pause
7
PRS
8
TUV
Program in an external autodial sequence to insert a 1.5 second delay ›.
For pulse dialing:
Priority
Call
6
MNO
9
WXY
< also inserts a 1.5 second delay.
Interrupt a person who is on a call.
A person on another call can invoke code
priority calls.
Privacy
8
TUV
3
DEF
8
TUV
5
JKL
(Do Not Disturb) to block
Change the privacy setting for an external line.
If a line normally has privacy, this permits another telephone that shares the line
to join your call by selecting the line while you are using it. If a line normally has
privacy disabled, this prevents another telephone that shares the line from joining
your call by selecting the line while you are using it. The privacy setting is reestablished once you end your call or when you enter the Privacy feature code
again.
Speed Dial
(Local)
To save speed dial numbers locally to the handset:
To add or replace a number on the handset list:
1. Dial the number.
2. Press FCT .
3. Dial a unique two-digit location (00 - 99).
To dial from a speed dial:
1. Press FCT once.
2. Key in the speed-dial location code (00-99).
SND
3. Press SND .
Page 7
To scroll through the speed-dial list:
1. Press
FCT
once.
2. Scroll through the list shown on the display to find the number you want.
SND
3. Press SND .
System
Speed Dial
0
QZ
Dial an external telephone number using a two-digit code (01 to 70).
System speed dial codes can be used from any display telephone in the system.
They are assigned by your System Administrator.
To make a call using a speed dial code:
1. Invoke the code.
2. Enter the two-digit code assigned to the parked call (01 to 70).
SWCA keys
System Wide
Call
Appearance
< 5
JKL
2
ABC
1
< 5
to
JKL
3
DEF
6
MNO
Use SWCA codes to retrieve and park calls on the system.
On display telephones, these codes will be assigned to buttons with indicators. On
the NetVision handset, these codes may appear on the Function menu, or you
enter the codes manually, using the menu Feature function.
Parking a call to SWCA keys:
Make a call available to any other telephone with the same SWCA key
assignment. Also follow these procedures if you retrieved a SWCA call, and want
to repark it.
– If you have the keys assigned to the feature menu: Choose the menu item
corresponding to a SWCA key or a SWCA key search command.
– If the code is not assigned to the feature menu use the Feature menu item, and
then enter the feature code for the SWCA key.
– If you want the system to assign an open SWCA key: Enter
< 5
JKL
2
ABC
0
QZ
. (This code can also be assigned to the feature
menu.)
Answering a SWCA call:
– If you know where the call is parked:
Choose the Feature menu item, then enter the feature code for the SWCA key.
The call becomes active on an intercom key.
< 5 JKL 3 DEF 7 PRS .
– To find the oldest parked call: Enter
(This code can also be assigned to the feature menu.)
The call that has been parked the longest will become the active call on your
intercom key.
Page 8
< 5 JKL 3 DEF 8 TUV .
– To find the newest parked call: Enter
(This code can also be assigned to the feature menu.)
The call that was parked last will become the active call on your intercom key.
When you repark a call, regardless of when it was received, it becomes the
newest parked call.
Putting a SWCA call on Hold:
How a SWCA call acts when you put it on Hold, depends on how the system
settings are configured. Ask your system administrator how your system is
configured.
One of the following will occur when you put a call on Hold for SWCA:
HOLD on an active call, the call will return to an assigned
– When you press HOLD
SWCA key, or it will attempt to assign to a SWCA. If the call gets successfully
parked, a call appearance will show up on all telephones with that SWCA key.
If it does not successfully park, the call remains on Hold at your telephone.
OR
– The call will simply remain on Hold at your telephone and you will have to
manually enter a SWCA code to park it for other telephones to access the call.
Intercom calls
Your system administrator also configures whether intercom calls will
automatically assign to a SWCA key and whether they will automatically assign to
a SWCA key if you put the call on Hold. Ask your system administrator how your
system is configured. If intercom calls do not automatically assign to a SWCA key,
you can manually enter a SWCA code to park an intercom call.
Time
8
TUV
0
QZ
3
DEF
Briefly display the time and date while you are on a call.
Transfer
7
PRS
0
QZ
Cancel
7
PRS
0
QZ
Send a call to another telephone within your system, or to an external telephone.
You may not be able to transfer a call on an external line to an external telephone,
depending on the capabilities of the lines.
1. Make or answer a call.
2. Invoke the code.
3. Call the person you want to transfer the call to.
4. Stay on the line if you wish to speak to the person first.
END to complete the transfer.
5. Press END
If an external call is transferred to a busy internal or network extension, or is not
answered after a few rings, the call automatically rings you back.
Page 9
Trunk
Answer
8
TUV
0
QZ
0
QZ
Answer an external call that is ringing on a line that has been placed into a
Ringing Service schedule from any telephone in your system. This feature does
not work for a private line.
Voice Call
6
MNO
6
MNO
Make an announcement or begin a conversation through the speaker of another
telephone in the system. Note: Telephones without speakers, such as the
NetVision handset, must be set up to receive voice calls as ringing calls.
Voice Mail
9
WXY
8
TUV
1
Login to voice mail system and receive and manage voice mail calls.
Leave a message:
9
WXY
Call forward a message:
8
9
TUV
0
QZ
WXY
8
TUV
4
9
Voice Mail directory number inquiry:
Transfer a message:
Intercept a message:
9
WXY
9
WXY
Access voice mail directory:
Record a voice mail call:
Page 10
9
8
TUV
8
TUV
9
WXY
WXY
8
6
WXY
8
TUV
MNO
7
PRS
8
TUV
GHI
TUV
9
8
WXY
TUV
5
JKL