1
BCM Rls 6.0
ipView SoftBoard
Task Based Guide
ipView SoftBoard
Copyright © 2010 Avaya Inc.
All Rights Reserved.
Notices
While reasonable efforts have been made to ensure that the information in this document is complete and accurate
at the time of printing, Avaya assumes no liability for any errors. Avaya reserves the right to make changes and
corrections to the information in this document without the obligation to notify any person or organization of such
changes.
Documentation disclaimer
Avaya shall not be responsible for any modifications, additions, or deletions to the original published version of
this documentation unless such modifications, additions, or deletions were performed by Avaya. End User agree to
indemnify and hold harmless Avaya, Avaya’s agents, servants and employees against all claims, lawsuits, demands
and judgments arising out of, or in connection with, subsequent modifications, additions or deletions to this
documentation, to the extent made by End User.
Link disclaimer
Avaya is not responsible for the contents or reliability of any linked Web sites referenced within this site or
documentation(s) provided by Avaya. Avaya is not responsible for the accuracy of any information, statement or
content provided on these sites and does not necessarily endorse the products, services, or information described or
offered within them. Avaya does not guarantee that these links will work all the time and has no control over the
availability of the linked pages.
Warranty
Avaya provides a limited warranty on this product. Refer to your sales agreement to establish the terms of the
limited warranty. In addition, Avaya’s standard warranty language, as well as information regarding support for
this product, while under warranty, is available to Avaya customers and other parties through the Avaya Support
Web site: http://www.avaya.com/support
Please note that if you acquired the product from an authorized reseller, the warranty is provided to you by said
reseller and not by Avaya.
Licenses
THE SOFTWARE LICENSE TERMS AVAILABLE ON THE AVAYA WEBSITE,
HTTP://SUPPORT.AVAYA.COM/LICENSEINFO/ ARE APPLICABLE TO ANYONE WHO DOWNLOADS,
USES AND/OR INSTALLS AVAYA SOFTWARE, PURCHASED FROM AVAYA INC., ANY AVAYA
AFFILIATE, OR AN AUTHORIZED AVAYA RESELLER (AS APPLICABLE) UNDER A COMMERCIAL
AGREEMENT WITH AVAYA OR AN AUTHORIZED AVAYA RESELLER. UNLESS OTHERWISE
AGREED TO BY AVAYA IN WRITING, AVAYA DOES NOT EXTEND THIS LICENSE IF THE
SOFTWARE WAS OBTAINED FROM ANYONE OTHER THAN AVAYA, AN AVAYA AFFILIATE OR AN
AVAYA AUTHORIZED RESELLER, AND AVAYA RESERVES THE RIGHT TO TAKE LEGAL ACTION
AGAINST YOU AND ANYONE ELSE USING OR SELLING THE SOFTWARE WITHOUT A LICENSE. BY
INSTALLING, DOWNLOADING OR USING THE SOFTWARE, OR AUTHORIZING OTHERS TO DO SO,
YOU, ON BEHALF OF YOURSELF AND THE ENTITY FOR WHOM YOU ARE INSTALLING,
DOWNLOADING OR USING THE SOFTWARE (HEREINAFTER REFERRED TO INTERCHANGEABLY
AS "YOU" AND "END USER"), AGREE TO THESE TERMS AND CONDITIONS AND CREATE A
BINDING CONTRACT BETWEEN YOU AND AVAYA INC. OR THE APPLICABLE AVAYA AFFILIATE
("AVAYA").
Copyright
Except where expressly stated otherwise, no use should be made of the Documentation(s) and Product(s) provided
by Avaya. All content in this documentation(s) and the product(s) provided by Avaya including the selection,
arrangement and design of the content is owned either by Avaya or its licensors and is protected by copyright and
other intellectual property laws including the sui generis rights relating to the protection of databases. You may not
modify, copy, reproduce, republish, upload, post, transmit or distribute in any way any content, in whole or in part,
including any code and software. Unauthorized reproduction, transmission, dissemination, storage, and or use
without the express written consent of Avaya can be a criminal, as well as a civil offense under the applicable law.
Third Party Components
Certain software programs or portions thereof included in the Product may contain software distributed under third
party agreements ("Third Party Components"), which may contain terms that expand or limit rights to use certain
portions of the Product ("Third Party Terms"). Information regarding distributed Linux OS source code (for those
Products that have distributed the Linux OS source code), and identifying the copyright holders of the Third Party
Components and the Third Party Terms that apply to them is available on the Avaya Support Web site:
http://support.avaya.com/Copyright.
Trademarks
The trademarks, logos and service marks ("Marks") displayed in this site, the documentation(s) and product(s)
provided by Avaya are the registered or unregistered Marks of Avaya, its affiliates, or other third parties. Users
are not permitted to use such Marks without prior written consent from Avaya or such third party which may own
the Mark. Nothing contained in this site, the documentation(s) and product(s) should be construed as granting, by
implication, estoppel, or otherwise, any license or right in and to the Marks without the express written permission
of Avaya or the applicable third party. Avaya is a registered trademark of Avaya Inc. All non-Avaya trademarks
are the property of their respective owners.
2
NN40011-025 Issue 1.2 BCM Rls 6.0
ipView SoftBoard
Downloading documents
For the most current versions of documentation, see the Avaya Support. Web site: http://www.avaya.com/support
Contact Avaya Support
Avaya provides a telephone number for you to use to report problems or to ask questions about your product. The
support telephone number is 1-800-242-2121 in the United States. For additional support telephone numbers, see
the Avaya Web site: http://www.avaya.com/support
Copyright © 2010 ITEL, All Rights Reserved
The copyright in the material belongs to ITEL and no part of the material may
be reproduced in any form without the prior written permission of a duly
authorised representative of ITEL.
NN40011-025 Issue 1.2 BCM Rls 6.0
3
ipView SoftBoard
Table of Contents
ipView Softboard............................................................... 5
Overview .......................................................................................... 5
PC Requirements...............................................................................................6
Operating System Compatibility ........................................................................6
Required Information ....................................................................... 6
Flow Chart ....................................................................................... 7
Installing the ipView SoftBoard ........................................................ 8
Installing Multiple ipView SoftBoards on one PC ........................... 17
Configuring ipView SoftBoard in Reporting for Contact Center...... 19
Configuring Messages, Alarms and Schedules ............................. 28
Messages .........................................................................................................28
Alarms ..............................................................................................................32
Scheduled Messages ......................................................................................36
Display Options .............................................................................. 41
Long View ........................................................................................................41
Message View..................................................................................................42
Parameter View ...............................................................................................42
History View .....................................................................................................43
Summary View .................................................................................................44
Shutting Down ipView ......................................................................................45
Tooltray Icon .................................................................................. 45
Re-play Summary ............................................................................................46
Configuration ....................................................................................................46
About ipView ....................................................................................................46
Close ipView ....................................................................................................47
Configuring ipView ......................................................................... 47
View Tab ..........................................................................................................48
Graphing Tab ...................................................................................................50
Echoing Tab .....................................................................................................52
Avaya Documentation Links .......................................... 54
4
NN40011-025 Issue 1.2 BCM Rls 6.0
ipView SoftBoard
ipView Softboard
Overview
Avaya‟s ipView Software WallBoard is often referred to as the ipView
SoftBoard.
The ipView SoftBoard is a Windows® software application that provides
software based IP enabled wallboards on the PC desktop of Contact Center
Agents.
Contact Center Statistics and Messages from the Avaya Reporting for Contact
Center application are displayed in Real Time on the ipView SoftBoard.
Audible Alerts can be associated with certain events, and histograms can be
displayed to graphically show the changes in a particular Contact Center
parameter over a rolling period of 15 minutes.
Configuring Reporting for Contact Center to operate with ipView is exactly the
same as configuring Reporting for Contact Center to operate with a hardware
wallboard.
The ipView SoftBoard is completely compatible with the ipView Hardware
wallboard, and a mixture of ipView hardware wallboards and ipView
SoftBoards can be configured within the Avaya Reporting for Contact Center
application.
Additionally, ipView SoftBoards can relay their input to any number of other
IP enabled wallboards, either ipView hardware wallboards or ipView
SoftBoards.
ipView SoftBoards on BCM, when working in conjunction with Reporting for
Contact Center will allow multiple installations on one PC. This allows an
Agent or Supervisor to view statistics on one or more Skillset. Earlier versions
allowed one or all of the Skillset statistics to be viewed. This version allows a
selection from the Skillsets and will display one or more ipView SoftBoards
on each PC Desktop.
Note: ipView SoftBoard can operate in UK English, North American English,
French, Canadian French, Italian, Spanish, Latin American Spanish, German,
Dutch, Brazilian Portuguese, Danish, Norwegian and Swedish.
Advances in the language configuration of Reporting for Contact Center
means that even though RCC may be running in UK English, the Wallboards
connected can be a mixture of the available languages. RCC can now use
different languages on different wallboards connected to the same RCC Web
Host PC.
NN40011-025 Issue 1.2 BCM Rls 6.0
5
ipView SoftBoard
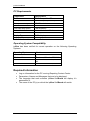
PC Requirements
Component
Platform
Microprocessor
Microprocessor speed
RAM
Free hard disk space
Network Interface
Network Protocol
Display Type
Display (Graphics) Card
Specification
IBM™ Compatible PC
Pentium 1 (or equivalent) minimum
200 MHz minimum
16 Mb minimum
2 Mb minimum
Network Interface Card
TCP/IP protocol
SVGA display
SVGA graphics card
Operating System Compatibility
ipView has been verified for correct operation on the following Operating
Systems:
Operating System
Windows XP Professional
Windows Vista
Windows 7
Windows Server 2008
Version
SP3
Business, Ultimate, 32/64 bit
Professional, Ultimate, 32/64
bit
Standard Edition R2, 32/64 bit
Required Information
6
Log on information for the PC running Reporting Contact Center.
Parameters, Alarms and Messages that are to be displayed.
The language that each software ipView SoftBoard will display it‟s
parameters in.
The name of the PC(s) on which the ipView SoftBoard will reside.
NN40011-025 Issue 1.2 BCM Rls 6.0
ipView SoftBoard
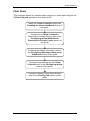
Flow Chart
This flowchart depicts the relevant steps required to install and configure the
IPView Softboard application on a desk top PC.
Install the IPView Softboard: refer to the
Installing the ipView SoftBoard section of
this guide.
Configure the IPView Softboard in
Reporting for Contact Centre: refer to the
Configuring ipView SoftBoard in
Reporting for Contact Center section of
this guide.
Configure the display information: refer to
the Configuring Messages, Alarms and
Schedules section of this guide.
Configure User Settings on the IPView
Softboard: refer to the Configuring ipView
section of this guide.
Configure Echoing for any Slave Boards:
refer to the Echoing Tab section of this
guide.
NN40011-025 Issue 1.2 BCM Rls 6.0
7
ipView SoftBoard
Installing the ipView SoftBoard
You can install the ipView SoftBoard onto any PC Desktop that is connected
via the network to the Reporting for Contact Center Web Host PC, with the
TCP/IP protocol.
To install the ipView SoftBoard onto an Agent desktop, go to the Agent PC
and perform the following steps.
1. Exit any Windows applications that are running.
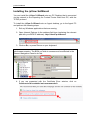
2. Open Internet Explorer.In the address field type (replacing the relevant
part with your BCM IP address): http://<bcm ip address>/
3. Click on Go, or press Return on your keyboard.
Note: You can also use the Web Page button in Element Manager to launch a
web broswer session. The BCM you wish to access must be selected in the
Element Navigation Panel to do this.
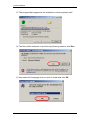
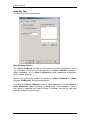
4. If you are presented with the Certificate Error window, click on
Continue to this website (not recommended).
8
NN40011-025 Issue 1.2 BCM Rls 6.0
ipView SoftBoard
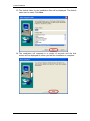
5. Accept any further security messages that you may get presented with.
6. You will now see the login screen, enter your BCM User name and
Password. By default these are set to User ID: nnadmin Password:
PlsChgMe! Click on OK.
7. In the Welcome to BCM window, ensure the Main tab has been
selected, and the BCM button clicked.
NN40011-025 Issue 1.2 BCM Rls 6.0
9
ipView SoftBoard
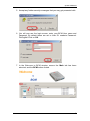
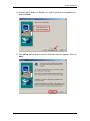
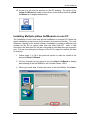
8. In the Applications area, select User Applications,and click on Run.
9. Again, accept any security messages that appear, and if prompted
enter any login details.
10. The Business Applications page will appear. Click on the ipView
Softboard link.
10
NN40011-025 Issue 1.2 BCM Rls 6.0
ipView SoftBoard
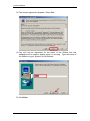
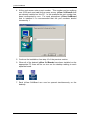
11. Then select the Download Wallboard IP View Client link from the
right section of the screen.
12. Click the Run button.
NN40011-025 Issue 1.2 BCM Rls 6.0
11
ipView SoftBoard
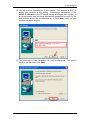
13. The progress bars appear as the installation routine prepares itself.
14. The files will be extracted. In the Security Warning window, click Run.
15. Now select the Language that you wish to install and click OK.
12
NN40011-025 Issue 1.2 BCM Rls 6.0
ipView SoftBoard
16. Choose which dialect of English you wish to perform the installation in,
and click Next.
17. The ipView Splash Screen and the Welcome screens appear. Click on
Next.
NN40011-025 Issue 1.2 BCM Rls 6.0
13
ipView SoftBoard
18. The license agreement appears. Select Yes.
19. You will now be requested for the name of the Skillset that this
wallboard will be used to display once it is running. Type the name of
the Skillset or type „System‟ for all Skillsets.
20. Click Next.
14
NN40011-025 Issue 1.2 BCM Rls 6.0
ipView SoftBoard
21. You will now be requested for a port number. This number is 3500 by
default and remains at this setting. Subsequent installations of the
ipView SoftBoard on this PC would require a different port number. It
is recommended that with each subsequent installation on each PC the
port number should be incremented by 1. Click Next when the port
number has been entered.
22. The destination of the installation will now be displayed. The default
location can be used. Click Next.
NN40011-025 Issue 1.2 BCM Rls 6.0
15
ipView SoftBoard
23. The default folder for the installation files will be displayed. The default
name can be used. Click Next.
24. The installation will complete in a couple of seconds and the final
screen will be displayed to inform you that the installation is complete.
16
NN40011-025 Issue 1.2 BCM Rls 6.0
ipView SoftBoard
25. A new icon will now be present on the PC desktop. The name of the
ipView SoftBoard will relate to the name of the Skillset that this ipView
SoftBoard is to display statistics for.
Installing Multiple ipView SoftBoards on one PC
The installation of more than one ipView SoftBoard on a single PC follows the
same installation procedure as documented in the previous section. The only
difference relating to the actual software installation is setting a different port
number for the PC to receive data from the Web Host PC. Later in this
document, the Web Host PC will be configured to send data through a specific
port. We are now setting the software on the PC to expect to receive the data
on that port.
1. Follow steps 1 to 18 in the previous section to start the install of the
second ipView SoftBoard.
2. For this example we are going to set this ipView SoftBoard to display
data relating to the first Skillset in the Contact Center, Skill1.
3. When you reach step 19 enter the name of the first Skillset. Click Next.
NN40011-025 Issue 1.2 BCM Rls 6.0
17
ipView SoftBoard
4. At the next screen enter a port number. This number can be anything
over 3500 and must not be the same as any ipView SoftBoards that
are already installed on this PC. In this example the port number has
been incremented by one. For each subsequent ipView SoftBoard
that is installed it is recommended that the port numbers should
increase by 1.
5. Continue the installation from step 16 of the previous section.
6. When all of the desired ipView SoftBoards have been installed on the
appropriate PC there will be an icon on the desktop relating to each
separate board.
7. Each ipView SoftBoard can now be opened simultaneously on the
desktop.
18
NN40011-025 Issue 1.2 BCM Rls 6.0
ipView SoftBoard
Configuring ipView SoftBoard in Reporting for Contact
Center
1. Access Reporting for Contact Center (refer to the Reporting for
Contact Center Guide for instructions on accessing RCC). You must
log into RCC with a username that has been configured to allow
configuration of wallboards (and also has Skillsets assigned to them).
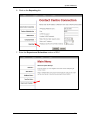
2. Select the Contact Center Connection link.
NN40011-025 Issue 1.2 BCM Rls 6.0
19
ipView SoftBoard
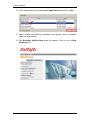
3. Then the Select an IP Address drop down box: if there is more than
one network card installed on the Web Host PC, from the Select an IP
Address drop down list select the IP address (of the Network Interface
Card) that is to be used to communicate with wallboards. Select the IP
address that has been configured on the Network Interface Card
connected to the same network as the wallboards.
Note: This is not the IP address of a wallboard itself. If you only have one
network card installed on the Web Host PC this setting will default to the
IP address of the card.
(To see the Contact Center Connection Screen you must be logged in as
an administrator of RCC).
4. Wallboard and Real Time Refresh Interval. Select the refresh
interval for wallboard and real time displays. The default is 1 second
with an option for 3 seconds. This setting only applies to the refresh
rate of the display, not the data. For example if 3 seconds is selected
the display updates every 3 seconds, but the data is still calculated to
the second.
5. Click Submit.
20
NN40011-025 Issue 1.2 BCM Rls 6.0
ipView SoftBoard
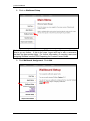
6. Click on the Reporting link.
7. Enter the Reports and Schedules section of RCC.
NN40011-025 Issue 1.2 BCM Rls 6.0
21
ipView SoftBoard
8. Click on Wallboard Setup.
Note: If the user does not have any Skillsets assigned then you will not be
able to go any further. If this is the case, logout and log in with a username
that has the appropriate rights. For further information on creating users and
assigning Skillsets see the ITEL Reporting for Contact Center Guide.
9. Click Wallboard Assignment. Click Add.
22
NN40011-025 Issue 1.2 BCM Rls 6.0
ipView SoftBoard
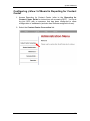
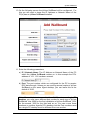
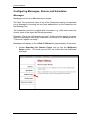
10. On the following screen the ipView SoftBoard will be configured. For
this you will need to know the IP Address or Network Name of the
PC(s) has an ipView SoftBoard installed.
11. Enter the following parameters:
a) IP / Network Name: The IP Address or Network Name of the PC
which the ipView SoftBoard resides on. In this example the PC‟s
address of 10.1.1.21 has been entered.
b) Port: The port number which we configured for the PC to receive
RCC data through. Unless you are running several copies of ipView
SoftBoard on the same Agent desktop, you can leave this at the
default of 3500.
Note: For multiple instances of ipView SoftBoard on a single PC
desktop, you must use a different port number for each copy of ipView
SoftBoard. Use 3500 for the first installation of ipView SoftBoard, 3501
for the second, 3502 for the third and so on. You can re-use these
numbers on another Agent‟s PC‟s desktop, but the Port numbers used
on a single PC desktop must be different from one another.
NN40011-025 Issue 1.2 BCM Rls 6.0
23
ipView SoftBoard
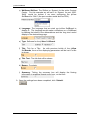
c) Wallboard Skillset: The Skillset or „System‟ for the entire Contact
Center. For this example we will set it to „System‟ for port 3500.
„Skill1‟ would be chosen if we were configuring the ipView
SoftBoard for „Skill1‟ (the port number would then be 3501).
d) Language: The language that we wish our ipView SoftBoard to
display in. The language would make a difference on a SoftBoard
by altering the letters in the abbreviations and the „long view‟ would
display in the desired language.
e) Type: Software for the ipView SoftBoard.
f) Title: Tick for a Title. As with previous builds of the ipView
SoftBoards, three of the displaying parameters will be lost if a title
is shown.
g) Title Text : The title that will be shown.
h) Buzzer : For alerts.
i) Summary: Ticking the summary box will display the flowing
information in graphical format every hour, on the hour.
9. Once the settings have been completed, click ‘Submit’.
24
NN40011-025 Issue 1.2 BCM Rls 6.0
ipView SoftBoard
10. A list of assigned and configured wallboards is now available:
11. Repeat Steps 4 to 10 any other SoftBoards. Remember to enter the
appropriate port number (entered during the installation of the
SoftBoard).
12. The edit the parameters that are to be displayed on the Wallboard click
on Parameters.
NN40011-025 Issue 1.2 BCM Rls 6.0
25
ipView SoftBoard
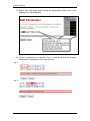
13. Select from the drop down boxes the parameters which are to be
displayed on the Wallboard.
14. When a parameter is selected from a drop down box its concise
description in displayed in the lower text box.
e.g. 1
e.g. 2
26
NN40011-025 Issue 1.2 BCM Rls 6.0
ipView SoftBoard
Below is a complete description of each parameter:
ID
Number of Incoming calls received in the current Day
IH
Number of Incoming calls received in the current Hour
AD
Number of Abandoned calls in the current Day
AH
Number of Abandoned calls in the current Hour
OD
Number of Outgoing calls made in the current Day
OH
Number of Outgoing calls made in the current Hour
SH
Grade of Service offered in the current Hour (%)
SD
Grade of Service offered in the current Day (%)
AO
Number of Agents on Outgoing calls
AI
Number of Agents on Incoming calls
AA
Number of Agents Available to receive calls
AN
Number of Agents in the Not Ready state
AL
Number of Agents Logged in
QL
Current Queue Length - number of calls in the call queue for this Skillset
QT
Current Queue Time for the longest waiting call for this Skillset (secs.)
15. When the choices are complete click Submit.
NN40011-025 Issue 1.2 BCM Rls 6.0
27
ipView SoftBoard
Configuring Messages, Alarms and Schedules
Messages
Messages can be up to 64 characters in length.
The Real Time numerical value of any of the Parameters can be incorporated
into a Message by inserting the two-letter abbreviation for the Parameter into
the Message text.
The Parameter must be in capitals and in brackets, e.g. (AN) would insert the
current value of the Agent Not Ready parameter.
Example: “There are (AN) agents not ready”. If there are five agents not ready
when the Message is sent to the Wallboard, the format of the Message will be:
“There are 5 agents not ready”.
Messages will display on the ipView SoftBoard for approximately 40 seconds.
1. Access Reporting for Contact Center and go into the Wallboard
Setup section. You must log into RCC as a user who has Wallboard
privileges.
28
NN40011-025 Issue 1.2 BCM Rls 6.0
ipView SoftBoard
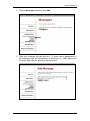
2. Click on Messages and then click Add.
3. Type your message into the text box. To make use of parameters in
the message enter the abbreviation in brackets e.g. “(AN) agents are
not ready and calls are waiting to be answered!”.
NN40011-025 Issue 1.2 BCM Rls 6.0
29
ipView SoftBoard
4. When the message is complete click Submit. In this example the
message will appear on System wallboards that are open on PC‟s.
Note: It would generally be advised that messages are linked against an
alarm parameter that will display the message when the condition for the
alarm is satisfied. (Refer to the Alarms section of this guide).
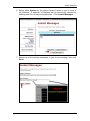
5. This message can be instantly sent to one or more wallboards
(hardware or software) by clicking on the Instant Messages heading.
30
NN40011-025 Issue 1.2 BCM Rls 6.0
ipView SoftBoard
6. Select either System for the entire Contact Center or one or more of
the Skillsets. A selection of Skillsets can be exclusively selected by
holding down the ctrl key during selection. Click Instant Messages.
7. Select one of the existing messages or type a new message, then click
Send.
NN40011-025 Issue 1.2 BCM Rls 6.0
31
ipView SoftBoard
Alarms
Alarms can be configured to alert Agents to conditions within the Contact
Center.
E.g. Less than 2 Agents are available to take calls.
An excessive amount of calls are in the queue.
Calls are waiting excessive times in the queue.
1000 calls have been answered during the day today.
A result of meeting these conditions is to display a message to alert the
agents on their individual desktops.
To Create an Alarm
(In this example a skillset alarm will be configured that will be displayed when
3 or less agents are available to take a call).
1. Follow steps 1 to 4 of the Messages subsection earlier in this section
to configure one or more messages relating to the parameters to which
you wish to alert the Agents.
2. When the messages are complete click on the Alarms heading under
Wallboard Setup. Click Add.
32
NN40011-025 Issue 1.2 BCM Rls 6.0
ipView SoftBoard
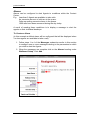
3. Certain parameters now need to be configured.
a. Select the System or the appropriate Skillset to which the
alarms apply to and will be sent to.
b. Select the Parameter name that you wish to monitor and set the
alarm against‟
NN40011-025 Issue 1.2 BCM Rls 6.0
33
ipView SoftBoard
c. Set the start time of the day when you wish the alarm to be
used. Then select the comparison for the alarm and the alarm
threshold. If a message is to be utilized, the message to be
associated with this alarm should also be selected.
4. In this example three alarms have been configured. One to start at
08:30 to alarm for 5 or less Agents being Available. The seconds runs
from 12:00 to 17:59 for 6 or less agents being available. The third is
effective from 18:00 until 08:29 the following morning to monitor for 2 or
less Agents being available.
Note: If no time is selected (left at 00:00) then the alarm will apply 24 hours
per day.
34
NN40011-025 Issue 1.2 BCM Rls 6.0
ipView SoftBoard
5. Click Submit.
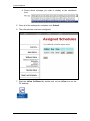
6. The Alarms configured will display on the Assigned Alarms screen.
Note: That the Alarm above has been configured with 2 additional alarm
periods.
NN40011-025 Issue 1.2 BCM Rls 6.0
35
ipView SoftBoard
In this example the alarm has been configured against System
softboards
Scheduled Messages
A Wallboard Schedule is a time and day(s) when a Wallboard Message is
automatically displayed on the Wallboard.
Examples would be to schedule a Message to display as a weekly reminder of
a fire alarm test, or to remind agents to log-in at the start of the working day.
To Schedule a Message
1. Follow steps 1 to 4 of the Messages subsection of this section.
2. Once the messages are configured they can be applied to a schedule.
From the Wallboard Setup Menu, click Schedules and then click Add.
36
NN40011-025 Issue 1.2 BCM Rls 6.0
ipView SoftBoard
3. The Add Schedule screen will be displayed.
4. There are four settings required for a Wallboard schedule.
a. Select either „System’ or the desired Skillset
b. Select the recurrence of the schedule
c. Select the time at which you wish the message to display on the
set recurrence.
NN40011-025 Issue 1.2 BCM Rls 6.0
37
ipView SoftBoard
d. Select which message you wish to display at the scheduled
time.
5. Once all of the settings are complete click Submit.
6. The schedule has now been configured.
7. Start the ipView SoftBoard by double-click on the ipView icon on the
PC desktop.
38
NN40011-025 Issue 1.2 BCM Rls 6.0
ipView SoftBoard
8. The ipView window will appear. The first time you start ipView
SoftBoard it will open in its default view, which is the Short View.
Note: When ipView SoftBoard is first opened it may be necessary to populate
the fields on the soft wallboard, for example making an Agent Not Ready to
reflect activity in the Contact Center. The wallboard should then display data.
If the IP address of your copy of ipView SoftBoard has been configured in the
Wallboards Setup of Reporting for Contact Center Configuration, and
Reporting for Contact Center application is operational, presently ipView
SoftBoard will start to display information.
The information it receives will depend on what has been configured by the
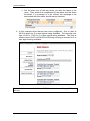
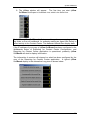
user of the Reporting for Contact Center application. A typical ipView
SoftBoard display in the alternative Long view is shown below.
NN40011-025 Issue 1.2 BCM Rls 6.0
39
ipView SoftBoard
To better understand what the abbreviations represent, point to one of the
abbreviations – using your mouse pointer - and you will see a „tip‟.
If the user of the Reporting for Contact Center has set a threshold for any of
the parameters, which are being displayed on your copy of ipView SoftBoard
and one of those parameters, exceeds that threshold; the parameter value will
be displayed in blinking red.
The Parameter is said to be „in the alarm state‟. If the user has configured it,
there may be an associated audible alert.
40
NN40011-025 Issue 1.2 BCM Rls 6.0
ipView SoftBoard
Display Options
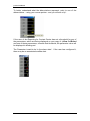
The ipView SoftBoard can be viewed in a variety of displays.
Long View
You can set ipView to operate in Long View. In Long View the two-letter
abbreviations for the parameters are replaced by longer descriptions.
To select Long View, right-click in the ipView window and a small menu will
appear.
The first option is Set Long View. Selecting this will cause ipView to adjust its
view to the Long View.
NN40011-025 Issue 1.2 BCM Rls 6.0
41
ipView SoftBoard
Message View
If Reporting for Contact Center sends a message to the ipView SoftBoard it is
displayed in the Message View window. (Message View windows will appear
whether ipView is currently in Short View or Long View.)
Messages may be sent from the Reporting for Contact Center if:
A parameter goes into the alarm state and has a message associated
with it.
A scheduled message has been set to go at a certain time and that
time has been reached.
A user in Reporting for Contact Center decides to send an instant
message.
All of these messages will be displayed in a Message View window. The
Message View window will be automatically removed when the message has
been displayed for a short period.
Parameter View
1. Click with the left mouse button on one of the parameter values (that
is, on the digits not the abbreviation or description) the Parameter View
window will be activated.
Note: The Parameter View window may open with a blank display. When the
value of the parameter updates, the display will show the data.
42
NN40011-025 Issue 1.2 BCM Rls 6.0
ipView SoftBoard
2. To close the Parameter View window, click once more on the selected
parameter value.
Note: You do not have to close the Parameter View to change the displayed
parameter. With the Parameter View displayed, to display a different
parameter within the Parameter View window click with the left mouse button
on the new parameter value.
History View
1. Click with the left mouse button on one of the parameter
abbreviations or descriptions the History View window will be
activated.
2. To close the History View window, click once more on the selected
parameter abbreviation or description.
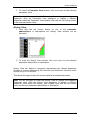
History View will display a histogram representing the chosen parameter
showing a column representing the minimum and maximum values for each
minute, for up to 15 minutes.
This allows the Agent to see the current trend for a selected parameter.
Note: You do not have to close the History View to change the displayed
parameter trend. With the History View displayed, to display a different
parameter trend within the History View window click with the left mouse
button on the new parameter abbreviation or description.
NN40011-025 Issue 1.2 BCM Rls 6.0
43
ipView SoftBoard
Summary View
When the Reporting for Contact Center application sends a summary to the
wallboards, it sends the daily and hourly totals for the following parameters:
Incoming Calls
Outgoing Calls
Abandoned Calls
Grade of Service
When a summary is received by ipView, it stores the hourly values so that
when subsequent summaries are displayed by ipView it can show a series of
four graphs showing the trend of the daily values of each of these parameters
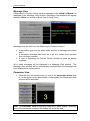
in turn.
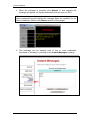
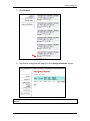
The diagram below shows a montage of the various graphs that are
displayed. (Only one graph is displayed at a time. After a short duration the
displayed graph is replaced by the next one.)
The Summary View window will display itself whenever a summary is received
from the Reporting for Contact Center application, whether ipView SoftBoard
is in Long View or Short View.
Montage of Summary Graphs with ipView in Short View.
There is no need to manually close the Summary View. Once the final graph
has been displayed for a short period the Summary View will be closed
automatically.
44
NN40011-025 Issue 1.2 BCM Rls 6.0
ipView SoftBoard
Shutting Down ipView
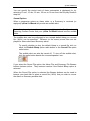
1. To shut down ipView, left-click with the mouse on the button top-right in
the ipView window.
2. You will be presented with a small dialog box asking you to confirm that
you wish to close down your copy of ipView, as shown.
3. Click on OK to close ipView, or click on Cancel to leave ipView
running.
Tooltray Icon
When ipView is running, a small ipView icon is placed in the Tooltray at the
bottom right hand corner of the PC desktop.
Right-clicking with the mouse on the ipView Tooltray icon will cause the menu
to appear.
NN40011-025 Issue 1.2 BCM Rls 6.0
45
ipView SoftBoard
Re-play Summary
Selecting this option causes the Re-play Summary sub-menu to appear.
These options allow you to re-play the most recently received summary. You
can choose to view All of the graphs again, or just select to re-play a single
graph of interest, either: Incoming, Outgoing and Abandoned or Grade of
Service.
Note: If the ipView SoftBoard was not active at the time of the last Summary,
it will show no data.
Configuration
Selecting this option allows you to have access to the ipView Configuration
Property Pages. Refer to the Configuring ipView section for these options.
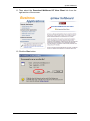
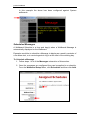
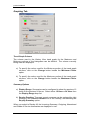
About ipView
Selecting this option causes the dialog shown to appear. The details of your
version of ipView may differ slightly than those shown here.
ipView About Box
Note: In order for the Reporting for Contact Center user to configure your
copy of ipView within Reporting for Contact Center, they will need to know the
IP Address of your PC. The ipView About box provides a simple and quick
way of discovering your IP Address.
46
NN40011-025 Issue 1.2 BCM Rls 6.0
ipView SoftBoard
Close ipView
Selecting this option starts the shut-down process, in exactly the same fashion
as if the button top-right on the ipView window had been clicked.
Configuring ipView
To access the Configuration Property Pages, right-click in the ipView window
and a small menu will appear.
The second option is Configuration. The ipView SoftBoard Configuration
Property Pages appear. There are three tabs within the ipView SoftBoard
Configuration Property Pages. The options which can be selected and set are
grouped together under these headings:
View: The View Tab groups together options which relate to the
ipView appearance and position on the PC desktop.
Graphing: The Graphing Tab groups together options which relate
to the ipView graphs and sounds.
Echoing: The Echoing Tab groups together the options that control
the echoing of the received data to other wallboards.
NN40011-025 Issue 1.2 BCM Rls 6.0
47
ipView SoftBoard
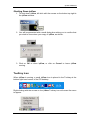
View Tab
View Options
ipView SoftBoard can be viewed either in Short View or Long View.
In Short View abbreviations are used to display the parameter identity and in
Long View more complete text descriptions are used to display the parameter
identity.
Most users start by using Long View for a few days until they get to know
which parameters are being sent to them. Then they change to Short View,
as this takes up less screen area.
You can choose which view you prefer ipView SoftBoard to start up in each
time ipView SoftBoard is launched.
a) To have ipView SoftBoard start up in the Short View, click the
Short View option radio button.
b) To have ipView SoftBoard start up in the Long View, click the Long
View option radio button.
48
NN40011-025 Issue 1.2 BCM Rls 6.0
ipView SoftBoard
Always On Top Options
When you have several programs running on your desktop their windows will
overlap so that only a portion of some windows will be visible, because other
windows are „in front‟ or „on top‟ of them.
Some smaller programs may be completely obscured by other larger
windows.
The way in which ipView SoftBoard positions itself with respect to the
windows of other programs can be specified. The options are:
a) Always On Top. The ipView SoftBoard window is always visible; it
stays „in front‟ of all other application windows, even when the other
applications are the currently active window. This allows you to be
using a full-screen application and still see the ipView SoftBoard
window.
b) Never On Top. The ipView SoftBoard window is only visible when
there are no other applications or windows opened „on top‟ or „in
front‟ of it.
c) On Top For Alerting. This option behaves like the Never On Top
option, except that if ipView SoftBoard receives either a text
message or a summary, or a parameter goes into the Alarm state,
the ipView SoftBoard window will move to the front so that you can
see it. Using any of the windows of the other applications causes
them to move in front of the ipView SoftBoard window once again.
Last Position Options
ipView SoftBoard can be configured to start up at either its default location
(top-right on the desktop) or the screen position at which ipView SoftBoard
was previously closed down.
a) To have ipView SoftBoard start up at its last screen location, click
the Open at last location option radio button.
b) To have ipView SoftBoard start up in the default location, click the
Open at default location option radio button.
NN40011-025 Issue 1.2 BCM Rls 6.0
49
ipView SoftBoard
Graphing Tab
Trend Graph Colours
The colours used in the History View trend graph for the Maximum and
Minimum portions of the histograms can be defined. The colours currently
being used are displayed.
a) To specify the colour used for the Minimum portion of the trend graph
columns, click on the Change button beside the Minimum Colour
option.
b) To specify the colour used for the Maximum portion of the trend graph
columns, click on the Change button beside the Maximum Colour
option.
Summary Options
a) Display Range. Summaries can be configured to show the previous 12
hours or the previous 24 hours. Select either 12 Hour or 24 Hour from
the Display Range drop-list.
b) Re-play Duration. The most recent summary can be replayed by right
clicking on the ipView SoftBoard icon in the Tooltray, and selecting the
Re-play Summary option.
When you select to Replay All, the Incoming Summary, Outgoing, Abandoned
and Grade of Service summaries are displayed in turn.
50
NN40011-025 Issue 1.2 BCM Rls 6.0
ipView SoftBoard
You can specify the period each of these summaries is displayed for, by
selecting 10 sec, 15 sec, 20 sec, 25 sec or 30 sec from the Re-play Duration
drop-list.
Sound Options
When a parameter enters an alarm state, or a Summary is received (or
replayed) ipView SoftBoard will provide an audible alert.
Note: It is dependant on the user setup specifying in the Configuration of
Reporting Contact Center that your ipView SoftBoard should receive audible
alerts.
The audible alert can be configured to be a simple default bleep or a sound
file (.WAV) can be specified. Different (or the same) sound files can be
played for Alarm alerts and Summary alerts.
To specify whether to play the default bleep or a sound file click on
either the Default Bleep option radio button or the Sound File option
radio button.
The audible alert can also be turned off. To turn off the audible alert,
click the radio button beside the „crossed speaker‟ icon.
If you select the Sound File option, the Alarm File and Summary File Browse
buttons become active. They become inactive if the Default Bleep option is
selected.
When the Sound File option is selected the Browse buttons can be used to
browse your hard disk to select a sound file (.WAV) that you wish to use as
the Alarm or Summary audible alert.
NN40011-025 Issue 1.2 BCM Rls 6.0
51
ipView SoftBoard
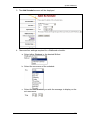
Echoing Tab
The Echoing Tab is shown below.
Data Echoing Options
The ipView SoftBoard running on one computer can be configured to send
any information it receives to other copies of ipView SoftBoard running on
other computers, or to ipView SoftBoard physical (hardware) wallboards.
This is called „echoing‟.
There is no limit to the number of copies of ipView SoftBoard (or ipView
physical WallBoards) that can be echoed to.
To configure ipView SoftBoard to echo to other wallboards, click the Send to
other wallboards option checkbox, to place a tick in the checkbox. (When
this option is checked, the Data Echoing IP Address List and its Add and
Remove buttons become active.)
52
NN40011-025 Issue 1.2 BCM Rls 6.0
ipView SoftBoard
Port Number
You will not normally need to change this value.
This is the Port number on which the ipView SoftBoard software will listen for
incoming data, and which it uses to echo to other wallboards. It may require
changing if you wish to address wallboards that are on the other side of a
firewall, and your network administrators have decided on a particular range
of Port numbers which software must use in order to communicate through
the firewall.
It is generally good practice to keep the same port number to echo data as
you have set to receive data. This means that the port number that is already
entered in this field can usually be left as is.
If your network administrator advises you to change your Port number to a
new value, overtype the old value and click the Apply button.
Note: You must close down and restart ipView SoftBoard before the new
setting will take place.
Data Echoing IP Address List
This is used to hold the list of IP addresses that you want ipView SoftBoard to
echo to.
a) To add a new entry to the list, type it into the dotted edit field above the
Add and Remove buttons, and then click the Add button.
b) To remove an entry from the list, highlight it in the list and then click the
Remove button.
Note: If you want to turn echoing off, you do not need to remove all of the
entries from the list. All you have to do is to un-check the Send to other
wallboards checkbox.
NN40011-025 Issue 1.2 BCM Rls 6.0
53
ipView SoftBoard
Avaya Documentation Links
54
IPView SoftBoard Set Up and Operation guide
Reporting for Contact Center Setup and Operations guide
Reporting for Contact Center Troubleshooting and Maintenance guide
NN40011-025 Issue 1.2 BCM Rls 6.0