1
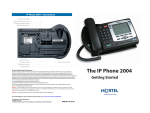
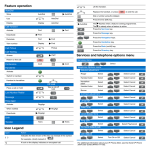
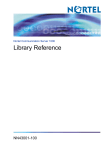
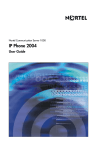
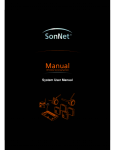
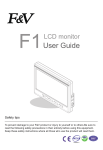
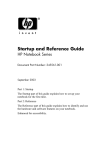
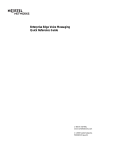
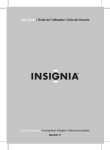
IP Phone 2004 - Connections
IP Phone 2004 Emissions Statement
This device complies with Part 15 of the FCC rules. Operation is subject to the following two conditions: (1) this device may not cause harmful
interference, and (2) this device must accept any interference received, including interference that may cause undesired operation. NOTE: This
equipment has been tested and found to comply with the limits for a Class B digital device, pursuant to Part 15 of the FCC rules. These limits are
designed to provide reasonable protection against harmful interference when the equipment is operated in a commercial environment. This equipment
generates, uses and can radiate radio frequency energy and if not installed and used in accordance with the instruction manual, may cause harmful
interference to radio communications. Operation of this equipment in a residential area is likely to cause harmful interference in which case the user
will be required to correct the interference at their own expense.
This Class B digital apparatus complies with Canadian ICES-003.
Cet appareil numérique de la classe B est conforme à la norme NMB-003 du Canada
Use only with Nortel Networks apprived Limited Power Source; output rated 16 VAC,. 500 mA, 50/60 Hz, OR, via supported Power over LAN
options, including IEEE 802.3af standard power.
Caution : Severe damage to your IP Phone 2004 will occur if this set is plugged into an ISDN connection. Consult your system
administrator to ensure that you are plugging your set into a 10/100 Base-T Ethernet Jack. It is recommended that this unit not be
exposed to direct sunlight for a prolonged period of time.
Warning : The earpiece/mouthpiece region on the handset may attract and retain small objects.
Document Number: NN43117-110
Document Version: Standard 01.04
Date: February 2009
Copyright© 2007–2009 NortelNetworks. All rights reserved.
Nortel, theNortel logo, and the Globemark aretrademarks ofNortelNetworks.
To provide feedback, or report a problem in this document go to www.nortel.com/document feedback.
The IP Phone 2004
Getting Started
IP Phone 2004 - Installation
Fig. 1
Fig. 3
Connecting the IP Phone 2004
Follow these steps to connect the IP Phone 2004:
Step 1 :
Attach the handset cord, with the longer straight
section into the handset jack on the back of the
phone, then route the straight section of the cord
through the cord guide. Attach the other end of the
handset cord to the handset.
Step 2 :
Thread the supplied CAT-5e Ethernet cable through
the bottom of the stand, as in Figure 1. Separately
orderable AC power adapters are available for global
regions. When using the AC power adapter, thread
the cable through the bottom of the stand.
Refer to figure 1.
Step 3 :
Connect the Ethernet cable to the RJ-45 connector
marked Network. Whe using AC power adapters,
connect to the AC jack on the bottom of the phone.
If you are connecting your PC through the phone
also thread its Ethernet cable through the stand and
connect it to the RJ-45 connector marked PC
.
Refer to figure 2
IP Phone 2004 - Features
Fig. 2
Handsfree key
Speaker
Hold key
Goodbye key
Quit key
Set lamp
Fig. 4
Step 4 :
Attach the front edge of the stand by aligning the two
clips on the bottom of the phone with the matching
pivot points on the stand. Depress the tilt adjusting
latch and push the stand firmly into the phone in the
direction illustrated. Refer to figure 3.
There should be two noticeable clicks when the stand is
correctly attached. Arrange the cords so that they do not
interfere with the tilt mechanism and so they exit from the
rear of the stand in the channels provided. Refer to figure 4.
Step 5 :
Connect the Ethernet Cable to the LAN via an Ethernet
connection. When using AC power adapters, plug in to
the nearest outlet. Follow the prompts that appear on
the screen. Your system administrator should provide
you with the correct information to enter..
Note :
The IP Phone 2004 supports both AC power and Power over
LAN options, including IEEE 802.3af standard power. To use
local AC power using an optional AC adapter, country
specific AC adapters are separately orderable. To use Power
over LAN where power is deliverd over the CAT-5e cable, it must
be suppoorted by the LAN infrastructure.
Volume
Mute key
Headset key
The IP Phone 2004 gives you multiple options to make
a call. Each of these options is described in detail in
your system-specific user guide.
Controlling Volume
The volume control key adjusts ringer, handset, headset and speaker volumes. Pressing the volume control
key while using your handset, headset or speaker will
adjust the volume of the associated device.
Making a Call with the Handset
Lift the handset to make a call using the primary line.
Enter the phone number on the dial pad. When your
call is complete, press the GOODBYE key or return the
handset to the cradle. If your phone is programmed
with a selection of line keys, you may select a line first
by pressing a line key.
Function keys
Navigation keys
Four programmable soft keys
Six programmable line/feature keys
Making a Call with Headset or
Handsfree
Press the HANDSFREE of HEADSET key. Enter the
phone number. When your call is complete, press
GOODBYE.
Using HOLD and MUTE
While on a call, pressing the HOLD key will place your
caller on hold. Press the LINE key to retrieve your call.
Held lines will be indicated by the icons nest to the line
keys.
Pressing MUTE will mute your handset, headset or
speakerphone microphone and allow you to speak
privately. Press MUTE again to speak with your caller.
The appropriate LED will light when these features
are activated..
Answering a Call
Answer a ringing call by lifting the handset or
apressing the HANDSFREE or HEADSET keys.