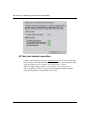
1
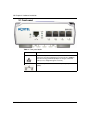
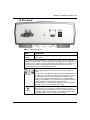
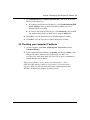
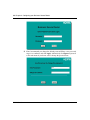
Nortel Business Secure Router 252 — Fundamentals
BSR252
Business Secure Router
Document Number: NN47923-301
Document Version: 1.2
Date: May 2007
2
Copyright © Nortel 2005–2006
All rights reserved.
The information in this document is subject to change without notice. The statements, configurations, technical data, and
recommendations in this document are believed to be accurate and reliable, but are presented without express or implied
warranty. The information in this document is proprietary to Nortel.
Trademarks
Nortel, Nortel (Logo), the Globemark, and This is the way, This is Nortel (Design mark) are trademarks of Nortel.
Microsoft, MS, MS-DOS, Windows, and Windows NT are registered trademarks of Microsoft Corporation.
All other trademarks and registered trademarks are the property of their respective owners.
NN47923-301
3
Contents
Preface . . . . . . . . . . . . . . . . . . . . . . . . . . . . . . . . . . . . . . . . . . . . . . . . . . . . . . . 7
Before you begin . . . . . . . . . . . . . . . . . . . . . . . . . . . . . . . . . . . . . . . . . . . . . . . . . . . . . . 7
Text conventions . . . . . . . . . . . . . . . . . . . . . . . . . . . . . . . . . . . . . . . . . . . . . . . . . . . . . . 7
Acronyms . . . . . . . . . . . . . . . . . . . . . . . . . . . . . . . . . . . . . . . . . . . . . . . . . . . . . . . . . . . . 7
Related publications . . . . . . . . . . . . . . . . . . . . . . . . . . . . . . . . . . . . . . . . . . . . . . . . . . . . 8
Hard-copy technical manuals . . . . . . . . . . . . . . . . . . . . . . . . . . . . . . . . . . . . . . . . . . . . . 8
How to get help . . . . . . . . . . . . . . . . . . . . . . . . . . . . . . . . . . . . . . . . . . . . . . . . . . . . . . . 9
Chapter 1
Introducing the Business Secure Router . . . . . . . . . . . . . . . . . . . . . . . . . . 11
Chapter 2
Hardware installation. . . . . . . . . . . . . . . . . . . . . . . . . . . . . . . . . . . . . . . . . . . 13
2.1 Front panel . . . . . . . . . . . . . . . . . . . . . . . . . . . . . . . . . . . . . . . . . . . . . . . . . . . 14
2.2 Rear panel
. . . . . . . . . . . . . . . . . . . . . . . . . . . . . . . . . . . . . . . . . . . . . . . . . . . 15
Chapter 3
Setting up your computer IP address . . . . . . . . . . . . . . . . . . . . . . . . . . . . . 17
3.1 Static or dynamic configuration (Windows 2000/NT/XP) . . . . . . . . . . . . . . . . . 17
3.2 Checking your computer IP address . . . . . . . . . . . . . . . . . . . . . . . . . . . . . . . . 19
Chapter 4
Configuring your Business Secure Router . . . . . . . . . . . . . . . . . . . . . . . . . 21
4.1 Accessing your Business Secure Router via the WebGUI . . . . . . . . . . . . . . . 21
4.2 Using the wizard to configure for internet access . . . . . . . . . . . . . . . . . . . . . . 24
Internet Connection with PPPoE . . . . . . . . . . . . . . . . . . . . . . . . . . . . . . . . . . . 26
Internet Connection with RFC 1483 . . . . . . . . . . . . . . . . . . . . . . . . . . . . . . . . 26
Internet Connection with ENET ENCAP . . . . . . . . . . . . . . . . . . . . . . . . . . . . . 27
Internet Connection with PPPoA . . . . . . . . . . . . . . . . . . . . . . . . . . . . . . . . . . . 28
Nortel Business Secure Router 252 — Fundamentals
4 Contents
4.3 Test your internet connection . . . . . . . . . . . . . . . . . . . . . . . . . . . . . . . . . . . . . . 32
Chapter 5
User Notes . . . . . . . . . . . . . . . . . . . . . . . . . . . . . . . . . . . . . . . . . . . . . . . . . . . 33
General Notes . . . . . . . . . . . . . . . . . . . . . . . . . . . . . . . . . . . . . . . . . . . . . . . . . . . . 33
General . . . . . . . . . . . . . . . . . . . . . . . . . . . . . . . . . . . . . . . . . . . . . . . . . . . . . . 33
Firewall . . . . . . . . . . . . . . . . . . . . . . . . . . . . . . . . . . . . . . . . . . . . . . . . . . . . . . 34
NAT . . . . . . . . . . . . . . . . . . . . . . . . . . . . . . . . . . . . . . . . . . . . . . . . . . . . . . . . . 34
VPN Client Termination . . . . . . . . . . . . . . . . . . . . . . . . . . . . . . . . . . . . . . . . . . 34
Security . . . . . . . . . . . . . . . . . . . . . . . . . . . . . . . . . . . . . . . . . . . . . . . . . . . . . . 36
Routing . . . . . . . . . . . . . . . . . . . . . . . . . . . . . . . . . . . . . . . . . . . . . . . . . . . . . . 36
Advanced Router Configuration . . . . . . . . . . . . . . . . . . . . . . . . . . . . . . . . . . . . . . 37
Setting up the router when the system has a server . . . . . . . . . . . . . . . . . . . . 37
Connecting two sites to establish a virtual private network . . . . . . . . . . . . . . . 37
Adding IP telephony to a multi-site network . . . . . . . . . . . . . . . . . . . . . . . . . . 38
Configuring the router to act as a Nortel VPN Server (Client Termination) . . . 39
Configuring the router to connect to a Nortel VPN Server (Client Emulation) . 39
Allowing remote management of a LAN-connected BCM50 . . . . . . . . . . . . . . 39
Setting up the router for guest access . . . . . . . . . . . . . . . . . . . . . . . . . . . . . . 40
Preventing heavy data traffic from impacting telephone calls . . . . . . . . . . . . . 40
Setting Up a Remote Office with a UNIStim IP Telephone . . . . . . . . . . . . . . . 41
Inter-Operability With Third-Party Routers . . . . . . . . . . . . . . . . . . . . . . . . . . . . . . 42
VPN Connections With Cisco Routers . . . . . . . . . . . . . . . . . . . . . . . . . . . . . . 42
Chapter 6
Troubleshooting . . . . . . . . . . . . . . . . . . . . . . . . . . . . . . . . . . . . . . . . . . . . . . . 43
Problem: None of the LEDs turn on when you turn on the Business Secure Router
43
Problem: You cannot access the Business Secure Router from the LAN . . . . 43
Problem: You cannot ping any computer on the LAN . . . . . . . . . . . . . . . . . . . 43
Problem: You cannot get a WAN IP address from the ISP . . . . . . . . . . . . . . . 44
Problem: You cannot access the Internet . . . . . . . . . . . . . . . . . . . . . . . . . . . . 44
NN47923-301
5
Table 1
Internet Account Information Worksheet
11
Table 2
Front panel details
14
Table 3
Rear panel details
15
Nortel Business Secure Router 252 — Fundamentals
6
NN47923-301
Preface
7
Preface
This Quick Start Guide provides instructions for installing and configuring your
Nortel Business Secure Router 252 as an Office Gateway for your network. After
completing this guide, you can access the Internet securely through your Nortel
Business Secure Router 252.
Before you begin
This guide is intended for network managers who are installing the Nortel
Business Secure Router 252 for the first time. It assumes that you are familiar
with the type of Internet connection used with your Business Secure Router.
Text conventions
This guide uses the following text conventions:
italic text
Indicates new terms, book titles, and variables in
command syntax descriptions. Where a variable is two
or more words, the words are connected by an
underscore.
Example: If the command syntax is
show at <valid_route>, valid_route is one
variable and you substitute one value for it.
Acronyms
This guide uses the following acronyms:
ADSL
asymmetric digital subscriber line
DHCP
Dynamic Host Configuration Protocol
DNS
domain name server
Nortel Business Secure Router 252 — Fundamentals
8
Preface
ENET
Ethernet
IP
Internet Protocol
ISP
Internet Service Provider
LAN
local area network
LLC
logical link control
PPPoA
Point-to-Point Protocol over ADSL
PPPoE
Point-to-Point Protocol over Ethernet
RFC
request for comment
SUA
single user account
TCP/IP
Transmission Control Protocol/Internet Protocol
VC
virtual channel
VCI
virtual channel identifier
VPI
virtual path identifier
WAN
wide area network
Related publications
For more information about using the Nortel Business Secure Router 252, refer to
the following publication:
•
Nortel Business Secure Router 252 - Basics (NN47923-500)
Hard-copy technical manuals
You can print selected technical manuals and release notes free, directly from the
Internet. Go to www.nortel.com/documentation. Find the product for which you
need documentation. Then locate the specific category and model or version for
your hardware or software product. Use *Adobe Reader* to open the manuals and
release notes, search for the sections you need, and print them on most standard
printers. Go to the Adobe Systems web site at www.adobe.com to download a free
copy of Adobe Reader.
NN47923-301
Preface
9
How to get help
If you purchased a service contract for your Nortel product from a distributor or
authorized reseller, contact the technical support staff for that distributor or
reseller for assistance.
If you purchased a Nortel service program, contact Nortel Technical Support. To
obtain contact information online, go to www.nortel.com/cgi-bin/comments/
comments.cgi, then click on Technical Support.
From the Technical Support page, you can open a Customer Service Request
online or find the telephone number for the nearest Technical Solutions Center.
If you are not connected to the Internet, you can call 1-800-4NORTEL
(1-800-466-7835) to learn the telephone number for the nearest Technical
Solutions Center.
An Express Routing Code (ERC) is available for many Nortel products and
services. When you use an ERC, your call is routed to a technical support person
who specializes in supporting that product or service. To locate an ERC for your
product or service, go to http://www.nortel.com/help/contact/erc/index.html.
Nortel Business Secure Router 252 — Fundamentals
10
Preface
NN47923-301
Chapter 1 Introducing the Business Secure Router 11
Chapter 1
Introducing the Business Secure Router
The Nortel Business Secure Router 252 is the ideal secure gateway for all data
passing between the Internet and the LAN. By integrating Network Address
Translation (NAT), firewall and Virtual Private Network (VPN) capability, the
Nortel Business Secure Router 252 is a complete security solution that protects
your Intranet and efficiently manages data traffic on your network. The embedded
WebGUI is easy to operate and totally independent of the operating system
platform you use.
You must have an Internet account already set up and have most of the following
information.
Table 1 Internet Account Information Worksheet
Nortel Business Secure Router 252 — Fundamentals
12 Chapter 1 Introducing the Business Secure Router
NN47923-301
Chapter 2 Hardware installation 13
Chapter 2
Hardware installation
Caution: To keep the Business Secure Router operating at optimal
internal temperature, keep the bottom, sides, and rear clear of
obstructions and away from the exhaust of other equipment.
Caution: AC Power Adapter Specifications
Only use the approved Phihong Model PSA21R-180 power supply with
this device.
NOTE: Attach the appropriate plug to the power supply first before
inserting it into the power outlet.
Caution: Electro-static Discharge can disrupt the router. Use
appropriate handling precautions to avoid ESD. Avoid touching the
connectors on the router, particularly when it is in use.
Note: Please use only No. 26 AWG (American Wire Gauge) or larger
telecommunication line cord.
Nortel Business Secure Router 252 — Fundamentals
14 Chapter 2 Hardware installation
2.1 Front panel
Table 2 Front panel details
NN47923-301
LABEL
DESCRIPTION
Step 1: 1-4
Connect a computer to one of these ports with an Ethernet cable.
These ports are auto-negotiating (can connect at 10 or 100Mb/s)
and auto-sensing (automatically adjusts to the type of Ethernet
cable you use, straight-through or crossover).
Step 2
Connect this port to an ADSL-enabled telephone jack (or DSL
splitter).
Chapter 2 Hardware installation 15
2.2 Rear panel
Table 3 Rear panel details
LABEL
DESCRIPTION
Step 3
18V DC
Connect the included power adaptor (use only this adapter) to this
power socket.
After you have made the connections, connect the power cable to a power supply and
look at the front panel LEDs. The power LED blinks while performing system testing and
then stays on if the testing is successful. The Ethernet port LEDs turn on if the ports are
properly connected. Refer to Configuring and Troubleshooting the Nortel Business
Secure Router 252 for more detailed LED descriptions.
port, switch
(no label)
Only connect this port if you want to configure the Business Secure
Router using the SMT via console port. See your User's Guide for
details.
Set this switch to the CON (Console) side to use the CON/AUX port as
a console port for local device configuration and management. Connect
the 9-pin male end of the console cable to the console port of the
Business Secure Router and the other end to a serial port (COM1,
COM2 or other COM port) on your computer. Your computer must have
a terminal emulation communications program (such as
HyperTerminal) set to VT100 terminal emulation, no parity, 8 data bits,
1 stop bit, no flow control and 9600 b/s port speed.
Press this button for one to three seconds to restart the Business
Secure Router. Press this button for longer than three seconds to
return the Business Secure Router to the factory defaults (password is
PlsChgMe!, LAN IP address 192.168.1.1, terminal emulation settings
as described above; see your User's Guide for details).
Nortel Business Secure Router 252 — Fundamentals
16 Chapter 2 Hardware installation
NN47923-301
Chapter 3 Setting up your computer IP address 17
Chapter 3
Setting up your computer IP address
The Business Secure Router is already set up to assign your computer an IP
address. Use this section to set up your computer to receive an IP address or assign
it a static IP address in the 192.168.1.2 to 192.168.1.127 range with a subnet mask
of 255.255.255.0. This is necessary to ensure that your computer can
communicate with your Business Secure Router.
Your computer must have an Ethernet card and TCP/IP installed. TCP/IP must
already be installed on computers using Windows NT/2000/XP or Macintosh OS
7 and later operating systems. Instructions are provided here for configuring
Windows 2000, NT and XP operating systems. Refer to Nortel Business Secure
Router 252 Configuration — Basics (NN47923-500) and Nortel Business Secure
Router 252 Configuration — Advanced (NN47923-501) for detailed IP address
configuration for Windows 95, 98, Me and Macintosh and Linux computer
operating systems.
3.1 Static or dynamic configuration (Windows 2000/NT/XP)
1
In Windows XP, click Start, Control Panel.
a
2
In Windows 2000/NT, click Start, Settings, Control Panel.
In Windows XP, click Network Connections.
a
In Windows 2000/NT, click Network and Dial-up Connections.
3
Right-click Local Area Connection and then click Properties.
4
Select Internet Protocol (TCP/IP) (under the General tab in Windows XP)
and click Properties.
5
The Internet Protocol TCP/IP Properties screen appears (the General tab in
Windows XP).
a
To have your computer assigned a dynamic IP address, click Obtain an
IP address automatically.
b
To configure a static IP address, click Use the following IP Address and
fill in the IP address (choose one from 192.168.1.2 to 192.168.1.127),
Subnet mask (255.255.255.0), and Default gateway (192.168.1.1) fields.
Nortel Business Secure Router 252 — Fundamentals
18 Chapter 3 Setting up your computer IP address
Nortel recommends that you do not use a static IP address in the same
range as the Business Secure Router DHCP server address pool
(192.168.1.2 to 192.168.1.127 by default).
6
NN47923-301
Click Advanced. Remove any previously installed gateways in the IP Settings
tab and click OK to go back to the Internet Protocol TCP/IP Properties screen.
Chapter 3 Setting up your computer IP address 19
7
Click Obtain DNS server address automatically if you do not know your
DNS server IP address(es).
a
If you know your DNS server IP addresses, click Use the following DNS
server addresses, and type them in the Preferred DNS server and
Alternate DNS server fields.
b
If you have more than two DNS servers, click Advanced, select the DNS
tab and then configure the two DNS servers using the Add button.
8
Click OK to close the Internet Protocol (TCP/IP) Properties window.
9
Click OK to close the Local Area Connection Properties window.
3.2 Checking your computer IP address
1
On your computer, click Start, (All) Programs, Accessories and then
Command Prompt.
2
In the Command Prompt window, type ipconfig and then press Enter. Your
computer IP address must be in the correct range (192.168.1.2 to
192.168.1.254), with subnet mask 255.255.255.0, in order to communicate
with the Business Secure Router.
Refer to Nortel Business Secure Router 252 Configuration — Basics
(NN47923-500) and Nortel Business Secure Router 252 Configuration —
Advanced (NN47923-501) for detailed IP address configuration for other
Windows and Macintosh computer operating systems.
Nortel Business Secure Router 252 — Fundamentals
20 Chapter 3 Setting up your computer IP address
NN47923-301
Chapter 4 Configuring your Business Secure Router 21
Chapter 4
Configuring your Business Secure Router
Choose one of these methods to access and configure the Business Secure Router.
This guide shows you how to use the WebGUI wizard only. See Nortel Business
Secure Router 252 Configuration — Basics (NN47923-500) and Nortel Business
Secure Router 252 Configuration — Advanced (NN47923-501) for background
information about all Business Secure Router features and SMT configuration.
Click the WebGUI online help for screen-specific web help.
4.1 Accessing your Business Secure Router via the WebGUI
1
Launch your web browser. Enter 192.168.1.1 as the web site address.
2
Enter the default username (nnadmin) and password (PlsChgMe!). Click
Login to proceed to a screen that will let you to change your password. Click
Reset if you want to clear any information you have entered in the Username
and Password fields.
Nortel Business Secure Router 252 — Fundamentals
22 Chapter 4 Configuring your Business Secure Router
3
NN47923-301
Nortel recommends you change the default password! Enter a new password,
retype it to confirm it and click Apply. Alternatively click Ignore to proceed
to the main menu if you do not want to change the password now.
Chapter 4 Configuring your Business Secure Router 23
4
Click Apply in the Replace Factory Default Certificate screen to create a
certificate using your Business Secure Router MAC address, which will be
specific to this device.
5
The WebGUI MAIN MENU screen appears.
•
Select WIZARD if you want help configuring your Business Secure Router
for the first time.
Select a link under MAIN MENU in the navigation panel to configure a
Business Secure Router feature.
Select MAINTENANCE in the navigation panel to view Business Secure
Router performance statistics, upload firmware and back up information or
restore or upload a configuration file.
Click LOGOUT when you have finished a Business Secure Router
management session. The Business Secure Router automatically logs you off
if the session is left idle for five minutes. Click ENTER to display the Login
screen again and then log back on. This idle timeout timer is one of the many
Business Secure Router features that you can edit using the WebGUI.
•
•
•
Nortel Business Secure Router 252 — Fundamentals
24 Chapter 4 Configuring your Business Secure Router
4.2 Using the wizard to configure for internet access
1
NN47923-301
Select WIZARD to display the first wizard screen.
Chapter 4 Configuring your Business Secure Router 25
From the Mode drop-down list box, select Routing (default) if your ISP allows
multiple computers to share an Internet account. Otherwise select Bridge.
Select the encapsulation type your ISP uses from the Encapsulation drop-down
list box. Choices vary depending on what you select in the Mode field.
Select the multiplexing method used by your ISP from the Multiplex drop-down
list box.
Enter the correct Virtual Path Identifier (VPI) and Virtual Channel Identifier
(VCI) numbers supplied by your ISP in the VPI and VCI fields. These fields may
already be configured.
Click Next.
2
The second wizard screen varies depending on what mode and encapsulation
type you use. All screens shown are with routing mode. Configure the fields
and click Next to continue.
Nortel Business Secure Router 252 — Fundamentals
26 Chapter 4 Configuring your Business Secure Router
Internet Connection with PPPoE
If your ISP provides the name of your PPPoE service provider, enter it in the
Service Name field.
Enter the user name and password exactly as your ISP gives you.
Select Obtain an IP Address Automatically if you have a dynamic WAN IP
address; otherwise select Static IP Address and type your ISP assigned WAN IP
address in the text box below.
Select Connect on Demand when you don't want the connection up all the time
and specify an idle time-out period (in seconds) in the Max. Idle Timeout field.
Select Nailed-Up Connection when you want your connection up all the time.
The Business Secure Router will try to bring up the connection automatically if it
is disconnected.
From the Network Address Translation drop-down list box, select SUA Only,
Full Feature or None.
Internet Connection with RFC 1483
Enter the IP address given by your ISP in the IP Address field.
From the Network Address Translation drop-down list box, select SUA Only,
Full Feature or None.
NN47923-301
Chapter 4 Configuring your Business Secure Router 27
Internet Connection with ENET ENCAP
Select Obtain an IP Address Automatically if you have a dynamic WAN IP
address; otherwise select Static IP Address and type your ISP assigned WAN IP
address and the subnet mask in the fields provided.
In the ENET ENCAP Gateway field, enter the gateway IP address given by your
ISP.
From the Network Address Translation drop-down list box, select SUA Only,
Full Feature or None.
Nortel Business Secure Router 252 — Fundamentals
28 Chapter 4 Configuring your Business Secure Router
Internet Connection with PPPoA
Refer to “Internet Connection with PPPoE” on page 26 for field descriptions.
3
NN47923-301
Verify the settings in the screen shown next. This screen varies depending on
what mode and encapsulation type you use. To change the LAN information
on the Business Secure Router, click Change LAN Configurations.
Otherwise click Save Settings to save the configuration and skip to step 5.
Chapter 4 Configuring your Business Secure Router 29
If you want to change your Business Secure Router LAN settings, click Change
LAN Configuration to display the screen as shown next
Nortel Business Secure Router 252 — Fundamentals
30 Chapter 4 Configuring your Business Secure Router
.
4
Enter the IP address of your Business Secure Router in dotted decimal
notation in the LAN IP Address field. For example, 192.168.1.1 (factory
default).
Note: If you change the Business Secure Router's LAN IP address, you must
use the new IP address if you want to access the WebGUI again.
Enter a subnet mask in dotted decimal notation in the LAN Subnet Mask field.
From the DHCP Server drop-down list box, select Server to allow your Business
Secure Router to assign IP addresses, an IP default gateway and DNS servers to
computer systems that support the DHCP client. Select Relay to have the
Business Secure Router forward DHCP requests to another DHCP server. When
set to Relay, fill in the DHCP Server Address field.
Select None to stop the Business Secure Router from acting as a DHCP server.
When you select None, you must have another DHCP server on your LAN, or else
the computers must be manually configured.
When DHCP server is used, set the following items:
NN47923-301
Chapter 4 Configuring your Business Secure Router 31
Specify the first of the contiguous addresses in the IP address pool in the Client IP
Pool Starting Address field.
Specify the size or count of the IP address pool in the Size of Client IP Pool field.
When DHCP relay is used, set the following:
Type the IP address of the DHCP server in dotted decimal notation (like
192.168.1.5) in the DHCP Server Address field.
To configure the DNS server settings:
Select Obtained From ISP if your ISP dynamically assigns DNS server
information (and the Business Secure Router WAN IP address). The field to the
right displays the (read-only) DNS server IP address that the ISP assigns.
Select UserDefined if you have the IP address of a DNS server. Enter the DNS
server IP address in the field to the right.
Select DNS Relay to have the Business Secure Router act as a DNS proxy. The
Business Secure Router LAN IP address displays in the field to the right
(read-only). The Business Secure Router tells the DHCP clients on the LAN that
the Business Secure Router itself is the DNS server. When a computer on the
LAN sends a DNS query to the Business Secure Router, the Business Secure
Router forwards the query to the Business Secure Router system DNS server
(configured in the SYSTEM General screen) and relays the response back to the
computer. You can only select DNS Relay for one of the three servers;
Select None if you do not want to configure DNS servers. If you do not configure
a DNS server, you must know the IP addresses of devices or web sites in order to
access them.
5
The Business Secure Router automatically tests the connection to the
computer(s) connected to the LAN ports. This screen varies depending on
what mode and encapsulation type you use. To test the connection from the
Business Secure Router to the ISP and the connected LAN device(s), click
Start Diagnose. Otherwise click Finish to go back to the Site Map screen.
Nortel Business Secure Router 252 — Fundamentals
32 Chapter 4 Configuring your Business Secure Router
.
4.3 Test your internet connection
Launch your web browser and go to www.nortel.com. You do not need a dial-up
program such as Dial-Up Networking. Internet access is just the beginning. Refer
to the Nortel Business Secure Router 252 Configuration — Basics
(NN47923-500) and Nortel Business Secure Router 252 Configuration —
Advanced (NN47923-501) for more detailed information about the complete
range of Nortel Business Secure Router 252 features.
NN47923-301
Chapter 5 User Notes 33
Chapter 5
User Notes
General Notes
There are some router functions that, although performing as expected, might
cause some confusion. These are summarized below.
General
1
Default Address Mapping Rules When First Enable NAT Full Feature.
When NAT Full Feature is first enabled, two address mapping rules are added to
the address mapping table. This is done to facilitate programming, and matches
the default SUA rule. The rules can be deleted.
2
Response to Invalid User ID or Password
When the wrong user ID or password is entered into the router login screen, no
error message is displayed. Instead, the login screen is simply displayed again.
3
First DHCP Address Reserved for BCM50
The first address of the DHCP Address Pool is reserved for a BCM50 in the
subnet, and will not be assigned to any other equipment. Once assigned to a
BCM50, it is reserved for that BCM50, and will not be assigned to any other. If
the BCM50 is changed, the following command must be used to enable the router
to assign the first address to a different BCM50:
ip dhcp enif0 server m50mac clear
4
Login Requires Reboot
If the Administrator Timeout is set to 0, and an administration session is
terminated without logging off, the router needs to be rebooted in order for the
administrator to log in to the WebGUI again. Alternatively, the administrator can
log in using a TelNet session, if TelNet access has been enabled in the Remote
Management menu.
Nortel Business Secure Router 252 — Fundamentals
34 Chapter 5 User Notes
5
Clicking Sound
The Business Secure Router will click once every two minutes until an ADSL line
is connected.
Firewall
1
Address Range Validation
In the firewall rules, the router does not confirm when given an address range, that
the second address is higher than the first. If this type of address range is entered,
the range is ignored.
2
Automatic Firewall Programming
Configurations to various areas of the router, such as remote management or
adding a SUA Server, do not automatically add the appropriate rules to the
Firewall, to enable the traffic to pass through the router. These need to be added
separately.
Note: Firewall rules do not apply to IPSec tunnels.
NAT
1
Deleting NAT Rule Does Not Drop an Existing Connection
If a NAT rule is deleted, the router must be rebooted to apply the change to
existing service connections. This is already noted in the GUI.
2
NAT Traversal Status
If NAT Traversal is enabled, but is not needed (because the client is not behind a
NAT router), it will be shown as 'inactive' in the VPN Client Monitor. This may
confuse some users.
VPN Client Termination
1
NN47923-301
Change of User Account Does Not Drop Existing Connections
Chapter 5 User Notes 35
If a VPN Client user account is de-activated, deleted, or changed, and that user is
currently connected, the connection is not automatically dropped. To drop the
connection, the administrator needs to disconnect the user using the 'Disconnect'
function in the VPN/SA Monitor GUI. This is consistent with other Nortel
Contivity products.
2
User Name Restrictions
User names are limited to a maximum length of 63 characters.
3
VPN Client Account Password Restrictions
The password for a VPN Client user cannot contain the single- or double-quote
characters.
4
IP Pool Address Overlap
When defining multiple VPN Client Termination IP pools, the router uses the IP
Subnet mask, and not the pool size, to determine if the pools are overlapping. The
subnet mask of each pool should be appropriate for the size of the VPN Client
Termination IP pool.
5
VPN Client Termination - Failure In Specific Addressing Situation
If the Client has an assigned IP address that is the same as the IP address assigned
for the Client Tunnel, the connection will fail to be established.
6
VPN Client Termination - Configuration Restrictions
This router has some restrictions when compared to larger Contivity Routers
(1000 Series and above). In particular,
VPN Clients cannot be added to the LAN subnet. They must have addresses
outside of the LAN subnet.
VPN Clients can have dynamically assigned IP addresses, or they can have a
statically assigned addresses. However, the router does not support both
modes at once. All addresses must either be dynamically assigned, or they
must all be statically assigned.
7
Establishing a Client Tunnel From One Business Secure Router to Another
Nortel Business Secure Router 252 — Fundamentals
36 Chapter 5 User Notes
When defining a Client Termination account for another Business Secure Router
that will connect using Contivity Client Emulation, the following configuration is
required:
•
•
•
Encryption must be Triple DES with SHA1 integrity, or Triple DES with
MD5 integrity.
IKE Encryption must be Triple DES with Diffie-Hellman Group 2.
Perfect Forward Secrecy (PFS) must be enabled.
Security
1
Exporting or Saving Self-Signed Certificate
To export or save a self-signed certificate, click details (the icon that looks like a
paper note), then click 'Export' or copy the PEM text into the clipboard, and paste
into a file.
Routing
1
RIP Version Advertisement Control
To change the version of generated RIP advertisements, the following CLI
command needs to be used
ip rip mode [enif0|enif1] [in|out] [0|1|2|3]
where:
'enif0' is the LAN side, and 'enif1' is the WAN side
'in' affects recognition of received advertisements, and
'out' applies to generated advertisements
The number controls the operating mode:
None (disabled)
RIP-1 only
RIP-2 only
NN47923-301
Chapter 5 User Notes 37
Both RIP-1 and RIP-2
Advanced Router Configuration
The following notes are intended to help with advanced router configuration.
Setting up the router when the system has a server
1
If you are using a Full-Feature NAT configuration, first, do the following...
a
2
In SUA/NAT / Address Mapping, add a 'Server' rule, specifying the
'Public' IP address of the server.
For both SUA-Only and Full-Feature NAT configurations, do the following...
a
In SUA/NAT : SUA Server, add server private IP address and port
number(s) to the SUA/NAT Server table.
b
In FIREWALL, add a WAN-to-LAN rule
c
If the service is not in the list of available services, add it as a 'Custom
Port'.
d
Add the rule, selecting the service, and entering the server IP address as
the destination IP address.
Connecting two sites to establish a virtual private network
The recommended method to do this is through a branch-to-branch IPSec tunnel.
1
In VPN / Summary, add a new tunnel by editing an unused rule. Create an
Active, Branch Office tunnel.
a
Select 'Nailed Up' if the tunnel should not be closed while not in use.
b
Enter the authentication information, with either a pre-shared key or an
imported certificate.
c
Enter the IP Address assigned to the router WAN port. This should be a
static address, or a dynamic DNS name, and the IP address of the remote
router.
d
Select the encryption and authentication algorithms.
e
Add an IP policy, by specifying the IP address ranges of the local and
remote hosts that will use the tunnel.
Nortel Business Secure Router 252 — Fundamentals
38 Chapter 5 User Notes
2
Repeat these steps at the other end of the branch.
Note: If VPN Client Termination is used on these sites, the client termination
address range will need to be included in the tunnel policies in order for the
VPN clients to see the other site.
Adding IP telephony to a multi-site network
Scenario 1: A BCM50 in the primary site acting as the gateway for
both sites
1
Ensure that the DHCP Server in the BCM50 is disabled, that the BCM50 is
connected to the router, and both have booted.
2
Add the IP phones to the primary site as per BCM50 installation guide.
3
Create a tunnel to the remote site, as described above.
4
In the remote site, set the S1 and S2 addresses to the IP address of the
BCM50, which is identified in the router DHCP table or in the BCM50. This
is done with a CLI command.
TELNET or SSH to the router. This needs TELNET or SSH enabled on that
router. Select menu 24, select menu 8, and enter the commands:
ip dhcp enif0 server voipserver 1 <BCM50_IP_Address> 7000 1
ip dhcp enif0 server voipserver 2 <BCM50_IP_Address> 7000 1
5
Add the IP phones to the remote site, configured for full DHCP client mode.
Scenario 2: A BCM50 in each site, each acting as the backup call
server for the other site
1
At each site,
a
Ensure that the DHCP Server in the BCM50 is disabled, that the BCM50
is connected to the router, and both have booted.
b
Add the IP phones to the site as per BCM50 installation guide.
c
At each router, change the S2 address to the IP address of the remote
BCM50, using TELNET or SSH, and the CLI command,
ip dhcp enif0 server voipserver 2 <Remote_BCM50_IP_Address> 7000 1
NN47923-301
Chapter 5 User Notes 39
2
Create a tunnel between the sites, as described above.
3
Create an H.323 trunk between the BCM50s, as per the BCM50 User Guide.
Configuring the router to act as a Nortel VPN Server (Client
Termination)
1
2
Under VPN / Client Termination,
a
Enable Client Termination.
b
Select authentication type and the encryption algorithms supported.
c
If the clients are assigned IP addresses from a pool, define the pool, and
enable it.
Assuming a Local User Database is used for authentication,
a
Add user name and password to the local user database as an IPSec user,
and activate it. If the hosts will be assigned a static IP address, enter the
address that will be assigned to the user.
Configuring the router to connect to a Nortel VPN Server (Client
Emulation)
1
Go to VPN / Summary, and select 'Edit'.
2
Select a connection type of Contivity Client, and fill in the web page with the
relevant data.
3
If Group authentication or On-Demand Client Tunnels are needed, click the
'Advanced' button to configure this.
Allowing remote management of a LAN-connected BCM50
1
Create the appropriate NAT server rules to add the BCM50.
Go to SUA/NAT / SUA Server, and create two server rules for HTTPS and
Element Manager access:
One named BCM_HTTPS, with port number 443, and the IP address of the
BCM50
One named BCM_EM, with the port number 5989, and the IP address of the
BCM50
Nortel Business Secure Router 252 — Fundamentals
40 Chapter 5 User Notes
Note: In DHCP Server mode, the BCM50 IP address will be the lowest
address in the pool.
2
Create the appropriate Firewall rules to add BCM50 access.
Go to FIREWALL / Summary, and create two WAN-to-LAN firewall rules:
One rule allowing access from allowed remote computer IP addresses, to the
BCM50 IP address, for service type HTTPS(TCP:443)
One rule allowing access from allowed remote computer IP addresses, to the
BCM50 IP address, for custom port TCP:5989
Setting up the router for guest access
The recommended approach to provide guest access is by creating an IP Alias,
and using static addressing for the corporate equipment, to make it a member of
the defined Alias subnet. Then use firewall rules to restrict access of the guest
equipment. NOTE: if a BCM50 is used, it will also need to be assigned a static IP
address.
1
Go to LAN / IP Alias, and Enable IP Alias 1.
2
Define a subnet for the corporate equipment.
3
Statically assign addresses to the corporate equipment that are within the IP
Alias subnet.
4
Set up LAN / IP to enable DHCP Server, with an address range that will be
used for guest equipment.
5
In the FIREWALL, set up a LAN-to-LAN rule to block traffic between the
guest subnet (DHCP Pool) and the corporate subnet (IP Alias subnet).
Note: If branch tunnels are being used, the policies on these tunnels should
exclude the guest subnet.
Preventing heavy data traffic from impacting telephone calls
To ensure voice quality during heavy data traffic, bandwidth needs to be reserved
for voice traffic.
NN47923-301
Chapter 5 User Notes 41
1
Determine your actual WAN up-stream bandwidth by connecting to a web site
such as http://myvoipspeed.visualware.com/.
2
On BANDWIDTH MANAGEMENT / Summary, activate WAN bandwidth
management, and fill in your actual uplink speed in the WAN Speed field..
3
On BANDWIDTH MANAGEMENT / Class Setup, add a WAN subclass, and
reserve sufficient bandwidth based on the number of telephones, for Protocol
ID 17 (UDP Traffic).
The amount of bandwidth should be based on a reasonable peak number of
simultaneous calls, and the data rate needed by the IP telephony CODECs.
Setting Up a Remote Office with a UNIStim IP Telephone
For a remote office with a PC, and a UNIStim IP telephone behind a BCM50a
Integrated Router, Client Emulation is the recommended method to connect to the
main office.
1
At the main office Contivity Client Server, establish two user accounts - one
for the telephone, and one for the PC.
2
On the remote office BCM50a Integrated Router, do the following:
Under WAN / WAN IP, ensure that Network Address Translation is set to
SUA Only (default). Also ensure that the Gateway IP address is set (not
0.0.0.0).
Under VPN / Summary, create an entry for the IP telephone client tunnel.
(Contivity Client, Active, Keep Alive). Fill in the IP address of the Contivity
Client Server, and the name and password of the telephone set user account.
Under VPN / Global Setting, enable Exclusive Mode, and fill in the MAC
address of the telephone set.
Under Bandwidth Management, set up WAN bandwidth management to
reserve 110 kbps of bandwidth for UDP traffic (protocol ID 17). See the
preceding section titled, “Preventing heavy data traffic from impacting
telephone calls”.
3
Provision the IP set with the corporate call server address.
4
On the PC, install Contivity Client Software, and configure it with the PC user
account information.
Nortel Business Secure Router 252 — Fundamentals
42 Chapter 5 User Notes
Inter-Operability With Third-Party Routers
VPN Connections With Cisco Routers
When establishing a VPN Client tunnel or Branch Office Tunnel between the
Business Secure Router and a Cisco router, the following configuration rules
should be followed:
NN47923-301
1
Ensure that the WAN IP of the BSR222/252 router and the Cisco router are
not in the same subnet.
2
Configure the connection to use DES Encryption and MD5 Authentication.
Chapter 6 Troubleshooting 43
Chapter 6
Troubleshooting
Problem: None of the LEDs turn on when you turn on the
Business Secure Router
Make sure that you have the correct power adapter connected to the Business
Secure Router and that it is plugged in to an appropriate power source. Check all
cable connections.
If the LEDs still do not turn on, you may have a hardware problem. In this case,
contact your local vendor.
Problem: You cannot access the Business Secure Router from
the LAN
Check the cable connection between the Business Secure Router and your
computer or hub. Refer to the Rear Panel section for details.
Ping the Business Secure Router (the default IP address is 192.168.1.1) from a
LAN computer. Make sure your computer Ethernet card is installed and
functioning properly.
Problem: You cannot ping any computer on the LAN
If the LAN LEDs are off, check the cable connections between the Business
Secure Router and your LAN computers.
Verify that the IP address and subnet mask of the Business Secure Router and the
LAN computers are in the same IP address range. See “3.1 Static or dynamic
configuration (Windows 2000/NT/XP)” on page 17 for details about how to
change your computer’s IP address with Windows 2000, NT and XP operating
systems. Refer to Configuring and Troubleshooting the Nortel Business Secure
Router 252 for detailed IP address configuration for Windows 95, 98, Me and
Macintosh and Linux computer operating systems.
Nortel Business Secure Router 252 — Fundamentals
44 Chapter 6 Troubleshooting
Problem: You cannot get a WAN IP address from the ISP
The ISP provides the WAN IP address after authenticating the username and
password, the MAC address, or the host name. Find out the verification method
used by your ISP.
You need a username and password if you are using PPPoE or PPPoA
encapsulation. Make sure that you have entered the correct service type,
username, and password (the username and password are case-sensitive). Use the
wizard screens or the WAN screens in the WebGUI.
If the ISP checks the MAC address, make sure the ISP is checking for the MAC
address of the Business Secure Router.
If your ISP requires host name authentication, configure your computer name as
the system name of the BCM50a Integrated Router (use the System General
screen to configure the system name).
Problem: You cannot access the Internet
Check the Business Secure Router connection to the ADSL-enabled telephone
jack (or DSL splitter).
Click WAN and verify your settings.
NN47923-301