1
Avaya 2007 IP Deskphone — User Guide
Avaya Business Communications Manager
Document Status: Standard
Document Number: NN40050-109
Document Version: 05.02
Date: October 2010
© 2010 Avaya Inc.
All Rights Reserved.
Notices
While reasonable efforts have been made to ensure that the information in this document is complete and accurate at the time of printing,
Avaya assumes no liability for any errors. Avaya reserves the right to make changes and corrections to the information in this document
without the obligation to notify any person or organization of such changes.
Documentation disclaimer
Avaya shall not be responsible for any modifications, additions, or deletions to the original published version of this documentation
unless such modifications, additions, or deletions were performed by Avaya. End User agree to indemnify and hold harmless Avaya,
Avaya’s agents, servants and employees against all claims, lawsuits, demands and judgments arising out of, or in connection with,
subsequent modifications, additions or deletions to this documentation, to the extent made by End User.
Link disclaimer
Avaya is not responsible for the contents or reliability of any linked Web sites referenced within this site or documentation(s) provided by
Avaya. Avaya is not responsible for the accuracy of any information, statement or content provided on these sites and does not
necessarily endorse the products, services, or information described or offered within them. Avaya does not guarantee that these links will
work all the time and has no control over the availability of the linked pages.
Warranty
Avaya provides a limited warranty on this product. Refer to your sales agreement to establish the terms of the limited warranty. In
addition, Avaya’s standard warranty language, as well as information regarding support for this product, while under warranty, is
available to Avaya customers and other parties through the Avaya Support Web site: http://www.avaya.com/support
Please note that if you acquired the product from an authorized reseller, the warranty is provided to you by said reseller and not by Avaya.
Licenses
THE SOFTWARE LICENSE TERMS AVAILABLE ON THE AVAYA WEBSITE, HTTP://SUPPORT.AVAYA.COM/LICENSEINFO/
ARE APPLICABLE TO ANYONE WHO DOWNLOADS, USES AND/OR INSTALLS AVAYA SOFTWARE, PURCHASED FROM
AVAYA INC., ANY AVAYA AFFILIATE, OR AN AUTHORIZED AVAYA RESELLER (AS APPLICABLE) UNDER A
COMMERCIAL AGREEMENT WITH AVAYA OR AN AUTHORIZED AVAYA RESELLER. UNLESS OTHERWISE AGREED TO
BY AVAYA IN WRITING, AVAYA DOES NOT EXTEND THIS LICENSE IF THE SOFTWARE WAS OBTAINED FROM ANYONE
OTHER THAN AVAYA, AN AVAYA AFFILIATE OR AN AVAYA AUTHORIZED RESELLER, AND AVAYA RESERVES THE
RIGHT TO TAKE LEGAL ACTION AGAINST YOU AND ANYONE ELSE USING OR SELLING THE SOFTWARE WITHOUT A
LICENSE. BY INSTALLING, DOWNLOADING OR USING THE SOFTWARE, OR AUTHORIZING OTHERS TO DO SO, YOU,
ON BEHALF OF YOURSELF AND THE ENTITY FOR WHOM YOU ARE INSTALLING, DOWNLOADING OR USING THE
SOFTWARE (HEREINAFTER REFERRED TO INTERCHANGEABLY AS "YOU" AND "END USER"), AGREE TO THESE
TERMS AND CONDITIONS AND CREATE A BINDING CONTRACT BETWEEN YOU AND AVAYA INC. OR THE
APPLICABLE AVAYA AFFILIATE ("AVAYA").
Copyright
Except where expressly stated otherwise, no use should be made of the Documentation(s) and Product(s) provided by Avaya. All content
in this documentation(s) and the product(s) provided by Avaya including the selection, arrangement and design of the content is owned
either by Avaya or its licensors and is protected by copyright and other intellectual property laws including the sui generis rights relating
to the protection of databases. You may not modify, copy, reproduce, republish, upload, post, transmit or distribute in any way any
content, in whole or in part, including any code and software. Unauthorized reproduction, transmission, dissemination, storage, and or
use without the express written consent of Avaya can be a criminal, as well as a civil offense under the applicable law.
Third Party Components
Certain software programs or portions thereof included in the Product may contain software distributed under third party agreements
("Third Party Components"), which may contain terms that expand or limit rights to use certain portions of the Product ("Third Party
Terms"). Information regarding distributed Linux OS source code (for those Products that have distributed the Linux OS source code),
and identifying the copyright holders of the Third Party Components and the Third Party Terms that apply to them is available on the
Avaya Support Web site: http://support.avaya.com/Copyright.
Trademarks
The trademarks, logos and service marks ("Marks") displayed in this site, the documentation(s) and product(s) provided by Avaya are the
registered or unregistered Marks of Avaya, its affiliates, or other third parties. Users are not permitted to use such Marks without prior
written consent from Avaya or such third party which may own the Mark. Nothing contained in this site, the documentation(s) and
product(s) should be construed as granting, by implication, estoppel, or otherwise, any license or right in and to the Marks without the
express written permission of Avaya or the applicable third party. Avaya is a registered trademark of Avaya Inc. All non-Avaya
trademarks are the property of their respective owners.
Downloading documents
For the most current versions of documentation, see the Avaya Support. Web site: http://www.avaya.com/support
Contact Avaya Support
Avaya provides a telephone number for you to use to report problems or to ask questions about your product. The support telephone
number is 1-800-242-2121 in the United States. For additional support telephone numbers, see the Avaya Web site: http://
www.avaya.com/support
Contents
3
Contents
Chapter 1
Getting started with the Avaya 2007 IP Deskphone . . . . . . . . . . . . . . . . . . . 5
Introduction . . . . . . . . . . . . . . . . . . . . . . . . . . . . . . . . . . . . . . . . . . . . . . . . . . . . . . . . . . 5
Avaya 2007 IP Deskphone buttons, display, and lights . . . . . . . . . . . . . . . . . . . . . . . . . 6
Avaya 2007 IP Deskphone LCD . . . . . . . . . . . . . . . . . . . . . . . . . . . . . . . . . . . . . . . . . . 7
Programmable line (DN)/ feature soft key area . . . . . . . . . . . . . . . . . . . . . . . . . . . . 8
Information area . . . . . . . . . . . . . . . . . . . . . . . . . . . . . . . . . . . . . . . . . . . . . . . . . . . 8
Soft key area . . . . . . . . . . . . . . . . . . . . . . . . . . . . . . . . . . . . . . . . . . . . . . . . . . . . . . 8
Feature keys area . . . . . . . . . . . . . . . . . . . . . . . . . . . . . . . . . . . . . . . . . . . . . . . . . . 9
Tools and Navigation area . . . . . . . . . . . . . . . . . . . . . . . . . . . . . . . . . . . . . . . . . . . 9
About your programmable soft keys . . . . . . . . . . . . . . . . . . . . . . . . . . . . . . . . . . . 10
Touch panel . . . . . . . . . . . . . . . . . . . . . . . . . . . . . . . . . . . . . . . . . . . . . . . . . . . . . . . . . 10
Calibrate the touch panel . . . . . . . . . . . . . . . . . . . . . . . . . . . . . . . . . . . . . . . . . . . 10
Stylus . . . . . . . . . . . . . . . . . . . . . . . . . . . . . . . . . . . . . . . . . . . . . . . . . . . . . . . . . . 10
To clean the touch panel . . . . . . . . . . . . . . . . . . . . . . . . . . . . . . . . . . . . . . . . . . . . 11
Configure Avaya 2007 IP Deskphone local options . . . . . . . . . . . . . . . . . . . . . . . . . . 11
Enter and edit text . . . . . . . . . . . . . . . . . . . . . . . . . . . . . . . . . . . . . . . . . . . . . . . . . . . . 11
Enter text using the pop-up keyboard . . . . . . . . . . . . . . . . . . . . . . . . . . . . . . . . . . 11
Enter text using the telephone dialpad . . . . . . . . . . . . . . . . . . . . . . . . . . . . . . . . . 12
Edit text using the soft keys . . . . . . . . . . . . . . . . . . . . . . . . . . . . . . . . . . . . . . . . . 12
Telephone setup . . . . . . . . . . . . . . . . . . . . . . . . . . . . . . . . . . . . . . . . . . . . . . . . . . . . . 12
Display contrast level . . . . . . . . . . . . . . . . . . . . . . . . . . . . . . . . . . . . . . . . . . . . . . 13
Language choice . . . . . . . . . . . . . . . . . . . . . . . . . . . . . . . . . . . . . . . . . . . . . . . . . . 13
Ring type . . . . . . . . . . . . . . . . . . . . . . . . . . . . . . . . . . . . . . . . . . . . . . . . . . . . . . . . 14
Chapter 2
Features and soft keys . . . . . . . . . . . . . . . . . . . . . . . . . . . . . . . . . . . . . . . . . 15
Basic call features . . . . . . . . . . . . . . . . . . . . . . . . . . . . . . . . . . . . . . . . . . . . . . . . . . . . 15
Make a call . . . . . . . . . . . . . . . . . . . . . . . . . . . . . . . . . . . . . . . . . . . . . . . . . . . . . . 15
Answer calls . . . . . . . . . . . . . . . . . . . . . . . . . . . . . . . . . . . . . . . . . . . . . . . . . . . . . 16
Hold . . . . . . . . . . . . . . . . . . . . . . . . . . . . . . . . . . . . . . . . . . . . . . . . . . . . . . . . . . . . 16
Handsfree . . . . . . . . . . . . . . . . . . . . . . . . . . . . . . . . . . . . . . . . . . . . . . . . . . . . . . . 16
Headset . . . . . . . . . . . . . . . . . . . . . . . . . . . . . . . . . . . . . . . . . . . . . . . . . . . . . . . . . 16
Mute . . . . . . . . . . . . . . . . . . . . . . . . . . . . . . . . . . . . . . . . . . . . . . . . . . . . . . . . . . . 17
Time offset . . . . . . . . . . . . . . . . . . . . . . . . . . . . . . . . . . . . . . . . . . . . . . . . . . . . . . . . . . 17
Navigation key . . . . . . . . . . . . . . . . . . . . . . . . . . . . . . . . . . . . . . . . . . . . . . . . . . . . . . . 17
Programmable line (DN)/feature soft keys . . . . . . . . . . . . . . . . . . . . . . . . . . . . . . . . . 18
Program soft keys . . . . . . . . . . . . . . . . . . . . . . . . . . . . . . . . . . . . . . . . . . . . . . . . . 18
Avaya 2007 IP Deskphone — User Guide
4
Contents
NN40050-109
5
Chapter 1
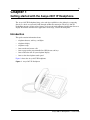
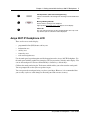
Getting started with the Avaya 2007 IP Deskphone
The Avaya 2007 IP Deskphone brings voice and data capabilities to the desktop by connecting
directly to a local area network (LAN) through an Ethernet connection. The Avaya 2007 IP
Deskphone supports call processing features and can work with an External Application Server to
display Web-based and interactive applications on the large, color LCD touch panel.
Introduction
This guide contains information about:
•
•
•
•
•
•
•
telephone buttons, soft keys, and lights
telephone display
telephone setup
how to make and answer calls
how to program the programmable line (DN)/feature soft keys
how to offset the time on your telephone display
how to clean the telephone touch panel
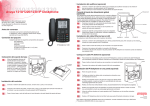
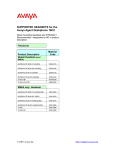
Figure 1 shows the Avaya 2007 IP Deskphone.
Figure 1 Avaya 2007 IP Deskphone
Avaya 2007 IP Deskphone — User Guide
6
Chapter 1 Getting started with the Avaya 2007 IP Deskphone
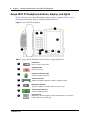
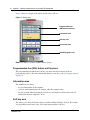
Avaya 2007 IP Deskphone buttons, display, and lights
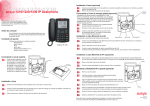
Figure 2 shows the Avaya 2007 IP Deskphone buttons, display, and lights. Table 1 gives a
description of the buttons, display, and lights identified in Figure 2.
Figure 2 Avaya 2007 IP Deskphone
I
B
A
J
C
E
D
H
G
H
F
Table 1 Avaya 2007 IP Deskphone button, display, and light descriptions
A
Hold button
Places an active call on hold.
B
C
Goodbye button
Ends an active call.
Handsfree button with LED
Turns the Handsfree mode on.
D
E
F
G
NN40050-109
Volume control bar
Adjusts the handset, Handsfree, headset, and ringer volume.
Mute button with LED
Turns the microphone off and on when you are on a call.
Headset button with LED
Turns the headset mode on.
Navigation key
Allows you to scroll through lines of text and menu items, such as those
listed in Services or the Call Log.
Chapter 1 Getting started with the Avaya 2007 IP Deskphone
H
I
J
7
Soft key buttons (either side of Navigation key)
Labels on the bottom of the LCD give the meaning associated with these
keys.
Message Waiting Indicator
Flashes when a call rings at the telephone.
Lights up when Message for you appears on the display.
Color LCD
The color LCD contains the soft keys and information areas. Tap a soft
key with the stylus to activate the feature displayed.
Avaya 2007 IP Deskphone LCD
There are five areas on the display:
•
•
•
•
•
programmable line (DN)/feature soft key area
information area
soft key area
feature key area
tools and navigation area
Use the touch panel to perform point and click operations on the Avaya 2007 IP Deskphone. Use
the touch panel with the graphical user interface (GUI) to present keys directly on the display. You
can use the touch panel to activate all line/DN keys, feature keys, and soft keys.
Calibrate the touch panel using the Tools menu, which enables you to fine tune the touch panel.
You are prompted to use the stylus to tap three targets.
You can operate the touch panel using a stylus or your finger. However, it is recommended that
you use only a stylus to avoid damage to the touch panel and to ensure accuracy.
Avaya 2007 IP Deskphone — User Guide
8
Chapter 1 Getting started with the Avaya 2007 IP Deskphone
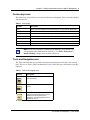
Figure 3 shows an example of the display and describes each area.
Figure 3 Display area
Programmable line
(DN)/feature soft keys
Information area
Soft key area
Feature key area
Tools/Navigation area
Note: Your display can differ slightly from this picture.
Programmable line (DN)/ feature soft key area
The programmable line (DN)/feature soft key area shows the label and status of the six
programmable soft keys. For more information about these soft keys, refer to “Program soft keys”
on page 18.
Information area
The information area shows:
•
•
•
the extension number of the telephone
a line for general information (for example, caller ID, company name)
the date and time when the telephone is not in use, and changes to show features and call
information when the telephone is in use
Soft key area
The soft key area shows the Feature soft key and three additional display soft keys. These labels
vary depending on the feature in use. You cannot reprogram these soft keys.
NN40050-109
Chapter 1 Getting started with the Avaya 2007 IP Deskphone
9
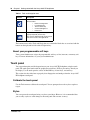
Feature keys area
The feature keys area provides access to the fixed features of the phone. Table 2 describes the keys
and what they do:
Table 2 Feature keys
Key label
Description
Inbox
Opens your voice mailbox. For more information, see your system administrator.
Directory*
Access phone directory.
Outbox
Allows you to send voice mail messages to people in your directory.
Quit*
Exit from various menus or the External Application Server.
Expand
Expand to PC to access text-based external services.
Services*
Access to scrollable feature display menu, including the hot desking feature.
Copy
Programmable key (default: empty).
Note: On the Avaya Business Communications Manager (Avaya BCM), you
can reprogram items marked with an asterisk (*). Use Tools > Preferences >
Button Labeling to display icons or insert custom text.
Tools and Navigation area
The Tools and Navigation area provides controls for navigating between features and selecting
tools. This area is always visible and functional. Table 3 shows the icons and describes what they
represent.
Table 3 Tools and Navigation area
Tool icon
Description
Tap this icon to access graphics-based
external services.
Tap this icon to access the Telephone
screen.
Use this soft key to access the first
registered external application. The icon
displayed on the key is that of the
application. The Avaya globemark is an
example of an icon.
Avaya 2007 IP Deskphone — User Guide
10
Chapter 1 Getting started with the Avaya 2007 IP Deskphone
Table 3 Tools and Navigation area
Tool icon
Description
Tap this icon to access the Tools menu,
which includes:
•
Network Configuration
•
Local Diagnostics
•
Touch Panel Setup
•
Contrast & Brightness
•
Preferences
Tap this icon to display a virtual keyboard
(pop-up keyboard) for text entry.
The stylus or USB keyboard maybe used to
enter text in some of the applications.
The bottom corners of the Tools and Navigation area contain the labels that are associated with the
buttons on the right and left side of the Navigation key.
About your programmable soft keys
Your system administrator assigns the programmable soft keys as line, intercom, or memory soft
keys. For more information, see your system administrator.
Touch panel
You can perform point and click operations on your Avaya 2007 IP Deskphone using the touch
panel. The touch panel works with the graphical user interface (GUI) to present keys directly on
the display. Use the touch panel to activate all line/DN keys, feature keys, and soft keys.
This section also describes how to properly clean fingerprints and smudges from the Avaya 2007
IP Deskphone touch panel.
Calibrate the touch panel
Use the Tools menu to calibrate the touch panel. You are prompted to use the stylus to tap three
targets.
Stylus
You can operate the touch panel using a stylus or your finger. However, it is recommended that
you use only a stylus to avoid damage to the touch panel and to ensure accuracy.
NN40050-109
Chapter 1 Getting started with the Avaya 2007 IP Deskphone
11
To clean the touch panel
1
Press and hold down the Goodbye button
2
While you hold down the Goodbye button, gently clean the touch panel with a soft, dry cloth.
.
Note: While you hold down the Goodbye button, pressing on the touch panel does not activate
features.
Configure Avaya 2007 IP Deskphone local options
Your Avaya 2007 IP Deskphone has both local and server-based options. The local options cover
the following entries in the Tools menu:
•
•
•
•
•
•
Network Configuration: enter telephone configuration information using the dialpad. Use the
touch panel to select fields, then use the pop-up keyboard, USB keyboard, or dialpad to enter
data.
Local Diagnostics: use for Network Diagnostics (Ping, Tracert), Ethernet Statistics IP
Network Statistics and DHCP information to improve the troubleshooting process.
Touch Panel Setup: calibrate the touch panel. You are prompted to use the stylus to tap three
targets.
Display Settings: adjust the contrast, brightness, backlight, screen saver slideshow, and display
dim settings.
USB Devices: view which USB devices are connected.
Preferences: find the Button Customization tool to change the feature key labels to display
icons or custom text.
Enter and edit text
You can enter and edit text on your Avaya 2007 IP Deskphone using the following methods:
•
•
•
•
the pop-up keyboard
the telephone dialpad
the soft keys
the USB keyboard or mouse (optional)
The use of any of these for text entry depends on the application.
Enter text using the pop-up keyboard
A full uppercase and lowercase keyboard and a number pad are available to enter text. You can
“type” on the keyboard with the stylus. The keyboard is primarily used for the local phone
applications in the Tools menu.
Avaya 2007 IP Deskphone — User Guide
12
Chapter 1 Getting started with the Avaya 2007 IP Deskphone
Enter text using the telephone dialpad
Use the dialpad to enter text when you use features such as Programming an Autodial key.
For example, if you want to enter the letter A, press the number 2 key once. If you want to enter
the letter C, press the number 2 key three times.
No letters are associated with the number 1 or the 0 keys.
Edit text using the soft keys
Use soft keys to access text when you work with such applications as Personal Directory, Redial
List, and Callers List.
Table 4 describes the soft key editing functions on the Avaya 2007 IP Deskphone.
Table 4 Editing soft keys description
Soft key
Description
Cancel
Action is canceled.
Choose
Select a symbol.
Clear
Clear the input field.
Case
Switch the next character to
either uppercase or
lowercase.
Delete
Backspace one character.
Done/Select/Enter
Meaning depends on
application.
More…
Access additional soft keys.
Telephone setup
This section describes the Avaya 2007 IP Deskphone display features:
•
•
•
Display contrast
Language choice
Ring type
Note: For more information about the features available to your
telephone and how to use them, refer to the Telephone Features Card.
NN40050-109
Chapter 1 Getting started with the Avaya 2007 IP Deskphone
13
Display contrast level
To adjust the contrast for the telephone display:
1
Tap Feature.
2
Enter *7 using the telephone dialpad.
3
Tap DOWN and UP to view the levels.
4
Tap OK to select a level.
Language choice
Note: Language choice affects only the Programmable line (DN)/ feature soft
key area, Information area, and Soft key area.
To customize the Feature key area and Tools/Navigation area, tap the Tools
icon and then select Preferences.
To select the Primary Language for the telephone display:
1
Tap Feature.
2
Enter *501 using the telephone dialpad.
3
Select the Alternate Language for the telephone display.
To select the second alternate language:
1
Tap Feature.
2
Enter *502 using the telephone dialpad.
3
Select the Alternate Language 2 for the telephone display.
To select the third alternate language:
1
Tap Feature.
2
Enter *503 using the telephone dialpad.
3
Select the Alternate Language 3 for the telephone display.
To select the fourth alternate language:
1
Tap Feature.
2
Enter *504 using the telephone dialpad.
3
Select the Alternate Language 4 for the telephone display.
Avaya 2007 IP Deskphone — User Guide
14
Chapter 1 Getting started with the Avaya 2007 IP Deskphone
Ring type
To select a different ring type for your telephone:
1
Tap Feature.
2
Enter *6 using the telephone dialpad.
3
Press 1, 2, 3, 4 (on the telephone dialpad), or NEXT to hear the different ring types.
4
Tap OK to store the ring type.
NN40050-109
15
Chapter 2
Features and soft keys
This section describes some of the Avaya 2007 IP Deskphone soft keys and call features:
•
•
•
basic call features
Navigation key
programmable line (DN)/feature soft keys
Note: For more information about the features available to your telephone
and how to use them, refer to the Telephone Features Card.
Basic call features
The following features are available on both external and internal calls:
•
•
•
•
•
•
•
Make a call
Answer a call
Hold a call
Handsfree
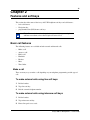
Headset
Mute
Time Offset
Make a call
There are many ways to make a call depending on your telephone programming and the type of
call.
To make external calls using line soft keys:
1
Lift the handset.
2
Tap a line soft key.
3
Dial the external telephone number.
To make external calls using intercom soft keys:
1
Lift the handset.
2
Tap an intercom soft key.
3
Enter a line pool access code.
Avaya 2007 IP Deskphone — User Guide
16
Chapter 2 Features and soft keys
4
When you hear an external dial tone, dial the external telephone number.
Note: Contact your system administrator for a list of line pool codes. When
entering a line pool access code on PRI lines, you do not hear dial tone.
To make internal calls using intercom soft keys:
1
Lift the handset.
2
Tap an intercom soft key.
3
Dial the extension number.
Note: Contact your system administrator for a list of extension numbers.
Answer calls
When your telephone rings and the light flashes, or an intercom or line soft key indicator flashes:
•
lift the handset.
or
•
tap the line or intercom soft key with the flashing
indictor before you lift the handset
Hold
Calls are put on hold automatically when you switch from one line to another.
•
•
While on a call, press
. The
indicator for the line on hold flashes.
To retrieve a held call, tap the line soft key with the flashing
indicator.
Handsfree
Your system administrator must program the Handsfree feature to your telephone.
•
•
•
Press
to make or answer a call.
To switch to Handsfree when you are on a handset call, press
the handset to switch back.
To switch to Handsfree when you are on a headset call, press
and replace the handset. Lift
. Press
to switch back.
Headset
You must have a headset installed on your telephone to use this feature.
•
Press
to activate the headset mode. When the
intercom soft key to make a call.
NN40050-109
light is on, press a line or
Chapter 2 Features and soft keys
•
•
To switch to your headset when you are on a handset call, press
handset. Lift the handset to switch back.
To switch to your headset when you are on a Handsfree call, press
back.
17
and replace the
. Press
to switch
Mute
•
•
•
While on a call, press
to turn the microphone off. The
microphone is off.
Press
again to turn the microphone on.
Use
on a handset, or with Handsfree or headset calls.
button lights when the
Time offset
When your Avaya 2007 IP Deskphone is located in a different time zone from your system, the
display shows the system time, not the local time. Use the Time Offset feature to adjust the time
that appears on the display.
Before you begin, calculate the time difference, in hours, between the server time and local time.
To change the time that appears on your telephone display to
local time:
1
Tap Feature.
2
Enter *510 using the telephone dialpad.
3
Tap CHANGE.
4
Press * on the telephone dialpad to switch between adding or subtracting time.
5
Using the dialpad, enter the number of hours between local time and system time.
Note: Press # to enter half hour increments.
6
Tap OK.
Note: It can take up to one minute for the change to appear on the display.
Navigation key
The Navigation key on the Avaya 2007 IP Deskphone provides all the scrolling motions
(horizontal and vertical) required to navigate the menus.
Avaya 2007 IP Deskphone — User Guide
18
Chapter 2 Features and soft keys
Programmable line (DN)/feature soft keys
The Avaya 2007 IP Deskphone programmable line (DN)/feature soft keys are soft keys that are not
assigned as line or intercom soft keys. Programmable line (DN)/feature soft keys store internal and
external numbers or features to give you one-touch dialing or feature activation. Refer to “Avaya
2007 IP Deskphone buttons, display, and lights” on page 6.
Program soft keys
You can program a programmable line (DN)/feature soft key with a new number or feature.
To program external autodial:
1
Tap Feature.
2
Enter *1 using the telephone dialpad.
3
Tap a memory soft key.
4
Dial the external number.
5
Tap OK to store the number.
To program internal autodial:
1
Tap Feature.
2
Enter *2 using the telephone dialpad.
3
Tap a memory soft key.
4
Dial the extension number.
5
Tap OK to store the number.
To program features:
1
Tap Feature.
2
Enter *3 using the telephone dialpad.
3
Tap a memory soft key.
4
Tap Feature and enter the feature code.
5
Tap OK to store the feature code.
To erase soft keys:
1
Tap Feature.
2
Enter *1 using the telephone dialpad.
3
Tap a memory soft key.
NN40050-109
Chapter 2 Features and soft keys
4
19
Tap OK to erase the soft key.
Avaya 2007 IP Deskphone — User Guide
20
Chapter 2 Features and soft keys
NN40050-109