1
Avaya 2007 IP Deskphone
Call Center User Guide
Avaya Communication Server 1000
Document Status: Standard
Document Version: 05.01
Part Code: NN43118-102
Date: November 2010
© 2010 Avaya Inc. All Rights Reserved.
Notices
While reasonable efforts have been made to ensure that the information in this document is complete and accurate at the time of
printing, Avaya assumes no liability for any errors. Avaya reserves the right to make changes and corrections to the information
in this document without the obligation to notify any person or organization of such changes.
Documentation disclaimer
Avaya shall not be responsible for any modifications, additions, or deletions to the original published version of this
documentation unless such modifications, additions, or deletions were performed by Avaya. End User agree to indemnify and
hold harmless Avaya, Avaya’s agents, servants and employees against all claims, lawsuits, demands and judgments arising out
of, or in connection with, subsequent modifications, additions or deletions to this documentation, to the extent made by End
User.
Link disclaimer
Avaya is not responsible for the contents or reliability of any linked Web sites referenced within this site or documentation(s)
provided by Avaya. Avaya is not responsible for the accuracy of any information, statement or content provided on these sites
and does not necessarily endorse the products, services, or information described or offered within them. Avaya does not
guarantee that these links will work all the time and has no control over the availability of the linked pages.
Warranty
Avaya provides a limited warranty on this product. Refer to your sales agreement to establish the terms of the limited warranty.
In addition, Avaya’s standard warranty language, as well as information regarding support for this product, while under
warranty, is available to Avaya customers and other parties through the Avaya Support Web site: http://www.avaya.com/
support
Please note that if you acquired the product from an authorized reseller, the warranty is provided to you by said reseller and not
by Avaya.
Licenses
THE SOFTWARE LICENSE TERMS AVAILABLE ON THE AVAYA WEBSITE, HTTP://SUPPORT.AVAYA.COM/
LICENSEINFO/ ARE APPLICABLE TO ANYONE WHO DOWNLOADS, USES AND/OR INSTALLS AVAYA
SOFTWARE, PURCHASED FROM AVAYA INC., ANY AVAYA AFFILIATE, OR AN AUTHORIZED AVAYA RESELLER
(AS APPLICABLE) UNDER A COMMERCIAL AGREEMENT WITH AVAYA OR AN AUTHORIZED AVAYA
RESELLER. UNLESS OTHERWISE AGREED TO BY AVAYA IN WRITING, AVAYA DOES NOT EXTEND THIS
LICENSE IF THE SOFTWARE WAS OBTAINED FROM ANYONE OTHER THAN AVAYA, AN AVAYA AFFILIATE OR
AN AVAYA AUTHORIZED RESELLER, AND AVAYA RESERVES THE RIGHT TO TAKE LEGAL ACTION AGAINST
YOU AND ANYONE ELSE USING OR SELLING THE SOFTWARE WITHOUT A LICENSE. BY INSTALLING,
DOWNLOADING OR USING THE SOFTWARE, OR AUTHORIZING OTHERS TO DO SO, YOU, ON BEHALF OF
YOURSELF AND THE ENTITY FOR WHOM YOU ARE INSTALLING, DOWNLOADING OR USING THE SOFTWARE
(HEREINAFTER REFERRED TO INTERCHANGEABLY AS "YOU" AND "END USER"), AGREE TO THESE TERMS
AND CONDITIONS AND CREATE A BINDING CONTRACT BETWEEN YOU AND AVAYA INC. OR THE
APPLICABLE AVAYA AFFILIATE ("AVAYA").
Copyright
Except where expressly stated otherwise, no use should be made of the Documentation(s) and Product(s) provided by Avaya.
All content in this documentation(s) and the product(s) provided by Avaya including the selection, arrangement and design of
the content is owned either by Avaya or its licensors and is protected by copyright and other intellectual property laws
including the sui generis rights relating to the protection of databases. You may not modify, copy, reproduce, republish, upload,
post, transmit or distribute in any way any content, in whole or in part, including any code and software. Unauthorized
reproduction, transmission, dissemination, storage, and or use without the express written consent of Avaya can be a criminal,
as well as a civil offense under the applicable law.
Third Party Components
Certain software programs or portions thereof included in the Product may contain software distributed under third party
agreements ("Third Party Components"), which may contain terms that expand or limit rights to use certain portions of the
Product ("Third Party Terms"). Information regarding distributed Linux OS source code (for those Products that have
distributed the Linux OS source code), and identifying the copyright holders of the Third Party Components and the Third
Party Terms that apply to them is available on the Avaya Support Web site: http://support.avaya.com/Copyright.
Trademarks
The trademarks, logos and service marks ("Marks") displayed in this site, the documentation(s) and product(s) provided by
Avaya are the registered or unregistered Marks of Avaya, its affiliates, or other third parties. Users are not permitted to use
such Marks without prior written consent from Avaya or such third party which may own the Mark. Nothing contained in this
site, the documentation(s) and product(s) should be construed as granting, by implication, estoppel, or otherwise, any license
or right in and to the Marks without the express written permission of Avaya or the applicable third party. Avaya is a registered
trademark of Avaya Inc. All non-Avaya trademarks are the property of their respective owners.
Downloading documents
For the most current versions of documentation, see the Avaya Support. Web site: http://www.avaya.com/support
Contact Avaya Support
Avaya provides a telephone number for you to use to report problems or to ask questions about your product. The support
telephone number is 1-800-242-2121 in the United States. For additional support telephone numbers, see the Avaya Web site:
http://www.avaya.com/support
Contents
Contents
About the Avaya 2007 IP Deskphone . . . . . . . . . . . . . . . . . . 7
Basic features . . . . . . . . . . . . . . . . . . . . . . . . . . . . . . . . . . . . . . 7
IP Deskphone controls . . . . . . . . . . . . . . . . . . . . . . . . . . . . . . . 8
IP Deskphone Display . . . . . . . . . . . . . . . . . . . . . . . . . . . . . . 11
Application area . . . . . . . . . . . . . . . . . . . . . . . . . . . . . . . . 12
Tools/Navigation area . . . . . . . . . . . . . . . . . . . . . . . . . . . 14
Touch panel . . . . . . . . . . . . . . . . . . . . . . . . . . . . . . . . . . . . . . 16
Calibrate the touch panel . . . . . . . . . . . . . . . . . . . . . . . . . 17
Using the stylus . . . . . . . . . . . . . . . . . . . . . . . . . . . . . . . . 17
Cleaning the phone Screen . . . . . . . . . . . . . . . . . . . . . . . . . . 17
Entering and editing text . . . . . . . . . . . . . . . . . . . . . . . . . . . 18
Entering text using the phone dialpad . . . . . . . . . . . . . . . . . . 18
Editing text using the soft keys . . . . . . . . . . . . . . . . . . . . . . . . 19
Entering text using the pop-up keyboard . . . . . . . . . . . . . . . . 19
Entering text using the USB keyboard . . . . . . . . . . . . . . . . . . 20
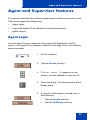
Agent and Supervisor features . . . . . . . . . . . . . . . . . . . . . . 21
Agent Login . . . . . . . . . . . . . . . . . . . . . . . . . . . . . . . . . . . . . . 21
Login with Agent ID and Multiple Queue Assignments . . . . . . 22
Agent ID and MQA login options . . . . . . . . . . . . . . . . . . . 23
Default Login . . . . . . . . . . . . . . . . . . . . . . . . . . . . . . . . . . 25
Agent Logout . . . . . . . . . . . . . . . . . . . . . . . . . . . . . . . . . . 26
Agent features . . . . . . . . . . . . . . . . . . . . . . . . . . . . . . . . . . . 27
Answer ACD calls . . . . . . . . . . . . . . . . . . . . . . . . . . . . . . . . . . 27
Use Force Call . . . . . . . . . . . . . . . . . . . . . . . . . . . . . . . . . . . . 28
Use Activity code . . . . . . . . . . . . . . . . . . . . . . . . . . . . . . . . . . 29
Use Emergency . . . . . . . . . . . . . . . . . . . . . . . . . . . . . . . . . . . 30
3
Contents
Use Not Ready . . . . . . . . . . . . . . . . . . . . . . . . . . . . . . . . . . . . 30
Place or answer non-ACD calls . . . . . . . . . . . . . . . . . . . . . . . 31
Contact the supervisor . . . . . . . . . . . . . . . . . . . . . . . . . . . . . . 32
Using Record On Demand key . . . . . . . . . . . . . . . . . . . . . . . . 34
Using SAVE key . . . . . . . . . . . . . . . . . . . . . . . . . . . . . . . . . . . 34
Supervisor features . . . . . . . . . . . . . . . . . . . . . . . . . . . . . . . 36
Use Answer Agent . . . . . . . . . . . . . . . . . . . . . . . . . . . . . . . . . 36
Use Agent key . . . . . . . . . . . . . . . . . . . . . . . . . . . . . . . . . . . . 37
Use Answer Emergency . . . . . . . . . . . . . . . . . . . . . . . . . . . . . 37
Use Call Agent . . . . . . . . . . . . . . . . . . . . . . . . . . . . . . . . . . . . 38
Use Interflow . . . . . . . . . . . . . . . . . . . . . . . . . . . . . . . . . . . . . . 38
Use Night Service . . . . . . . . . . . . . . . . . . . . . . . . . . . . . . . . . . 39
Observe . . . . . . . . . . . . . . . . . . . . . . . . . . . . . . . . . . . . . . . . . 40
Display Queue . . . . . . . . . . . . . . . . . . . . . . . . . . . . . . . . . . . . 40
Display Agent status . . . . . . . . . . . . . . . . . . . . . . . . . . . . . . . . 42
Terms you should know . . . . . . . . . . . . . . . . . . . . . . . . . . . 45
Regulatory and safety information . . . . . . . . . . . . . . . . . . . 51
Other . . . . . . . . . . . . . . . . . . . . . . . . . . . . . . . . . . . . . . . . . . . . 53
DenAn regulatory notice for Japan . . . . . . . . . . . . . . . . . . . . . 53
Index . . . . . . . . . . . . . . . . . . . . . . . . . . . . . . . . . . . . . . . . . . . 55
4
Revision history
Revision history
November 2010
Standard 05.01. This document is up-issued to support Avaya
rebranding changes.
August 2010
Standard 04.02. This document is up-issued to support Avaya
Communication Server 1000 Release 7.0. Rebranding done.
June 2010
Standard 04.01. This document is up-issued to support Avaya
Communication Server 1000 Release 7.0.
December 2009
Standard 03.03. This document is up-issued to support
Communication Server 1000 Release 6.0. This document
contains updates to the IP Phone 2007 LCD.
May 2009
Standard 03.02. This document is up-issued to support
Communication Server 1000 Release 6.0.
April 2008
Standard 02.01. This document is issued to support
Communication Server 1000 Release 5.5 for UNIStim 3.0.
May 2007
Standard 01.02. This document is issued to support
Communication Server 1000 Release 5.0. This document
contains information previously contained in the following legacy
document, now retired: IP Phone 2007 Call Center User Guide
(NN10300-020). Graphics are also updated.
5
Revision history
August 2005
Standard 2.00. This document is up-issued to support the
Communication Server 1000 Release 4.5.
May 2005
Standard 1.00. This document is issued to support the
IP Phone 2007 on Communication Server 1000 Release 4.0.
6
About the Avaya 2007 IP Deskphone
About the
Avaya 2007 IP Deskphone
The Avaya 2007 IP Deskphone brings a premier multimedia experience
to the IP Deskphone and offers color touch-screen that enables the
presentation of a wide array of information and applications. It supports
the services provided by Application Gateway 2000. The Avaya 2007 IP
Deskphone display can present multimedia content to enhance your
communications experience, including visual voicemail, broadcast alerts
such as company news and emergency notifications, promotion of guest
services within hospitality environments for revenue generation as well as
other customized applications desired by the organization.
The Avaya 2007 IP Deskphone brings voice and data to the desktop by
connecting directly to a Local Area Network (LAN) through an Ethernet
connection.
The Avaya 2007 IP Deskphone provides all the functionality of the
IP Phone 2004, using a graphical user interface (GUI). In addition,
advanced text and graphic-based Web-centric applications are
supported.
The Avaya 2007 IP Deskphone does not support the IP Deskphone Key
Expansion Module (KEM).
Note: Not all features are available on all phone. Consult the system
administrator to verify which features are available.
Basic features
The Avaya 2007 IP Deskphone supports the following features:
•
large, color, touch panel display screen
•
high quality speaker phone.
•
12 programmable feature keys: six programmable line (DN)/feature
keys and six lines/features accessed by pressing the Shift key
•
four context-sensitive soft keys
7
About the Avaya 2007 IP Deskphone
•
volume control bar for adjusting ringer, speaker, handset, and
headset volume
•
five call-processing fixed keys:
— Hold
— Goodbye
— Handsfree
— Mute
— Headset
•
shared LAN access with a PC
•
automatic network configuration
•
hearing-aid compatibility
•
Web-based applications support
•
remote firmware download
•
USB mouse and keyboard support or mouse
Note: For more information about context-sensitive soft keys, see
Avaya New in This Release (NN43001-115) for Avaya
Communication Server 1000 Release 6.0.
Consult your system administrator to verify if your Avaya 2007 IP
Deskphone is configured to support soft key functionality.
IP Deskphone controls
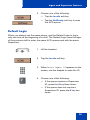
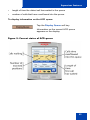
Figure 1 on page 9 shows the Avaya 2007 IP Deskphone.
8
About the Avaya 2007 IP Deskphone
Figure 1: Avaya 2007 IP Deskphone
Use the Volume control bar to adjust the
volume of the ringer, handset, headset,
speaker, and the Handsfree feature. Press
the right side of the rocker bar to increase
volume, the left side to decrease volume.
Use the Goodbye key to terminate an active
call.
Press the Hold key to put an active call on
hold. Tap the flashing line (DN) soft key to
return to the caller on hold.
Use the Navigation key to scroll through
menus and lists appearing on the LCD
screen. The key rocks for up, down, left, and
right movements.
9
About the Avaya 2007 IP Deskphone
Press the Headset key to answer a call
using the headset or to switch a call from the
handset or handsfree to the headset. The
LED next to the headset button flashes when
the headset is in use.
Press the Handsfree key to activate
handsfree. The speaker LED indicator lights
to indicate when handsfree is active.
Your Mute key functionality is enabled or
disabled by your system administrator.
Contact your system administrator to
determine if your Mute key is enabled.
If your Mute key is enabled, press the Mute
key to listen to the receiving party without
transmitting your voice. Press the Mute key
again to return to two-way conversation.
If your Mute key is not enabled, pressing the
Mute key places the call on hold. Press the
Mute key again to restore the active call or
press the line key to restore the active call.
You cannot retrieve this call from hold by
pressing the Hold key.
Note: The Mute LED indicator, located
on the Mute key, flashes to indicate that
the microphone is muted.
10
About the Avaya 2007 IP Deskphone
When a message is waiting, or there is an
incoming call, the red Message
Waiting\Incoming Call Indicator LED at
the top center of the IP Deskphone flashes.
The flash cadence for each alert is different.
Note: You may also hear an audio
Message Waiting Indicator (stutter or
beeping dial tone) when you go off-hook.
Context-Sensitive Soft keys are located on
either side of the navigation key. The LCD
label above each key changes, based on the
active feature. These keys are sometimes
referred to as Soft keys.
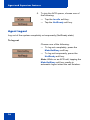
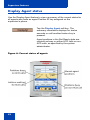
IP Deskphone Display
The Avaya 2007 IP Deskphone provides a large, color, touch panel
display that supports color XML/HTML content through an external
application server.
The Avaya 2007 IP Deskphone window-based user interface has two
display areas:
•
Application area
•
Tools/Navigation area
Figure 2 shows an idle display.
11
About the Avaya 2007 IP Deskphone
Figure 2: Avaya 2007 IP Deskphone display
Note: The display can differ from the above example.
To extend the life of the LCD panel, the panel goes dark (“sleeps”) after a
configured period of time. For information about configuring the time
before the display sleeps, see the Avaya 2007 IP Deskphone User Guide
(NN43118-100).
Application area
The Application area provides:
•
line and feature key status
•
information items such as caller number, caller name, feature prompt
strings, user-entered digits, date and time information (or call timer, if
provisioned in the Telephone Options menu), and IP Deskphone
information
•
context-sensitive soft keys
•
feature keys
12
About the Avaya 2007 IP Deskphone
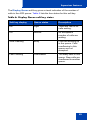
Figure 3 shows the Application area and the feature area, the soft keys
can show either text or icons.
Figure 3: Avaya 2007 IP Deskphone Detailed in Application
area
Table 1 shows the soft key text and icon equivalents. The text labels are
displayed by default and are changed using the Tools menu.
Your Avaya 2007 IP Deskphone displays different icons and text labels
depending on the version of your IP Deskphone and the installed
firmware, as shown in Table 1.
Table 1: Feature key text and icon displays (Part 1 of 2)
Avaya 2007 IP Deskphone
older version
Text display
Icon display
Avaya 2007 IP Deskphone
newer version
Text display
Icon display
13
About the Avaya 2007 IP Deskphone
Table 1: Feature key text and icon displays (Part 2 of 2)
Avaya 2007 IP Deskphone
older version
Text display
Icon display
Avaya 2007 IP Deskphone
newer version
Text display
Icon display
Tools/Navigation area
The Tools/Navigation area provides controls for navigating between
features and selecting tools. This area is visible and functional at all times
unless you tap the keyboard icon. The pop-up keyboard occupies this
portion of the screen.
Figure 4 on page 15 shows the Tools/Navigation area.
14
About the Avaya 2007 IP Deskphone
Figure 4: Avaya 2007 IP Deskphone Tools/Navigation area
The Tools/Navigation area has five main elements presented as
touchable soft keys. The icons on the soft keys are different depending on
the installed IP Deskphone software.
Tap this icon to determine which external
applications are registered (for example, My
CallPilot), and launch them by tapping on the
Applications appropriate icon.
Tap this icon to access the Telephone screen.
Telephone
Primary
Application
Tap this soft key to go to the primary external
application, as configured by the administrator.
The key displays the icon of the primary
application.
15
About the Avaya 2007 IP Deskphone
Tools
Tap this icon to access the following tools
used on the Avaya 2007 IP Deskphone. You
can be prompted to enter the Administration
password.
•
Network Configuration
•
Local Diagnostics
•
Touch Panel Setup
•
Display Settings
•
USB Devices
•
Preferences
•
Lock Menu
Note: Network Configuration, Local
Diagnostics, and TFTP Upgrade are for
administrator use only.
Tap this icon to display a virtual keyboard
(pop-up keyboard) for text entry.
The stylus or USB keyboard can be used to
Keyboard enter text in some of the applications. See
“Entering and editing text” on page 18 for
further information.
Touch panel
You perform point-and-click operations on your
Avaya 2007 IP Deskphone using the touch panel. The touch panel is
used with the graphical user interface (GUI) to present soft keys directly
on the display. You can activate all Line/DN soft keys and feature soft
keys by using the touch panel.
For important information about cleaning your touch-panel, see
“Cleaning the phone Screen” on page 17.
16
About the Avaya 2007 IP Deskphone
Calibrate the touch panel
You calibrate the touch panel through the Tools menu, where you can
fine-tune the touch panel. You are prompted to use the stylus to tap three
targets. For more information, see the Avaya 2007 IP Deskphone User
Guide (NN43118-100).
Using the stylus
You operate the touch panel using a stylus or your finger. However, use
of a stylus is recommended to avoid damage to the touch panel.
Cleaning the phone Screen
Hold the Goodbye key down and gently wipe the phone screen with a
soft, dry cloth.
CAUTION
Do not use any liquids or powders on the
phone.
Using anything other than a soft, dry cloth
can contaminate phone components and
cause premature failure.
17
Entering and editing text
Entering and editing text
You can enter and edit text on your Avaya 2007 IP Deskphone using the
following methods:
•
“Entering text using the phone dialpad” on page 18
•
“Editing text using the soft keys” on page 19
•
“Entering text using the pop-up keyboard” on page 19
•
“Entering text using the USB keyboard” on page 20
The use of any of these methods for text entry depends on the application. Table 2 shows the applications and input devices that can be used
for text entry:
Table 2: Application Text Entry
For:
Use:
Call server related applications
(for example, changing feature
key labels, adding personal
directory entries or for dialing)
Dialpad
Graphical applications
Pop-up or USB keyboard
Tools menu
Pop-up or USB keyboard
Pop-up or USB keyboard for
numeric entries only
Dialpad for numeric and text
entries
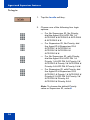
Entering text using the phone dialpad
You use the dialpad to enter text when using features such as
programming an Autodial key.
For example, to enter the letter A, press the number 2 key once. To enter
the letter C, press the number 2 key three times.
18
Entering and editing text
Note: No letters are associated with the number 1 or the number 0
key. Punctuation is associated with the number 1.
When entering IP addresses with the dialpad, the address is entered as
xxx**xxx**xxx**xxx, and the phone translates this to xxx.xxx.xxx.xxx.
Editing text using the soft keys
You use soft keys to access text when you work with such applications as
Personal Directory, Redial List, and Callers List.
Table 3 describes the soft key editing functions on the
Avaya 2007 IP Deskphone.
Table 3: Editing soft key description
Soft key
Description
Cancel
Stop the current action.
Choose
Select a symbol.
Clear
Clear the input field.
Case
Switch the next character to either uppercase
or lowercase.
Delete
Backspace one character.
Done/Select/Enter
Depends on application.
More..
Access additional soft keys.
Entering text using the pop-up keyboard
A full uppercase and lowercase keyboard and a number pad are available
to enter text. The user can type on the keyboard with the stylus. The popup keyboard can be used to enter text in the tools and graphical
applications.
19
Entering and editing text
For number entry in phone applications (for example, when dialing), the
keyboard can be used to enter digits (0 to 9), as well as asterisk (*) and
pound (#). Other characters are ignored.
Entering text using the USB keyboard
The USB keyboard, when connected, can be used to enter text in the
tools and graphical applications.
For number entry in phone applications (for example, when dialing), the
keyboard can be used to enter digits (0 to 9), as well as * and #. Other
characters are ignored.
When on a call, the function keys (f1, f2, f3, f4, f5, f6, f7, and f8) can be
used to control the phone. Table 4 shows the function keys and their
associated action during phone calls.
Table 4: USB keyboard function keys during phone calls
Function key
Action
f1
Go to Handsfree mode
f2
Go to Headset mode
f3
Place the current call on Hold
f4
Mute the current call
f5
Volume Up
f6
Volume Down
f7
Copy
f8
Quit
20
Agent and Supervisor features
Agent and Supervisor features
This section describes the following login features that are common to the
Call Center Agent and Supervisor:
•
Agent Login
•
Login with Agent ID and Multiple Queue Assignments
•
Agent Logout
Agent Login
Use the Agent Login to enter an Automated Call Distribution (ACD)
queue. If an Agent ID is assigned, enter the four-digit code at the display
screen prompts.
1. Lift the handset.
2. Tap the Incalls soft key.
3. If Enter Agent ID appears on the
screen, use the dialpad to enter the ID.
4. Press the # key. The phone enters a Not
Ready state.
5. To join the ACD queue, choose one of
the following:
— Tap the Incalls soft key.
— Tap the NotReady soft key.
21
Agent and Supervisor features
6. If you are using a headset and the
Handset On-Hook Means Log out
(HOML) setting is configured to No by
the administrator, then perform the
following:
a. Press the Headset key and replace
the handset in the cradle to receive
calls on the headset.
b. Tap the Services soft key. Change
the On-hook default path to
Headset Enabled.
Note: If the HOML setting is configured
to Yes, replace the handset to log out of
the queue.
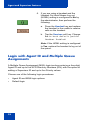
Login with Agent ID and Multiple Queue
Assignments
A Multiple Queue Assignment (MQA) login involves entering a four-digit
Agent ID and up to five ACD Directory Numbers (DN), with the option of
adding a Supervisor ID and up to five Priority values.
Choose one of the following login procedures:
•
Agent ID and MQA login options
•
Default login
22
Agent and Supervisor features
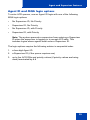
Agent ID and MQA login options
To enter ACD queues, use an Agent ID login with one of the following
MQA login options:
•
No Supervisor ID, No Priority
•
Supervisor ID, No Priority
•
No Supervisor ID, with Priority
•
Supervisor ID, with Priority
Note: The system prevents a supervisor from entering a Supervisor
ID when the supervisor is logging in to accept ACD calls. This
includes logins where agents must enter a Supervisor ID.
The login options require the following entries in sequential order:
1. a four-digit Agent ID
2. a Supervisor ID (if the queue requires one)
3. up to five ACD DNs and priority values (if priority values are being
used) terminated by # #
23
Agent and Supervisor features
To log in
1. Tap the Incalls soft key.
2. Choose one of the following four login
options:
— For No Supervisor ID, No Priority,
dial the Agent ID # ACD DN 1 #
ACD DN 2 # ACD DN 3 # ACD DN 4
# ACD DN 5 # #.
— For Supervisor ID, No Priority, dial
the Agent ID # Supervisor ID #
ACD DN 1 # ACD DN 2 #
ACD DN 3 # ACD DN 4 #
ACD DN 5 # #.
— For No Supervisor ID, with Priority,
dial the Agent ID # ACD DN 1 #
Priority 1 # ACD DN 2 # Priority 2 #
ACD DN 3 # Priority 3 # ACD DN 4 #
Priority 4 # ACD DN 5 Priority 5 # #.
— For Supervisor ID, with Priority, dial
the Agent ID # Supervisor ID #
ACD DN 1 # Priority 1 # ACD DN 2 #
Priority # 2 ACD DN 3 # Priority 3 #
ACD DN 4 # Priority 4 #
ACD DN 5 # Priority 5 # #.
Note: To choose the default Priority
value or Supervisor ID, enter #.
24
Agent and Supervisor features
3. Choose one of the following:
— Tap the Incalls soft key.
— Tap the NotReady soft key to enter
the ACD queue.
Default Login
When you always use the same phone, use the Default Login to log in
only one time at the beginning of a shift. The Default Login uses the login
of the previous shift to enter the same ACD queues and with the same
Supervisor.
1. Lift the handset.
2. Tap the Incalls soft key.
3. When Enter Agent ID appears on the
screen, use the dialpad to enter the ID.
4. Choose one of the following:
— If the queue requires a Supervisor
ID, press the # key three times.
— If the queue does not require a
Supervisor ID, press the # key two
times.
25
Agent and Supervisor features
5. To join the ACD queue, choose one of
the following:
— Tap the Incalls soft key.
— Tap the NotReady soft key.
Agent Logout
Log out of the system completely or temporarily (NotReady state).
To log out
Choose one of the following:
— To log out completely, press the
MakeSetBusy soft key.
— To log out temporarily, press the
NotReady soft key.
Note: While on an ACD call, tapping the
MakeSetBusy soft key results in
automatic logout when the call finishes.
26
Agent features
Agent features
The following sections describe features available to Agents:
•
Answer ACD calls
•
Activity code
•
Call Forcing
•
Emergency
•
Not Ready
•
Answer or Place Non-ACD calls
•
Contact the Supervisor
Answer ACD calls
Use the Incalls key to answer the next queued ACD call on the primary
DN. The Incalls key is located in the lower right-hand corner of the
programmable line/feature keys.
To answer the call
When the Incalls soft key flashes, tap the
Incalls soft key.
27
Agent features
To terminate the call
Choose one of the following:
— Press the Goodbye key.
— Tap the Incalls soft key.
— Tap the individual DN line soft key
(to be removed from the queue).
— Tap the NotReady soft key (to be
removed from the queue, but to
remain logged in as an agent
position) or wait for the caller to
terminate the call.
Use Force Call
Use the Force Call feature to automatically connect to an incoming ACD
call. A time interval is set by the system administrator between each
incoming call.
When calls come in, a short tone indicates the new call. The InCall soft
key changes color, and the ACD call automatically goes to the agent
position. Pressing the Incalls key while call forcing (Auto Answer) is
active disconnects an active ACD call.
To enable call forcing for headset users
1. Log in.
2. Replace the handset.
28
Agent features
3. Press the Services soft key. Set the
On-hook default path to
Headset Enabled.
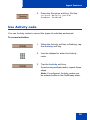
Use Activity code
You use Activity codes to record the types of activities performed.
To record activities
1. When the Activity soft key is flashing, tap
the Activity soft key.
2. Use the dialpad to enter the Activity
code.
3. Tap the Activity soft key.
If performing multiple tasks, repeat these
steps.
Note: If configured, Activity codes can
be entered while in the NotReady state.
29
Agent features
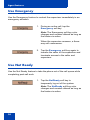
Use Emergency
Use the Emergency feature to contact the supervisor immediately in an
emergency situation.
1. During an active call, tap the
Emergency soft key.
Note: The Emergency soft key color
changes and remains altered as long as
the feature is active.
When the supervisor answers, a threeway call commences.
2. Tap the Emergency soft key again to
transfer the caller to the supervisor and
terminate access to the caller and
supervisor.
Use Not Ready
Use the Not Ready feature to take the phone out of the call queue while
completing post-call work.
1. Tap the NotReady soft key to
temporarily log out of the system.
Note: The NotReady soft key color
changes and remains altered as long as
the feature is active.
30
Agent features
2. To return to the queue, choose one of
the following:
— Tap the Incalls soft key
— Tap the NotReady soft key.
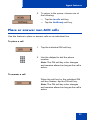
Place or answer non-ACD calls
Use this feature to place or answer calls on an individual line.
To place a call
1. Tap the individual DN soft key.
2. Use the dialpad to dial the phone
number.
Note: The DN soft key color changes
and remains altered as long as the call is
active.
To answer a call
When the soft key for the individual DN
soft key flashes, tap the DN soft key.
Note: The DN soft key color changes
and remains altered as long as the call is
active.
31
Agent features
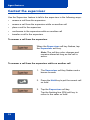
Contact the supervisor
Use the Supervisor feature to talk to the supervisor in the following ways:
•
answer a call from the supervisor
•
answer a call from the supervisor while on another call
•
place a call to the supervisor
•
conference in the supervisor while on another call
•
transfer a call to the supervisor
To answer a call from the supervisor
When the Supervisor soft key flashes, tap
the Supervisor soft key.
Note: The soft key color changes and
remains altered as long as the call is
active.
To answer a call from the supervisor while on another call
1. The Supervisor soft key flashes and a
buzzer sounds.
2. Press the Hold key to put the current call
on hold.
3. Tap the Supervisor soft key.
Tap the flashing line (DN) soft key to
return to the caller on hold.
32
Agent features
To place a call to the supervisor
Tap the Supervisor soft key.
Note: Calls are automatically put on hold
when the Supervisor soft key is used.
To return to the ACD call
Tap the Incalls soft key.
To conference in the supervisor during a call in progress
1. Tap the Supervisor soft key to talk
privately with the supervisor.
2. Tap the Supervisor soft key again for a
conference call.
To transfer a call to the supervisor during a call in progress
1. Tap the Supervisor key.
2. When the supervisor answers, tap the
Supervisor key again.
3. Press the Goodbye key to terminate
access to the call.
33
Agent features
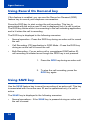
Using Record On Demand key
If this feature is enabled, you can use the Record on Demand (ROD)
feature key to record your telephone conversation.
Press the ROD key to start or stop the call recording. This key is
associated with the active user ID and is displayed only if a call is active.
The ROD key blinks while it is connecting to the call recording application,
and is lit when the call is recording.
The ROD key is displayed in the following scenarios:
•
Normal operation - Press the ROD key during an active call to record
the call.
•
Call Recording (CR) application in ROD Mode - Press the ROD key
during an active call to record the call
•
Bulk Recording - For an active call or unregistered DN/Position ID,
call recording is initiated even though the ROD key is not pressed.
1. Press the ROD key during an active call.
2. To stop the call recording, press the
ROD key again.
Using SAVE key
Use the SAVE feature key to save the recording of an active call. This key
is associated with the active user ID and is operational only if a call is
active.
The SAVE key is displayed in the following scenarios:
•
34
Normal operations - If the SAVE key is pressed during an active call,
the call is saved.
Agent features
•
CR application in Bulk Record + Save everything mode - Recorded
conversation is saved at the end of the call. If the SAVE key is
pressed, then the call is not saved.
•
CR application in Bulk Record + Delete everything mode - Recorded
conversation is deleted at the end of the call. If the SAVE key is
pressed, then the call is saved.
The SAVE key lamp status depends on the status of the call recording. If
the call is to be saved, then the lamp is lit.
1. Press the ROD key during an active call.
2. To stop the call recording, press the
ROD key again.
3. Press the SAVE key to save the
conversation.
35
Supervisor features
Supervisor features
The following sections describe features available to the Supervisor:
•
Answer Agent
•
Agent key
•
Answer Emergency
•
Call Agent
•
Interflow
•
Night Service
•
Observe
•
Display Agent Status
•
Display Queue
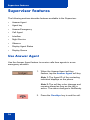
Use Answer Agent
Use the Answer Agent feature to receive calls from agents in a nonemergency situation.
1. When the Answer Agent soft key
flashes, tap the Answer Agent soft key.
Note 1: The Agent ID of the contacting
individual displays on the phone.
Note 2: The soft key color changes and
remains altered as long as the call is
active. The status changes to NotReady.
2. Press the Goodbye key to end the call.
36
Supervisor features
Use Agent key
Use the Agent feature to connect, observe, or monitor the status of each
agent position. Each Agent key links to a particular agent position, and
can be used with the Call Agent or Observe Agent keys.
Table 5 lists the four states of the LCD indicator.
Table 5: Agent status
LCD
Description
Off
Agent is not logged in.
On
Agent is logged in but either NotReady or on a
call.
Slow Flashing
Agent is waiting for an ACD call.
Fast Flashing
Agent is on a non-ACD call.
Use Answer Emergency
Use the Answer Emergency feature to receive calls from agents in an
emergency situation.
1. When the Answer Emergency soft key
flashes, tap the Answer Emergency
soft key.
Note 1: The Agent ID of the contacting
individual displays on the phone.
Note 2: The soft key color changes and
remains altered as long as the call is
active. The status changes to NotReady.
2. Press the Goodbye key to end the call.
37
Supervisor features
Use Call Agent
Use the Call Agent feature to contact an Agent.
1. Tap the Call Agent soft key.
2. Choose one of the following:
— Tap a selected Agent soft key.
— Dial the agent’s Position ID.
3. Press the Goodbye key to end the call.
Use Interflow
Use the Interflow feature to redirect calls when the backlog or wait time
exceeds a predefined threshold.
1. Tap the Interflow soft key.
Note: The Interflow soft key color
changes and remains altered while the
feature is active.
2. Tap the Interflow soft key again to
deactivate the feature and resume
normal call flow.
38
Supervisor features
Use Night Service
Use the Night Service feature to define how calls are handled outside of
business hours.
To activate Night Service
1. Tap the Night Service soft key.
2. Press the 6 key (6 = N for Night) to go
into Night Service.
The Night Service soft key color
changes and remains altered. All calls in
queue and new calls receive night
service.
To transition to Night Service
1. Tap the Night Service soft key.
2. Press the 8 key (8 = T for Transition) to
activate Transition mode.
The Night Service soft key color
changes and remains altered. All calls in
queue remain in queue and new calls
receive Night Service.
To deactivate Night Service
1. Tap the Night Service soft key.
39
Supervisor features
2. Press the 3 key (3 = D for Day) to
resume Day mode.
The Night Service soft key color
changes and remains altered. New calls
enter the queue.
Observe
Use the Observe feature to monitor an agent in a call.
1. Tap the Observe soft key.
2. Choose one of the following:
— Tap a selected Agent soft key.
— Dial the agent’s Position ID.
3. Tap the Call Agent soft key to talk to the
agent being monitored.
4. Tap the Observe soft key to terminate
the observation.
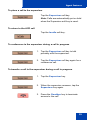
Display Queue
Use the Display Queue feature to access the status of calls in an
ACD queue. The information displayed includes the following:
•
number of calls waiting in the queue
•
number of agent positions occupied for the queue
40
Supervisor features
•
length of time the oldest call has waited in the queue
•
number of calls that have overflowed into the queue
To display information on the ACD queue
Tap the Display Queue soft key.
Information on the current ACD queue
appears on the display.
Figure 5: Current status of ACD queue
41
Supervisor features
Display Agent status
Use the Display Agent feature to view a summary of the current status for
all agents who have an agent Position ID key assigned on the
supervisor’s phone.
Tap the Display Agent soft key. The
summary information displays for twelve
seconds or until another feature key is
pressed.
Agent positions in the Not Ready state are
counted as busy on either ACD calls or nonACD calls, as specified by the system
administrator.
Figure 6: Current status of agents
42
Supervisor features
The Display Queue soft key gives a visual indication of the number of
calls in the ACD queue. Table 6 lists the four states for this soft key.
Table 6: Display Queue soft key states
Soft key display
Queue status
Description
Off
Light
There are few or no
calls waiting.
On
Normal
An acceptable
number of calls are
waiting.
Slow Flashing
Busy
Calls are backing up
in the queue. Calls
overflowing to this
queue are not
accepted.
Fast Flashing
Overloaded
Too many calls in this
queue. New calls are
overflowed to another
queue.
43
Supervisor features
44
Terms you should know
Terms you should know
Attendant
A telephone operator in your organization.
AutoDial
A telephone number programmed on the AutoDial soft key for
one-touch dialing.
Avaya Communication Server 1000
An office communication system.
Copy key
A soft key used to copy entries to your Personal Directory from
other lists, such as the Callers List, Redial List, Corporate
Directory, etc.
Date/Time display
The current date and time when the telephone is in an idle state.
Directory soft key
Enables access to Corporate Directory, Personal Directory,
Redial List, and Callers List.
Directory Number (DN)
A number consisting of one to seven digits for a telephone. Also
known as an extension number.
Expand to PC
A soft key on your telephone used to access external server
applications.
45
Terms you should know
Fastbusy
A signal given when all outgoing lines are busy.
Feature display
An area that shows status information about the feature in use. It
also displays the name and status of the active session.
Fixed key
Any of the hard-labeled keys on your telephone.
Goodbye key
A fixed key used to end an active call.
Handsfree
A method of conversing with the party on the other end of the line
without lifting your handset.
Headset key
A fixed key used to answer a call using the headset.
Hold key
A fixed key used to place an active call on hold.
Information display
Any display of call activity, lists, prompts, and status of calls.
Information line
A 1-line by 24-character area that displays date and time or
application information.
Interrupted dial tone
A broken or pulsed dial tone you hear when you access some
features on your telephone.
46
Terms you should know
Message (Inbox)
A soft key on your telephone that connects to your voice
messaging system when the key is tapped.
Message Waiting indicator/Incoming Call indicator
An LCD or an LED that indicates the status of a feature by the
flash, wink, steady on, or off.
Meridian 1
An office communication system.
More..
An option allowing access to the multiple layers of the soft keys.
Mute key
A fixed key used to listen to a caller without transmitting.
Navigation key
Contains the Up/Down and Left/Right keys used to scroll through
menus and lists appearing on the LCD display screen.
Off-hook
Any line selected to make a call or receive an incoming call.
The term off-hook is applied whether (a) the end user lifts up the
handset, (b) the end user presses a line key, (c) the call is
automatically answered at the set, or (d) a line is automatically
selected for an outgoing call.
Outbox/Shift key
A soft key used to switch between two feature key sets to provide
access to an additional six lines/features.
Primary Directory Number
The main extension number on your telephone.
47
Terms you should know
Programmable line (DN)/feature soft keys (self-labeled)
The six soft keys located in the upper area of the display.
Quit key
A soft key on your telephone that is used to exit applications.
Ringback/ring tone
A sound indicating that a call you have made is ringing at its
destination.
Services key
A soft key used to access options, such as Telephone Options,
Password Admin, Display Network Diagnostics Utilities, Virtual
Office Login, Virtual Office Logout, Test Local Mode, and Resume
Normal Mode.
Soft keys
A set of keys programmed by your system administrator. These
four keys, located in the middle of the display area, have four
programmable layers that are accessed through the More.. soft
key. These keys are also used to configure parameters in the
Telephone Options menu.
Speaker key
A fixed key used to activate Handsfree.
Special dial tone
The three consecutive tones followed by dial tone that you hear
when accessing telephone features.
48
Terms you should know
Status messages
A message displayed to inform the user of important information.
A right arrow appears if more than one status message is
present. Examples of status messages include: Message
Waiting, All Lines Forwarded to: 6453, Do Not Disturb On, Ring
Again Active, Ringer is OFF, and Line x Unavailable.
System or Switch
Your office communication system.
Switchhook
A button that the handset depresses, disconnecting your call
when you replace the handset. When lifted, the handset releases
the switchhook, and you either answer an incoming call or you
receive a dial tone to make a call.
User interface
Screen displays that interact with the end user as a result of an
action or event.
Volume control bar
A rocker bar you press to increase or decrease the volume of the
ringer, handset, headset, speaker, and the Handsfree feature.
49
Terms you should know
50
Regulatory and safety information
Regulatory and safety
information
This equipment has been tested and found to comply with the limits for a Class B
digital device, pursuant to part 15 of the FCC Rules. These limits are designed to
provide reasonable protection against harmful interference in a residential
installation. This equipment generates, uses and can radiate radio frequency
energy and, if not installed and used in accordance with the instructions, may
cause harmful interference to radio communications. However, there is no
guarantee that interference will not occur in a particular installation. If this
equipment does cause harmful interference to radio or television reception, which
can be determined by turning the equipment off and on, the user is encouraged to
try to correct the interference by one or more of the following measures:
•
•
•
•
Reorient or relocate the receiving antenna.
Increase the separation between the equipment and receiver.
Connect the equipment into an outlet on a circuit different from that to which
the receiver is connected.
Consult the dealer or an experienced radio/ TV technician for help.
Note: The user should not make changes or modifications not expressly
approved by Avaya. Any such changes could void the user’s authority to
operate the equipment.
This Class B digital apparatus complies with Canadian ICES-003. Cet appareil
numérique de la classe B est conforme à la norme NMB-003 du Canada.
Warnings:
•
•
This is a Class B product. In a domestic environment this product can cause
radio interference in which case the user must take adequate measures.
Operation is subject to the following two conditions: (1) this device may not
cause interference, and (2) this device must accept any interference,
including interference that may cause undesired operation of the device.
この装置は、情報処理装置等電波障害自主規制協議会(VCCI)の基準に基づくクラス
B 情報技術装置です。この装置は、家庭環境で使用することを目的としていますが、この
装置がラジオやテレビジョン受信機に近接して使用されると、受信障害を引き起こすこと
があります。
取扱説明書に従って正しい取り扱いをして下さい。
51
Regulatory and safety information
Table 7 lists EMC compliance for various jurisdictions.
Table 1: EMC Compliance
Jurisdiction Standard
Description
United States FCC CFR 47
Part 15
Class B Emissions: FCC Rules for Radio
Frequency Devices
Canada
Class B Emissions: Interference-Causing
Equipment Standard: Digital Apparatus
ICES-003
Australia/New AS/NZS 3548
Zealand
CISPR 22
Class B Emissions: Information technology
equipment - Radio disturbance
European
Community
EN 55022
Class B Emissions: Information technology
equipment - Radio disturbance
EN 55024
Information technology equipment - Immunity
characteristics
Limits and methods of measurement
EN 61000-3-2
Limits for harmonic current emissions
(equipment input current <= 16 A per phase)
EN 61000-3-3
Limitation of voltage fluctuations and flicker in
low-voltage supply systems for equipment with
rated current <= 16 A
VCCI
Regulations for voluntary control measures.
Japan
Table 2: Safety
Jurisdiction
Standard
Description
United States
UL 60950-1
Safety of Information Technology
Equipment
Canada
CSA 60950-1-03
Safety of Information Technology
Equipment
European
Community
EN 60950-1
ITE equipment - Safety - Part 1:
General requirements
Australia/New AS/NZS
Zealand
60950.1:2003
Safety of Information Technology
Equipment
Other Safety Approvals: IEC 60950-1: ITE equipment - Safety - Part 1:
General requirements
52
Regulatory and safety information
Other
US/Canada: Hearing Aid Compatibility (HAC) as per FCC Part 68
This equipment complies with the CE Marking requirements.
Australia: AS/ACIF S004: Voice Frequency Performance Requirements for
Customer Equipment
EU Countries: This device complies with the essential requirements and other
relevant provisions of Directive 1999/5/EC. A copy of the Declaration may be
obtained from http://support.avaya.com/css/appmanager/public/
support.
DenAn regulatory notice for Japan
53
Regulatory and safety information
54
Index
Index
A
Directory key 45
About the Avaya 2007 IP Deskphone 7
Directory Number (DN) 45
Activity code 29
Display Queue 40
Display Agent status 42
Agent and MQA login options 23
Agent and Supervisor features 21
E
Agent features 27
Emergency 30
Agent key 37
Expand to PC key 45
Agent login 21
Agent logout 26
F
Answer ACD calls 27
Fastbusy signal 46
Answer Agent 36
Feature display 46
Answer Emergency 37
Fixed key 46
Attendant 45
Force Call 28
AutoDial 45
Avaya Communication
1000 45
Server
G
Goodbye key 9, 46
B
H
Basic features 7
Handsfree 46
Headset key 10, 46
C
Hold key 9, 46
Calibrate the touch panel 17
Call Agent 38
I
Cleaning the telephone screen 17
Indicator status 47
Contact your supervisor 32
Information display 46
Copy key 45
Information line 46
Interflow 38
D
Interrupted dial tone 46
Date/Time display 45
Default login 25
L
Local Area Network 7
55
Index
Login with Agent ID and MQA 22
M
Meridian 1 47, 49
Message (Inbox) 47
Message waiting indicator 47
More key 47
Mute key 10, 47
N
S
Services key 48
Soft keys (self-labeled) 48
Speaker key 10, 48
Special dial tone 48
Status messages 49
Supervisor features 34
Switchhook 49
System or Switch 49
Navigation keys 9, 47
T
Night Service 39
Touch panel 16
Not Ready 30
O
Observe 40
Off-hook 47
Outbox/Shift key 47
P
Paging tone 47
Place or answer non-ACD calls 31
Primary Directory Number 47
Programmable line (DN)/feature
keys (self-labeled) 48
Q
Quit key 48
R
Regulatory and safety information
51
Ringback/ring tone 48
56
cleaning 17
U
User interface 49
V
Volume control bar 9, 49