1
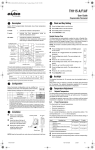
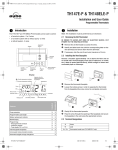
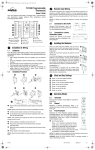
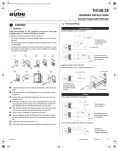
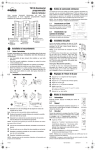
400-062-000-B ENG.fm Page 1 Friday, July 4, 2008 9:37 AM
TI062
Installation and User Guide
Programmable Multi-purpose Timer
n
Applications
1.
n
Hold the On/Off button for 3 seconds to
enter the menu. The Mode menu will
flash.
o
Press the On/Off button briefly. The
current mode will flash on the screen.
p
Press the button repeatedly until the
desired mode flashes on the screen.
q
Hold the On/Off button for 3 seconds to
exit the menu.
The TI062 timer can be used indoors and outdoors to control lighting,
motors and block heaters. The timer provides 5 modes of operation:
Mode
Ideal for
Automatic mode
• indoor and outdoor lights (at set times)
• swimming pool pumps
Automatic mode with
temperature threshold
• engine block heaters
• gutter heating cables
Automatic mode with
darkness threshold
• outdoor lighting during the evening
Sunset/sunrise mode
• outdoor lighting during the night
Manual mode
• when you do not wish the controlled
appliance to turn on or off automatically.
NOTE 1: Suitable for use with outdoor appliances. Store indoors
when not in use.
NOTE 2: To reduce the risk of electric shock, the timer has a
grounding-type plug, which has a third (grounding) pin. This plug will
fit only in a grounding-type outlet. If the plug does not fit in the outlet,
contact a qualified electrician to install the proper outlet. Do not
modify the plug in any way.
o
First Use
2.
Plug the timer in an electrical outlet before setting it for the first time.
The clock flashes to indicate that it must be set*. When the timer has
been charged for at least 2 hours, it can be unplugged for several
minutes without losing the time. The other settings are saved at all
times.
* The clock will still tick even if it is not set. When this happens, the
on/off times of the controlled appliance might be shifted.
p
Description of Controls
3.
NOTE: The timer automatically returns to its
normal display if you do not press any button
for 60 seconds.
4.1
Manual mode
The timer operates like a regular switch. It
applies or cut power to the appliance when
you press the On/Off button.
4.2
Automatic mode
The timer applies and cuts power to the
appliance at the desired times by means of a
program. Power is applied at the start of the
program and is cut at the end of the program.
By default, the program starts at 6:00 pm and
ends at 11:00 pm. see section 6 on how to set
the start program time and end program time.
4.3
Automatic mode with temperature threshold
When the timer is plugged to an outdoor outlet,
this mode is used to activate an appliance
such as an engine block heater or gutter
heating cables when the temperature drops.
Heating starts when both following conditions
are met:
•
•
The program has started.
The temperature threshold is reached (see the different
temperature threshold options in the following table). The icon
flashes when the threshold is not reached.
See section 6 for program setting and temperature threshold
selection.
The timer is rainproof when held in the upright
position using the support.
Light sensor
Temperature Threshold
The LED illuminates when power is applied
to the controlled appliance.
Navigation and adjustment buttons
Press briefly to apply or cut power to the controlled
appliance.
Press for 3 seconds to enter or exit the setup menu.
Recommended Applications
-12 °C (10 °F) [default]
gas engine block heaters
-6 °C (21 °F)
diesel engine block heaters
3 °C (37 °F)
gutter heating cables
Heating will stop at the end of the program or when the temperature
rises above the threshold by a few degrees. However, heating will
resume if the temperature drops again before the end of the program.
CAUTION: Do not use the timer for temperature control applications.
q
Setting the Mode of Operation
4.
You can set the timer in any of the following modes:
Manual mode
Automatic mode (default mode)
Automatic mode with temperature threshold
Automatic mode with darkness threshold
Sunset/sunrise mode
To switch mode, use the programming menu. For example, to switch
from Automatic mode to Manual mode:
TI062
4.4
Automatic mode with darkness threshold
When the timer is plugged to an outlet
exposed to daylight, this mode is used to turn
lights on at sunset and turn them off at a set
time. The lights turn on when both following
conditions are met:
•
•
The program has started (see section 6).
The darkness threshold is reached. The icon flashes when the
darkness threshold is not reached.
The lights will turn off at the end of the program.
NOTE: Ensure that the timer is positioned such that the light sensor is
pointing to an area that is undisturbed by car lights, outdoor lights, etc.
400-062-000-B
2008-07-04
1/2
400-062-000-B ENG.fm Page 2 Friday, July 4, 2008 9:37 AM
4.5
Sunset/sunrise mode
t
When the timer is plugged to an outlet
exposed to daylight, this mode is used to turn
lights on at sunset and turn them off at sunrise.
The lights turn on when the darkness threshold
is reached. (The
icon flashes when the
darkness threshold is not yet reached.) When
the timer will detect light, the lights will turn off.
n
o
p
q
r
4.6
s
t
Temporary Override
You can press the On/Off button at any time to apply or cut power to
the appliance. If you derogate from the state in which the timer is
supposed to be, the new state (On or Off) will flash to show that it is
temporary. The override remains in effect until you press the On/Off
button or until the start of the next on or Off time.
r
n
Hold the On/Off button for 3 seconds to
enter the menu.
o
Press the button once. The Time
menu will flash.
p
Press the On/Off button to display the
time format options. The selected
format will flash. Press the or
button to switch format.
q
Press the On/Off button. The hour
setting will flash. Press the or
button to set the hour.
r
Press the On/Off button. The minutes
setting will flash. Press the or
button to set the minutes.
s
5.
n
o
p
q
r
s
t
6.
Press the On/Off button to display the
temperature format options. The
selected format will flash. Press the
or button to switch format.
Press the On/Off button to display the
temperature threshold. Press the or
button to display the desired
threshold.
v
Hold the On/Off button any time for 3
seconds to exit the menu.
NOTE: The timer automatically returns to its normal display if you do
not press any button for 60 seconds.
TI062
Check that the icon stops flashing after approximately 40
seconds to indicate the sensor has not detected light.
Remove your finger.
Check that the icon resumes flashing after approximately 40
seconds.
u
Reset to Factory Settings
8.
To return to factory settings, simultaneously press both
On/Off and buttons and hold. The software version will
appear for 5 seconds. RST will appear for the next 5
seconds. Release the buttons only when all segments
appear on the screen. The timer is now reset.
w
Hold the On/Off button for 3 seconds
to enter the menu.
Press the button twice. The Prog
menu will flash.
Press the On/Off button. The hour
setting will flash. Press the or
button to set the hour for the program
start time.
Press the On/Off button. The minutes
setting will flash. Press the or
button to set the minutes for the
program start time.
Press the On/Off button. The hour
setting will flash. Press the or
button to set the hour for the program
end time.
Press the On/Off button. The minutes
setting will flash. Press the or
button to set the minutes for the
program end time.
u
Check that the icon flashes to indicate the sensor has
detected light.
Place your finger on the sensor.
Power Outage
9.
During a power outage, the screen is blank. If the outage lasts more
than 4 hours (at 25 °C / 77 °F), when power will be back, the clock
will be reset (0:00) and will start ticking again. Therefore, the timer
can still apply or cut power to the controlled appliance, however the
on/off times will be shifted.
NOTE: The timer automatically returns to its
normal display if you do not press any
button for 60 seconds.
s
Place the timer in automatic mode with darkness threshold or in
sunset/sunrise mode.
Position the timer such that it be exposed to daylight.
v
Hold the On/Off button any time for 3
seconds to exit the menu.
Setting the Program and Temperature
7.
To test if the light sensor is working properly:
NOTE: Ensure that the timer is positioned such that the light sensor
is pointing to an area that is undisturbed by car lights, outdoor lights,
etc.
Setting the Clock
Testing the Light Sensor
Technical Specifications
10.
Supply: 120 VAC, 60 Hz
Maximum load: 15 amps, 1 HP
Operating temperature: -40 to 50 °C (-40 to 122 °F) [NOTE: The
display is illegible below -20°C (-4°F)]
Charging time: minimum of 8 hours
Data protection: Most settings are saved at all times. Only the clock
must be set if the timer was without power for more than 4 hours (at
25 °C / 77 °F).
Program: 1 on setting and 1 off setting. The same settings are
repeated every day.
Approval: UL (c UL us)
;
Warranty
11.
AUBE warrants this product, excluding battery, to be free from defects in the workmanship or materials, under normal use and service, for a period of three (3) years from the
date of purchase by the consumer. If at any time during the warranty period the product is
determined to be defective or malfunctions, AUBE shall repair or replace it (at AUBE's
option).
If the product is defective,
(i)
return it, with a bill of sale or other dated proof of purchase, to the place from
which you purchased it, or
(ii)
contact AUBE. AUBE will make the determination whether the product should be
returned, or whether a replacement product can be sent to you.
This warranty does not cover removal or reinstallation costs. This warranty shall not
apply if it is shown by AUBE that the defect or malfunction was caused by damage which
occurred while the product was in the possession of a consumer.
AUBE's sole responsibility shall be to repair or replace the product within the terms stated
above. AUBE SHALL NOT BE LIABLE FOR ANY LOSS OR DAMAGE OF ANY KIND,
INCLUDING ANY INCIDENTAL OR CONSEQUENTIAL DAMAGES RESULTING,
DIRECTLY OR INDIRECTLY, FROM ANY BREACH OF ANY WARRANTY, EXPRESS
OR IMPLIED, OR ANY OTHER FAILURE OF THIS PRODUCT. Some provinces, states
or regions do not allow the exclusion or limitation of incidental or consequential damages,
so this limitation may not apply to you.
THIS WARRANTY IS THE ONLY EXPRESS WARRANTY AUBE MAKES ON THIS
PRODUCT. THE DURATION OF ANY IMPLIED WARRANTIES, INCLUDING THE WARRANTIES OF MERCHANTABILITY AND FITNESS FOR A PARTICULAR PURPOSE, IS
HEREBY LIMITED TO THE THREE-YEAR DURATION OF THIS WARRANTY. Some
provinces, states or regions do not allow limitations on how long an implied warranty
lasts, so the above limitation may not apply to you.
This warranty gives you specific legal rights, and you may have other rights which vary
from one province, state or region to another.
Technical Assistance
12.
705 Montrichard Avenue
Saint-Jean-sur-Richelieu, Quebec
J2X 5K8
Canada
Tel.: (450) 358-4600
Toll-free: 1-800-831-AUBE
Fax: (450) 358-4650
Email: [email protected]
For more information on our products, go to
www.aubetech.com
400-062-000-B
2008-07-04
2/2