1
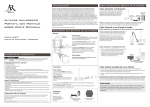
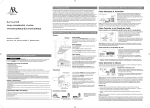
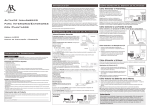
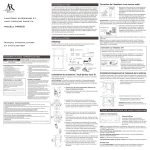
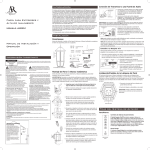
WIRELESS 2.1
STEREO HEADPHONES
OWNER’S
AWD211
MANUAL
IMPORTANT INFORMATION
CAUTION
RISK OF ELECTRIC SHOCK.
DO NOT OPEN.
Caution: To reduce the risk of electric shock, do not
remove cover (or back). No user serviceable parts inside.
Refer servicing to qualified service personnel.
WARNING: To reduce the risk of fire or
electric shock, do not expose this product to
rain or moisture. The apparatus shall not be
exposed to dripping or splashing. No objects
filled with liquids, such as vases, shall be
placed on the apparatus.
Important Safety Instructions
1. Read these instructions.
2. Keep these instructions.
3. Heed all warnings.
4. Follow all instructions.
5. Do not use this apparatus near water.
6. Clean only with dry cloth.
7. Do not block any ventilation openings.
Install in accordance with the
manufacturer’s instructions.
8. Do not install near any heat sources such
as radiators, heat registers, stoves, or
other apparatus (including amplifiers) that
produce heat.
9. Protect the power cord from being walked
on or pinched particularly at plugs,
convenience receptacles, and the point
where they exit from the apparatus.
10.Unplug this apparatus during lightning
storms or when unused for long periods
of time.
11. Refer all servicing to qualified service
personnel. Servicing is required when
the apparatus has been damaged in any
way, such as power-supply cord or plug
is damaged, liquid has been spilled or
objects have fallen into the apparatus, the
apparatus has been exposed to rain or
moisture, does not operate normally, or has
been dropped.
FCC Information
FCC Regulations state that unauthorized
changes or modifications to this equipment may
void the user’s authority to operate it.
This device complies with Part 15 of the FCC
rules. Operation is subject to the following two
conditions: (1) This device may not cause harmful
interference and (2) this device must accept any
interference received, including interference that
may cause undesired operation.
RF Exposure Warning: This equipment must
be installed and operated in accordance with
provided instructions and the antenna(s) used
for this transmitter must be installed to provide
a separation distance of at least 20 cm from
all persons and must not be co-located or
operating in conjunction with any other antenna
or transmitter. End-users and installers must be
provide with antenna installation instructions
and transmitter operating conditions for
satisfying RF exposure compliance.
Industry Canada Regulatory Information
Operation is subject to the following two
conditions: (1) this device may not cause harmful
interference and (2) this device must accept any
interference received, including interference that
may cause undesired operation.
The user is cautioned that this device should
be used only as specified within this manual
to meet RF exposure requirements. Use of this
device in a manner inconsistent with this manual
could lead to excessive RF exposure conditions.
This Class B digital apparatus complies with
Canadian ICES-003. This radiocommunication
device complies with Industry Canada Standard
RSS-210.
Cet appareil numérique de la classe B est
conforme à la norme NMB-003 du Canada. Ce
dispositif de radiocommunication respecte la
norme CNR-210 d’Industrie Canada.
Product Information
Keep your sales receipt to obtain warranty parts and service and for proof of purchase.
Attach it here and record the model number in case you need it. These numbers are
located on the product.
Model No.: _____________________________________________________________________
Purchase Date: _________________________________________________________________
Dealer/Address/Phone: __________________________________________________________
INTRODUCTION
Welcome
Congratulations on your purchase of the 2.4GHz Wireless Headphones
with 2.1 Sound. The AWD211 uses the latest in wireless transmission,
2.4GHz digital technology, that lets you enjoy crystal clear, digital
audio up to 150 feet away from the transmitter. The headphones also
offer a 2.1 stereo listening experience, with a dual-speaker design
in each ear cup providing your own “personal subwoofer”. The
headphones’ compact design and comfortable ear cups let you enjoy
music and TV sound just about anywhere inside or outside your home.
Easy, push-button pairing makes it simple to get started, wirelessly.
This manual covers various connection options and detailed operating
instructions for setup and use of the AR wireless headphones. If, after
having reviewed the instructions, you have any questions, please call
toll-free 1-800-732-6866 or visit www.araccessories.com.
Supplied Accessories
This headphone system includes accessories that enable you to use
your wireless headphone set in a number of ways.
• Wireless headphones (AWD211RX)
• 2.4GHz wireless transmitter (AWD211TX)
• AC power adapter
• Stereo audio cable (stereo pair to 3.5mm)
• 2 AA rechargeable batteries
• 3.5 mm to stereo (R/L) RCA jack adapter
• Instruction manual
3
GETTING STARTED
Installing the Headphone Batteries
1. Find the depression in the middle of
the left headphone. Press down on
this area to remove the headphones’
battery compartment cover.
Depression
2. Insert the two (2) rechargeable
AA batteries (included) in the left
headphone, following the polarity
(+ and –) diagram inside the
Left headphone, side view
compartment.
3. Place the battery cover back on the left headphone. Make sure it
locks back into place.
Important: DO NOT mix batteries with different chemistry types
(for example, a zinc battery with an alkaline battery). DO NOT
mix new and used batteries. DO NOT leave batteries installed in
the product when not in use for long periods. Always remove old,
weak or worn-out batteries promptly and recycle or dispose of
them in accordance with local and national regulations.
Important: If you are using rechargeable batteries NiMH or NiCd
(such as the batteries provided), the batteries will charge when
the headphones are put on the charging cradle of the transmitter.
DO NOT put the headphones on the charging cradle of the
transmitter if you installed alkaline or other non-rechargeable
batteries – this could cause the batteries to leak, which would
damage the headphones.
4
GETTING STARTED
Charging the Headset
If you use the rechargeable batteries provided with the headphones,
you should charge them before you use the headphones for the first
time. The batteries charge when the headphones are placed in the
charging cradle on the transmitter as shown below.
WARNING: To avoid risk of fire or injury, DO NOT place the
headphones in the charging cradle if you installed alkaline or other
non-rechargeable batteries – this could cause the batteries to leak,
which would damage the headphones.
To charge the headphones:
1. Connect the AC adapter to the power jack on the back of the
transmitter. Then plug the AC adapter into a standard wall outlet or
surge protector.
Note: This power adapter should be plugged in so that it stays
vertical or lies flat.
2. Locate the charging contact
on the bottom of the left
headphone. Line this contact
up with the charging pins on
the transmitter.
3. Place the headphones in the
cradle on top of the transmitter.
The indicator light on top of the
transmitter flashes green when
the headphones are charging.
Left headphone,
side view
Transmitter,
top view
Charging contact
Charging pins
Before using your headphones for the first time, let them charge
continuously for 16 hours.
Notes about charging:
• When the batteries are charged, remember to remove the
headphone from charging cradle of the transmitter.
• Never leave the batteries charging for more than 48 hours.
5
GETTING STARTED
Setting Up the Transmitter
The 2.4GHz digital wireless transmitter works with a wide variety of
audio sources, from portable MP3 players to A/V receivers to DVD
players or gaming systems. The way you set it up depends on the kind
of output you want to use on your audio source.
To connect the transmitter to your audio source:
1. Before you start, unplug the transmitter.
2. Plug the white and red connectors of
the stereo audio cable included into
the red and white AUDIO IN jacks
on the back of the transmitter. Make
sure you match the red connector
to the red jack and the white to the
white.
3. Plug the other end of the stereo
audio cable into the audio output or
headphone jack on your MP3 player
or other audio device.
PAIR
DC IN 6V
R AUDIO IN L
Transmitter (back panel)
4. Plug the transmitter back in.
Note: High-output sources, such as DVD players or audio receivers/
amplifiers, may cause distortion if used at full volume with the
transmitter. Try setting them at 1/2 or 2/3 volume.
If your audio source has stereo RCA outputs:
Connect the red and white plugs of the included
stereo (R/L) RCA jack adapter to the audio
source’s line out jacks. Then plug the 3.5mm jack
of the included stereo audio cable into the adapter,
and connect the stereo cable to the transmitter.
6
BUTTONS & JACKS
Using the Wireless Headphones
Turning the Headphones On
1. Make sure the transmitter is plugged
in and connected to an audio source.
Start playback on the audio source.
The indicator light on the top of the
transmitter turns blue when a signal
is transmitting.
2. Press the On/Off button on the right
headphone.
On/Off
button
Volume
controls
Right headphone, side view
The headphones and transmitter should tune automatically in a
matter of seconds—you should hear sound from the headphones.
Use the volume controls on the bottom of the right headphone to
adjust the headphone volume.
If you don’t hear sound from the headphones:
Make sure the indicator light on top of the transmitter is blue. If it is
and you still don’t hear sound from the headphones, press the pair
button on the back of the transmitter and the pair button on the
right headphone simultaneously for three seconds.
If the indicator light on top of the transmitter is not blue:
Make sure the transmitter is plugged in and your audio source is
connected to the transmitter and playing audio. If you’re using a
variable-level audio output (something you can set the volume on),
adjust the volume on your audio source. Then adjust the volume
using the Volume wheel on the right earphone.
Turning the Headphones Off
While you hear sound coming from the headphones, press the On/Off
button. Don’t forget to unplug the transmitter too!
7
BUTTONS & JACKS
Transmitter
Top
Signal LED on transmitter illuminates
blue when transmitting an audio signal.
Charging starts when charging pins of
transmitter touch charging contacts
of headphone. The charging LED on
transmitter flashes green when your
headphone is charging.
The mood light will light BLUE when the
headset is charging, you can turn it off by
pressing the PAIR button for one second
on the back panel of the transmitter.
Charging
contacts
PAIR
DC IN 6V
R AUDIO IN L
Back Panel
PAIR allows you to link manually to the
headphones if they do not automatically
link
AUDIO IN jacks connect to the provided
audio cable
DC IN jack connects to the AC power
adapter
headphones
Depression
Charging
contacts
8
Left headphone,
side view
Left Headphone
Depression releases the battery
compartment door. Press down on it to
access the battery compartment.
Charging contacts receive charge from
the transmitter via the charging pins to
recharge your headphones if you’re using
rechargeable batteries
USING YOUR HEADPHONES
PAIR allows you to link manually to the
transmitter if they do not automatically
link.
Power button turns the headphones on
and off
Vol controls increase or decrease the
headphone volume
Right headphone,
side view
Important Note About Audio Outputs
If possible, use a fixed-level (or line-level) audio output from your
audio source. This kind of output provides a consistent level of audio
that doesn’t change when you adjust the source’s volume control.
Fixed-level audio outputs from stereo receivers/amps are typically
designated as tape or VCR audio output connections, sometimes
marked on the component as ‘TAPE OUTPUT,’ ‘TAPE OUT,’ ‘TAPE REC,
or ‘TAPE RECORD or REC OUT.’
Fixed-level outputs from TVs are usually marked as ‘Constant,’ ‘Fixed,’
or ‘Select.’ If they are not marked as such, they are probably variable
outputs (see “About Variable-Level Audio Outputs” below). Outputs
from DVD players are almost always fixed.
Important: Jacks labeled CD, DVD/DVR, PHONO, or tape playback
(PB) are INPUTS and will not work with the transmitter.
9
USING YOUR HEADPHONES
Variable-Level Audio Outputs
A variable-level output, such as a headphone jack or certain RCA-type
outputs, provides an audio signal that changes with the volume level
set on the audio source. As the volume of the audio source is adjusted
up and down, so is the audio signal strength sent to the transmitter.
This can affect the quality of sound generated by the headphones, and
may require an adjustment of the volume level of the audio source to
produce a signal strong enough for the transmitter.
Hints:
• On most bookshelf-type or compact stereo systems, inserting a
headphone plug into the headphone jack results in automatic cutoff of
the regular, or hard-wired speakers.
• Most TVs, regardless of age or price, have variable outputs. If you
are unsure which of your TV audio outputs is fixed, refer to the TV
instruction manual. Some TVs have outputs that can switch between
variable and fixed. When given a choice, fixed is always recommended.
Listen safely!
Enjoy your headphones at a safe volume. Avoid or limit the amount of
time you listen at higher volumes—permanent hearing loss may occur if
the headphone is used at too high a volume. If you experience a ringing
in your ears, or your own voice and other sounds seem muffled, stop
using the headphones and consult a hearing professional.
10
TROUBLESHOOTING
The following troubleshooting guide takes you through some of the more common
problems associated with the installation and/or operation of a wireless system. If the
problem persists, please call toll-free 1-800-732-6866 or visit www.araccessories.com.
No sound
• Make sure the transmitter’s power adapter is fully inserted into the wall outlet and
the power cord from the AC adapter is firmly connected to the transmitter power
input jack.
• Check that the audio source component (stereo, TV, etc.) is turned on and
transmitting sound as it normally should. If you’re using a PC or DVD player, make
sure you’ve selected the correct audio output and that the sound is not muted.
• Confirm that the headphones are turned on and that the transmitter is receiving
audio—the transmitter’s indicator light should be blue. If the transmitter’s indicator
light is blue and you still don’t hear sound from the headphones, press the pair
button on the back of the transmitter and the pair button on the right headphone
simultaneously for three seconds.
• Check that the headphone volume is turned up.
• If you’re using a variable output audio source (like a headphone jack or variable
output on a TV set), make sure the source component’s volume is set high enough
for the transmitter to detect.
Interrupted sound
• Move closer to the transmitter with the headphones on. Sending the signal
through certain materials, such as glass, tile, and metal, can decrease the effective
transmitting distance of the system.
Distorted sound
• High-output sources, such as DVD players or audio receivers/amplifiers, may cause
distortion if used at full volume with the transmitter. Try setting them at 1/2 or 2/3 volume.
11
Specifications
Transmitter
Omni-directional 2.4GHz digital broadcast
Effective transmitting range:
up to 150ft. (45m)*
RF output: ɘ20dBm
Audio inputs: RCA stereo jacks
Runs on AC power adapter
*Maximum range; results may vary
according to environment.
Headphones
Frequency response: 20Hz–20kHz
Signal to Noise ratio: 75dB
Distortion (THD): 0.5%
Channel separation: 60dB
Battery type: 2 AA (rechargeable batteries
included)
12 Month Limited Warranty
Audiovox Electronics Corporation (the “Company”) warrants to the original retail purchaser of this product that
should this product or any part thereof, under normal use and conditions, be proven defective in material or
workmanship within 12 months from the date of original purchase, such defect(s) will be repaired or replaced (at the
Company’s option) without charge for parts and repair labor. To obtain repair or replacement within the terms of this
Warranty, the product along with any accessories included in the original packaging is to be delivered with proof of
warranty coverage (e.g. dated bill of sale), specification of defect(s), transportation prepaid, to the Company at the
address shown below. Do not return this product to the Retailer.
This Warranty is not transferable and does not cover product purchased, serviced or used outside the United
States or Canada. The warranty does not extend to the elimination of externally generated static or noise, to costs
incurred for the installation, removal or reinstallation of the product. The warranty does not apply to any product
or part thereof which, in the opinion of the company, has suffered or been damaged through alteration, improper
installation, mishandling, misuse, neglect, accident or exposure to moisture. This warranty does not apply to damage
caused by an AC adapter not provided with the product, or by leaving non-rechargeable batteries in the product
while plugged into an AC outlet.
THE EXTENT OF THE COMPANY’S LIABILITY UNDER THIS WARRANTY IS LIMITED TO THE REPAIR OR REPLACEMENT
PROVIDED ABOVE AND, IN NO EVENT, SHALL THE COMPANY’S LIABILITY EXCEED THE PURCHASE PRICE PAID BY
PURCHASER FOR THE PRODUCT.
This Warranty is in lieu of all other express warranties or liabilities. ANY IMPLIED WARRANTIES, INCLUDING ANY IMPLIED
WARRANTY OF MERCHANTABILITY OR FITNESS FOR A PARTICULAR PURPOSE, SHALL BE LIMITED TO DURATION OF THIS
WARRANTY. ANY ACTION FOR BREACH OF ANY WARRANTY HEREUNDER, INCLUDING ANY IMPLIED WARRANTY, MUST BE
BROUGHT WITHIN A PERIOD OF 24 MONTHS FROM THE DATE OF ORIGINAL PURCHASE. IN NO CASE SHALL THE COMPANY
BE LIABLE FOR ANY CONSEQUENTIAL OR INCIDENTAL DAMAGES WHATSOEVER. No person or representative is authorized
to assume for the Company any liability other than expressed herein in connection with the sale of this product.
Some states/provinces do not allow limitations on how long an implied warranty lasts or the exclusion or limitation
of incidental or consequential damage so the above limitations or exclusions may not apply to you. This Warranty
gives you specific legal rights and you may also have other rights which vary from state/province to state/province.
USA:
Audiovox Electronics Corporation, 150 Marcus Blvd., Hauppauge, NY 11788
CANADA:
Audiovox Return Center, c/o Genco, 6685 Kennedy Road, Unit 3, Door 16,
Mississauga, Ontario L5T 3A5
© 2011 Audiovox Accessories Corporation
111 Congressional Blvd., Suite 350
Carmel, IN 46032 USA
AWD211_NA_IB_00
Audiovox Canada Limited
c/o Genco,
6685 Kennedy Road, Unit 3, Door 16, Mississauga, Ontario,
Canada L5T 3A5
All other brands and product names are trademarks or registered
trademarks of their respective owners.
www.araccessories.com
Trademark(s) Registered
Marque(s) de commerce déposée(s)
Toutes les autres marques et tous les autres noms de produits sont des
marques de commerce ou des marques déposées de leurs propriétaires
respectifs.