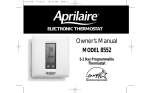
1
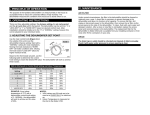
VI. maintenance
Dehumidifier
Air Filter
Under normal circumstances, the filter in the dehumidifier should be cleaned or replaced once a year.
A clean filter is necessary to prevent damage to the dehumidifier and allow it to function at full capacity.
To remove the filter, first unplug or disconnect power to the dehumidifier, then remove the air filter
via the access panel on the side of the dehumidifier. To clean, flush with warm water and detergent
solution. After a clean or new filter is reinstalled, replace the access panel and reconnect power to
the dehumidifier. The replacement filter for the dehumidifier is Model 4510 and is available from most
HVAC contractors in your area or Aprilaire.com
Model 1710A Dehumidifier
Installation &
Owner’s Manual
Drain
The drain trap or outlet should be checked and cleaned of debris annually.
NOTE: The drain trap needs to be primed with water prior to start-up and after extended periods of unit
shut down (winter months).
Includes Safety & Operating
Instructions and
Warranty Information
VII. limited warranty
Your Research Products Corporation Aprilaire® Dehumidifier is expressly warranted for five (5) years from date of installation to be free from
defects in materials or workmanship.
Research Products Corporation’s exclusive obligation under this warranty shall be to supply, without charge, a replacement for any component
which is found to be defective within such five (5) year period and which is returned not later than thirty (30) days after said five (5) year period
by you to either your original supplier or to Research Products Corporation, Madison, Wisconsin 53701, together with the model number and
installation date of the dehumidifier.
THIS WARRANTY SHALL NOT OBLIGATE RESEARCH PRODUCTS CORPORATION FOR ANY LABOR COSTS AND SHALL NOT APPLY TO DEFECTS IN
WORKMANSHIP OR MATERIALS FURNISHED BY YOUR INSTALLER AS CONTRASTED TO DEFECTS IN THE DEHUMIDIFIER ITSELF.
IMPLIED WARRANTIES OF MERCHANTABILITY OR FITNESS FOR A PARTICULAR PURPOSE SHALL BE LIMITED IN DURATION TO THE AFORESAID
FIVE YEAR PERIOD. RESEARCH PRODUCTS CORPORATION’S LIABILITY FOR INCIDENTAL OR CONSEQUENTIAL DAMAGES, OTHER THAN
DAMAGES FOR PERSONAL INJURIES, RESULTING FROM ANY BREACH OF THE AFORESAID IMPLIED WARRANTIES OR THE ABOVE LIMITED
WARRANTY IS EXPRESSLY EXCLUDED. THIS LIMITED WARRANTY IS VOID IF DEFECT(S) RESULT FROM FAILURE TO HAVE THIS UNIT INSTALLED
BY A QUALIFIED HEATING AND AIR CONDITIONING CONTRACTOR. IF THE LIMITED WARRANTY IS VOID DUE TO FAILURE TO USE A QUALIFIED
CONTRACTOR, ALL DISCLAIMERS OF IMPLIED WARRANTIES SHALL BE EFFECTIVE UPON INSTALLATION.
Some states do not allow limitations on how long an implied warranty lasts or the exclusion or limitation of incidental or consequential damages
so the above exclusion or limitations may not apply to you.
This warranty gives you specific legal rights and you may also have other rights which vary from state to state.
READ AND SAVE THESE INSTRUCTIONS
Warning
120 volts may cause serious injury from electric shock.
Disconnect electrical power before servicing.
Do not use solvents/cleaners on or
near the control board.
Sudden operation may cause personal injury or property
damage. Unplug the dehumidifier before servicing.
Corrosive environments can damage
electrical equipment. Do not use in
pool applications.
Unit weight and dropping may cause personal injury or
equipment damage. Handle with care.
WARRANTY REGISTRATION
CAUTION
Please… Take a few minutes to visit us online at www.aprilaire.com to register your Aprilaire product.
If you do not have on-line access, please mail a postcard with your name, address, phone number, email
address, product purchased, model number, date of purchase and dealer name and address to:
Research Products Corporation
P.O. Box 1467
Madison, WI 53701
Thank you!
INSTALLER – PLEASE NOTE!
1. Installation must conform to all applicable state or local codes.
2. A 15 Amp circuit is required for proper operation of the dehumidifier. Do not use an
extension cord.
3. For protection of the compressor, unit must be transported and installed in an upright position.
If the unit was shipped or stored on its side, a 24 hour settling period is required before running the unit.
Your Warranty Registration information will not be sold or shared outside of this company.
I. Principle of Operation
RESEARCH PRODUCTS CORPORATION
1015 E. Washington Ave. • Madison, WI 53703 • Phone: 608/257-8801 • Fax: 608/257-4357 • www.aprilaire.com
10007974 9.09
B2204572B
The purpose of the Aprilaire® Dehumidifier is to keep humidity in a space at acceptable limits to reduce
the unwanted effects of high humidity. The dehumidifier measures the condition of the air in the space
to decide when to run.
II. specifications
IV. operating instructions
Dimensions: 20 3/4” W x 24” L x 20 3/8”– 23 5/8” H Design Airflow: 275 CFM @ 0.6 in. w.c.
Weight: 93 lbs.
Filter: MERV 8 Filter
Capacity: 90 pints per day @ 60%RH, 80˚F
(ANSI/AHAM DH-1-2003 standard conditions)
Cabinet Insulation: 1” foil faced EPS insulation
Power: 115 VAC, 8 Amps, Unit is equipped
with an 8 ft. grounded cord.
Inlet Air Operating Conditions: 40˚F to 105˚F
Ambient Air Operation Conditions: 40˚F to 150˚F
III. installation instructions
1.Install the drain line
NOTE: The provided condensate trap must be installed to the dehumidifier.
• Verify the bottom of the dehumidifier is 2 1/2” or higher above the floor.
• Insert the high side of the trap into the drain outlet (water flow direction is shown on the trap and
should point away from the dehumidifier)
• If there is not enough room to install the trap directly into the dehumidifier, use the provided 90°
elbow to position the trap close to the dehumidifier
Use the main control knob (Figure 2) on the outside of the unit
to set the dehumidifier dryness setting. Start with a “Normal”
setting for most installations. Moving the knob clockwise to
“more” will make conditions drier. Moving the knob toward
“less” allows for higher moisture levels.
Based on the indoor temperature, use the following table to
determine the control knob setting to reach the desired RH value.
The dehumidifier will work to achieve these values.
%RH (± 5%) based on Control Knob Setting and Indoor Temperature
Indoor Temperature
Control Knob
Setting
65°F
70°F
75°F
80°F
1 – “LESS”
84%
71%
60%
2
86%
73%
61%
52%
53%
3 – “NORMAL”
74%
63%
45%
4 – “NORMAL”
64%
54%
45%
39%
5 – “NORMAL”
55%
46%
39%
33%
6
47%
39%
33%
28%
7 – “MORE”
40%
34%
28%
24%
SYMPTOM
• After verifying that the trap is in the proper orientation, use PVC primer and cement to secure the
trap in place. Cement the supplied threaded coupler to the outlet of the trap.
Dehumidifier is producing hot air
• Screw the supplied hose barb fitting into the coupler and attach the supplied 1/2 inch I.D. drain hose.
Route the hose to the nearest drain.
Dehumidifier not adequately dehumidifying
IMPORTANT: To prevent a pressure lock within the drain line, the tube must be installed with a
constant downward slope.
Prime the drain system by filling the drip pan in the dehumidifier with water until flow is completed to
the drain.
2.Plug the dehumidifier directly into an outlet – do not use an extension cord.
NOTE: A 15 amp circuit is required for proper operation.
3.Turn the ON/OFF switch to ON.
FIGURE 1
• Rotate the control knob clockwise to
the “Test” position.
BARBED FITTING
COUPLER
a. The blower will start immediately
and after three minutes the
compressor will start.
WA
b. Both will run for one minute then
both will shut off.
TRAP
TE
90-1393
c. Turn the control knob to the
desired setting.
• If the unit does not run, refer to the Troubleshooting Guide.
RF
1/2”
LO W
90-1327
Example: At an indoor temperature of
75°F with a dehumidifier control knob
setting of 3, the dehumidifier will work to
achieve an RH value of 53%.
NOTES:
1. %RH values are ±5% and are to be
used as a GUIDE ONLY for initial
set-up.
2. Indoor Temperature is measured at the
inlet to the dehumidifier.
V. Troubleshooting guide
IMPORTANT: The bottom of the trap outlet must be at least 1/2 inch below the bottom of the
dehumidifier to ensure a proper drainage slope (see Figure 1).
4.System Checkout:
FIGURE 2
2-1/2”
Dehumidifier is not draining properly
Dehumidifier does not run
TROUBLESHOOTING PROCEDURE / POSSIBLE REASON
• Reheat of outgoing air will cause a temperature increases across the dehumidifier
• Unit will possibly run continuously initially. After unit has “dried” home, dehumidifier
will cycle, reducing load
• Unit will need time to “dry” materials in home before effectively changing RH.
• Compressor is not turning on
• System undercharged
• Check condensate trap to be sure it is clear
• Check drain line for continuous slope
• Follow all of the system checkout procedures. Make sure power switch is on!
• Check that circuit breaker is not tripped. The dehumidifier requires a minimum of
8 amps. The dehumidifier should be placed on its own dedicated 15 amp circuit
LED CODES
Green LED
Activity
ON Solid
Blinking 1 second on, 1 second off
Blinking 1/2 second ON, 1/2 second OFF
Status
Compressor ON
Sampling
Defrosting
Red LED
Activity
1 Blink every 5 seconds
2 Blinks every 5 seconds
3 Blinks every 5 seconds
4 Blinks every 5 seconds
5 Blinks every 5 seconds
6 Blinks every 5 seconds
7 Blinks every 5 seconds
Status
There is an error with the RH sensor
The board temperature sensor is opened or shorted
The Model 70 Living Space Control fails to respond after 3 consecutive attempts
The refrigerant charge has been detected as low
The temperature sensor is out of the operating range
The internal frost sensor is opened or shorted
The float switch has opened
Test Mode
At the end of test mode (3 minutes of DEH Fan + 1 minute of Compressor ON & DEH Fan), the Red and Green LEDs will turn ON
and OFF alternately until the knob has been turned away from “TEST”.