1
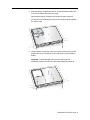
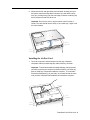
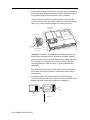
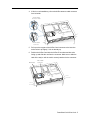
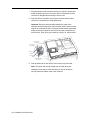
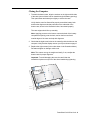
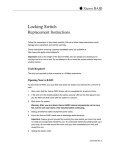
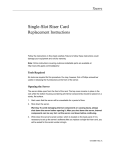
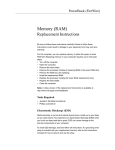
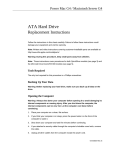
PowerBook G4 AirPort Card Installation Instructions Be sure to follow the instructions in this sheet carefully. Failure to follow these instructions could result in damage to your equipment and may void your warranty. Warning: Sharp edges may exist inside your computer and on any parts you may remove or install. Use caution to avoid injury. Installing an AirPort Card requires these basic steps: • Turn off the computer. • Remove any cables and the battery. • Remove the bottom case from the computer. • Remove an existing AirPort Card, if present. • Install the AirPort Card. • Attach the bottom case to the computer. • Reinstall the battery and reconnect any cables. Note: Written and video instructions covering customer-installable parts are available at: http://www.info.apple.com/installparts/. Tools Required • Phillips screwdriver • Soft towel or cloth, larger than the PowerBook Electrostatic Discharge (ESD) Static electricity, a normal and natural phenomenon, builds up on your body as you walk around. You experience an electrostatic discharge (ESD) when you touch an object and feel a shock or see a spark. ESD can cause damage to the internal components of your computer. To avoid ESD damage, read and follow all instructions. Opening the Computer 1. Place your computer on a clean, flat surface. 2. Shut down your computer. Disconnect the power cord and any other cables connected to the computer. Warning: Always turn off your computer before opening its case to avoid damaging its internal components. Warning: The internal components of your PowerBook may be hot. If you have been using your PowerBook, wait 30 minutes after shutting it down to let the internal components cool before continuing. 3. Place a towel or soft cloth on a table in front of you. The towel or cloth will protect the keyboard and display area of the PowerBook when you flip it over to remove the bottom case. Make sure it covers an area large enough for your PowerBook and that it hangs over the edge of the table. 4. With the display open at an angle greater than 90 degrees, carefully flip the PowerBook over and lay it flat, fully on the table. Make sure the display hangs over the edge of the table and rests lightly on your lap. Soft cloth 2 - PowerBook G4 AirPort Card Top of display in your lap 5. Slide the battery compartment latch to remove the battery. Make sure to return the battery latch fully to the right. Removing the battery will help you remove the bottom case and prevent you from accidentally turning on the computer while installing the AirPort Card. 6. Using a Phillips screwdriver, remove the eight screws that secure the bottom case to the PowerBook (in the order shown in the illustration below). Important: To avoid damaging the case, be careful that the screwdriver tip does not slip out of the screw head during removal. 1 4 3 2 5 8 7 6 PowerBook G4 AirPort Card - 3 7. To remove the bottom case you will need to disengage it at the left and right sides, then carefully pivot it forward to release a retaining clip near the DVD drive slot, as follows. Important: Do not push on the rubber feet of the bottom case. At the left side, carefully slide the bottom case slightly up and away from you by pushing on it just above the hinge of the display, and at the same time from within the battery compartment, pushing away from you on the edge of the bottom case, until the left side releases. At the right side, again carefully slide the bottom case slightly up and away from you by pushing it just above the hinge of the display, and at the same time from within the battery compartment, pushing away from you at the right-most edge of the bottom case, until the right side releases. 4 - PowerBook G4 AirPort Card 8. When both the left and right sides have released, carefully pull up on the bottom case at the edge that is closest to you and rotate it away from you, pivoting evenly over the front edge to release a retaining clip that is located near the DVD drive slot. Important: Do not force, twist or pry the bottom case if it binds or resists. The case should remove easily. If not, follow step 7 again, until the case releases. Installing the AirPort Card 1. Touch the computer’s inside framework (a dull gray conductive composite material) to discharge any static electricity, as shown. Important: To avoid electrostatic discharge damage, always ground yourself by touching the computer’s framework before you touch any parts or install any components inside the computer. To avoid static electricity building back up in your body, do not walk around the room until you have completed the installation and closed the computer. PowerBook G4 AirPort Card - 5 2. If removing an existing AirPort Card (if not, skip to step 3), pull back on the antenna clip to release the antenna connector and allow the card to rise up slightly, then pull the card from the AirPort connector. Hold the AirPort Card with one hand and grasp the antenna cable connector with the other. While being careful not to strain the antenna cable, firmly pull the connector straight out of the AirPort Card. AirPort Card Connector Antenna Cable Antenna Clip Antenna Cable Connector Important: If an AirPort Card is not being reinstalled right away, the antenna cable connector must be replaced into its holder (shown in step 4) and the loop of the antenna cable pulled up slightly and away from the edge of the computer case. This prevents the cable from interfering with the PC card slot, below, or getting pinched during reassembly. Also, if the insertion end of the AirPort Card connector is rotated up, push it down into the level position. This allows the bottom case to install properly. 3. If the AirPort Card to be installed came with the AirPort adapter, remove the metal clip and pull the AirPort Card from the adapter. (The adapter and metal clip are not used with your PowerBook.) AirPort Adapter AirPort Card Metal Clip 6 - PowerBook G4 AirPort Card 4. If this is a new installation, pull out the AirPort antenna cable connector from its holder. Antenna Cable Connector Holder Antenna Cable Connector 5. Pull up on the top part of the AirPort Card connector at the insertion end to raise it up slightly, if it is not already up. 6. Position the AirPort Card with the AirPort ID numbers and bar code facing up and slide the card into the connector. Make sure to slide the card all the way in until the card is securely attached to the connector. AirPort Card AirPort Card Connector PowerBook G4 AirPort Card - 7 7. Plug the antenna cable connector into the port, which is located just below the plastic tab, on the end of the AirPort Card. Make sure the connector is straight before inserting it into the card. 8. Push the AirPort Card down into its space until the antenna cable connector is secured by the small antenna clip. Important: Route the antenna cable between the edge of the computer and the AirPort Card. Verify that the cable is away from the edge of the computer so that it will not be pinched during reassembly and that it does not sag down into the PC card slot area (below the AirPort Card). Take up any extra cable by tucking it in, where shown. Tuck in here if needed Plastic Tab Computer Case Edge Antenna Cable Antenna Clip Antenna Cable Connector 9. Fold the plastic tab on the AirPort Card over the top of the card. Note: The plastic tab must be folded over the card during the installation of the bottom case, otherwise you will not be able to securely attach the bottom case to the computer. 8 - PowerBook G4 AirPort Card Closing the Computer 1. To attach the bottom case, align the notches on the right and left sides of the case (some of these can be viewed through the battery opening). Then press down and toward you slightly to secure the case. Verify that the case lies flat and fits properly around the battery latch and that the alignment tab that protrudes on the underside of the bottom case, shown in the illustration below, has seated properly. The case edges should line up smoothly. Note: Applying pressure to the bottom case at the back of the battery compartment opening, near the latch, and on the front and back outside edges of the case can help with alignment. 2. Check that the eight screw holes on the case align with the holes on the computer. Verify that the display rests on your lap as shown on page 2. 3. Replace the eight screws (in the order shown in the illustration below). Do not overtighten or damage could result. Note: The screws must go in straight and easily; if not, readjust the bottom case for proper alignment. Important: To avoid damaging the case, be careful that the screwdriver tip does not slip out of the screw head during tightening. 8 5 6 Tab 7 2 4 1 3 PowerBook G4 AirPort Card - 9 4. Replace the battery. 5. Turn the computer over so that the DVD slot faces you. Just below the center of the DVD slot, verify that the bottom case is flush with the front edge of the slot. If the case is slightly bowed and there is a gap, carefully pull the bottom edge of the DVD slot until it clicks into place and becomes flush with the bottom case. DVD slot Gap 6. Reconnect the power cord and any other cables. Restart your computer. Warning: Never turn on your computer unless all of its internal, external, and case parts are securely installed. Operating the computer when its case is open or missing parts can damage your computer or cause injury. 10 - PowerBook G4 AirPort Card Apple Computer, Inc. © 2001 Apple Computer, Inc. All rights reserved. Under the copyright laws, this document may not be copied, in whole or in part, without the written consent of Apple. The Apple logo is a trademark of Apple Computer, Inc., registered in the U.S. and other countries. Use of the “keyboard” Apple logo (Option-Shift-K) for commercial purposes without the prior written consent of Apple may constitute trademark infringement and unfair competition in violation of federal and state laws. Every effort has been made to ensure that the information in this document is accurate. Apple is not responsible for printing or clerical errors. Apple Computer, Inc. 1 Infinite Loop Cupertino, CA 95014-2084 408-996-1010 http://www.apple.com Apple, the Apple logo, and PowerBook are trademarks of Apple Computer, Inc., registered in the U.S. and other countries. PowerBook G4 AirPort Card - 11