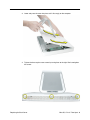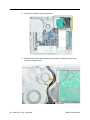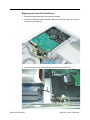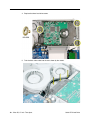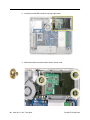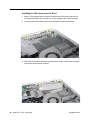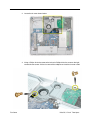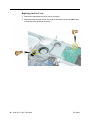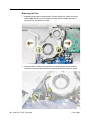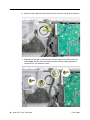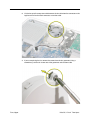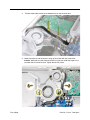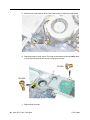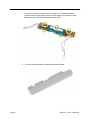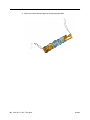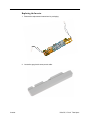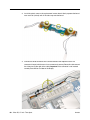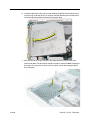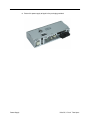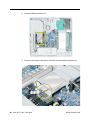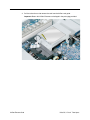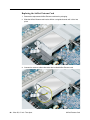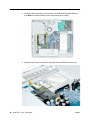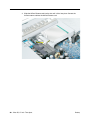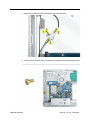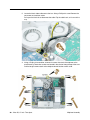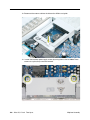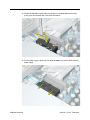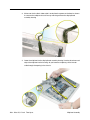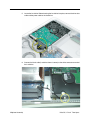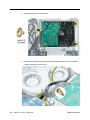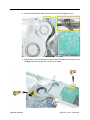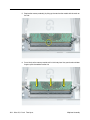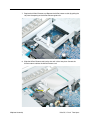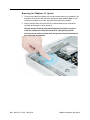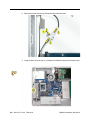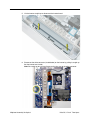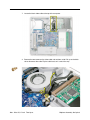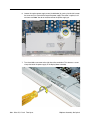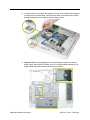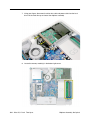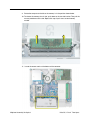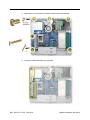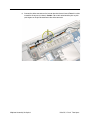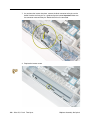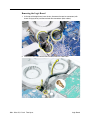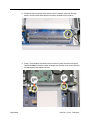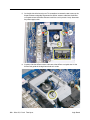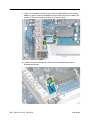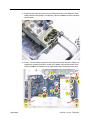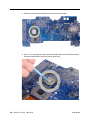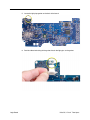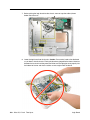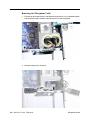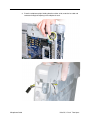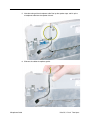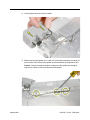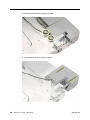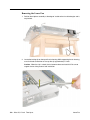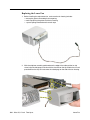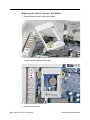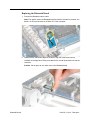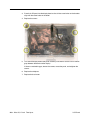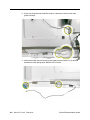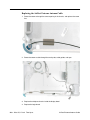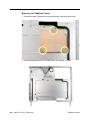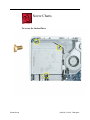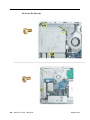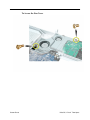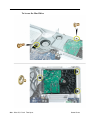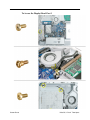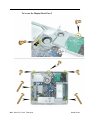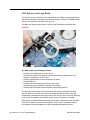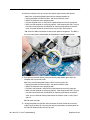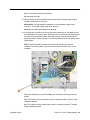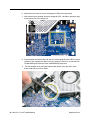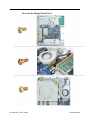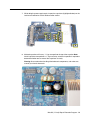
1
Service Source iMac G5 (17-inch) Updated 1 October 2007 © 2005 Apple Computer, Inc. All rights reserved. Service Source Take Apart iMac G5 (17-inch) © 2004 Apple Computer, Inc. All rights reserved. General Information What’s New October 2007 Updated Logic Board replacement procedure. A “caution” was added to notify service providers not to twist, flex, or bend the iMac G5 logic as you install to board into the chassis. Flexing the board may jeopardize the thermal interface between the heatsink and the processor. Refer to the iMac logic board inbox notice 073-1158 for additional information. July 2006 A diecut piece of microfoam (922-7671) is included with all replacement optical drives and display bezels. It should be installed in between the disc drive and the display bezel to prevent optical media from ejecting out of the system and dropping to the desktop. Only one diecut of microfoam should be used per system. Refer to the replacement procedures in Take Apart for either the optical drive, display bezel, or microfoam shim for more information. Display/Bezel Assembly Elimination Effective July 24, 2006, the Display and Bezel assembly module will no longer be available as a single service part for the iMac G5 (17- and 20-inch models). The Display and Bezel are now available as two separate service parts (see below) to simplify inventory and reduce repair costs. • 922-6796 Front Cover Assy,w/Optical Slot,iMac G5 17" • 922-6795 Front Cover Assy,w/out Optical Slot,iMac G5 17" • 661-3598 Panel, Display w/Brackets, iMac G5 17" Procedures added to Take Apart (May 2005) • • • • • • • General Information Fans, Upper Logic board Speakers Microphone Bluetooth card Soft modem Chassis iMac G5, 17-inch Take Apart - 1 • AirPort antenna • Bluetooth antenna • LED light pipe 2 - iMac G5, 17-inch Take Apart General Information Tools The following tools are required to service the computer: • Phillips #2 screwdriver • Flat-blade screwdriver • Torx-6 and 8 screwdriver • Jeweler’s flat-blade screwdriver • Nylon probe tool (black stick 922-5065) • Needlenose pliers • Soft cloth (to protect removed parts from scratches) General Information iMac G5, 17-inch Take Apart - 3 Important Things to Know 1. All customer removable screws are brass colored (except for some fan screws on earlier units which use torx screws). Do not remove screws unless they are brass colored, or you will void your warranty. 2. Important: Ground yourself when working on the computer. The procedure will show you how to ground yourself. 3. A magnetized “L”-shaped Phillips screwdriver is included with the replacement part. 4. The midplane is no longer offered as a service part or as a Do-it-Yourself repair. Most parts on the midplane are now available as individual service parts. 5. The display/bezel parts no longer offered as a service or DIY repair. The display and front bezel are offered separately. 6. Additional items are included with these service parts: Back Cover • Two blank labels are included with the replacement back cover. Copy the serial number and Ethernet number off the bottom of the computer’s foot and attach the new labels to the bottom of the replacement foot. The back cover take apart procedure will show you where to attach the labels. Logic Board • Syringe with thermal compound • Alcohol cleaning wipe • A new pre-printed Ethernet label is included with the midplane. Attach the sticker to the bottom of the computer’s foot, above the existing label. • A blank serial number label is included with the midplane. Copy the serial number off the bottom of the computer’s foot and attach the new label to the midplane. The midplane take apart procedure will show you where to attach the label. 7. Do not pull on individual wires when disconnecting a part; pull on the connector. 8. A screw chart is attached at the end of this document. Use the chart to identify screw type and screw locations. 4 - iMac G5, 17-inch Take Apart General Information Removing the Back Cover Tools Use the screwdriver provided, or a Phillips #2 screwdriver Procedure 1. Turn your computer off by choosing Shut down from the Apple (K) menu. 2. Disconnect all cables, and unplug the power cord from your computer. Put on your ESD Wrist strap. Removing the Back Cover iMac G5, 17-inch Take Apart - 5 3. Place a soft, clean towel or cloth on the desk or surface. Hold the sides of the computer and slowly lay the computer face down as shown. 4. Locate the three case screws circled below. You may have to lift the metal foot to locate the middle case screw. Note: These screws are captive; they are part of the display/bezel assembly and cannot be removed. 5. Using the screwdriver provided, or a Phillips #2 screwdriver, loosen the three captive screws. Note: Turn the screws to the left until they stop turning. Don’t force the screws once they stop turning. 6 - iMac G5, 17-inch Take Apart Removing the Back Cover 6. Holding the back cover by the metal stand, tilt the cover up and lift it off the computer. Set the back cover aside. Removing the Back Cover iMac G5, 17-inch Take Apart - 7 Replacing the Back Cover Tools Use the screwdriver provided, or a Phillips #2 screwdriver Procedure 1. Remove the replacement back cover and foot from its packaging. 2. Replace the cover so that the slots on the top edge of the back cover mate with the tabs on the display housing. 8 - iMac G5, 17-inch Take Apart Replacing the Back Cover 3. Lower and press the cover into place until it fits snugly on the computer. 4. Tighten the three captive case screws by turning them to the right. Don’t overtighten the screws Replacing the Back Cover iMac G5, 17-inch Take Apart - 9 5. Make sure the case is not bowing along the bottom or sides. If it is, check that the optical drive and cables are seated properly. There should be no gaps around the edges when the screws are tightened. 6. Position the computer in the upright position. Reconnect the power cord and remaining cables. Turn on the computer. 10 - iMac G5, 17-inch Take Apart Replacing the Back Cover Serial ATA Hard Drive Tools • Use the screwdriver provided, or a Phillips #2 screwdriver, preferably with a magnetized tip • Flatblade screwdriver • Screw tray or something equivalent to hold the screws Preliminary Steps Before you begin, remove the back cover. Part Location Serial ATA Hard Drive iMac G5, 17-inch Take Apart - Removing the Serial ATA Hard Drive 1. To access the hard drive you must first remove other service modules. This procedure will show you how to remove and replace these modules. Note: As you remove each module, set it aside, along with the screws for that module. 2. Ground yourself. Touch the metal surface (as shown below) on the inside of the computer to discharge any static electricity. Warning: Always discharge static electricity before you touch any parts or install any components inside the computer. To avoid generating static electricity, do not walk around the room until you have finished installing the part and closed the computer. 12 - iMac G5, 17-inch Take Apart Serial ATA Hard Drive 3. Locate the fan cover near the top of the computer. 4. Using the tool provided, or a Phillips #2 screwdriver, remove the two fan cover screws. Lift the fan cover off the computer. Set the screws and fan cover aside. Serial ATA Hard Drive iMac G5, 17-inch Take Apart - 5. Locate the hard drive in the top right corner. 6. Move the black video cable (located to the left of the hard drive) out of the way to access a hard drive screw. 14 - iMac G5, 17-inch Take Apart Serial ATA Hard Drive 4. Remove the three hard drive screws. Set the screws aside. 5. Carefully lift the hard drive straight up, about one inch, and disconnect the black cable from the white connector on the hard drive. Note: Leave the other end of the cable attached to the logic board. Serial ATA Hard Drive iMac G5, 17-inch Take Apart - 6. Using your fingers, or a flat-blade screwdriver, disconnect the drive data cable and power cable from the hard drive. 7. Lift the hard drive up and out of the midplane assembly.Important: Return this hard drive to Apple in the packaging provided. 16 - iMac G5, 17-inch Take Apart Serial ATA Hard Drive Replacing the Serial ATA Hard Drive 1. Remove the replacement hard drive from its packaging. 2. Connect the drive data cable and power cable to the hard drive. Lower the hard drive into place on the midplane. 3. Connect the black cable to the white connector on end of the hard drive. Serial ATA Hard Drive iMac G5, 17-inch Take Apart - 4. Replace the three hard drive screws. 5. Tuck the black video cable into the area shown by the arrows. 18 - iMac G5, 17-inch Take Apart Serial ATA Hard Drive 6. Press the video cable into the notch on the midplane chassis. 4. Replace the two fan cover screws. The larger screw attaches on the left. Note: Make sure the pull tab is sticking up as shown Serial ATA Hard Drive iMac G5, 17-inch Take Apart - Parallel ATA Hard Drive Tools • Use the screwdriver provided, or a Phillips #2 screwdriver, preferably with a magnetized tip • Screw tray or something equivalent to hold the screws Preliminary Steps Before you begin, remove the back cover. Part Location Note: The Parallel ATA hard drive is only available on the Education model. 20 - iMac G5, 17-inch Take Apart Parallel ATA Hard Drive Removing the Parallel ATA Hard Drive 1. Ground yourself. Touch the metal surface (as shown below) on the inside of the computer to discharge any static electricity. Warning: Always discharge static electricity before you touch any parts or install any components inside the computer. To avoid generating static electricity, do not walk around the room until you have finished installing the part and closed the computer. Parallel ATA Hard Drive iMac G5, 17-inch Take Apart - 2. Locate the parallel ATA hard drive in the top right corner. 4. Remove the three hard drive screws. Set the screws aside. 22 - iMac G5, 17-inch Take Apart Parallel ATA Hard Drive 5. Locate the white connector on the end of the hard drive. 6. Carefully lift the hard drive straight up, about one inch and disconnect the black cable from the white connector. Note: Leave the other end of the cable attached to the logic board. Parallel ATA Hard Drive iMac G5, 17-inch Take Apart - 7. Using your fingers, disconnect the drive data cable and power cable from the hard drive. 8. Lift the hard drive up and out of the midplane assembly.Important: Return this hard drive with the carrier to Apple in the packaging provided. 24 - iMac G5, 17-inch Take Apart Parallel ATA Hard Drive Replacing the Parallel ATA Hard Drive 1. Remove the replacement hard drive from its packaging. 2. Connect the drive data cable and power cable to the hard drive. Lower the hard drive into place on the midplane. 3. Connect the black cable to the white connector on end of the hard drive. Parallel ATA Hard Drive iMac G5, 17-inch Take Apart - 4. Replace the three hard drive screws. . 5. Before replacing the back cover, tuck the black video cable into the space next to the hard drive. 26 - iMac G5, 17-inch Take Apart Parallel ATA Hard Drive Optical Drive Tools • Use the screwdriver provided, or a Phillips #2 screwdriver, preferably with a magnetized tip • Screw tray or equivalent to hold the screws Preliminary Steps Before you begin, remove the back cover. Part Location Note: The education models do not have an optical drive. Optical Drive iMac G5, 17-inch Take Apart - Removing the Optical Drive 1. Ground yourself. Touch the metal surface (as shown below) on the inside of the computer to discharge any static electricity. Warning: Always discharge static electricity before you touch any parts or install any components inside the computer. To avoid generating static electricity, do not walk around the room until you have finished installing the part and closed the computer. 28 - iMac G5, 17-inch Take Apart Optical Drive 2. Locate the optical drive in the top left corner. 4. Using a Phillips #2 screwdriver, remove the three optical drive screws circled below. Set the screws aside. Optical Drive iMac G5, 17-inch Take Apart - 5. Pull the optical drive tab straight up and then to the right. Set the optical drive aside. 30 - iMac G5, 17-inch Take Apart Optical Drive Replacing the Optical Drive 1. Note: A microfoam shim is included with the replacement optical drive and should be installed using the instructions included below. The microfoam shim will prevent optical media from ejecting out of the system and dropping to the desktop. Only one microfoam insert should be used per system. The shim part number is 922-7671. 2. Locate the enclosed piece of white microfoam and the two white posts (circled) on the bezel. 3. With the shiny side of the microfoam facing the bezel, slide the holes of the microfoam onto the two white posts on the bezel. Optical Drive iMac G5, 17-inch Take Apart - 4. Tuck the mircofoam into place before installing the optical drive. 5. Remove the replacement optical drive from its packaging. 6. Replace the optical drive in the direction of the arrow, lining up the white posts on the bezel with the holes on the optical drive bezel. 32 - iMac G5, 17-inch Take Apart Optical Drive 7. The optical drive will click into place when you push down near the pull tab. Note: If the optical drive is not seated accurately, the optical drive may not function. 8. Make sure no microfoam is sticking out of the bezel. Note: Before reassembling the computer, partially insert an optical disc to make sure it inserts smoothly. Optical Drive iMac G5, 17-inch Take Apart - 9. Replace the three optical drive screws. 34 - iMac G5, 17-inch Take Apart Optical Drive Microfoam Shim Tools Required • Use the screwdriver provided, or a Phillips #2 screwdriver, preferably with a magnetized tip • Screw tray or equivalent to hold the screws Preliminary Steps Before you begin, remove the back cover and the optical drive. Part Location Note: The education models do not have an optical drive. Microfoam Shim iMac G5, 17-inch Take Apart - Installing the Microfoam onto the Bezel 1. Steps 2-7 show photos of the microfoam inside the iMac G5 20-inch computer. The installation procedure is the same for the 17-inch computer. Go on to the next step. 2. Locate the piece of microfoam and the two white posts (circled) on the bezel. 3. With the shiny side of the microfoam facing the bezel, slide the holes of the microfoam onto the two white posts on the bezel. 36 - iMac G5, 17-inch Take Apart Microfoam Shim 4. Tuck the mircofoam into place before installing the optical drive. 5. Replace the optical drive in the direction of the arrow, lining up the white posts on the bezel with the holes on the optical drive bezel. Microfoam Shim iMac G5, 17-inch Take Apart - 6. Slide the optical drive into place and press down near the tab to reconnect the drive. 7. Make sure no microfoam is sticking out of the bezel. Note: Before reassembling the computer, partially insert an optical disc to make sure it inserts smoothly. 8. Replace the optical drive screws. 9. Replace the back cover. 38 - iMac G5, 17-inch Take Apart Microfoam Shim Fan Cover Tools Required • Use the screwdriver provided, and a Phillips #2 screwdriver, preferably with a magnetized tip • Screw tray or equivalent to hold the screws Preliminary Steps Before you begin, remove the back cover. Part Location Note: This fan cover is not present on the education model. . Fan Cover iMac G5, 17-inch Take Apart - Removing the Fan Cover 1. Ground yourself. Touch the metal surface (as shown below) on the inside of the computer to discharge any static electricity. Warning: Always discharge static electricity before you touch any parts or install any components inside the computer. To avoid generating static electricity, do not walk around the room until you have finished installing the part and closed the computer. 40 - iMac G5, 17-inch Take Apart Fan Cover 2. Locate the fan cover shown below. 4. Using a Phillips #2 for the screw on the left and a Phillips #2 for the screw on the right, remove the two screws. Lift the fan cover off the midplane and set the fan cover aside. Fan Cover iMac G5, 17-inch Take Apart - Replacing the Fan Cover 1. Remove the replacement fan cover from its packaging. 4. Replace the two fan cover screws. The larger screw attaches on the left. Note: Make sure the pull tab is sticking up as shown. 42 - iMac G5, 17-inch Take Apart Fan Cover Fans, Upper Tools Required • Phillips #2 screwdriver or Torx-8 (some models have torx screws on the fan) • Screw tray or equivalent to hold the screws Preliminary Steps Before you begin, remove the back cover and the fan cover. Part Location Fans, Upper iMac G5, 17-inch Take Apart - Removing the Fans 1. Depending on the type of screws present (Torx 8 or Phillips #2), loosen the two fan screws. Note: You don’t have to remove the screws from the rubber grommets to remove the fan, just loosen the screws. 2. Disconnect the fan cable from the connector on the logic board. Pull on the black connector, not on the cable. Route the fan cable under the black cable (as shown). 44 - iMac G5, 17-inch Take Apart Fans, Upper 3. Lift the fan out of the computer. 4. If your are replacing the fan, remove the screws from the fan grommets. Using a screwdriver, push the fan screws out of the grommets and set them aside. Use these screws on the replacement fan. 5. Go on to the next step to remove the second fan. Fans, Upper iMac G5, 17-inch Take Apart - 6. Move the video cable to the left to access the fan screw near the top of the computer 7. Depending on the type of screws present (Torx 8 or Phillips #2), loosen the two fan screws. Note: You don’t have to remove the screws from the rubber grommets to remove the fan, just loosen the screws 46 - iMac G5, 17-inch Take Apart Fans, Upper 8. Lift the fan out of the computer and disconnect the fan cable from the connector on the logic board. Pull on the black connector, not on the cable. 9. If you are replacing the fan, remove the screws from the fan grommets. Using a screwdriver, push the fan screws out of the grommets and set them aside. Fans, Upper iMac G5, 17-inch Take Apart - Replacing the Fans 1. Route the fan cable under the black hard drive cable. Connect the fan cable to the connector on the logic board. Note: The fan cables are keyed. 2. Place the two screws into the grommets on the replacement fan. Position the fan into place and tighten the two fan screws. 48 - iMac G5, 17-inch Take Apart Fans, Upper 3. Tuck the video cable into the space between the fan and the hard drive. 4. Lower the larger fan into the chassis, lining up the screws with the screw holes. Caution: Move the fan cable (from the smaller fan) out from under the larger fan as you lower the fan into the chassis. Tighten the two fan screws. Fans, Upper iMac G5, 17-inch Take Apart - 5. Route the fan cable under the black cable. Connect the fan cable to the logic board. 6. Replace the two fan cover screws. The larger screw attaches on the left. Note: Make sure the pull tab at the top of the case is sticking up as shown. 7. Replace the back cover. 50 - iMac G5, 17-inch Take Apart Fans, Upper Inverter Tools Required • Phillips #2 screwdriver, preferably with a magnetized tip • Screw tray or something equivalent to hold the screws Preliminary Steps Before you begin, remove the back cover. Part Location Inverter iMac G5, 17-inch Take Apart - Removing the Inverter 1. To access the inverter assembly other service modules have to be removed. This procedure will show you how to remove and replace each module. As you remove each module, set it aside, along with the screws for that module. 2. Important: Ground yourself. Touch the metal surface (as shown below) on the inside of the computer to discharge any static electricity. Warning: Always discharge static electricity before you touch any parts or install any components inside the computer. To avoid generating static electricity, do not walk around the room until you have finished installing the part and closed the computer. 52 - iMac G5, 17-inch Take Apart Inverter 3. Locate the optical drive. 4. Using a Phillips #2 screwdriver, remove the three optical drive screws. Inverter iMac G5, 17-inch Take Apart - 5. Pull the optical drive tab straight up and then to the right. Set the optical drive aside. 6. Locate the inverter-to-display panel cable connector. 54 - iMac G5, 17-inch Take Apart Inverter 7. Release the cable from the clip. Disconnect the cable connector. 4. Using the iMac G5 screw tool, or a Phillips #2 screwdriver, remove the inverter screw. Inverter iMac G5, 17-inch Take Apart - 5. Lift the inverter straight up to disconnect the inverter board. 6. Disconnect the white connector (circled below) by pulling it straight up. Lift the inverter out of the computer. 56 - iMac G5, 17-inch Take Apart Inverter 7. Turn over the inverter as shown. Using your fingers or a flat-blade screwdriver, carefully remove the gray plastic inverter cover by gently prying the tabs (circled below) away from the board. Set the plastic cover aside. 8. Inverter This cover will be attached to the replacement inverter board. iMac G5, 17-inch Take Apart - 9. Return the inverter board to Apple in the packaging provided. 58 - iMac G5, 17-inch Take Apart Inverter Replacing the Inverter 1. Remove the replacement inverter from its packaging. 2. Locate the gray plastic cover you set aside. Inverter iMac G5, 17-inch Take Apart - 3. Install the plastic cover on the replacement inverter board. Gently squeeze the board near each tab (circled) until all five tabs snap onto the board. 4. Connect the white connector on the inverter board to the midplane board. The connector is keyed, which means it can connect only one way. Route this cable around the silver post (to the right of the cable). Important: If the connector is not inserted correctly there will be no video on the display. 60 - iMac G5, 17-inch Take Apart Inverter 5. As you lower the inverter into place, connect the black connector to the pins on the board. Use the tall silver pins as a guide to align the inverter. Important: Make sure the connector mates with the pins. Double check that it’s connected. 6. Replace the inverter screw. Inverter iMac G5, 17-inch Take Apart - 4. Reconnect the inverter-to-display panel cable. Important: The connector is keyed (it fits together only one way) 5. Secure the connector under the metal tab. 62 - iMac G5, 17-inch Take Apart Inverter 6. Locate the optical drive that you set aside. Holding the optical drive by the back end (near the tab), insert the drive at an angle to mate the two white pins and the plastic rectangle with the two holes and notch on the optical drive. 7. With your thumb on the tab and your index finger behind the tab, push the drive forward and down. The optical drive should click into its connector. Note: If the optical drive won’t click into place, check that the fan cables are not obstructing the optical drive connector. Inverter iMac G5, 17-inch Take Apart - 8. Replace the optical drive screws. 64 - iMac G5, 17-inch Take Apart Inverter Memory (DIMMs) About iMac G5 Memory • iMac G5 computers work with memory modules (DIMMs) that meet all of these criteria: PC3200, 2.5V, unbuffered, 8-byte, nonparity, 184-pin, 400Mhz DDR SDRAM. • There are two RAM slots. The maximum amount of RAM you can install is 2 GB. You can use RAM module sizes of 256 MB, 512 MB and 1 GB, in either slot. • DIMMs with any of the following features are not supported in the iMac G5 computer: registers or buffers, PLLs, ECC, parity, or EDO RAM Tools Use the screwdriver provided, or a Phillips #2 screwdriver to open the back co Preliminary Steps Before you begin, remove the back cover. Part Location Memory (DIMMs) iMac G5, 17-inch Take Apart - Removing the Memory 1. Important: Ground yourself. Touch the metal surface (as shown below) on the inside of the computer to discharge any static electricity. Warning: Always discharge static electricity before you touch any parts or install any components inside the computer. To avoid generating static electricity, do not walk around the room until you have finished installing the part and closed the computer. 66 - iMac G5, 17-inch Take Apart Memory (DIMMs) 2. Locate the memory module(s) in the bottom right corner. 3. Rotate the computer to the left so the memory is in the position shown below. 4. To release the memory from its slot, push down on the two side latches. Then pull the memory module out of the slot. Repeat this step if you have a second memory module. Important: Return the memory to Apple in the packaging provided. Memory (DIMMs) iMac G5, 17-inch Take Apart - Replacing the Memory 1. Remove the replacement memory module from its packaging. 2. Replace the memory module(s) by lining up the notch on the module with the notch on the slot. 3. Press firmly on the memory module until it clicks into place. Use your thumb and index finger to push the module into the slot. 68 - iMac G5, 17-inch Take Apart Memory (DIMMs) Power Supply Tools Required • Use the screwdriver provided, or a Phillips #2 screwdriver, preferably with a magnetized tip • Flat-blade screwdriver • Screw tray or equivalent to hold the screws Preliminary Steps Before you begin, remove the back cover. Part Location Power Supply iMac G5, 17-inch Take Apart - Important Things to Know Note: These instructions cover the iMac G5 (17-inch) models. The models may look slightly different from one shown in the illustration; however, the following procedure applies to both models. 1. The replacement power supply has an ambient light sensor attached with two plastic rivets. If your computer doesn’t have an ambient light sensor (see next step), remove the ambient light sensor from the replacement power supply. 2. How do you tell if you have an iMac G5 with the ambient light sensor? Look at the picture below. Along the bottom of the display bezel, next to the middle case screw is a small bump protruding from the case. This is the ambient light sensor. 3. All customer removable screws are brass colored. Do not remove screws unless they are brass colored, or you will void your warranty. 4. Ground yourself when working on the computer. The procedure will show you how to ground yourself. 5. Do not pull on individual wires when disconnecting a part; pull on the connector. 6. A magnetized “L”-shaped Phillips screwdriver is included with the replacement part. 70 - iMac G5, 17-inch Take Apart Power Supply Removing the Power Supply 1. Ground yourself. Touch the metal surface (as shown below) on the inside of the computer to discharge any static electricity. Warning: Always discharge static electricity before you touch any parts or install any components inside the computer. To avoid generating static electricity, do not walk around the room until you have finished installing the part and closed the computer. Power Supply iMac G5, 17-inch Take Apart - 2. Locate the power supply in the picture below. 3. Loosen the three captive power supply screws (circled below) by turning them to the left. The screws are captive; they will not come out of the power supply. 72 - iMac G5, 17-inch Take Apart Power Supply 4. Turn the middle case screw to the right about five revolutions. This releases a screw clamp that holds the power supply in the display/bezel assembly. 5. Disconnect the power supply connector with a flat-blade screwdriver. Loosen the connector enough so that you can remove it with your fingers. Power Supply iMac G5, 17-inch Take Apart - 6. Pull the power supply cable out of the connector by rocking it back and forth with your hands and pulling it toward the power supply. 7. Tilt up the power supply until it clears the edge of the main circuit board. Lift it out of the computer and set it aside. 74 - iMac G5, 17-inch Take Apart Power Supply 8. Return this power supply to Apple in the packaging provided. Power Supply iMac G5, 17-inch Take Apart - Replacing Power Supply 1. Remove the replacement power supply from its packaging. Note: If your computer does not use an ambient light sensor, remove the ambient light sensor that is riveted to the front of the power supply. Refer to “Important Things to Know” at the beginning of this section. 2. Lower the power supply into the computer. 3. Connect the black power supply connector and tighten the three captive screws, turning them to the right. 76 - iMac G5, 17-inch Take Apart Power Supply 4. Turn the middle case screw to the left about five revolutions. This step prepares the back cover to be installed and secured. Replacement Note: Align the card’s connector with the expansion slot and press until the connector is inserted all the way into the slot. If you’re installing a 12-inch card, make sure the card engages the appropriate slot in the PCI card guide. • Don’t rock the card from side to side; instead, press the card straight into the slot. • Don’t force the card. If you meet a lot of resistance, pull the card out. Check the connector and the slot for damage or obstructions, then try inserting the card again. • Pull the card gently to see if it is properly connected. If it resists and stays in place, and if its gold connectors are barely visible, the card is connected. Power Supply iMac G5, 17-inch Take Apart - AirPort Extreme Card Only the AirPort Extreme Card may be installed in the iMac G5. Older AirPort Cards do not work in this computer. Tools No tools are required for this procedure. Preliminary Steps Before you begin, remove the back cover. Part Location 78 - iMac G5, 17-inch Take Apart AirPort Extreme Card Removing the AirPort Extreme Card 1. Ground yourself. Touch the metal surface (as shown below) on the inside of the computer to discharge any static electricity. Warning: Always discharge static electricity before you touch any parts or install any components inside the computer. To avoid generating static electricity, do not walk around the room until you have finished installing the part and closed the computer. AirPort Extreme Card iMac G5, 17-inch Take Apart - 2. Locate the AirPort Extreme card. 3. Disconnect the antenna cable from the end of the installed AirPort Extreme card. 80 - iMac G5, 17-inch Take Apart AirPort Extreme Card 4. Pull the tab on the card to remove the card from the AirPort card guide. Important: Return this AirPort Extreme card to Apple in the packaging provided. AirPort Extreme Card iMac G5, 17-inch Take Apart - Replacing the AirPort Extreme Card 1. Remove the replacement AirPort Extreme card from its packaging. 2. Slide the AirPort Extreme card into the AirPort card guide channel until it clicks into place. 3. Connect the antenna cable to the end of the installed AirPort Extreme card. 82 - iMac G5, 17-inch Take Apart AirPort Extreme Card 4. Make sure the AirPort Extreme card is flush with the plastic AirPort card guide. AirPort Extreme Card iMac G5, 17-inch Take Apart - Battery Tools No tools are required for this procedure. You may, however, find a flat-blade screwdriver or the nylon probe tool useful in removing the battery from its holder. Preliminary Steps Before you begin, remove the back cover. Part Location 84 - iMac G5, 17-inch Take Apart Battery Removing the Battery 1. To access the battery other service modules have to be removed. This procedure will show you how to remove and replace each module. As you remove each module, set it aside, along with the screws for that module. 2. Important: Ground yourself. Touch the metal surface (as shown below) on the inside of the computer to discharge any static electricity. Warning: Always discharge static electricity before you touch any parts or install any components inside the computer. To avoid generating static electricity, do not walk around the room until you have finished installing the part and closed the computer. Battery iMac G5, 17-inch Take Apart - 3. Locate the AirPort Extreme card. The battery is located below the AirPort Extreme card. Note: If an AirPort Extreme card is not installed, go on to step 7. 4. Disconnect the antenna cable from the end of the installed AirPort Extreme card. 86 - iMac G5, 17-inch Take Apart Battery 5. Pull the tab on the card to remove the card from the AirPort card guide. 6. Reconnect the antenna cable to the hole on the AirPort card guide. Battery iMac G5, 17-inch Take Apart - 7. WIth a pencil or other plastic tool, push the battery in the direction of the arrow to free the battery from the metal clip. 88 - iMac G5, 17-inch Take Apart Battery Replacing the Battery 1. Remove the replacement battery from its packaging. 2. Holding the battery positive side up, push the battery (in the direction of the arrow) under the battery clip. The battery should slip into place under the clip. 3. Replace the AirPort Extreme card. Remove the AirPort antenna cable (by pulling the tab) from the opening on the AirPort Extreme guide rail. Battery iMac G5, 17-inch Take Apart - 4. Slide the AirPort Extreme card into the slot until it clicks into place. Connect the AirPort antenna cable to the AirPort Extreme card. 90 - iMac G5, 17-inch Take Apart Battery Midplane Assembly Tools Required • Use the screwdriver provided, or a Phillips #2 screwdriver, preferably with a magnetized tip • Flat-blade screwdriver • Screw tray or equivalent to hold the screws Preliminary Steps Before you begin, remove the back cover. Part Location Midplane Assembly iMac G5, 17-inch Take Apart - Removing the Midplane Assembly 1. To access the midplane assembly you must first remove other service modules. This procedure will show you how to remove and replace these modules. Note: As you remove each module, set it aside, along with the screws for that module. 2. Ground yourself. Touch the metal surface (as shown below) on the inside of the computer to discharge any static electricity. Warning: Always discharge static electricity before you touch any parts or install any components inside the computer. To avoid generating static electricity, do not walk around the room until you have finished installing the part and closed the computer. 92 - iMac G5, 17-inch Take Apart Midplane Assembly 3. Locate the optical drive in the top left corner. 4. Using the iMac G5 screw tool, or a Phillips #2 screwdriver, remove the three optical drive screws circled below. Set the screws aside. Midplane Assembly iMac G5, 17-inch Take Apart - 5. Pull the optical drive tab straight up and then to the right. Set the optical drive aside. 6. Locate the inverter-to-display panel cable connector. 94 - iMac G5, 17-inch Take Apart Midplane Assembly 7. Release the cable from the clip. Disconnect the cable connector. 4. Using the iMac G5 screw tool, or a Phillips #2 screwdriver, remove the inverter screw. Midplane Assembly iMac G5, 17-inch Take Apart - 5. Lift the inverter straight up to disconnect the inverter board. 6. Disconnect the white connector (circled below) by pulling it straight up. Set the inverter board aside. Note: Be careful not to prick your fingers on the pins next to the white connector. 96 - iMac G5, 17-inch Take Apart Midplane Assembly 7. Locate the fan cover shown below. 4. Using the iMac G5 screw tool, or a Phillips #2 and #2 screwdriver, remove the two fan cover screws. Lift the fan cover off the midplane and set the fan cover aside . Midplane Assembly iMac G5, 17-inch Take Apart - 5. Locate the black video cable next to the fans. Using a Phillips #2 screw. Remove the two screws and set them aside. Pull up on the black tab to disconnect the cable. Flip the cable back, so it is out of the way. 4. Using a Phillips #2 screwdriver, remove six screws that attach the midplane to the panel housing. Three short screws are located in the channel along the top of the case and the longer screws attach to the midplane board. Set the screws aside. 98 - iMac G5, 17-inch Take Apart Midplane Assembly 5. Locate the power supply at the bottom of the picture below. 6. Loosen the middle power supply screw (a captive screw) by turning it to the left until it is flush with the top of the power supply. This screw attaches the power supply to the display bezel; make sure to loosen the screw all the way. Note: The power supply will be removed later. Midplane Assembly iMac G5, 17-inch Take Apart - 7. Turn the middle case screw to the right about five revolutions. This releases the back cover clamp screw. 8. Locate the pull tab at the top of the computer. Pull the tab up to lift the midplane assembly from the display/bezel. Push the cable (in the top left corner) down through the opening in the midplane. Set the midplane aside. 100 - iMac G5, 17-inch Take Apart Midplane Assembly 9. Remove the highlighted parts shown below (hard drive, memory, power supply, and the AirPort Extreme card) before retuning the midplane to Apple. Continue with the procedure for these removal instructions. 10. Locate the hard drive in the top right corner. Midplane Assembly iMac G5, 17-inch Take Apart - 4. Remove the three hard drive screws. Set the screws aside. 5. Carefully lift the hard drive straight up, about one inch, and disconnect the black cable from the white connector on the hard drive. Note: Leave the other end of the cable attached to the logic board. 102 - iMac G5, 17-inch Take Apart Midplane Assembly 6. Using your fingers, or a flat-blade screwdriver, disconnect the drive data cable and power cable from the hard drive. Lift the hard drive up and out of the midplane assembly. 7. Locate the memory module(s) in the bottom right corner. Midplane Assembly iMac G5, 17-inch Take Apart - 8. Rotate the computer to the right so the memory is in the position shown below. 9. To release the memory from its slot, push down on the two side latches. Then pull the memory module out of the slot. Repeat this step if you have a second memory module. 10. Locate the AirPort Extreme card. 104 - iMac G5, 17-inch Take Apart Midplane Assembly 11. Disconnect the antenna cable from the end of the installed AirPort Extreme card. 12. Pull the tab on the card to remove the card from the AirPort card guide. Midplane Assembly iMac G5, 17-inch Take Apart - 13. Reconnect the antenna cable to the hole on the AirPort card guide. 14. Loosen the two outer power supply screws by turning them to the left. Note: These screws are captive; they cannot be removed. 106 - iMac G5, 17-inch Take Apart Midplane Assembly 15. Disconnect the power supply cable by pressing the connector release tab and by prying apart the connector with a flat-blade screwdriver. 16. Pull the power supply cable out of the connector. Note: The cable is attached to the power supply Midplane Assembly iMac G5, 17-inch Take Apart - 17. Tilt up the power supply until it clears the edge of the main circuit board. Lift it out of the midplane and set it aside. Important: Return the midplane to Apple in the packaging provided. 108 - iMac G5, 17-inch Take Apart Midplane Assembly Replacing the Midplane Assembly 1. Remove the replacement midplane from its packaging. 2. Position the display/bezel assembly with the display face down on a clean soft cloth. Midplane Assembly iMac G5, 17-inch Take Apart - 3. Make sure that the black video cable is tucked into the groove on the bezel as shown. A cutout on the midplane chassis lines up with the groove on the display/bezel assembly housing 4. Lower the midplane into the display/bezel assembly housing. Use the tab to lower and adjust the midplane into the housing. As you lower the midplane, pull the inverter cable through the opening in the chassis. 110 - iMac G5, 17-inch Take Apart Midplane Assembly 5. Locate the hard drive. Before lowering the hard drive into place, connect the drive data cable and the power cable to the hard drive. 6. Connect the black cable (hard drive thermal sensor) to the white connector on end of the hard drive. Midplane Assembly iMac G5, 17-inch Take Apart - 4. Replace the three hard drive screws. 5. Reconnect the video cable and replace the two video cable screws. Tuck the video cable into the area next to the fans. 112 - iMac G5, 17-inch Take Apart Midplane Assembly 6. Press the top end of the video cable into the notch on the midplane chassis. 4. Replace the fan cover and the two fan cover screws. The larger screw attaches on the left. Note: Make sure the pull tab is sticking up as shown. Midplane Assembly iMac G5, 17-inch Take Apart - 5. Replace the memory module(s) by lining up the notch on the module with the notch on the slot. 6. Press firmly on the memory module until it clicks into place. Use your thumb and index finger to push the module into the slot 114 - iMac G5, 17-inch Take Apart Midplane Assembly 7. Replace the AirPort Extreme card. Remove the AirPort antenna cable (by pulling the tab) from the opening on the AirPort Extreme guide rails. 8. Slide the AirPort Extreme card into the slot until it clicks into place. Connect the AirPort antenna cable to the AirPort Extreme card. Midplane Assembly iMac G5, 17-inch Take Apart - 9. Lower the power supply into the midplane. 10. Connect the black power supply connector and tighten the three captive screws, turning them to the right. 116 - iMac G5, 17-inch Take Apart Midplane Assembly 4. Replace the six case screws. (The shorter screws attach along the top.) 5. Locate the inverter board that you set aside. 6. Connect the white connector on the inverter board to the main board. Route this cable around the silver post (as shown). Caution: Be careful not to bend the pins or prick Midplane Assembly iMac G5, 17-inch Take Apart - your fingers on the pins located next to the white connector. 118 - iMac G5, 17-inch Take Apart Midplane Assembly 7. As you lower the inverter into place, connect the black connector to the pins on the board. Use the tall silver pins as a guide to align the inverter. Important: Make sure the connector mates with the pins. Double check that it’s connected. 4. Replace the inverter screw. Midplane Assembly iMac G5, 17-inch Take Apart - 5. Reconnect the inverter-to-display panel cable. Important: The connector is keyed (it fits together only one way). 6. Secure the connector under the metal tab. 120 - iMac G5, 17-inch Take Apart Midplane Assembly 7. Locate the optical drive that you set aside. Holding the optical drive by the back end (near the tab), insert the drive at an angle to mate the two white pins and the plastic rectangle with the two holes and notch on the optical drive. 8. With your thumb on the tab and your index finger behind the tab, push the drive forward and down. The optical drive should click into its connector. Note: If the optical drive won’t click into place, check that the fan cables are not obstructing the optical drive connector. Midplane Assembly iMac G5, 17-inch Take Apart - 4. Replace the three optical drive screws. 5. Turn the middle case screw to the left about five revolutions. This step prepares the back cover to be installed and secured. 122 - iMac G5, 17-inch Take Apart Midplane Assembly Midplane Assembly, No Optical Tools Required • Phillips #2 screwdriver, preferably with a magnetized tip • Flat-blade screwdriver • Screw tray or equivalent to hold the screws Preliminary Steps Before you begin, remove the cover. Part Location Midplane Assembly, No Optical iMac G5, 17-inch Take Apart - Removing the Midplane, No Optical 1. To access the midplane assembly you must first remove other service modules. This procedure will show you how to remove and replace these modules. Note: As you remove each module, set it aside, along with the screws for that module. 2. Ground yourself. Touch the metal surface (as shown below) on the inside of the computer to discharge any static electricity. Warning: Always discharge static electricity before you touch any parts or install any components inside the computer. To avoid generating static electricity, do not walk around the room until you have finished installing the part and closed the computer. 124 - iMac G5, 17-inch Take Apart Midplane Assembly, No Optical 3. Locate the inverter on the left side of the computer. 4. Locate the inverter-to-display panel cable connector. Midplane Assembly, No Optical iMac G5, 17-inch Take Apart - 5. Release the cable from the clip. Disconnect the cable connector. 4. Using the iMac G5 screw tool, or a Phillips #2 screwdriver, remove the inverter screw. 126 - iMac G5, 17-inch Take Apart Midplane Assembly, No Optical 5. Lift the inverter straight up to disconnect the inverter board. 6. Disconnect the white connector (circled below) on the inverter by pulling it straight up. Set the inverter board aside. Note: Be careful not to prick your fingers on the pins next to the white connector. Midplane Assembly, No Optical iMac G5, 17-inch Take Apart - 7. Locate the black video cable at the top of the computer. 4. Remove the two screws on the video cable and set them aside. Pull up on the black tab to disconnect the cable. Flip the cable back, so it is out of the way. 128 - iMac G5, 17-inch Take Apart Midplane Assembly, No Optical 4. Using the Phillips screwdriver, remove six screws that attach the midplane to the display panel housing. Three short screws are located along the top of the case and the longer screws attach on the midplane board. Set the screws aside. 5. Locate the power supply at the bottom of the picture below. Midplane Assembly, No Optical iMac G5, 17-inch Take Apart - 6. Loosen the captive power supply screw (circled below) by turning it to the left. Loosen the screw until it is flush with the top of the power supply. The screw is captive; it will not come out. Note: You do not need to remove the power supply yet. 7. Turn the middle case screw to the right about five revolutions. This releases a screw clamp that holds the power supply in the display/bezel assembly. 130 - iMac G5, 17-inch Take Apart Midplane Assembly, No Optical 8. Locate the pull tab at the top of the computer. Pull the tab up to release the midplane assembly from the display/bezel. Pull the inverter cable (in the top left corner) down through the opening in the midplane. Set the midplane aside. 9. Important: Remove the highlighted parts from the midplane (hard drive, memory, power supply, and the AirPort Extreme card if it is installed) before retuning the it to Apple. Continue with the procedure for removal instructions. Midplane Assembly, No Optical iMac G5, 17-inch Take Apart - 10. Locate the hard drive in the top right corner. 4. Remove the three hard drive screws. Set the screws aside. 132 - iMac G5, 17-inch Take Apart Midplane Assembly, No Optical 5. Locate the black cable and white connector on the end of the hard drive. 6. Carefully lift the hard drive up about one inch and disconnect the black cable from the white connector. Note: Leave the other end of the cable attached to the board. Midplane Assembly, No Optical iMac G5, 17-inch Take Apart - 7. Using your fingers, disconnect the drive data cable and power cable from the hard drive. Lift the hard drive up and out of the midplane assembly. 8. Locate the memory module(s) in the bottom right corner. 134 - iMac G5, 17-inch Take Apart Midplane Assembly, No Optical 9. Rotate the computer to the left so the memory is in the position shown below. 10. To release the memory from its slot, push down on the two side latches. Then pull the memory module out of the slot. Repeat this step if you have a second memory module. 11. Locate the power supply at the bottom of the computer. Midplane Assembly, No Optical iMac G5, 17-inch Take Apart - 12. Loosen the two outer screws on the power supply by turning them to the left. Note: These screws are captive; they cannot be removed. 13. Disconnect the power supply cable by pressing the connector release tab and using a wide, flat-blade screwdriver to pry apart the connector. 136 - iMac G5, 17-inch Take Apart Midplane Assembly, No Optical 14. Pull the power supply cable out of the connector.Tilt up the power supply and lift it out of the midplane. Set the power supply aside. Important: Return the midplane to Apple in the packaging provided Midplane Assembly, No Optical iMac G5, 17-inch Take Apart - Replacement the Midplane, No Optical 1. Remove the replacement midplane from its packaging. 2. Position the display/bezel assembly with the display face down on a clean soft cloth 138 - iMac G5, 17-inch Take Apart Midplane Assembly, No Optical 3. Make sure that the black video cable is tucked into the groove on the bezel as shown. A cutout on the midplane chassis lines up with the groove on the display/bezel assembly housing 4. Lower the midplane into the display/bezel assembly housing. Use the tab to lower and adjust the midplane into the housing. As you lower the midplane, pull the inverter cable through the opening in the chassis. Midplane Assembly, No Optical iMac G5, 17-inch Take Apart - 5. Locate the hard drive. Connect the drive data cable and power cable to the hard drive. Lower the hard drive into place on the midplane. 6. Connect the black cable to the white connector on end of the hard drive. 140 - iMac G5, 17-inch Take Apart Midplane Assembly, No Optical 4. Replace the three hard drive screws. 4. Reconnect the video cable and replace the two video cable screws.Tuck the video cable into the area next to the fan and hard drive. Midplane Assembly, No Optical iMac G5, 17-inch Take Apart - 5. Replace the memory module(s) by lining up the notch on the module with the notch on the slot. 6. Press firmly on the memory module until it clicks into place. Use your thumb and index finger to push the module into the slot 142 - iMac G5, 17-inch Take Apart Midplane Assembly, No Optical 7. Lower the power supply into the midplane. 8. Connect the black power supply connector and tighten the three captive screws, turning them to the right. Midplane Assembly, No Optical iMac G5, 17-inch Take Apart - 4. Replace the six case screws.The shorter screws attach along the top. 5. Locate the inverter board that you set aside. 144 - iMac G5, 17-inch Take Apart Midplane Assembly, No Optical 6. Connect the white connector on the inverter board to the main board. Route this cable around the silver post (as shown). Caution: Be careful not to bend the pins or prick your fingers on the pins located next to the white connector. Midplane Assembly, No Optical iMac G5, 17-inch Take Apart - 7. As you lower the inverter into place, connect the black connector to the pins on the board. Use the tall silver pins as a guide to align the inverter. Important: Make sure the connector mates with the pins. Double check that it’s connected. 4. Replace the inverter screw. 146 - iMac G5, 17-inch Take Apart Midplane Assembly, No Optical 5. Reconnect the inverter-to-display panel cable. Important: The connector is keyed (it fits together only one way). 6. Secure the connector under the metal tab. Midplane Assembly, No Optical iMac G5, 17-inch Take Apart - 7. Turn the middle case screw to the left about five revolutions. This step prepares the back cover to be installed and secured. 148 - iMac G5, 17-inch Take Apart Midplane Assembly, No Optical Logic Board Tools • • • • • Phillips #2 screwdriver Torx-10 flat-blade Torx-6 Flat-blade screwdriver Screw tray or equivalent to hold the screws Preliminary Steps Before you begin, remove the following: • Back cover • Optical drive • Inverter • Fan cover • Memory Part Location Logic Board iMac G5, 17-inch Take Apart - Removing the Logic Board 1. At the top of the logic board, near the fan, disconnect the two fan connectors (with brown and gray wires) and the two hard drive connectors (black cables). 2. Remove the two video cable screws and disconnect the video cable. 150 - iMac G5, 17-inch Take Apart Logic Board 3. Disconnect the hard drive thermal sensor (near the memory slots) from the logic board. Leave the other end of the thermal sensor attached to the hard drive. 4. Using a T-8 screwdriver, disconnect the two fan duct screws and lift the duct off the logic board. Note: These two screws are longer than the other silver screws securing the logic board to the midplane chassis. Logic Board iMac G5, 17-inch Take Apart - 5. On the left side of the board, use a T-6 screwdriver to remove the two screws on the Airport Extreme card guide. Disconnect the AirPort antenna cable from the AirPort card guide or from the AirPort Extreme card if the card is present. Lastly, disconnect the power supply cable. 6. Carefully slide the AirPort antenna cable out of the AirPort card guide slot. Lift the AirPort card guide off the logic board and set it aside. 152 - iMac G5, 17-inch Take Apart Logic Board 7. Using the T-6 screwdriver, remove the two modem screws. 8. Lift the modem straight up and off the logic board connector and disconnect the modem cable. Note: If a Bluetooth board is present continue with the next step, otherwise go on to step 12. Logic Board iMac G5, 17-inch Take Apart - 9. Using a T-6 screwdriver, remove the two screws on the Bluetooth board (if present). Note: This graphic shows the Bluetooth board on the iMac G5 20-inch, however; the board is in the same location on the iMac G5 17-inch computer. 10. Carefully disconnect the Bluetooth antenna from the Bluetooth board. Set the Bluetooth board aside. 154 - iMac G5, 17-inch Take Apart Logic Board 11. Disconnect the three connectors near the bottom left corner of the midplane. These cables connect to the speakers, microphone, and the fan. Note: Pull on the connector, not the cables. 12. Using a T-10 screwdriver, remove six silver logic board screws and with a Phillips #2 screwdriver, remove the two brass screws in the bottom right and left corners of the logic board. Note: The numbers are for replacement order, disregard for take-apart. Logic Board iMac G5, 17-inch Take Apart - 13. Carefully lift the logic board out of the midplane chassis. Do not flex the board as you remove it from the chassis or you may jeopardize the thermal interface between the heatsink and the processor. 14. Look on the back of the logic board for the light pipe. If you are replacing the board, remove the light pipe. Attach this light pipe to the gasket on the replacement board. 15. If you don’t see the light pipe on the back of the logic board, it may be stuck in the chassis (shown below). Use a needlenose pliers to remove the light pipe. 16. Return the logic board to Apple in the packaging provided. 156 - iMac G5, 17-inch Take Apart Logic Board Replacing the Logic Board 1. Locate the cleaning wipe and syringe in the replacement logic board box. 2. Cean the copper heatpad (circled) .Use the alcohol wipe to clean the copper heatpad. Logic Board iMac G5, 17-inch Take Apart - 3. Whenever you remove the logic board clean the U3 chip (circled) 4. Add 1 1/2 to 2 syringes of thermal grease to the U3 chip to ensure sufficient cooling. Spread the paste evenly across the surface of the chip.. 158 - iMac G5, 17-inch Take Apart Logic Board 5. Locate the light pipe gasket on the back of the board. 6. Peel the adhesive backing off the gasket. Attach the light pipe to the gasket. Logic Board iMac G5, 17-inch Take Apart - 7. Before placing the logic board into the chassis, move or tape the cables (shown below) out of the way. 8. Lower the logic board into the chassis. Caution: Do not twist, bend or flex the board as you lower it into the chassis. Flexing the board may jeopardize the thermal interface between the heartsink and the processor. Make sure the light pipe seats properly into the bottom left corner and that the cables are not caught under the board. 160 - iMac G5, 17-inch Take Apart Logic Board 9. Connect the three cables (speakers, microphone and lower fan) in the bottom left corner of the midplane. 10. Using a T-10 screwdriver, replace the logic board screws. Install the screws in the numbered sequence shown below, starting with the screws nearest the heatsink. Logic Board iMac G5, 17-inch Take Apart - 11. If present, connect the Bluetooth antenna to the Bluetooth board and replace the two T-6 screws. Note: This graphic shows the Bluetooth board on the iMac G5 20-inch, however; the board is in the same location on the iMac G5 17-inch computer. 12. Connect the modem cable to the modem board. 162 - iMac G5, 17-inch Take Apart Logic Board 13. Replace the two T-6 modem screws. 14. Place the AirPort card guide on the logic board and slide the antenna into the slot. Logic Board iMac G5, 17-inch Take Apart - 15. Replace the two T-6 screws on the AirPort Card guide, attach the AirPort antenna, and connect the power supply cable. 16. Replace the fan duct and the two fan duct screws. Note: These two screws are longer than the other silver screws securing the logic board to the midplane chassis. 164 - iMac G5, 17-inch Take Apart Logic Board 17. Rotate the computer to the right. Connect the hard drive thermal sensor to the logic board. Make sure the other end of the thermal sensor attaches to the hard drive. 18. Replace the memory. Logic Board iMac G5, 17-inch Take Apart - 19. Connect the video cable to the logic board and replace the two screws. 166 - iMac G5, 17-inch Take Apart Logic Board 20. Reconnect the hard drive and fan cables to the logic board. 21. Replace the inverter. 22. Replace the optical drive. 23. Replace the fan cover. 24. Replace the back cover. Logic Board iMac G5, 17-inch Take Apart - Bluetooth Antenna Cable Tools Required • Nylon probe tool • Flat-blade screwdriver Preliminary Steps Before you begin, remove the following: • Back cover • Midplane • Bluetooth board Note: The graphics in this procedure show the Bluetooth antenna cable on the iMac G5 20-inch; however, the steps are the same for the iMac G5 17-inch computer Part Location 168 - iMac G5, 17-inch Take Apart Bluetooth Antenna Cable Removing the Bluetooth Antenna Cable 1. Holding the midplane vertical, route the Bluetooth antenna cable through the small opening in the chassis. Bluetooth Antenna Cable iMac G5, 17-inch Take Apart - 2. On the other side of the midplane, note the placement of the other end of the Bluetooth antenna cable in its plastic holder. 3. Use a nylon probe tool to pry up the Bluetooth holder from its adhesive on the chassis. 170 - iMac G5, 17-inch Take Apart Bluetooth Antenna Cable 4. Release the Bluetooth antenna cable from the chassis guides. If necessary, use a flatblade screwdriver to carefully pry open the guides. 5. Near the Bluetooth holder, note that the Bluetooth antenna cable runs underneath the speaker and fan cables. Without straining the cables, route the Bluetooth antenna cable under the other two cables to release it from the chassis. Bluetooth Antenna Cable iMac G5, 17-inch Take Apart - Replacing the Bluetooth Antenna Cable 1. On the back of the midplane chassis, route the Bluetooth antenna cable under the fan and speaker cables. 2. If you are replacing the Bluetooth antenna cable with a new one, rub away any remaining adhesive on the midplane chassis. Peel off the backing on the Bluetooth holder, and press the holder onto the chassis. 3. Secure the cables in the cable guides on the underside of the chassis. Replacement Note: If necessary, use a flat-blade screwdriver to press the cable guides closed over the cables. 4. Thread the Bluetooth antenna cable through the small opening in the chassis. 5. Connect the Bluetooth antenna to the Bluetooth board. 6. Replace the Bluetooth board. 7. Replace the midplane. 8. Replace the back cover. 172 - iMac G5, 17-inch Take Apart Bluetooth Antenna Cable Light Pipe with Gasket Tools Required No tools are required for this procedure. Preliminary Steps Before you begin, remove the following: • Back cover • Midplane Part Location Light Pipe with Gasket iMac G5, 17-inch Take Apart - Removing the Light Pipe with Gasket 1. On the underside of the midplane chassis, locate the light pipe. 2. Grasping the outer ring of the light pipe, pull it straight off the connector. 174 - iMac G5, 17-inch Take Apart Light Pipe with Gasket Replacing the Light Pipe with Gasket 1. Peel the adhesive backing off of the narrower end of the light pipe. 2. Note the small plastic pin on the outer ring of the light pipe. Position the light pipe over the logic board so that the pin aligns with the hole in the logic board. Light Pipe with Gasket iMac G5, 17-inch Take Apart - 3. Press the light pipe with gasket into place. 4. Replace the midplane. 5. Replace the back cover. 176 - iMac G5, 17-inch Take Apart Light Pipe with Gasket Microphone Cable Tools Required • Needlenose pliers Preliminary Steps Before you begin, remove the following: • Back cover • Midplane • Light pipe Part Location Microphone Cable iMac G5, 17-inch Take Apart - Removing the Microphone Cable 1. From the top of the logic board at the bottom of the port bank, use a needlenose pliers to disconnect the two narrowest cable connectors: fan and microphone. 2. Locate the longer (fan) connector. 178 - iMac G5, 17-inch Take Apart Microphone Cable 3. Place the midplane upright. Holding the other cables aside, route the fan cable and connector through the opening in the midplane chassis. Microphone Cable iMac G5, 17-inch Take Apart - 4. Route the microphone cable connector through the midplane chassis opening. Important: The microphone connector has two pegs. To enable routing, position the connector so the two pegs point toward the logic board, and the flat side of the connector is positioned away from the logic board. 180 - iMac G5, 17-inch Take Apart Microphone Cable 5. Note the routing of the microphone cable. Peel up the speaker tape, and lift up the microphone cable from the speaker channel. 6. Slide out the rubber microphone gasket. Microphone Cable iMac G5, 17-inch Take Apart - Replacing the Microphone Cable 1. Secure the microphone cable to the speaker, and apply new tape. Note: A strip of new tape comes with both a replacement microphone cable and a replacement speaker set. 2. Route the cable connectors through the chassis opening as follows: • microphone cable connector first • narrowest fan cable connector last 3. Connect the connectors to the logic board. 4. Replace the light pipe. 5. Replace the midplane. 6. Replace the back cover. 182 - iMac G5, 17-inch Take Apart Microphone Cable Speaker Set Tools Required • • • • Needlenose pliers Torx T10 screwdriver, preferably with a magnetized tip Flat-blade screwdriver Screw tray or something equivalent to hold the screws Preliminary Steps Before you begin, remove the following: • Back cover • Midplane • Light pipe Part Location Speaker Set iMac G5, 17-inch Take Apart - Removing the Speaker Set 1. Locate the two speakers on the midplane chassis. 2. From the top of the logic board at the bottom of the port bank, use a needlenose pliers to disconnect the three cable connectors: fan, microphone, and speaker. 3. Holding the midplane vertically, locate the narrowest (fan) connector. 4. Holding the other cables aside, route the fan cable and connector through the opening in the midplane chassis. 184 - iMac G5, 17-inch Take Apart Speaker Set 5. Route the narrower microphone cable connector through the opening in the midplane chassis. Note: The images below show both sides of the midplane chassis. Important: The microphone connector has two pegs. To enable routing, position the connector so the two pegs point toward the logic board, and the flat side of the connector is positioned away from the logic board. Speaker Set iMac G5, 17-inch Take Apart - 6. Route the widest speaker cable connector through the midplane chassis opening. 7. Place the midplane flat on the table and note the single screw securing the speaker to the midplane. Remove the screw from the speaker. 186 - iMac G5, 17-inch Take Apart Speaker Set 8. Lift the speaker off of the chassis standoff. 9. Without straining the speaker or fan cable, use a flat-blade screwdriver to carefully lift up the cables from the three cable guides on the underside of the midplane chassis. Caution: Use the flat-blade screwdriver to open the cable guides only enough to slide out the cables. Do not over-extend the cable guides. Speaker Set iMac G5, 17-inch Take Apart - 10. Remove the two screws at the other speaker. 11. Lift the speaker off of the chassis standoff. 188 - iMac G5, 17-inch Take Apart Speaker Set 12. Replacement Note: If you are replacing the speaker set, remove the microphone cable from the speaker and transfer it to the new speaker set. To remove the microphone cable, • peel up the speaker tape • lift up the microphone cable • slide out the rubber microphone gasket Speaker Set iMac G5, 17-inch Take Apart - Replacing the Speaker Set 1. Note: The speaker set includes the two speakers, speaker housing, and attached cable and connector. 2. Secure the microphone cable to the speaker, and apply new tape. Note: A strip of new tape comes with both a replacement speaker set and a replacement microphone cable. 3. Attach the speaker that is closest to the lower fan on the chassis. Replace the two screws. 4. Route the speaker cable into the cable guides. Then route the fan cable on top of it. 5. Gently press on the cable guides to ensure that the cables cannot become loose. 6. Install the remaining speaker to the chassis. Replace the single screw. 7. Route the three cable connectors through the chassis opening as follows: • thick speaker connector first • narrow microphone cable connector next • narrowest fan cable connector last 8. Connect the three connectors. 9. Replace the light pipe. 10. Replace the midplane. 11. Replace the back cover. 190 - iMac G5, 17-inch Take Apart Speaker Set Lower Fan Tools Required • Flat-blade screwdriver Preliminary Steps Before you begin, remove the following: • Back cover • Midplane • Speaker set Part Location Lower Fan iMac G5, 17-inch Take Apart - Removing the Lower Fan 1. Position the midplane assembly at the edge of a table so the fan cable dangles and is not pinched. 2. Locate the locking clip on the top of the fan housing. While supporting the fan housing, use a flat-blade screwdriver to raise up the clip approximately 1/4 inch. Caution: When the clip is raised, the fan becomes loose and could fall. Be sure to support the fan during removal and installation. 192 - iMac G5, 17-inch Take Apart Lower Fan 3. Remove the fan from the chassis. Lower Fan iMac G5, 17-inch Take Apart - Replacing the Lower Fan 1. Before installing the replacement fan, make sure the fan housing includes: • rectangular gasket surrounding the fan opening • mesh tape joining the gasket and the fan housing • a spacer sponge centered over the mesh tape 2. With the midplane assembly positioned over the edge of the table and the fan clip raised, align the side pegs on the fan with the channels on the clip. Slide in the fan and press down on the clip so it locks onto the raised pegs on the side of the fan housing. 194 - iMac G5, 17-inch Take Apart Lower Fan 3. Replace the speaker set. 4. Replace the midplane. 5. Replace the back cover. Lower Fan iMac G5, 17-inch Take Apart - AirPort Extreme Card Holder Tools Required • Torx T6 screwdriver, preferably with a magnetized tip • Screw tray or something equivalent to hold the screws Preliminary Steps Before you begin, remove the following: • Back cover • AirPort Extreme Card Part Location 196 - iMac G5, 17-inch Take Apart AirPort Extreme Card Holder Removing the AirPort Extreme Card Holder 1. Remove the two identical T6 screws from the top of the card holder. 2. Tilt up the holder and remove the AirPort antenna. 3. Remove the AirPort Card holder from the computer assembly. AirPort Extreme Card Holder iMac G5, 17-inch Take Apart - Replacing the AirPort Extreme Card Holder 1. Route the AirPort antenna cable into the holder. 2. Fit the AirPort Card holder onto the logic board. With the AirPort Card holder properly aligned and level, replace the two screws. 3. Replace the AirPort Extreme Card. 4. Replace the back cover. 198 - iMac G5, 17-inch Take Apart AirPort Extreme Card Holder Modem Board Tools Required • Torx T6 screwdriver, preferably with a magnetized tip • Screw tray or something equivalent to hold the screws Preliminary Steps Before you begin, remove the following: • Back cover • AirPort Extreme Card • AirPort Extreme Card holder Part Location Modem Board iMac G5, 17-inch Take Apart - Removing the Modem Board 1. Locate the modem board. 2. Remove the two identical T6 screws. 3. Holding the top and bottom edge of the board, lift the modem board straight up to disconnect it from the logic board. 4. Turn over the board, and disconnect the cable from the modem board. 200 - iMac G5, 17-inch Take Apart Modem Board Replacing the Modem Board 1. Connect the modem cable. 2. Holding the top and bottom edges of the board, align the screw holes over the standoffs on the logic board. Then press down on the area of the board that is over the connector. Caution: Do not press on any other areas of the modem board. Modem Board iMac G5, 17-inch Take Apart - 3. Replace the two screws. 4. Replace the AirPort Extreme Card holder. 5. Replace the AirPort Extreme Card. 6. Replace the back cover. 202 - iMac G5, 17-inch Take Apart Modem Board Bluetooth Board Tools Required • Torx T6 screwdriver, preferably with a magnetized tip • Screw tray or something equivalent to hold the screws Preliminary Steps Before you begin, remove the following: • Back cover • AirPort Extreme Card Part Location Bluetooth Board iMac G5, 17-inch Take Apart - Removing the Bluetooth Board 1. Locate the Bluetooth board. 2. Remove the two identical T6 screws. 3. Holding the top and bottom edge of the board, lift the Bluetooth board straight up to disconnect it from the logic board. 4. Using your fingers, disconnect the cable from the Bluetooth board. Note: This graphic shows the Bluetooth board on the iMac G5 20-inch, however; the board is in the same location on the iMac G5 17-inch computer. 204 - iMac G5, 17-inch Take Apart Bluetooth Board Replacing the Bluetooth Board 1. Connect the Bluetooth antenna cable. Note: This graphic shows the Bluetooth board on the iMac G5 20-inch, however; the board is in the same location on the iMac G5 17-inch computer. 2. Holding the top and bottom edges of the board, align the screw holes over the standoffs on the logic board. Then press down on the area of the board that is over the connector. Caution: Do not press on any other areas of the Bluetooth board. Bluetooth Board iMac G5, 17-inch Take Apart - 3. Replace the two screws. 4. Replace the AirPort Extreme Card. 5. Replace the back cover. 206 - iMac G5, 17-inch Take Apart Bluetooth Board LCD Panel Tools Required • Torx T10 screwdriver, preferably with a magnetized tip • Clean, soft, lint-free towel or blanket • Screw tray or something equivalent to hold the screws Preliminary Steps Before you begin, remove the following: • Back cover • Midplane Part Location LCD Panel iMac G5, 17-inch Take Apart - Removing the LCD Panel 1. Place the display bezel/LCD panel assembly face-down on a clean, soft, lint-free folded towel or blanket. 2. Remove the four screws at the LCD panel brackets. 3. Touching only the top and bottom edges of the LCD panel, raise it up out of the display bezel. 208 - iMac G5, 17-inch Take Apart LCD Panel Replacing the LCD Panel 1. Check the routing of the LCD panel cables. Note: The replacement LCD panel includes the brackets, cables, tape, and gaskets, as shown. 2. Make sure the cables cannot be pinched when setting the LCD panel in the display bezel. LCD Panel iMac G5, 17-inch Take Apart - 3. Place the LCD panel into the display bezel so that all four screw holes on the brackets align with the screw holes on the bezel. 4. Replace the screws. 5. Turn over the display bezel/LCD panel assembly, and check that there are no uneven gaps between the bezel and the display. If there are noticeable gaps, loosen the screws, reseat the panel, and retighten the screws. 6. Replace the midplane. 7. Replace the back cover. 210 - iMac G5, 17-inch Take Apart LCD Panel Front Bezel Tools Required • Clean, soft, lint-free towel or blanket Preliminary Steps Before you begin, remove the following: • Back cover • Midplane • LCD panel Part Location Front Bezel iMac G5, 17-inch Take Apart - Removing the Display Bezel With all preliminary steps performed, the display bezel is the part that remains. Note: The display bezel includes the captive screw, light pipe gasket, and drive felt. 212 - iMac G5, 17-inch Take Apart Front Bezel Replacing the Front Bezel 1. Before installing the LCD panel and reassembling the computer, make sure the display bezel is clean and free of dust and any foreign matter. 2. Install the microfoam shim if it’s not installed. Refer to the “Microfoam Shim” topic in this chapter. 3. Replace the LCD panel. 4. Replace the midplane. 5. Replace the back cover. Front Bezel iMac G5, 17-inch Take Apart - AirPort Extreme Antenna Cable Tools Required • Torx T10 screwdriver, preferably with a magnetized tip • Screw tray or something equivalent to hold the screw Preliminary Steps Before you begin, remove the following: • Back cover • Optical drive • Inverter • Fan cover • Memory • Logic board Part Location 214 - iMac G5, 17-inch Take Apart AirPort Extreme Antenna Cable Removing the AirPort Extreme Antenna Cable 1. Locate the pull tab at the top of the computer. Pull the tab up to remove the midplane assembly from the display/bezel. Pull the cable in the top left corner down through the opening in the midplane. Set the midplane assembly on the work surface. 2. Note the routing of the AirPort antenna cable through the cable guides, tape, and mesh sponge pads on the left side of the midplane chassis. AirPort Extreme Antenna Cable iMac G5, 17-inch Take Apart - 3. Starting at the plug end of the AirPort antenna, release the cable from the cable guides and tape. 4. Release the cable from the remaining cable guide and from where it is sandwiched between the mesh sponge pads. Remove the T10 screw. 216 - iMac G5, 17-inch Take Apart AirPort Extreme Antenna Cable 5. Route the cable through the corner opening in the midplane chassis. 6. Note that the AirPort antenna cable includes the attached board. AirPort Extreme Antenna Cable iMac G5, 17-inch Take Apart - Replacing the AirPort Extreme Antenna Cable 1. Route the antenna through the corner opening in the chassis, and replace the screw first. 2. Route the antenna cable through the mesh pads, cable guides, and tape. 3. Replace the midplane chassis inside the display bezel. 4. Replace the logic board. 218 - iMac G5, 17-inch Take Apart AirPort Extreme Antenna Cable 5. Replace the memory. 6. Replace the fan cover. 7. Replace the inverter. 8. Replace the optical drive. 9. Replace the back cover. AirPort Extreme Antenna Cable iMac G5, 17-inch Take Apart - Midplane Chassis Tools Required • Torx T10 screwdriver, preferably with a magnetized tip • Screw tray or something equivalent to hold the screws Preliminary Steps Before you begin, remove the following: • Back cover • Midplane assembly • Upper fans • Logic board • AirPort Extreme antenna cable • Microphone cable • Speaker set • Lower fan 220 - iMac G5, 17-inch Take Apart Midplane Chassis Part Location Midplane Chassis iMac G5, 17-inch Take Apart - Removing the Midplane Chassis 1. Remove the three T10 screws from the copper heatpad. Set the heatpad aside. 2. Note that the midplane chassis includes the fan duct, gaskets, and tape. 222 - iMac G5, 17-inch Take Apart Midplane Chassis 3. On the other side of the chassis, note that the midplane chassis includes the mesh tape that borders the hard drive area. Midplane Chassis iMac G5, 17-inch Take Apart - Replacing the Midplane Chassis 1. Transfer the copper heatpad to the replacement chassis. Replace the screws. Replacement Note: Before installing the logic board, refer to the Logic Board procedure to clean the copper heatpad and apply new thermal grease. 2. Replace the lower fan. 3. Replace the microphone cable. 4. Replace the speaker set. 5. Replace the AirPort Extreme antenna cable. 6. Replace the logic board. 7. Replace the upper fans. 8. Replace the midplane assembly in the back cover. 224 - iMac G5, 17-inch Take Apart Midplane Chassis Screw Charts To Access the Optical Drive Screw Charts iMac G5, 17-inch Take Apart - To Access the Inverter 226 - iMac G5, 17-inch Take Apart Screw Charts To Access the Fan Cover Screw Charts iMac G5, 17-inch Take Apart - To Access the Hard Drive 228 - iMac G5, 17-inch Take Apart Screw Charts To Access the Display/Bezel-Part 1 Screw Charts iMac G5, 17-inch Take Apart - To Access the Display/Bezel-Part 2 230 - iMac G5, 17-inch Take Apart Screw Charts To Access the Midplane Assembly-Part 1 Screw Charts iMac G5, 17-inch Take Apart - To Access the Midplane Assembly-Part 2 232 - iMac G5, 17-inch Take Apart Screw Charts Screw Charts iMac G5, 17-inch Take Apart - Service Source Troubleshooting iMac G5 (17-inch) © 2004 Apple Computer, Inc. All rights reserved. General Information iMac G5 Repair Extension Program (REP) for Video and Power Issues Apple has announced the iMac G5 Repair Extension Program (REP) for Video and Power Issues that covers first-generation 17-inch and 20-inch iMac G5 models that have videoor power-related symptoms as a result of a specific component failure. Instructions and CompTIA Codes to use specifically for repairs covered under the iMac G5 REP for Video and Power symptoms are provided in this section. Overview The iMac G5 REP for Video and Power Issues covers first-generation 17-inch and 20-inch iMac G5 models that exhibit one of the following video- or power-related symptoms: – Scrambled or distorted video – No video – No power NOTE: Only the Non-PFC* power supplies sold in Canada, Japan and the U.S. are eligible for coverage under the iMac G5 REP for Video and Power Issues. The universal** power supplies used in Asia-Pac and Europe are not affected by the issues covered under this program. * Non-PFC power supplies can only be used in certain countries (Canada, Japan and the U.S.); they support only 100 VAC - 120 VAC. ** Universal power supplies can be used worldwide; they support 100 VAC - 240 VAC. The program covers affected iMacs for up to two years from the original date of purchase. Apple will continue to evaluate the repair data and will provide further repair extensions as needed. General Information iMac G5, 17-inch Troubleshooting - 1 Eligible Products The program is available for first generation iMac G5 models that were sold between approximately September 2004 and June 2005 featuring 17- and 20-inch displays with 1.6GHz and 1.8GHz G5 processors. 1. The affected iMac G5 computers have serial numbers where the first five (5) digits fall into the ranges noted below: – W8435xxxxxx - W8522xxxxxx – QP435xxxxxx - QP522xxxxxx – CK435xxxxxx - CK522xxxxxx – YD435xxxxxx - YD522xxxxxx Note: The iMac G5 REP for Video and Power Issues is based upon the system's serial number and the symptoms diagnosed, not upon the serial numbers of the logic boards or power supplies. 2. The affected iMac G5 models have EMC codes 1989 and 2008. The EMC number (EMC No.) is located on the label on the bottom of the iMac stand. 2 - iMac G5, 17-inch Troubleshooting General Information Note: Only first generation iMac G5 models are eligible for the repair extension program. Generation First Second EMC No. iMac model 1989 17-inch iMac G5 2008 20-inch iMac G5 2055 17-inch iMac G5 (Ambient Light Sensor) 2056 20-inch iMac G5 (Ambient Light Sensor) . Note: Customers are responsible for the repair cost of any accidental or cosmetic damage, or for any issues that do not relate directly to the specific logic board or power supply issues covered by this program. For example, if an iMac is taken to an Apple service provider with a cracked display and a component failure eligible under the program, Apple will cover the component failure repair, but the cost of replacing the cracked display is the customer's responsibility. Repair Strategy Required service parts for this program are available so that certified technicians may create a repair at an Apple service provider location. WARRANTY REPAIRS: If an iMac product eligible for this program is currently covered by an Apple warranty or extended service agreement, create the repair in the usual manner. However, it is extremely important that you select the CompTIA Code(s) created for this program (see below) for the repair. OUT-OF-WARRANTY REPAIRS: Until further notice, Apple asks that service providers in all regions that use GSX select the “Mark for Review” checkbox on all out-of-warranty Carry-In repairs created for iMac products eligible for coverage under this repair extension program. In addition, it is extremely important that you select the CompTIA Code(s) created for this program (see below) for the repair. Troubleshooting If a computer falls within the serial number range noted under “Eligible Products” and exhibits the symptoms noted under “Overview”, inspect the capacitors on the logic board for signs of bulging and/or venting. If the logic board has bulged or vented capacitors, the logic board should be replaced. If the logic board has bulged or vented capacitors, the power supply should also be inspected. If the power supply has a specific part number and AC input value, it should also be replaced. General Information iMac G5, 17-inch Troubleshooting - 3 Replacement Parts If a logic board and/or power supply must be replaced, order on a like-for-like basis only. The following parts are eligible to be replaced under this repair extension program: • 661-3595 Board, Logic, 1.6GHz, No Optical, iMac G5 17" • 661-3596 Board, Logic, 1.6GHz, w/Optical, iMac G5 17" • 661-3597 Board, Logic, 1.8GHz, w/SuperDrive, iMac G5, 17" • 661-3599 Board, Logic, 1.8GHz, w/SuperDrive, iMac G5, 20" * 661-3350 Power Supply, Non-PFC (iMac G5 20") [only applies to units sold in US/Canada/Japan] * 661-3351 Power Supply, Non-PFC (iMac G5 17") [only applies to units sold in US/Canada/Japan] * Effective September 12, 2005, these power supply replacements will be excluded from Service Excellence measurement (in applicable regions). In addition, all first-generation iMac G5 power supplies are no longer available as Do-It-Yourself (DIY) parts. The parts listed above are the only approved logic board and power supply replacements for repairs covered under the iMac G5 REP for Video and Power Issues. Apple will charge service accounts for any parts ordered for repairs involving units eligible for the iMac G5 REP for Video and Power Issues that are not related to this program and are not covered by warranty or an extended AppleCare service agreement. Special CompTIA Codes Apple has created the following two CompTIA Codes to use for repairs on iMac products eligible for coverage under the iMac G5 REP for Video and Power Issues: • Use CompTIA Code 560: iMac G5 MLB/Power Supply REP when replacing a logic board, whether or not the iMac is covered by warranty or an extended service agreement • Use CompTIA Code 660: iMac G5 MLB/Power Supply REP when replacing a power supply, whether or not the iMac is covered by warranty or an extended service agreement If it's necessary to replace both the logic board and power supply, use both CompTIA Codes. European IMCs For repairs covered under the iMac G5 REP for Video and Power Issues, IMCs in Europe must order logic boards as stock parts using the part numbers listed above. To receive credit for the covered logic boards ordered as stock parts, IMCs must request an RMA number from the SPS team and return the defective parts to Apple with the RMA number. 4 - iMac G5, 17-inch Troubleshooting General Information Japan Service providers in Japan who create a Mail-In Repair for iMac products eligible for coverage under the iMac G5 REP for Video and Power Issues should ALWAYS select CompTIA Code 660: iMac G5 MLB/Power Supply REP in GSX, whether the repair is related to the logic board, power supply, or both. WARRANTY REPAIRS: If an iMac product is currently covered by an Apple warranty or extended service agreement, create the Mail-In Repair in the usual manner. OUT-OF-WARRANTY REPAIRS: Until further notice, Apple asks that service providers select the “Mark for Review” checkbox on all out-of-warranty Mail-In repairs created for iMac products eligible for coverage under this repair extension program. Latin America Latin America service providers should order parts for this repair extension program in the usual manner. More information concerning the iMac G5 REP for Video and Power Issues is available in the Repair Extension Programs section of the Apple Authorized Service Programs Manual (Canada/Europe/US). Complete information concerning the iMac G5 Repair Extension Program is available in the Repair Extension Programs section of the Service Programs Manual. http:// www.info.apple.com/kbnum/n500123 General Information iMac G5, 17-inch Troubleshooting - 5 Serial Number Location The iMac G5 serial number is located on the bottom of the computer stand (foot). Note: If the back cover is replaced, copy the serial number from the original back cover to the blank label that comes with the replacement back cover. Attach the new label to the replacement back cover. 6 - iMac G5, 17-inch Troubleshooting General Information Diagnostic LEDs The iMac G5 has built-in diagnostic LEDs (shown below) on the main logic board that can help you to troubleshoot the computer. To access these LEDs, remove the back cover of the computer: 1. Turn your computer off (choose Shut Down from the Apple menu). If you can't shut it down that way, you can turn the computer off by pressing the power button for five seconds. 2. After the computer is off, disconnect all cables and the power cord from your computer. General Information iMac G5, 17-inch Troubleshooting - 7 3. Place a soft, clean towel or cloth on the desk or surface. Hold the sides of the computer and slowly lay it down so the screen is flat against the surface and the bottom is toward you. 4. Raise the foot and use a Phillips #1 screwdriver to loosen the three screws at the bottom of the computer by turning them completely counterclockwise. These are “captive screws,” which means they're not supposed to come all the way out. 8 - iMac G5, 17-inch Troubleshooting General Information 5. As you hold the metal foot, tilt the back cover up and lift it away from the computer. The back cover with the foot attached should come off easily. If it doesn't, make sure the screws are turned completely counter-clockwise, but not too far. 6. To protect the computer from electrostatic discharge, ground yourself by touching a metal surface inside the computer. Warning: Always discharge static electricity before you touch any parts or install any components inside the computer. Don't walk around the room in socks or bare feet, for example, until after you've finished these steps. General Information iMac G5, 17-inch Troubleshooting - 9 7. Locate the large white arrow in the middle of the board. 8. Above this arrow, you'll see four LEDs: • LED 1 indicates that the trickle voltage from the power supply has been detected by the main logic board. This LED will remain ON whenever the iMac G5 is connected to a working AC power source. The LED will remain on even when the computer has been shut down or put to sleep. The LED will turn off only if the AC power source is disconnected or the power supply is faulty. 10 - iMac G5, 17-inch Troubleshooting General Information • LED 2 indicates that the main logic board has detected proper power from the power supply when the computer is turned on. This LED will be ON when the computer is turned on and the power supply is working correctly. • LED 3 indicates that the computer and the LCD display are communicating. This LED will be ON when the computer is turned on and video signal is being generated. • LED 4 lights only if the computer detects an over-temperature condition. This LED will be OFF when the computer is turned on and running at the correct temperature. General Information iMac G5, 17-inch Troubleshooting - 11 Internal Power Button To the left of the diagnostic LEDs are two buttons. The top button is the internal power button; the lower button is the SMU button (described later in this chapter). The internal power button gives you the ability to power on the computer with the back cover off the computer. 12 - iMac G5, 17-inch Troubleshooting General Information To power the computer on with the back cover off: 1. First remove the back cover. 2. Plug in the power cord. 3. Press the power button. The LEDs will come on indicating the computer status. 4. To shut the computer off with the back cover off, press the power button for at least five seconds. The green LEDs will go out. General Information iMac G5, 17-inch Troubleshooting - 13 SMU Button on the Logic Board The iMac G5 uses an advanced system management unit (SMU) to manage the thermal and wattage conditions, while keeping the acoustic noise to a minimum. The SMU controls the fans and regulates the speeds to run each fan. The SMU reset button (shown below) is similar to the PMU button on previous iMac computers. The SMU supports the following functions: • provides initial configuration of system clocks • automatically initiates and sequences voltage and frequency slews when the OS requests a transition to a new run level • handles all power button and environmental user events • controls RPM fans • provides processor Mode Ring and thermal data store • monitors processor temperature and power consumption • monitors VRD10-compliant processor power supply digital interface. The iMac G5 system employs advanced thermal and wattage management to keep acoustic noise to a minimum. The enclosure is divided into discrete zones, each with independently controlled fans bringing in cool air from the front of the enclosure, directing it over system components and exhausting it out the rear. Temperature and power consumption are monitored by the operating system which communicates with the SMU, which in turn controls and monitors fan operation. If Mac OS X is not booted, thermal management must be provided by the alternate development operating system. 14 - iMac G5, 17-inch Troubleshooting General Information Note: If Mac OS X is not booted and the alternate development operating system does not manage the fans, the fans go into an unmanaged state and run at full speed. The SMU controls the fans and regulates the speeds to run each fan. The SMU derives fan speed from sensors in each thermal zone. Some of these sensors monitor thermal only, while others monitor both thermal and power. If the SMU does not receive an update from the operating system within two minutes, it begins to ramp up the speed of the fans to full speed. General Information iMac G5, 17-inch Troubleshooting - 15 Ports The iMac G5 ports are shown below. 16 - iMac G5, 17-inch Troubleshooting General Information Spares Kit Shipping with Replacement Modules 1. An extra thermal sensor cable (shown below) is included with the hard drive replacement part. If the original sensor is damaged during the disassembly, attach the new sensor cable to the main board and to the end of the hard drive (as shown). General Information iMac G5, 17-inch Troubleshooting - 17 DDR Memory iMac G5 computers work with memory modules (DIMMs) that meet all of these criteria: PC3200, 2.5V, unbuffered, 8-byte, nonparity, 184-pin, 400Mhz DDR SDRAM. There are two RAM slots. The maximum amount of RAM you can install is 2 GB. You can use RAM module sizes of 256 MB, 512 MB and 1 GB, in either slot. DIMMs with any of the following features are not supported in the iMac G5 computer: registers or buffers, PLLs, ECC, parity, or EDO RAM. 18 - iMac G5, 17-inch Troubleshooting General Information Symptom Charts How to Use the Symptom Charts The Symptom Charts included in this chapter will help you diagnose specific symptoms related to the product. Because cures are listed on the charts in the order of most likely solution, try the cures in the order presented. Verify whether or not the product continues to exhibit the symptom. If the symptom persists, try the next cure. Note: If a cure instructs you to replace a module, reinstall the original module before you proceed to the next cure. Symptom Charts iMac G5, 17-inch Troubleshooting - 19 Power Issues No Power. The iMac G5 will not turn on. 1. Refer to the iMac G5 Repair Extension Program for video and power issues mentioned at the beginning of this chapter. 2. Verify power outlet is good. Plug a different device into the socket to ensure there is power, or plug the iMac G5 into another outlet. 3. Check the power cord. Use a known good power cord. 4. Check the connection of the power cord on both ends. Verify that the plug is securely plugged into both the AC outlet and back of the computer. 5. Remove keyboard, mouse, and other peripherals such as speakers. Try starting up the computer with these devices removed. 6. Remove the back cover to access the diagnostic LEDs on the main logic board. See “Diagnostic LEDs” in this chapter for complete instructions on this procedure. 7. Locate LEDs 1 through 4 above the large white arrow in the middle of the main logic board (near the fan cover). 20 - iMac G5, 17-inch Troubleshooting Symptom Charts 8. Plug the power cord into the iMac G5 and into the AC outlet. Check to see if LED #1 is On or Off. • LED #1 is On. This indicates that the power supply is getting good power from the AC outlet. Go to step 8. • LED #1 is Off. This indicates that your power supply should be replaced. Order and install the power supply for your computer. 9. Turn the computer on by using the internal power button. With your finger, or with the nylon probe tool, press the small, metal button. Go on to the next step. Symptom Charts iMac G5, 17-inch Troubleshooting - 21 10. Does the computer start up normally after pressing the internal power button? - Yes: Press and hold the power button until the computer powers off. • Unplug the power cord from the iMac, and reinstall the back cover. • Return the computer to the upright position. • Plug the computer back in, and press the power button to turn on the computer. • Make sure the computer is starting up properly. If the computer will ONLY start up from the internal power but will not power on from the power button on the back cover, the power button on the back cover may be faulty. Go to step 13. - No: Press the SMU reset button to reset system power management. The SMU is the small metal button (shown below) located below the internal power button. 11. After pressing the SMU button, press the internal power button again. Does the computer start up normally now? Yes: Press and hold the power button until the machine powers off. • Unplug the power cord from the iMac, and replace the back cover. • Return the computer to the upright position. • Plug the in the computer, and press the power button to turn on the computer. • Make sure the computer is starting up properly. If the computer will ONLY start up from the internal power but will not power on from the power button on the back cover, this may indicate that the power button on the back cover is faulty. Got to step 13. No: Go to the next step. 12. Unplug the power from the iMac G5 and remove the internal hard drive and set it aside. Plug in the iMac G5, and using the Internal power button as before, power on the iMac G5. Does the iMac G5 start up now? 22 - iMac G5, 17-inch Troubleshooting Symptom Charts Yes: The hard drive needs to be replaced. No: Go to the next step. 13. When pressing the internal power button to power on the computer, does LED #2 come on momentarily, or not at all? Momentarily: The logic board has detected 12v, but the power supply cannot maintain it. Your power supply needs to be replaced. Not at all: Your logic board needs to be replaced. 14. If the computer will ONLY start up from the internal power but will not power on from the power button on the back cover, the back cover may need to be replaced. Unplug the computer and remove the back cover. WIth the back cover removed, plug the power cord back in. Touch and hold an insulated screwdriver to the two contact points shown below: Note: The picture below shows the contact points on the iMac G5 (20-inch) computer. The contact points are in the same location on the iMac G5 (17-inch) computer. Does your computer start up when holding your screwdriver to these two contact points? Yes: This shows that the power button switch is working correctly. The back cover should be replaced. No: This indicates that the power button switch is not working correctly. The logic board should be replaced. Symptom Charts iMac G5, 17-inch Troubleshooting - 23 Loud buzzing, ticking, or whining noise The computer may make a loud buzzing, ticking, or whining noise when it’s on. The sound may vary depending upon screen brightness or processor load. 1. Determine that this noise is related to the computer by removing and shutting down all other devices in the vicinity of the computer that could be causing a sound. 2. Determine if this is a power supply noise. With the iMac G5 on and running, adjust the screen brightness by pressing the F14 and F15 keys on the keyboard. Does the noise change in loudness when adjusting the brightness? Yes: The volume changes when the brightness changes, the noise may be related to the power supply. Replace the power supply. No: If the volume does not change when the brightness changes, the noise is not a power supply issue. Go on to step 3. 3. Quit all applications and test the computer again. 4. Check the volume settings under Sound in System Preferences. 5. Reboot the computer and check the computer again. 6. If the noise still doesn’t go away, contact Apple Technical Support. 24 - iMac G5, 17-inch Troubleshooting Symptom Charts No Video The computer will turn on and there is no picture or color on the display. The boot chime, the fan, and hard drive activity can be heard. 1. Refer to the iMac G5 Repair Extension Program for video and power issues mentioned at the beginning of this chapter. 2. Check if the computer is sleeping. Press the space bar to wake the computer from sleep mode. 3. Did the computer wake from sleep? Yes: Put the computer to sleep from the Apple menu and wake the computer again to test the settings. Check Energy Saver setting to see when the computer has been designated to sleep. No: Continue to the next step. 4. Reset your computer's PRAM (Parameter RAM). • If your iMac is on, turn it off by pressing the power button in until the computer powers off. You should hear the drives and fans go quiet. • Wait for a few seconds. • While the computer is off, with your left hand, hold down the Apple key, the option key next to it, and the letter R. When you have them all pressed push the power button with your right hand and then quickly move that hand to hold down the letter P. Keep the four keys pressed while the computer starts up. • Make sure you hold down the four keys (P-R-Command-Option) while the computer starts up. When you keep all the keys held down, you will hear the startup chime over and over again (about every ten seconds) until you let go. After you hear the second chime, you can let go of the keys. • If you didn't hear at least two startup chimes, go to step one on this page and try again. It's important that you two startup chimes when performing this procedure. This indicates that you have successfully reset the computer's PRAM (Parameter RAM). 5. Does the computer display video after successfully resetting the computer's PRAM? Yes: Problem resolved. Restart the computer from the Apple menu and make sure the computer is starting up properly. No: Continue to the next step. Symptom Charts iMac G5, 17-inch Troubleshooting - 25 6. Remove the back cover to access the diagnostic LEDs on the logic board. 7. With the back cover removed, locate the diagnostic LEDs 1 through 4 above the large white arrow on the main logic board. 8. Plug the power cord into the iMac G5 and into a known good AC outlet. LED #1 should come on if your computer has been starting up properly. If LED #1 is off, see iMac G5: Troubleshooting: No Power for further troubleshooting information. 9. Turn the computer on by using the internal power button. Press the small, metal button under the fan cover as shown. 26 - iMac G5, 17-inch Troubleshooting Symptom Charts 10. When the computer starts up, LED #2 will light after you hear the boot chime indicating the logic board is processing power correctly. If LED #2 does not light, go to step 11 for instructions on resetting the SMU. If LED #2 remains off after resetting the SMU, your logic board needs to be replaced. Order and install the logic board for your computer. 11. LED # 3 will light last indicating that the logic board and LCD assembly have communicated and the LCD is ready to receive video. Does LED #3 come on? Yes: This indicates that your logic board is working correctly to produce video. Continue to step 12. No: Continue to step 11 to reset system power management. 12. Press the SMU reset button to reset system and power management. This is the small metal button below the internal power button as shown. After pressing the SMU button, press the internal power button to start up the computer. Does LED #3 light now? Yes: Press and hold the power button until the computer powers off. Start the computer again and confirm that LED #3 is reliably lighting. Continue to step 14. No: Go to the next step. Symptom Charts iMac G5, 17-inch Troubleshooting - 27 13. Unplug the iMac G5 and remove the SDRAM. Replace with known good SDRAM. Plug the iMac G5 back in and start the unit by pressing the two internal power pins. Does LED #3 light now? Yes: Replace the original SDRAM and test again. If LED #3 does not light with the original SDRAM, replace the SDRAM. No: Continue to next step. 14. Unplug the iMac G5 and remove the optical drive. Plug the iMac G5 back in and start the unit up from the internal power button. Does LED #3 light now? – Yes This indicates the optical drive has failed. Replace the optical drive. – No Replace the logic board. 15. WIth LED #3 on, turn the machine off by holding the internal power button until the unit powers off. Unplug the computer and reinstall the back cover. Return the computer to the upright position. Plug in the computer again and power on the computer. Does the computer have video now? – Yes Restart the computer and make sure that the computer is operating properly. – No Continue to the next step. 16. Turn the display at an angle to you and look closely at the display. Is the display completely black or can you see a dim light or glow to the display? – Completely black: Replace the inverter. – DIm or light glow: Replace the LCD panel. Scrambled or distorted video Refer to the iMac G5 Repair Extension Program for video and power issues mentioned at the beginning of this chapter. 28 - iMac G5, 17-inch Troubleshooting Symptom Charts Display is tinted another color 1. Refer to the iMac G5 Repair Extension Program mentioned at the beginning of this chapter. 2. Reset the parameter RAM. Press Command-Option-P-R keys. When you keep all the keys held down, you will hear the startup chime over and over again (about every ten seconds) until you let go. After you hear the second chime, you can let go of the keys. 3. Does the computer display video after successfully resetting the computer's PRAM? Yes: Problem resolved. Restart the computer from the Apple menu and make sure the computer is starting up properly. No: Continue to the next step. 4. Check for external video. Connect an external monitor to the mini-VGA port. Do you have external video now? Yes: Replace the display panel and then go on to step 4. No: Replace the logic board. 5. After replacing the display panel? Do you have video now? Yes: Problem solved. No: Replace the logic board. Symptom Charts iMac G5, 17-inch Troubleshooting - 29 When displaying a single color over the screen area, the LCD panel shows one or more pixels that are not properly lit Active-matrix LCD technology uses rows and columns of addressable locations (pixels) that render text and images on screen. Each pixel location has three separate subpixels (red, green, and blue) that allow the image to be rendered in full color. Each subpixel has a corresponding transistor responsible for turning the subpixel on or off. There are typically millions of these subpixels on an LCD display. For example, the LCD panel used in the Apple Cinema HD display is made up of 2.3 million pixels and 6.9 million red, green, and blue subpixels. Occasionally, a transistor does not work perfectly, which may result in the affected subpixel being turned on (bright) or turned off (dark). With the millions of subpixels on a display, it is quite possible to have a low number of faulty transistors on an LCD. Therefore, a certain number of subpixel anomalies is considered acceptable. Rejecting all but perfect LCD panels would significantly increase the retail price for products using LCD displays. These factors apply to all manufacturers using LCD technology—not just Apple products. To determine whether or not the display has an acceptable number of pixel anomalies, follow the steps below: 1. Set the display image to one of the following colors: all-white display, all-red display, all-green display, or all-blue display. 2. Using a jeweler’s loupe, pocket microscope, or other magnifying device, identify and count each subpixel anomaly: • Bright subpixel anomaly = subpixel that is always on • Dark subpixel anomaly = subpixel that is always off 3. Important: Check the number of subpixel anomalies with the following chart: LCD Size (inches) 17 to 20 Acceptable Number of Subpixel Anomalies Replace the Display Bright Dark Combination Bright Dark Combination up to 4 up to 6 up to 8 5 or more 7 or more 9 or more 4. If the number of subpixel anomalies exceeds the acceptable number listed in the chart, replace the LCD panel. 5. If the number of subpixel anomalies is acceptable, explain to the customer that the pixel anomalies are within specifications, and no repair is necessary. Important: Do not release the specifications to customers. Instead, inform them that a certain number of subpixel anomalies is considered acceptable, and these factors apply to all manufacturers using LCD technology—not just Apple products. 30 - iMac G5, 17-inch Troubleshooting Symptom Charts Hard Drive In a hard drive failure, the computer fails to boot to the desktop and may display a flashing question mark, or an alternating question mark and Mac OS (face o a folder) 1. Restart the computer with the Apple Hardware Test (AHT) disc that came with the computer. Run the Quick/Extended test. 2. Does the Apple Hardware Test test pass? Yes: Run Disk repair from the Install CD that came with the computer. No: Replace the component indicated by Apple Hardware Test, go on to the next step. 3. Does the computer start up properly now? Yes: Problem resolved. No: Reinstall system software. Go on to the next step. 4. Does the computer start up properly now? Yes: Problem resolved. No: Replace the hard drive. Does the computer work now? – Yes: Problem resolved. – No: Replace the logic board. System hangs during normal startup process 1. Boot from the system CD that came with the computer and see if the hard drive mounts on the desktop. 2. Using Drive Setup, reinstall the system software drivers for the hard drive. 3. Using Drive Setup, reinitiation the hard drive. 4. Check all cable connections to and from the hard drive. 5. Replace the hard drive. 6. Replace the logic board. Symptom Charts iMac G5, 17-inch Troubleshooting - 31 Flashing question mark appears on the screen 1. Boot from the system CD that came with the computer and see if the hard drive mounts on the desktop. 2. Launch Drive Setup. Reinstall the system software drivers for the hard drive. 3. If no hard drive is found in Drive Setup, verify the hard drive cable connections. 4. Reinstall system software. Backup the data first. 5. Reinitialize the hard drive. 6. Replace the hard drive. 7. Replace the logic board. Optical Drive CDs or DVDs don't show up on my desktop. 1. The first thing we should check is whether your drive can read discs normally. Try inserting an audio CD and check whether it shows up on your desktop or launches iTunes. Then eject it and insert the iMac Software Install and Restore disc that came with your computer. Are either of these discs recognized by the computer? Yes: It seems that some discs will show up on your Desktop, so the drive is OK - the problem is the individual discs that don't appear. Try cleaning these discs, and make sure they're in a format that can be read by your computer. No: So no disc will show up on your desktop. Go ahead and leave the iMac Software Install and Restore disc in your drive, and we're going to try a process that involves restarting your computer. Follow the instructions, below. – 1. Leave the iMac Install and Restore disc in the drive. – 2. Go to the Apple menu and choose Shut Down. – 3. Once the computer has shut down, hold down the OPTION button and press the power button to start the computer up again. – 4. You will see a blue background, a curly arrow and a right arrow, and between them is a button with the name of your hard drive. Wait about thirty seconds to see if another button comes up with the name iMac Software Install and Restore. – 5. After waiting about thirty seconds, choose the button with your hard drive's name, and click the right arrow button. – 6. The computer will start up normally. Open your browser and go back to the Apple support page at: www.apple.com/support” 2. When you were looking at the button with your hard drive's name on it, did a button with the iMac Software Install and Restore ever appear? Yes: The fact that the disc appeared there means your drive does know that a disc is in it. Let's check some system settings to see if they're the reason the discs don't appear. 32 - iMac G5, 17-inch Troubleshooting Symptom Charts No: The next thing to check to make sure the computer realizes the drive is there. From the Apple menu, choose About This Mac. From the window that pops up, click on More Info. An application called System Profiler should open. In System Profiler, in the column on the left, look under Hardware for a line called SATA. In the section on the right, you should see a header saying “S-ATA” and below it, two items. The first is your hard drive. The second is your optical drive. Do you see two items here? – Yes: Even after checking for the drive in the startup manager, discs won't show up. This indicates that your optical drive needs to be replaced. – No: Reseat the optical drive and check System Profiler again. Does the optical drive appear this time? If no, go on to the next step. If yes, it looks like the drive connection may not have been too great, but you've got it plugged in properly now. 3. Replace the optical drive. 4. Replace the logic board. The computer won’t burn discs. 1. The first thing we should check is whether your drive can read discs normally. Try inserting an audio CD and check whether it shows up on your desktop or launches iTunes. Then eject it and insert the iMac Software Install and Restore disc that came with your computer. Are either of these discs recognized by the computer? Yes: This is a good sign. So do you get a specific error message or error code when you try to burn a disc? Go on to step 2. No: So no disc will show up on your desktop. Go ahead and leave the iMac Software Install and Restore disc in your drive, and we're going to try a process that involves restarting your computer. Follow the instructions, below. – 1. Leave the iMac Install and Restore disc in the drive. – 2. Go to the Apple menu and choose Shut Down. – 3. Once the computer has shut down, hold down the OPTION button and press the power button to start the computer up again. – 4. You will see a blue background, a curly arrow and a right arrow, and between them is a button with the name of your hard drive. Wait about thirty seconds to see if another button comes up with the name iMac Software Install and Restore. – 5. After waiting about thirty seconds, choose the button with your hard drive's name, and click the right arrow button. – 6. The computer will start up normally. Open your browser and go back to the Apple support page at: www.apple.com/support” 2. Which of these error messages do you see? • Unknown Error -2147352480: See Knowledge Base article 25480 and 25750 for more information. • Buffer underrun error: See Knowledge Base article 25480 and 25750 for more Symptom Charts iMac G5, 17-inch Troubleshooting - 33 information. • Unknown Error: If you see “Unknown Error”, without “-2147352480”, you will want to see Knowledge Base article 152224 for more information. • None of these alert messages: Is your disc drive the one inside the iMac, or is it attached to the iMac by a USB or FireWire cable? – Inside the Mac: Go on to step 3. – Attached by a cable: Go on to step 4. 3. So you can see other discs, it's just that they don't burn. Have you tried discs of other brands? Sometimes certain discs won't burn, either because of quality or because they're damaged or old. Try purchasing a different brand of discs and test to see whether these discs will burn. Do the new discs burn correctly? Yes: Great! It looks like the issue can be isolated to the old discs you were using. For whatever reason, they don't seem to be working, so you'll want to use the new discs from now on. No: So your new discs didn't work either. What sort of disc are you trying to burn - is it a CD or a DVD? – CD: You said you're having problems burning CDs. Let's try an easy question first. In your Finder, open a window and select your hard drive. At the bottom of the window, does it say you have at least a gigabyte (1 GB) free? If no, go to step 5. – DVD: The first thing we should check is whether your drive can read DVDs normally. Try inserting the iMac Software Install and Restore disc that came with your computer. If you still have problems, go to step 6. 4. We don't have the capacity to troubleshoot an external drive - if you are having problems with a drive other than the internal one, you will need to talk to the manufacturer of that drive. 5. When the computer burns a CD, it needs some free space on the hard drive for it to do what it needs to do when it burns a disc. Try freeing up some space by emptying trash and deleting unneeded items. Once you have at least one gigabyte free and you've emptied the trash, try burning a disc again. Does it burn correctly now? Yes: Problem solved. No: When you try to burn a CD, are you burning a disc from the Finder, from iTunes, or from a different application? Refer to Knowledge Base articles 151904, 150293,151701, and 153426 for disc burning issues. Does it burn a disc now? – Yes: Problem solved. – No: Go on to the next step. 6. Reinstall the system software. Print Knowledge Base article 151641 and follow the steps. Try burning a disc again. Did the disc burn correctly? Yes: Problem solved. No: Replace the optical drive. Does it burn correctly now? – Yes: Problem solved. – No: Replace the logic board. 34 - iMac G5, 17-inch Troubleshooting Symptom Charts Inserting Discs Issue 1. Is there a disc already in the drive? Refer to Knowledge Base article 106752, “Macintosh: How to Eject a Disc When Other Options Do Not Work”. 2. Check System Profiler. In System Profiler, in the column on the left, look under Hardware for a line called S-ATA. In the section on the right, you should see a header saying “S-ATA” and below it, two items. The first is your hard drive. The second is your optical drive. Do you see two items here? Yes: Problem solved. Run diagnostics and trying inserting a disc again. No: Remove the back cover and reseat the optical drive. Can you insert a disc now? – Yes: Problem solved. – No: Replace the optical drive. If this doesn’t solve the problem, go on to the next step. 3. Replace the logic board. Optical disc constantly ejects 1. Disconnect all peripheral devices, especially the mouse in cases where the disc is constantly ejecting. 2. Try cleaning the disc. If it is dirty or scratched, it may not mount. 3. Try a different disc. 4. Boot from Apple Hardware Test (hold down the “C” key at startup) or boot from the system install CD (use Startup Manager, hold down the Option key at startup). 5. Perform a clean install with the CD that came with the computer. 6. Reseat the optical drive. 7. Replace the optical drive. 8. Replace the miplane assembly. Symptom Charts iMac G5, 17-inch Troubleshooting - 35 Fan Sound Loud fan noise coming from inside the computer The grill on the bottom of the iMac G5 lets a trio of fans draw cool air into the system. Advanced thermal software spins the fans fast or slow as needed, passing the heated air through a slit on the back cover. As the system usage increases, the fans will adjust their speed using advanced thermal software to meet the cooling needs of the system. Accumulating dust can obstruct the flow of air through the system causing the fans to run faster than normal. In severe cases the system may overheat and unexpectedly shut down. Under normal conditions, rotating fans will make a slight hum that varies in relationship with their rotational speed and the amount of air that they are moving. In addition, the normal functioning of the hard drive and optical drive will generate additional whirring and scratching sounds that may be audible. All of these sounds are normal and do not indicate a failure with your computer. To begin troubleshooting a possible fan issue, we need to qualify the sound that you’re experiencing. 1. Does the sound occur only under specific light/heavy usage conditions? Yes: CPU intensive applications such as iTunes, Garage Band, DVD Player, etc., or two or more applications open at once will cause the fans to run at an increased rate making them more noticeable. If the sound only occurs when one or more of these applications is running, this is normal. No: If the sound isn’t affected by CPU intensive application it may be due to other factors. Go on to the next step. 2. Is the sound always present, or does the sound vary? The sound is always present: The normal functioning of the hard drive and optical drive will generate additional whirring and scratching noises that may be audible. Let’s see if this sound is related to one of the components. Go to step 4. The sound varies: Under normal conditions rotating blowers will make a slight hum that varies in relationship with their rotational speed and the amount of air that they are moving. Let's see if this is indeed the case. Go to Next Step. 3. Are the fans making a normal humming sound that increases/decreases in relation to processor usage? As the fans increase their speed to cool the system the sound level will increase. Launch the Activity Monitor application included with Mac OS X in the Utilities folder to determine whether the noise corresponds with heavy usage of the CPU. Does fan activity increase / decrease with the CPU Usage graph in Activity Monitor? Yes: As the system CPU usage increases, the fans will adjust their speed using advanced thermal software to meet the cooling needs of the system. As the fans 36 - iMac G5, 17-inch Troubleshooting Symptom Charts increase their speed to cool the system the sound level will increase. This is normal operation and none of your fans require replacement. Refer to the “Heatsink Cleaning Procedure” that follows to determine whether dust accumulating in the heatsink cooling fins may be causing the fans to run faster than normal. No: If the fan activity does not coincide with CPU usage, the sound you're hearing may not be fan activity. Go to the Next Step. 4. The normal functioning of the hard drive and optical drive will generate additional whirring and scratching noises that may be audible. We can isolate these noises by booting the computer to the iMac G5 Install Mac OS X Install Disc 1. - Place the disc in the drive, and restart your machine, holding down the “C” key as the machine starts up. - Once at the Installer window, choose Open Disk Utility from the Installer Menu. - Once Disk Utility is open, select your Macintosh HD and on the toolbar choose Unmount. Note: if you have multiple partitions, you should unmount each of these partitions. This will spin down the hard drive. The optical drive will also be busy at this time; wait a moment for the optical drive to spin down also and then listen to the machine. Is the sound that you've been experiencing still present? Yes: With the hard drive and optical drive inactive, all you should be hearing are the fans in the machine. While booted to the CD, these fans should be running at a lower level since the CPU is under very little task with both drives inactive. Fan sound that includes objectionable ticking, whistling, or squealing may require further investigation and/or replacement of the particular fan. Go on to the Next Step. No: The normal functioning of the hard drive and optical drive will generate additional whirring and scratching sounds that may be audible. All of these sounds are normal and do not indicate a failure with your machine. If you wish to check the health of your hard drive, see article 152349 - Replacing a disk before it fails. 5. Symptom Charts Power off your computer, remove the power cord and any other cables that are connected to your computer and remove the back cover. iMac G5, 17-inch Troubleshooting - 37 6. With the cover off, plug the computer in and start it up by pressing the internal power button. - As the machine starts up, listen carefully to each of the fans, and see if you can locate one of the three fans of which the objectionable ticking, whistling, or squealing sound is coming from. Can you pinpoint the fan making the sound? Yes: If the sound is coming from one of the fans near the hard drive, you can order and install the Upper Fan kit for the computer. If the sound is coming from the fan near the power supply of your computer, you should order the lower fan. No: If you can hear an objectionable ticking, whistling, or squealing sound, but you cannot identify the source of the sound, contact Apple Technical Support. 38 - iMac G5, 17-inch Troubleshooting Symptom Charts Heatsink Cleaning Procedure Dust drawn in through the intake grill on the bottom of the iMac can gradually accumulate, eventually degrading the cooling performance of the heatsink by obstructing the air flow. 1. Before you begin, remove the back cover and the midplane assembly. 2. Remove the lower fan from it’s mounting bracket to expose the heatsink cooling fins. Note: The lower fan does not need to be disconnected from the logic board. 3. With the lower fan removed, carefully inspect the heatsink intake for visible dust contamination as shown below. If the heatsink appears free of dust then reinstall the lower fan, assemble the system, and retest the computer. If there is visible dust, proceed to the next step. Symptom Charts iMac G5, 17-inch Troubleshooting - 39 4. If the dust has accumulated on the cooling fins then use compressed air from a can or an air compressor to blow the dust from the heatsink as shown below. 5. Inspect the lower fan and use the compressed air to clean it out if needed. 6. Inspect the lower grill on the iMac front bezel and clean if needed. 7. Reassemble the computer and retest. Fans are running at a constant high speed If the fans on the system are running at a constant high speed, or ramp very quickly to high speed and do not vary this speed once reached, the fans are most likely receiving incorrect thermal input. In these cases you should use the following steps to resolve: 1. Reset the SMU (refer to “Resetting the SMU” mentioned earlier in this chapter) and then test to see if the fans still exhibit the issue. 2. Boot from the iMac G5 Install DVD or another iMac G5 of the same type in FireWire Target disc mode and see if the issue persists. If the fans run normally here, reinstall the system software. Be sure to give the system enough time to recreate the issue when booted to these other volumes. 3. Verify that the hard drive sensor cable is plugged in correctly. If necessary, replace the hard drive sensor cable. 4. Replace the hard drive (the hard drive includes the sensor on the hard drive carrier. 5. Replace the main logic board. 40 - iMac G5, 17-inch Troubleshooting Symptom Charts AirPort Not able to connect wirelessly with AirPort 1. From the Apple menu, choose About this Mac. 2. Click on More Info. System Profiler should open. 3. In System Profiler, in the column on the left, look under Hardware for a line called “AirPort Card”. Select that line. 4. Does the section to the right say “No Information Found”? Yes: It looks like your computer doesn't realize it has an AirPort card installed. Go on to step. 5 No: It looks like your iMac recognizes that it has an AirPort Card installed. Go on to step 6. 5. Remove the back cover and reseat the AirPort Extreme card. Check System Profiler again to see if the computer sees the AirPort card. Does it recognize the card now? Yes: Problem solved. No: Replace the AirPort Extreme card. 6. Now that we know your iMac recognizes your AirPort card, check your antenna. If the AirPort antenna is not plugged in all the way, you may have very short AirPort range. 7. Remove the back cover. Reconnect the antenna cable to the AirPort card. Press the antenna connector firmly, to make sure it's fully connected to the iMac. You should be ready to go wireless now. 8. If your antenna is plugged in properly and your AirPort card is recognized there are a number of other things that could cause issues with wireless networking. Refer to Knowledge Base document 106858 for more networking information. 9. Replace the AirPort card. 10. Replace the AirPort antenna. 11. Replace the logic board. Symptom Charts iMac G5, 17-inch Troubleshooting - 41 My AirPort signal seems to be very week 1. Check your antenna. If the AirPort antenna is not plugged in all the way, you may have very short AirPort range. 2. Remove the back cover. Reconnect the antenna cable to the AirPort card. Press the antenna connector firmly, to make sure it's fully connected to the iMac. Replace the cover and reconnect the power cord. 3. Try connecting to your wireless access point now. Did your reception improve? Yes: It looks like the AirPort antenna had not been plugged in all the way. You should be ready to go wireless now. No: It continues like your antenna is plugged in properly and your AirPort card is recognized. However, there are a number of other things that could cause issues with wireless networking. Refer to Knowledge Base document 106858 for more networking information. 4. Replace the AirPort card. 5. Replace the AirPort antenna. 6. Replace the logic board. 42 - iMac G5, 17-inch Troubleshooting Symptom Charts Speakers I don’t hear sound from the speakers. 1. Press the F5 button on your keyboard. It has a sound icon on it. Do you hear sound now? Yes: It looks like your volume was muted. When this happens again, just press the F4 and F5 keys to regulate your volume. No: Are there any external microphones, speakers or headphones plugged into the iMac? If yes, go on to step 2. If no, go on to step 3. 2. Disconnect your external microphones, speakers, or headphones. Do you hear sound now? Yes: It looks like the built-in speakers are working properly. Now try plugging in a different set of speakers or headphones. Go on to step 4. No: Unplug any USB devices you have plugged into your iMac except the mouse and keyboard. Do you hear sound now? Go on to step 3. 3. Unplug any USB devices you have plugged into your iMac except the mouse and keyboard. Do you hear sound now? Yes: It sounds like you may have a USB Audio device plugged into your iMac such as a USB microphone adapter or USB speakers. Please work with the manufacturer to troubleshoot this issue. No: Reset your computer's PRAM (Parameter RAM), which stores settings for sound and go to step 5. 4. With new speakers or headphones plugged in, do you have audio? Yes: It appears that the issue may be with the external microphone, speakers or headphones that were plugged into your iMac originally. Work with the manufacturer to troubleshoot the speakers or headphones No: It looks like there may be something wrong with the audio output port on your iMac. Replace the logic board. 5. After resetting the PRAM, do you hear sound now? Yes: Test the audio again. Open System Preferences and check the Sound icon. Make sure the preferences are set correctly. Problem resolved. No: Replace the logic board Symptom Charts iMac G5, 17-inch Troubleshooting - 43 I hear sound out of only one speaker. 1. Are there any external microphones, speakers or headphones plugged into the iMac? Yes: Disconnect any external microphones, speakers, or headphones. Do you hear audio from both of the built in speakers on your iMac? – Yes: Good. It looks like the built-in speakers are working properly. This may be an issue with the microphone, speakers or headphones that were plugged into your iMac. Please work with the manufacturer to troubleshoot this issue. – No: Go to step 2. No: Check your speaker balance. If your balance setting was set to the left or right speaker, you would only hear sound from one speaker. Go to step 2. 2. Open System Preferences. (System Preferences can be found under the Apple menu.) 3. Click once on the sound icon. 4. Click once on the Output tab. 5. Make sure your balance setting is in the middle. After adjusting the audio balance, do you have audio from both speakers now? Yes: It looks like the issue was the balance was not set properly. No: Replace the logic board. Mouse My mouse doesn’t work at all. 1. Try using the mouse on another surface. Non-reflective, opaque surfaces without repetitive patterns work best. The surface should be clean, but not shiny. 2. Unplug any USB devices plugged into your computer, other than the Apple Mouse and Apple Keyboard. 3. Try another known good USB mouse. 4. Replace the mouse. 5. Replace the logic board. My mouse works intermittently (the cursor freezes randomly). 1. Unplug any USB devices plugged into your computer, other than the Apple Mouse and Apple Keyboard. 2. Reconnect the USB devices one by one and test your mouse after each to figure out which device is causing the issue. Once you have isolated the “problem child” that isn't playing well with others, you will want to contact the manufacturer of that device to see if they have any suggestions or assistance. 44 - iMac G5, 17-inch Troubleshooting Symptom Charts 3. Try a known good USB mouse. 4. Replace the mouse. 5. Replace the logic board. The mouse is slow to respond. 1. Try putting the mouse on a different surface - an opaque surface with no patterns is best. 2. Adjust the settings on the mouse. – Choose Apple menu > System Preferences and click Keyboard & Mouse. – Click Mouse. – Drag the Tracking Speed slider to select how fast the pointer moves. Drag the Double-Click Speed slider to set how fast you have to double-click. 3. If the mouse still doesn’t work, insert the iMac Software Install and Restore disc that came with your computer. Shut the computer down and then start it up while holding down the letter “c” on the keyboard. Does the mouse work when the computer is started up from this disc? 4. Try a known good USB mouse. 5. Replace the mouse. 6. Replace the logic board. Keyboard None of the keys on my keyboard work. 1. Unplug all devices from your computer, including your mouse and keyboard as well as printer, scanner, external hard drives, and hubs. (Warning: Some devices may require you to perform steps before it is safe to unplug them, e.g, external storage devices.) Be sure to unplug your hub, if you have one. 2. Plug your keyboard into the back of your computer firmly and securely. Plug your mouse into the back of your computer firmly and securely. Take special care to make sure the connector is completely in the socket. Go on to step 3. 3. Does your keyboard work now? Yes: Problem solved. No: Unplug your keyboard and plug it into another USB slot on the back of your iMac Does it work now? – Yes: Replace the logic board. – No: Unplug your keyboard and plug your mouse into the port the keyboard just occupied. Go on to step 4. 4. Does your mouse work now? Yes: Replace the keyboard. Symptom Charts iMac G5, 17-inch Troubleshooting - 45 No: Replace the logic board. Certain keys don't work. 1. Unplug all devices from your computer, including your mouse and keyboard as well as printer, scanner, external hard drives, and hubs. (Warning: Some devices may require you to perform steps before it is safe to unplug them, e.g, external storage devices.) Be sure to unplug your hub, if you have one. 2. Plug your keyboard into the back of your computer firmly and securely. Plug your mouse into the back of your computer firmly and securely. Take special care to make sure the connector is completely in the socket. (Note that USB plugs can only work one way up, and if you try them upside-down they won't slide together properly.) Go on to the next step. 3. Does your keyboard work now? Yes: Problem solved. No: Unplug your keyboard and plug it into another USB slot on the back of your iMac Does it work now? – Yes: Replace the logic board. – No: Unplug your keyboard and plug your mouse into the port the keyboard just occupied. Go on to step 4. 4. Does your mouse work now? Yes: Replace the keyboard. No: Replace the logic board. My keys are sticky or slow to respond. 1. Try a known good keyboard. 2. Open System Preferences. Click on the keyboard and mouse icon. Adjust the “key repeat speed and delay until repeat” rate. 3. Replace the keyboard. 46 - iMac G5, 17-inch Troubleshooting Symptom Charts When I type, strange characters appear on the screen. 1. Depending on your iMac's settings, a simple keystroke can change your keyboard from English to Japanese. This can result in some pretty funny characters showing up when you type. To switch to the US keyboard, 2. Open System Preferences. 3. Click on the International icon. 4. Click on the Input Menu near the top of the screen. 5. Scroll down the list and uncheck any non-US keyboard layouts. 6. Close the System Preferences. Try typing a few characters. Did is solve the problem? Yes: Problem solved. No: Replace the keyboard. The USB port on my keyboard doesn't work. 1. Unplug all devises from your keyboard. 2. Plug your Apple mouse into the left USB port on your keyboard. Does your mouse work when it's plugged into this port? Yes: Now plug the mouse into the right port. Does it work? – Yes: Try a known good keyboard. – No: Try a known good mouse to rule out the mouse. Then go to step 3. No: Try a different mouse or keyboard. 3. Now unplug the keyboard from the USB port on the back of the iMac, and plug the mouse into the port the keyboard had been in. Does the mouse work now? Yes: Replace the keyboard? No: It appears that your USB port isn't functioning properly. Go on to step 4. 4. Replace the logic board. Error Beep(s) Computer beeps at startup. 1. Check that the memory DIMMs are iMac G5 compliant. iMac G5 computers work with memory modules (DIMMs) that meet all of these criteria: PC3200, 2.5V, unbuffered, 8byte, nonparity, 184-pin, 400Mhz DDR SDRAM. There are two RAM slots. The maximum amount of RAM you can install is 2 GB. You can use RAM module sizes of 256 MB, 512 MB and 1 GB, in either slot. DIMMs with any of the following features are not supported in the iMac G5 computer: registers or buffers, PLLs, ECC, parity, or EDO RAM. Symptom Charts iMac G5, 17-inch Troubleshooting - 47 2. Reseat the memory into the slot. 3. Replace the memory. 4. Replace the logic board. USB A USB device doesn’t work 1. Please unplug all of your USB devices from your iMac except your Apple Keyboard and Apple mouse. 2. Now plug your device directly into the back of your iMac. Does it work as expected now? Yes: Your device works when plugged directly into the computer. This indicates a conflict with one of the other USB devices. You can test by gradually adding your devices back and seeing where the issue occurs, then contacting the manufacturer of the device(s) for assistance. No: Unplug your device from the iMac and plug the keyboard into the port your device just occupied. Is your keyboard still working? – Yes: Your Apple Keyboard works when plugged into the USB port your device was plugged into. This points to an issue with your device. Please review the documentation that came with your device. Install any necessary drivers and contact the manufacturer of your device for assistance. – No: Replace the logic board. I see a message saying not enough power to function. It appears that this device needs to be plugged into the computer's USB port, rather than the keyboard USB port. Any USB device connected to the keyboard needs to be either a self-powered device (a USB device with its own AC power supply), or a low-power device (a device that does not need a large amount of voltage to operate). Your device may draw more power than the keyboard can provide. 48 - iMac G5, 17-inch Troubleshooting Symptom Charts Symptom Charts iMac G5, 17-inch Troubleshooting - 49 Service Source Views iMac G5, 17-inch © 2005 Apple Computer, Inc. All rights reserved. iMac G5 (17-inch) Back Cover 076-1113 Non PFC 076-1114 PFC Microphone 076-1178 Speakers 076-1177 Light Pipe w/Gasket 922-6797 Cover, Inverter 922-6794 Inverter w/o Cover 661-3294 Cable, Hard Drive Sensor 922-6790 Cable, Hard Drive, Data, PATA 922-6791 Cable, Hard Drive Data, PATA 922-6788 Cable, Hard Drive, Power, PATA 922-6792 Cable, Hard Drive Power, SATA 922-6789 Kit, Upper Fan 076-1183 Cover, Heatsink, G5 922-6805 Duct, Air Deflector, Hard Drive 922-6798 Card, Modem, Soft 922-6492 Logic Board 661-3597 1.8 GHz 661-3596 1.6 GHz 661-3595 1.6 GHz (No optical, Education) SDRAM 661-3286 256 MB, DDR 400 661-3287 512 MB, DDR 400 661-3288 1.0 GB, DDR 400 Power Supply 661-3290, PFC Optical Drive 661-3272 Super Drive 661-3271 Combo Drive Fan, Lower 922-6787 AirPort Card 661-3045 AirPort Card Holder 922-6799 AirPort Antenna 922-6793 BlueTooth Card 922-6871 BlueTooth Antenna 076-1179 Microfoam shim (Location only, item not shown) 922-7671 iMac G5 (17-inch) Hard Drive 661-3342 40 GB, PATA 661-3341 80 GB, SATA 661-3340 160 GB, SATA 661-3347 250 GB, SATA Fan Cover 076-1104 Chassis 922-6828 Panel, w/Brackets 661-3598 Front Bezel, w/o Display 922-6795 w/o Optical Slot 922-6796 w/Optical Slot iMac G5,17-inch Views - 1 Screw Matrix and Part Numbers iMac G5 (17-inch) Note: These are not to scale. 922-6659 922-6661 922-6662 • Video cable to midplane (2) Phillips #1 • Fan cover to hard drive (1) • Chassis to front bezel (4) 922-6665 922- 6666 922-6668 • Inverter to chassis (1) • Optical drive to midplane (3) • Logic board to chassis to front bezel (3) • Hard drive bracket to chassis (3) 922-6802 922-6850 922-6856 • Fan cover to midplane (1) • Speaker, Right, (1) T10 • LCD Panel • Logic Board to midplane T10 2 - iMac G5, 17-inch Views Screw Matrix and Part Numbers 922- 922-6842 922- 6846 • Modem (2) T6 • Bluetooth (2) T6 • AirPort Guide (2) T6 • AirPort antenna (1) • Heatsink pad to chassis • T10 922-6851 Speaker, Left (2) T10 Screw Matrix and Part Numbers iMac G5,17-inch Views - 3 Screw Locators To Access the Optical Drive 4 - iMac G5, 17-inch Views Screw Locators To Access the Inverter Screw Locators iMac G5,17-inch Views - 5 To Access the Fan Cover 6 - iMac G5, 17-inch Views Screw Locators To Access the Hard Drive Screw Locators iMac G5,17-inch Views - 7 To Access the Display/Bezel-Part 1 8 - iMac G5, 17-inch Views Screw Locators To Access the Display/Bezel-Part 2 Screw Locators iMac G5,17-inch Views - 9 To Access the Midplane Assembly-Part 1 10 - iMac G5, 17-inch Views Screw Locators To Access the Midplane Assembly-Part 2 Screw Locators iMac G5,17-inch Views - 11 Service Source Repair Extension Program iMac G5 (17-inch) © 2005 Apple Computer, Inc. All rights reserved. Repair Extension Program for Video and Power Issues Apple has announced the iMac G5 Repair Extension Program (REP) for Video and Power Issues that covers first-generation 17-inch and 20-inch iMac G5 models that have videoor power-related symptoms as a result of a specific component failure. Instructions and CompTIA Codes to use specifically for repairs covered under the iMac G5 REP for Video and Power symptoms are provided in this section. Overview The iMac G5 REP for Video and Power Issues covers first-generation 17-inch and 20-inch iMac G5 models that exhibit one of the following video- or power-related symptoms: – Scrambled or distorted video – No video – No power NOTE: Only the Non-PFC* power supplies sold in Canada, Japan and the U.S. are eligible for coverage under the iMac G5 REP for Video and Power Issues. The universal** power supplies used in Asia-Pac and Europe are not affected by the issues covered under this program. * Non-PFC power supplies can only be used in certain countries (Canada, Japan and the U.S.); they support only 100 VAC - 120 VAC. ** Universal power supplies can be used worldwide; they support 100 VAC - 240 VAC. The program covers affected iMacs for up to two years from the original date of purchase. Apple will continue to evaluate the repair data and will provide further repair extensions as needed. iMac G5 (17-inch) Repair Extension Program - 1 Eligible Products The program is available for first generation iMac G5 models that were sold between approximately September 2004 and June 2005 featuring 17- and 20-inch displays with 1.6GHz and 1.8GHz G5 processors. 1. The affected iMac G5 computers have serial numbers where the first five (5) digits fall into the ranges noted below: – W8435xxxxxx - W8522xxxxxx – QP435xxxxxx - QP522xxxxxx – CK435xxxxxx - CK522xxxxxx – YD435xxxxxx - YD522xxxxxx Note: The iMac G5 REP for Video and Power Issues is based upon the system's serial number and the symptoms diagnosed, not upon the serial numbers of the logic boards or power supplies. 2. The affected iMac G5 models have EMC codes 1989 and 2008. The EMC number (EMC No.) is located on the label on the bottom of the iMac stand. iMac G5 (17-inch) Repair Extension Program - 2 Note: Only first generation iMac G5 models are eligible for the repair extension program. Generation First Second EMC No. iMac model 1989 17-inch iMac G5 2008 20-inch iMac G5 2055 17-inch iMac G5 (Ambient Light Sensor) 2056 20-inch iMac G5 (Ambient Light Sensor) . Note: Customers are responsible for the repair cost of any accidental or cosmetic damage, or for any issues that do not relate directly to the specific logic board or power supply issues covered by this program. For example, if an iMac is taken to an Apple service provider with a cracked display and a component failure eligible under the program, Apple will cover the component failure repair, but the cost of replacing the cracked display is the customer's responsibility. Repair Strategy Required service parts for this program are available so that certified technicians may create a repair at an Apple service provider location. WARRANTY REPAIRS: If an iMac product eligible for this program is currently covered by an Apple warranty or extended service agreement, create the repair in the usual manner. However, it is extremely important that you select the CompTIA Code(s) created for this program (see below) for the repair. OUT-OF-WARRANTY REPAIRS: Until further notice, Apple asks that service providers in all regions that use GSX select the “Mark for Review” checkbox on all out-of-warranty Carry-In repairs created for iMac products eligible for coverage under this repair extension program. In addition, it is extremely important that you select the CompTIA Code(s) created for this program (see below) for the repair. Troubleshooting If a computer falls within the serial number range noted under “Eligible Products” and exhibits the symptoms noted under “Overview”, inspect the capacitors on the logic board for signs of bulging and/or venting. If the logic board has bulged or vented capacitors, the logic board should be replaced. If the logic board has bulged or vented capacitors, the power supply should also be inspected. If the power supply has a specific part number and AC input value, it should also be replaced. iMac G5 (17-inch) Repair Extension Program - 3 Replacement Parts If a logic board and/or power supply must be replaced, order on a like-for-like basis only. The following parts are eligible to be replaced under this repair extension program: • 661-3595 Board, Logic, 1.6GHz, No Optical, iMac G5 17" • 661-3596 Board, Logic, 1.6GHz, w/Optical, iMac G5 17" • 661-3597 Board, Logic, 1.8GHz, w/SuperDrive, iMac G5, 17" • 661-3599 Board, Logic, 1.8GHz, w/SuperDrive, iMac G5, 20" * 661-3350 Power Supply, Non-PFC (iMac G5 20") [only applies to units sold in US/Canada/Japan] * 661-3351 Power Supply, Non-PFC (iMac G5 17") [only applies to units sold in US/Canada/Japan] * Effective September 12, 2005, these power supply replacements will be excluded from Service Excellence measurement (in applicable regions). In addition, all first-generation iMac G5 power supplies are no longer available as Do-It-Yourself (DIY) parts. The parts listed above are the only approved logic board and power supply replacements for repairs covered under the iMac G5 REP for Video and Power Issues. Apple will charge service accounts for any parts ordered for repairs involving units eligible for the iMac G5 REP for Video and Power Issues that are not related to this program and are not covered by warranty or an extended AppleCare service agreement. Special CompTIA Codes Apple has created the following two CompTIA Codes to use for repairs on iMac products eligible for coverage under the iMac G5 REP for Video and Power Issues: • Use CompTIA Code 560: iMac G5 MLB/Power Supply REP when replacing a logic board, whether or not the iMac is covered by warranty or an extended service agreement • Use CompTIA Code 660: iMac G5 MLB/Power Supply REP when replacing a power supply, whether or not the iMac is covered by warranty or an extended service agreement If it's necessary to replace both the logic board and power supply, use both CompTIA Codes. iMac G5 (17-inch) Repair Extension Program - 4 European IMCs For repairs covered under the iMac G5 REP for Video and Power Issues, IMCs in Europe must order logic boards as stock parts using the part numbers listed above. To receive credit for the covered logic boards ordered as stock parts, IMCs must request an RMA number from the SPS team and return the defective parts to Apple with the RMA number. Japan Service providers in Japan who create a Mail-In Repair for iMac products eligible for coverage under the iMac G5 REP for Video and Power Issues should ALWAYS select CompTIA Code 660: iMac G5 MLB/Power Supply REP in GSX, whether the repair is related to the logic board, power supply, or both. WARRANTY REPAIRS: If an iMac product is currently covered by an Apple warranty or extended service agreement, create the Mail-In Repair in the usual manner. OUT-OF-WARRANTY REPAIRS: Until further notice, Apple asks that service providers select the “Mark for Review” checkbox on all out-of-warranty Mail-In repairs created for iMac products eligible for coverage under this repair extension program. Latin America Latin America service providers should order parts for this repair extension program in the usual manner. More information concerning the iMac G5 REP for Video and Power Issues is available in the Repair Extension Programs section of the Apple Authorized Service Programs Manual (Canada/Europe/US). iMac G5 (17-inch) Repair Extension Program - 5 Troubleshooting Video Issues Video Symptoms Affected computers will exhibit one or more of the following: • Scrambled or distorted video • The system intermittently freezes or crashes • The system may crash during the boot process with the fans running at full speed Repair Procedure 1. Verify that the system is eligible for the REP program. Refer to the topic “Eligible Products” mentioned earlier in this section. 2. If the computer is eligible, remove the rear cover on the iMac G5 so that the main logic board is visible. 3. Inspect the capacitors (highlighted below) on the logic board, looking for signs of bulging and/or venting. iMac G5 (17-inch) Repair Extension Program - 6 4. Affected capacitors will have a “+” sign stamped into the top of the capacitor. Note: Not all capacitors stamped with a “+” sign are faulty, so further inspection is required to determine whether one or more of the capacitors are faulty. 5. Failed capacitors will no longer have a flat top and can be identified by signs of bulging (shown below) and/or venting. The top may bulge upward. In severe cases the top of the capacitor may show signs of electrolyte venting which appears as a small amount of cream-colored paste around the top of the capacitor. One or both of these symptoms indicates that the capacitor has or will likely fail. Warning: Use caution when handling failed electronic components, and be sure to wash your hands afterwards. iMac G5 (17-inch) Repair Extension Program - 7 6. If the logic board has bulged or vented capacitors, replace the logic board. 7. If the logic board has bulged or vented capacitors, remove and inspect the power supply. Note: Affected power supplies are rated for 100-127VAC and are known as non-PFC power supplies. These power supplies were placed into iMac G5 systems destined for the US, Canada, and Japan. 8. Turn over the power supply to view the label. Affected power supplies have: • an Apple part number of 614-0293 or 614-0296 (shown below) • an AC Input of 100-127V, 50-60Hz (listed below the 614-xxxx part number) Note: A power supply failure may leave a visible residue on the rear cover, logic board, and the chassis. The residue does not affect the operation of the iMac G5 and can be left in place. If desired, the residue on the rear cover can usually be removed using a lightly dampened disposable cloth. Be sure to thoroughly dry the rear cover before reinstalling it. 9. If the power supply fits this description, replace the power supply as well. Proceed to the next topic, Special CompTIA Codes, for repair coverage information. Note: Effective today, these power supply replacements will be excluded from Service Excellence measurement (in applicable regions). In addition, all firstgeneration iMac G5 power supplies are no longer available as Do-It-Yourself (DIY) parts. Warning: Use caution when handling failed electronic components, and make sure to wash your hands afterwards. iMac G5 (17-inch) Repair Extension Program - 8 Special CompTIA Codes Apple has created the following two CompTIA Codes to use for repairs on iMac products eligible for coverage under the iMac G5 REP for Video and Power Issues: • Use CompTIA Code 560: iMac G5 MLB/Power Supply REP when replacing a logic board, whether or not the iMac is covered by warranty or an extended service agreement • Use CompTIA Code 660: iMac G5 MLB/Power Supply REP when replacing a power supply, whether or not the iMac is covered by warranty or an extended service agreement If it's necessary to replace both the logic board and power supply, use both CompTIA Codes. European IMCs For repairs covered under the iMac G5 REP for Video and Power Issues, IMCs in Europe must order logic boards as stock parts using the part numbers listed above. To receive credit for the covered logic boards ordered as stock parts, IMCs must request an RMA number from the SPS team and return the defective parts to Apple with the RMA number. Japan Service providers in Japan who create a Mail-In Repair for iMac products eligible for coverage under the iMac G5 REP for Video and Power Issues should ALWAYS select CompTIA Code 660: iMac G5 MLB/Power Supply REP in GSX, whether the repair is related to the logic board, power supply, or both. WARRANTY REPAIRS: If an iMac product is currently covered by an Apple warranty or extended service agreement, create the Mail-In Repair in the usual manner. OUT-OF-WARRANTY REPAIRS: Until further notice, Apple asks that service providers select the “Mark for Review” checkbox on all out-of-warranty Mail-In repairs created for iMac products eligible for coverage under this repair extension program. Latin America Latin America service providers should order parts for this repair extension program in the usual manner. More information concerning the iMac G5 REP for Video and Power Issues is available in the Repair Extension Programs section of the Apple Authorized Service Programs Manual (Canada/Europe/US). iMac G5 (17-inch) Repair Extension Program - 9 Troubleshooting Power Issues Power Symptoms The affected power supplies are rated for 100VAC-127VAC and were placed in iMac G5 systems destined for the US, Canada, and Japan. Affected power supplies will exhibit one or more of the following: • No power to the computer • The computer intermittently shuts down without warning • The computer makes a popping sound followed by no power. An odor is detectable. Repair Procedure 1. Verify that the system is eligible for the REP program. Refer to the topic “Eligible Products” mentioned earlier in this section. 2. If the computer is eligible, remove the rear cover. 3. Affected power supplies are rated for 100-127VAC and are known as non-PFC power supplies. These power supplies were placed into iMac G5 systems destined for the US, Canada, and Japan. 4. Proceed to the next step. iMac G5 (17-inch) Repair Extension Program - 10 5. Remove the power supply. Turn over the power supply to view the label. Affected power supplies have: • an Apple part number of 614-0293 or 614-0296 (shown below) • an AC Input of 100-127V, 50-60Hz (listed below the part number) Note: A power supply failure may leave a visible residue on the rear cover, logic board, and the chassis. The residue does not affect the operation of the iMac G5 and can be left in place. If desired, the residue on the rear cover can usually be removed using a lightly dampened disposable cloth. Be sure to thoroughly dry the rear cover before reinstalling it. 6. Replace the power supply if it meets the criteria mentioned above. Refer to the next topic in this section, Special CompTIA Codes, for repair coverage information. Note: Effective today, these power supply replacements will be excluded from Service Excellence measurement (in applicable regions). In addition, all firstgeneration iMac G5 power supplies are no longer available as Do-It-Yourself (DIY) parts. Warning: Use caution when handling failed electronic components, and be sure to wash your hands afterwards. iMac G5 (17-inch) Repair Extension Program - 11 7. While doing the power supply repair, inspect the capacitors (highlighted below) on the logic board, looking for signs of bulging and/or venting. 8. Affected capacitors will have a “+” sign stamped into the top of the capacitor. Note: Not all capacitors stamped with a “+” sign are faulty, so further inspection is required to determine whether one or more of the capacitors are faulty. Warning: Use caution when handling failed electronic components, and make sure to wash your hands afterwards. iMac G5 (17-inch) Repair Extension Program - 12 9. Failed capacitors will no longer have a flat top and can be identified by signs of bulging (shown below) and/or venting. The top may bulge upward. In severe cases the top of the capacitor may show signs of electrolyte venting which appears as a small amount of cream-colored paste around the top of the capacitor. One or both of these symptoms indicates that the capacitor has or will likely fail. 10. If the logic board has bulged or vented capacitors, replace the logic board as well. Refer to the next topic in this section, Special CompTIA Codes, for repair coverage information. iMac G5 (17-inch) Repair Extension Program - 13 Special CompTIA Codes Apple has created the following two CompTIA Codes to use for repairs on iMac products eligible for coverage under the iMac G5 REP for Video and Power Issues: • Use CompTIA Code 560: iMac G5 MLB/Power Supply REP when replacing a logic board, whether or not the iMac is covered by warranty or an extended service agreement • Use CompTIA Code 660: iMac G5 MLB/Power Supply REP when replacing a power supply, whether or not the iMac is covered by warranty or an extended service agreement If it's necessary to replace both the logic board and power supply, use both CompTIA Codes. iMac G5 (17-inch) Repair Extension Program - 14 European IMCs For repairs covered under the iMac G5 REP for Video and Power Issues, IMCs in Europe must order logic boards as stock parts using the part numbers listed above. To receive credit for the covered logic boards ordered as stock parts, IMCs must request an RMA number from the SPS team and return the defective parts to Apple with the RMA number. Japan Service providers in Japan who create a Mail-In Repair for iMac products eligible for coverage under the iMac G5 REP for Video and Power Issues should ALWAYS select CompTIA Code 660: iMac G5 MLB/Power Supply REP in GSX, whether the repair is related to the logic board, power supply, or both. WARRANTY REPAIRS: If an iMac product is currently covered by an Apple warranty or extended service agreement, create the Mail-In Repair in the usual manner. OUT-OF-WARRANTY REPAIRS: Until further notice, Apple asks that service providers select the “Mark for Review” checkbox on all out-of-warranty Mail-In repairs created for iMac products eligible for coverage under this repair extension program. Latin America Latin America service providers should order parts for this repair extension program in the usual manner. More information concerning the iMac G5 REP for Video and Power Issues is available in the Repair Extension Programs section of the Apple Authorized Service Programs Manual (Canada/Europe/US). iMac G5 (17-inch) Repair Extension Program - 15