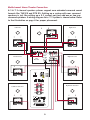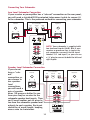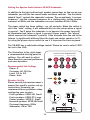
1
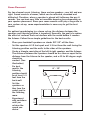
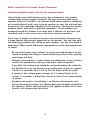
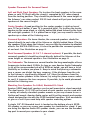
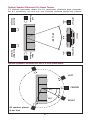
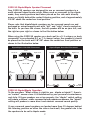
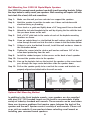
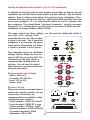
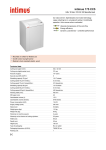
Owner’s Manual
Intimus Series Loudspeakers
522D-LR Bookshelf Speakers
522D-C Center Channel
522D-VAC Vertical Array Center Channel
522D-SS Dipole/Bipole Surround Speakers
522D-PT Power Towers
S8-APR Subwoofer
S-10 Subwoofer
S-12 Subwoofer
© 2004 Aperion Audio, all rights reserved.
Revision 5008
July 2004
Aperion Audio Owner’s Manual
Table Of Contents
Thank You From Aperion Audio .......................................................................1
The Joy of Buying Direct ................................................................................1
DiAural® Crossover Technology .......................................................................1
What You’ll Need For Installation ....................................................................2
Choosing The Right Speaker Wires ..................................................................2
Placement: ................................................................................................3-8
- Stereo Placement & Installation...................................................................3
- Multichannel Music & Home Theater Placement ..........................................4
- Speaker Placement For Surround Sound.......................................................5
- Mounting Your Bookshelf Speakers ............................................................5
- Speaker Placement Diagrams For Home Theater & Multichannel Music ...........6
- Dipole/Bipole Placement & Operation ...........................................................7
- Wall Mounting Your Dipole/Bipole Speakers ................................................8
Connections:............................................................................................9-11
- Home Theater Connection Diagram ..............................................................9
- Making The Connection..............................................................................10
- Connecting Your Subwoofer ........................................................................11
Subwoofer Setup ....................................................................................12-13
- S8-APR Setup .........................................................................................12
- S-10 or S-12 Setup..................................................................................13
Power Tower Setup ......................................................................................14
Dialing In Your System............................................................................15-16
- Speaker Setup ..........................................................................................15
- Speaker Distance ......................................................................................15
- Subwoofer Setup .......................................................................................15
- Speaker Level Calibration ...........................................................................15
- Speaker Break-In.......................................................................................16
- Troubleshooting.........................................................................................16
Specifications ........................................................................................16-18
Warranty .....................................................................................................19
Thank You From Aperion Audio
Thank you for purchasing Aperion Audio loudspeakers. Your new speakers
incorporate the very latest audio technology, yet they are built with oldfashioned care and craftsmanship. We designed your Aperion Audio sound
system to give you years of listening pleasure. Whether you’re enjoying music
or watching a film in your home theater, Aperion Audio speakers will deliver
pure and accurate sound. The speaker cabinets feature a real wood exterior
or high-gloss painted finish, and—like fine furniture— they will maintain
their beauty indefinitely if properly maintained. Use this manual as your
guide but feel free to contact us if you have any questions.
The Joy of Buying Direct
Because we sell direct to you, we’re not beholden to the middlemen. There
are no dealer markups, nor is there the overhead of a thousand-acre
superstore. Instead, we pour everything we have into our speakers. How
does this model of doing business benefit you?
1. You buy from a company whose focus is on building rich, full-bodied
sounding speakers with superior components and cabinetry.
2. You get speakers that are factory fresh with the latest enhancements.
3. You get a price that is as much as 50% less than the electronics retailer.
4. You can audition our speakers for 30 days in your own home with your
own equipment, then return the speakers risk-free should you have a
change of heart.
5. You get free shipping both ways.
6. You have direct contact with the manufacturer so answers to your questions
are instant and dependable.
7. You pay zero sales tax.
The DiAural® Breakthrough
The DiAural® Circuit is a new, patented crossover topology that allows for
proper communication and interaction between the transducers (woofer,
mid-range, and tweeter). This innovative process results in fewer parts, less
distortion, and renders the high frequency and mid-range drivers virtually
burn-out proof.
Aperion Audio’s 522D speaker design centers on a custom woofer/mid-range
driver that is engineered to handle a very wide frequency range, combined
with an exceptional soft-dome tweeter to produce the very high frequencies.
By using DiAural® circuitry to interconnect the drivers, your Aperion Audio
speakers reproduce music and movies with a coherent, open and natural
sound that brings the original recordings to life in your home.
1
What You’ll Need for Installation
A little planning will make your installation a breeze. You’ll want to have
all of the necessary equipment and supplies by your side before you begin.
For your convenience, Aperion Audio carries high-quality wires, cables, and
connectors. Visit our web site at www.aperionaudio.com if you need these
accessories.
For
·
·
·
·
·
·
·
·
·
Stereo or Multichannel Installation:
Two or more Aperion Audio speakers
One or more Aperion Audio subwoofer(s)
A multichannel receiver or amplifier and processor
An audio/video source: DVD, laserdisc or VCR
Speaker wire (16 gauge or better) with banana plugs, spade terminals,
or pin-type termination. Note: 5-way binding posts will accept bare wire
but terminated speaker wire is the preferred connection method.
Subwoofer connection materials: RCA terminated interconnect cable or
additional speaker wire if making a speaker-level connection to your
subwoofer. Note: Low level RCA connection is the preferred connection
method.
Source interconnects: Digital coaxial or optical interconnect and RCA
analog cables for your existing equipment.
Video interconnects: Composite (good), S-Video (better) or Component
Video (best) depending on your TV inputs.
Wire cutter/stripper.
Choosing The Right Speaker Wires
We recommend using speaker wire that is
at least 16 gauge. (For runs longer than 50’,
use 14 gauge or larger and for runs over
100’ use 12 gauge.) The wire should be cut
into equal lengths for each pair of speakers
and long enough to reach from the rear of
your amplifier or receiver to where the
speakers will be placed in the room, keeping
excess wire to a minimum.
Important:
If you will be running wires
in the walls or through the
floor, use wire that meets
your local code for that
type of installation.
“Wire Tip”
Wire size is expressed by it’s American Wire Gauge
(AWG) number. The lower the AWG number, the
thicker the wire, i.e., A 12 gauge wire is larger than
a 14 gauge wire.
2
Stereo Placement
For two channel music listening, there are two speakers—one left and one
right. Sound consists of waves, which can be reflected, absorbed and
diffracted. Therefore, where a speaker is placed will influence the way it
sounds. You can have very little or incredible booming bass depending on
your speaker placement. Since your room acoustics will play a large role in
your system set-up, some experimentation is necessary to get the best
results.
For optimal soundstaging in a stereo set-up, the distance between the
speakers and listening position is important. Generally, the goal is to reduce
the effect of surfaces that can interfere with the sound before it reaches
the listener. Follow these simple guidelines for the best results:
Place your bookshelf speakers on stands 28”-30” off the floor.
·
Set the speakers 6-12 feet apart and 1-3 feet from the wall facing the
listening position and the walls to the sides of the speakers.
·
Create a triangle consisting of the left & right speakers and the listener.
The distance between the speakers should be less than or equal to the
distance from the listener to the speaker, and a 45 to 60 degree angle
should be
created. (See
illustration)
·
For best
results, the
listening
position should
be at least 1-3
feet from the
back wall.
Set the
speakers so
they face the
sweet spot in
the listening
room.
·
Experiment
with variations
until you
achieve the
sound you
desire.
45°
1' - 3'
·
6' - 12'
3
1' - 3'
·
Multi-channel Music & Home Theater Placement
Optimizing A Multi-channel Set-Up For Surround Sound
Home theater and multi-channel music has introduced a new speaker
configuration to home audio. Instead of the large floor mounted stereo
speakers of the 70’s and 80’s, your Aperion Audio sound system is comprised
of a combination of small, easy to locate speakers to carry the mid and high
frequencies and a powered subwoofer for the low bass. You may also choose
powered towers with built-in powered subwoofers. These speakers are
arranged around the listener in an array with 3 speakers in the front, two
surrounds and in some cases one or two back surround speakers.
Each room is unique and unless the room was specifically designed to be
a home theater, the acoustic properties are not perfect. You can start with
the following guidelines for setting up your speakers, but don’t be afraid to
experiment. Often a small difference in placement can yield a big improvement
in sound.
·
Be aware that many bare surfaces in a room can add harshness to the
sound or muddy the dialogue. Sound absorbing surfaces like carpeting
and drapes will help.
·
Perfectly square rooms, or rooms where one dimension is close to twice
another are problematic and may need more sound absorption.
·
If possible, the seating area should be centered between the sidewalls.
·
For the best bass, try not to place your seating area so that it is against
a wall or at a position that is 1/2 or 1/4 the room's width or length.
·
A speaker’s bass output grows stronger as it is moved closer to the
corners. If a speaker is placed too close to a corner it can sound muddy
or boomy.
·
Speakers can create a “soundstage”, an illusion of instuments and
voices with precise locations in 3-dimensional space between and behind
the speakers. Excess room reflections and speaker locations on or close
to walls, will compromise this effect.
4
Speaker Placement For Surround Sound
Left and Right Front Speakers: Try to place the front speakers in the same
plane as your TV (flush with the screen), separated by 45° when viewed
from the seating position. They should be positioned at the same height as
the listeners’ ears when seated. 28-30 inch stands will put your bookshelf
speakers at the correct height.
Center Speaker: A good position for the center speaker is right on top of
your TV (or just below, if your TV is mounted high). Try to place the center
speaker on the same plane, or slightly behind the plane formed by the front
left and right speakers. If it is placed low or high, you may want to aim the
speaker up or down at the listening area.
Surround Speakers: For home theater, the surround speakers should be
placed directly to each side of the listener or slightly behind them. Placing
the speakers 2 feet above the listeners’ ears can help to minimize localization
effects. For SACD & DVD-A use, it is best to position the surround speakers
at ear level. See illustration on page 6.
Back Surround Speakers (6.1 & 7.1 channel systems): If possible, the back
surround speaker(s) should be placed directly behind the listeners at the
same height as surround speakers. See illustration on page 6.
The Subwoofer: The human ear cannot localize the long wavelengths of bass
frequencies below about 100Hz. As long as your Aperion Audio Subwoofer
is set at the recommended cut-off of 80Hz or below, you will have a lot of
flexibility as to where you place it. Keep in mind that placing a subwoofer
near a corner can distort the bass response. If the distance from the sub
to the listener is significantly different (>3’) than the distance from the
front and center speakers to the listener, try using the phase reverse switch
to see if it improves the bass response. If possible, try to avoid placement
behind the listening area.
Mounting Your Speakers On A Wall, Bookshelf Or Stand
Aperion 522D bookshelf speakers can be wall mounted or stand mounted.
The dual inserts ( 1/4”-20) on the back of each speaker can be used with
a variety of industry standard speaker mounts or you may choose to use a
friction wall mount. Aperion Audio carries wall & ceiling mounts and speaker
stands designed for use with the 522D bookshelf speakers. Visit our website
or give us a call if you need help with speaker mounting options.
A single 1/4”-20 threaded insert is located on the bottom of each 522DLR speaker, so you can secure your speaker to a bookshelf or stand. If you
are using the Aperion Audio i29 speaker stands, you can use the threaded
top post to mount your speakers to your stands.
5
Optimal Speaker Placement For Home Theater
7.1 Channel placement shown. For 5.1 placement, eliminate back surrounds.
For 6.1 placement, use only one rear surround centered behind the listener.
Left Front
Left
Surround
Back Left
Surround
Center
45° to 60°
Right Front
Right
Surround
Back Right
Surround
Optimal Speaker Placement For SACD & DVD-Audio Music
LEFT
30°
110°
All speakers placed
at ear level
6
CENTER
RIGHT
522D-SS Dipole/Bipole Speaker Placement
Your 522D-SS speakers are designed for use as surround speakers in a
multi-channel home theater setup. When used as surrounds in the dipole
mode, they usually perform best when placed on the side walls directly
across or slightly behind the seated listening position, and at approximately
18-28" above the seated ear level position.
Please note that dipole/bipole speakers are for surround sound use and
packaged as mirror-imaged pairs with “left” and “right” clearly marked on
the back. As you face the screen, the left speaker will be on your left, and
the right on your right as shown in the illustration below.
When using the 522D-SS speaker on a back wall in a 5.1 setup or as back
surround(s) in an extended 6.1 or 7.1 channel setup, the speaker(s) should
be placed on the back wall 18"-28" above the seated ear level position as
shown in the illustration below.
Dipole/Bipole Side Wall Placement
Dipole/Bipole Back Wall Placement
Center
Center
Left Front
Left Front
Right Front
45° to 60°
45° to 60°
Left
Surround
Right Front
Right
Surround
Left
Surround
Right
Surround
522D-SS Dipole/Bipole Operation
To the question: “What setting is right for me - dipole or bipole?”, there is
no “correct” answer since it is determined by your personal circumstances
and style. If these speakers are set up properly, the “dipole” switch setting
will create a diffuse, subtle surround sound experience whereas the “bipole”
setting will produce a more direct and obvious surround sound quality.
If your surround sound speakers are located more than 15 degrees behind
the listening position on either the side or back wall, the general rule is for
the speakers to be set to bipole mode.
7
Wall Mounting Your 522D-SS Dipole/Bipole Speakers
Your 522D-SS surround sound speakers have built-in wall mounting brackets. Follow
the steps below to safely mount your speakers. Wall mounting will require skill with
basic tools like a level, drill and screwdriver.
Step 1:
Make sure the wall you have selected can support the speakers.
Step 2:
Hold the speaker in position to make sure it does not interfere with
electrical wiring or plumbing.
Step 3:
Use a level as a guide and lightly draw a 18” long pencil line on the wall.
Step 4:
Attach the included template to the wall by aligning the line with the level
line you have drawn on the wall.
Step 5:
Drill a 3/32” pilot hole in the center of each of the keyhole mounting
locations as shown.
Step 6:
If you are certain there is a stud behind the wall surface, drive the supplied
screw through the wall and into the stud as shown in the illustration below.
Step 7:
If there is not a stud behind the wall, install the wall anchor as shown in
the illustration below.
Step 8:
Tighten the screws into the stud or wall anchor and leave 1/4” of the
screw head protruding from the wall.
Step 9:
Install the rubber bumpers to the corners on the back of each speaker.
Step 10: Connect the speaker wires to the speaker.
Step 11: Line up the keyhole slots on the back of the speaker so the screw heads
pass through the large center hole then slide the speaker down.
Step 12: Pull on the speaker gently to be sure that the screws and brackets are
properly aligned and attached to the wall securely.
1/4”
Hollow Wall Installation
Wall Stud Installation
Wall Stud Installation
Optional Wall Mounting Method
In addition to the flush keyhole mounts, your speakers are also supplied
with dual 1/4”-20 threaded inserts on the back to accommodate a wide
variety of industry standard wall mounts. These mounts can be used when
there are clearance problems that require space between the back of the
speaker and the wall. Aperion carries a variety of wall mounts. Please call
us or visit our website if you need assistance selecting a wall mount or
installing your surround sound speakers.
8
Multichannel Home Theater Connection
6.1 & 7.1 channel speaker systems support new extended surround sound
formats like THX EX and DTS ES. Setting up a system with rear surround
speakers is just like setting up a 5.1 system; you just add one or two rear
surround speakers. A wiring diagram for a 7.1 system is shown below. Refer
to the illustration on page 6 for proper placement.
Center
Right Front
Left Front
-
-
+
-
+
Front
R
L
- +
- +
+
Surround
L
R
- +
- +
- +
Center
Left Surround
A/V
Receiver
-
Sub Out
- +
Right Surround
- +
-
+
+
Right Back Surround
Left Back Surround
-
Rear Surr
L
R
-
+
9
+
Making The Connection
First, turn off the power and unplug your audio equipment from the electrical
outlet before making any connections.
Connecting to a 5-Way Binding Post
If you’re using banana plugs, just insert the plug
into the end of each terminal. Be sure that the
knobs on each terminal are screwed down tight so
that they don’t rattle. If your receiver or amp has
push connectors, you will have to use either bare
wire or a pin connector at that end of the wire.
5 Way Binding Post
If you’re connecting
with just bare wire, strip off about ½ inch
of insulation at each end and twist the wire
ends tightly, making sure there are no stray
ends.
Unscrew the (+) and (-) knobs far enough
to expose the hole (see illustration above).
Insert the twisted ends of the wires, or the
pin connector through the holes in the
threaded shaft. With your thumb, tighten the
connectors back down clockwise to secure
the wires. Be sure no stray strands of wire
from one post can touch the other post.
For spade plugs, unscrew the (+) and (-)
connector screws and slide the plugs over
the threaded shaft, and thumb tighten the
connectors back down clockwise to secure
the wires.
Twisted Bare Wire
Banana Plug
IMPORTANT:
Speaker wire is coded to
identify which of the two wire
strands is positive and which
is negative. The positive (+)
strand is usually marked with
a colored line, ribbing, or a
different shape. The negative
(-) strand is usually not
colored or ribbed. However,
if the manufacturer uses
colored wire you may choose
one wire color to represent
positive (+) and one wire
color to represent negative
(-). Be sure to maintain this
determination for all speaker
wire connections on your
receiver and your speakers.
(i.e. red to red and black to
black)
Pin Connector
10
Spade Connector
Connecting Your Subwoofer
Low Level Subwoofer Connection
If your receiver or preamplifier has a “sub-out” connection on the rear panel,
you will need a shielded RCA terminated interconnect cable to connect it
to the subwoofer. This is the preferred method for connecting your subwoofer.
Receiver
Processor/Amplifier
Left Front
Left
- +
-
Sub Out
Right Front
Right
- +
-
+
+
NOTE: Your subwoofer is supplied with
two low-level inputs (L&R). But if your
receiver or processor has a single subout connector, connect it to the input
labeled “5.1 sub input”; or you can use
a “y” plug to connect to both the left and
right inputs.
Speaker Level Subwoofer Connection
If you do not
Left Front
have a “subout”
connection, or
you choose to
use speakerlevel
- +
connections,
you will need a
pair of speaker
wires (16 gauge or better) to run
from your amp or receiver to the
subwoofer speaker level inputs. Then
you’ll need another pair of wires to
run from the subwoofer speaker level
outputs to each speaker. Each pair
should be of equal length, keeping
excess wire to a minimum.
Receiver
Processor/Amplifier
Left
- +
11
Sub Out
Right Front
Right
- +
-
+
Setting the Aperion Audio Intimus S8-APR Subwoofer
In addition to the high and low-level speaker connections on the rear of your
subwoofer, you will see two round knobs and three switches. The first knob,
labeled “level,” controls the subwoofer’s volume. The second knob, “crossover
frequency,” sets the crossover frequency. As a starting point, set the receiver
crossover at 80Hz and the subwoofer crossover between 80Hz-120Hz.
The power switch has three settings - on, off and auto. When the switch is
set in the “auto” setting, it will automatically turn the sub on when a signal
is present. You’ll know the subwoofer is on because the power lamp will
be illuminated red (when a signal is present it turns green). The “phase”
switch reverses the subwoofer’s polarity. If the distance from the sub to the
listener is significantly different than the front and center speakers (>3’),
try using the phase reverse switch to see if it improves the bass response.
The S8-APR has a switchable voltage control. Please be sure to select 120V
for use in the USA.
The illustration to the right shows
a recommended starting point for
settings. You will want to adjust
these based on personal preference
and room dynamics.
150W ACTIVE SUBWOOFER
HIGH LEVEL OUPUT
HIGH LEVEL INPUT
L
-
+
-
+
R
Recommended Sub Settings
· Phase: 0º
· Crossover: 80-120 Hz
· Level: 1/2 to 3/4
· Power: Auto
R
L
LINE IN
Receiver Set-Up
Please consult your receiver owner’s
manual for specific receiver set-up
instructions. Generally, we
recommend these guidelines when
configuring your receiver.
· Front speakers: 522D-LR: Small
· Front speakers: 522D-PT: Large
· Center speaker: 522D-C: Small
· Surround speakers: 522D-LR:Small
· Crossover frequency: 80Hz
· Subwoofer: ON or YES
LEVEL
LINE OUT
12
80Hz
120Hz
40Hz
180Hz
CROSSOVER
FREQUENCY
Setting the Aperion Audio Intimus S-10 & S-12 Subwoofer
In addition to the high and low-level speaker connections on the rear of your
subwoofer, you will see three round knobs and two switches. The first knob,
labeled “phase” allows you to adjust the polarity of your subwoofer. If the
distance from the sub to the listener is significantly different than the front
and center speakers (>3’), try reversing the phase to see if it improves the
bass response. The second knob, “crossover frequency,” sets the crossover
frequency. As a starting point, set the receiver crossover at 80Hz and the
subwoofer crossover between 80Hz-120Hz.
The power switch has three settings - on, off and auto. When the switch is
set in the “auto” setting, it will
automatically turn the sub on when
a signal is present. You’ll know the
subwoofer is on because the power
lamp will be illuminated red (when
a signal is present it turns green).
Your subwoofer also has a switchable
voltage control. Please be sure to
select 115V for use in the USA. The
illustration to the right shows a
recommended starting point for
settings. You will want to adjust
these based on personal preference
and room dynamics.
Recommended Sub Settings
· Phase: Start at 0º
· Crossover: 80-120 Hz
· Level: 1/3 to 1/2
· Power: Auto
Receiver Set-Up
Please consult your receiver owner’s
manual for specific receiver set-up
instructions. Generally, we
recommend these guidelines when
configuring your receiver.
· Front speakers: 522D-LR: Small
· Front speakers: 522D-PT: Large
· Center speaker: 522D-C: Small
· Surround speakers: 522D-LR:Small
· Crossover frequency: 80Hz
· Subwoofer: ON or YES
13
522D-PT Power Tower Setup
Connecting Your Power Towers
You will notice that there is only one set of speaker
level inputs on the back of your power tower (PT).
This is because your 522D-PT Power Towers are
designed to be used as full-range speakers. For
best performance, a full-range signal is sent through
the speaker level inputs. The mid-range and high
frequencies are routed to the “top” half while the
bass frequencies below about 100Hz are routed
through the amplifier to the subwoofer.
Receiver Setup For Power Towers
When Used With A Separate Subwoofer
When using power towers with a stand-alone
subwoofer, it is best to set them up as full range
or “large” speakers with the crossover level at
80Hz or lower in your receiver setup menu. This
will send a full range signal to the power towers
and an 80Hz or lower signal to the subwoofer. You may want to experiment
with different crossover settings because in some cases your speakers may
perform best in your room with the crossover set at 60Hz or 40Hz.
Speaker Setup: Set the front L&R to “large”.
Subwoofer: Set the subwoofer to “on” or “yes”.
Crossover Setting: Start at 80Hz but experiment with lower settings.
IMPORTANT NOTE: Some receivers will not allow you to set your main
speakers to “large” when using a subwoofer. In these cases, select the
lowest crossover setting on your receiver for the best performance from your
towers.
Receiver Setup For Power Towers When Used Without A Separate Subwoofer
When you are using your power towers without a stand-alone subwoofer, you
will want to set them up as full range or “large” speakers in your reciever
setup menu. You will also want to set your subwoofer to “no” or “off”. This
will route all bass information to your main L&R speakers.
Speaker Setup: Set the front L&R to “large”.
Subwoofer: Set the subwoofer to “off” or “no”.
Crossover Setting: The crossover setting may appear on your menu but it
will not affect the performance of your system. If you are required to make
a choice set it to the lowest setting available.
14
Dialing In Your System
The final step to enjoying you new system is to dial it in for optimal sound.
First, consult the manual for your receiver. It contains all the information
you will need to dial in your system. As always if you need help, visit our
website or feel free to call, email or use live chat for technical support.
Speaker Setup: Enter the speaker setup menu on your receiver and proceed
to set all of your 522D bookshelf speakers to the “small” setting. 522D
towers should be set to the “large” setting. Also, if you have a 6.1 or 7.1
channel receiver but you are using a 5.1 speaker setup, be sure to set the
back surrounds to “off” or “none”. The same is true for the center channel
if, for some unlikely reason, you are not using a dedicated center channel,
you can disable the center and send the dialogue to the front left & right
main speakers.
Speaker Distance: Sit in the most common listening position with a tape
measure and have a friend help you measure the distance to each speaker.
Then enter the speaker distance menu on your receiver and input the
distance. This step is important because it sets the appropriate time delay
for your surround sound system. Some receivers require you to calculate the
delay using a mathematical formula. Please consult your receiver manual
for details on setting the delay.
Subwoofer Setup: In the speaker setup menu there is usually a subwoofer
selection option. Set the subwoofer selection to “Yes” or “On” if you are
using a separate subwoofer. Many receivers have a number of crossover
settings but we recommend starting with the crossover set at 80Hz and your
bookshelf speakers set to “small”. Power towers should be set to “large”.
If you are setting the crossover frequency on your receiver, you will be using
your receiver for bass management. We recommend that you set the variable
crossover setting on you subwoofer amplifier between 80Hz -120Hz until
you get a good blend. If the subwoofer is in the same plane as the front
speakers, the "0 degrees" phase position is the correct setting. Start with
the volume level at 1/3-1/2 and adjust it up or down based on the source
material and your personal preference.
Speaker Level Calibration: One of the most important steps to setting up
your system is level calibration. Some speakers will play louder or quieter
than they should because of differing placements or efficiencies. The speaker
level calibration menu will allow your receiver to compensate for this by
using a test signal for balancing the channels. The signal moves from channel
to channel, allowing you to adjust the levels until each channel plays at the
same volume. You can do this by ear but it's better to use a SPL (sound
pressure level) meter. If you notice with actual program material that the
surround speakers play much lower than the fronts, this is normal. They are
simply supplying the subtle ambience the director intended.
15
Speaker Break-In
Your new speakers will sound great right out of the box but we do recommend
that you allow about 50 hours of break-in time to fully appreciate them.
Like a new pair of shoes, the suspension of your speaker will loosen up and
become much smoother and dynamic over time. As your speakers breakin, you will notice smoother highs, a lusher midrange and deeper bass.
Troubleshooting
Setting up a home theater system can seem like a daunting task but it
becomes simple when you plan it out and take your time. As always, lifetime
technical support is provided with your system purchase. If you have any
problems, call us at 866-APERION. We also have technical support available
on our website. Visit www.aperionaudio.com and search our knowledge base
to find answers to common questions or use our forum as a resource to help
you set-up and optimize your system. If this information doesn’t solve your
problems or if you have additional questions, you can send email to:
[email protected], or visit our website and log on to live
chat for instant help (M-F 8:30AM - 5:30PM, PT).
Loudspeaker Specifications:
Aperion Audio Intimus 522D-LR
Frequency response: 80hz to 20Khz
Nominal speaker impedance: 6-8 ohms
Recommended power: 50-150 watts
Speaker enclosure type: 2-Way Vented, Video Shielded
Tweeter (diameter): 1”
Woofer (diameter): 5.25”
Dimensions LR (HxWxD): 11-1/2” X 7-1/3”” X 8”
Weight: 12.6 pounds each
Aperion Audio Intimus 522D-C
Frequency response: 80hz to 20Khz
Nominal speaker impedance: 6-8 ohms
Recommended power: 50-150 watts
Speaker enclosure type: 2-Way Vented, Video Shielded
Tweeter (diameter): 1”
Woofer (diameter): 5.25”
Dimensions C (HxWxD): 7-1/3” X 11-1/2” X X 8”
Weight: 12.6 pounds each
16
Loudspeaker Specifications:
Aperion Audio Intimus 522D-VAC
Frequency response: 80hz to 18Khz
Nominal speaker impedance: 6-8 ohms
Recommended power: 50-200 watts
Speaker enclosure type: 2-Way Sealed, Video Shielded
Tweeter (diameter): 1”
Midrange (diameter): 4”
Woofer (diameter): 5.25”
Dimensions LR (HxWxD): 7-1/3” X 19” X 8”
Weight: 20 pounds each
Aperion Audio Intimus 522D-SS
Frequency response: 90hz to 8Khz (Bipole)
Frequency response: 60hz to 14Khz (Dipole)
Nominal speaker impedance: 12 ohms
Recommended power: 50-300 watts
Speaker enclosure type: Sealed
Tweeter (diameter): 1”
Woofer (diameter): 5.25”
Dimensions LR (HxWxD): 10-5/8" X 14-3/16" X 6-3/4”
Weight: 16 pounds each
Aperion Audio Intimus 522D-PT Power Tower
Frequency response: 30hz to 20Khz
Nominal speaker impedance: 6-8 ohms
Recommended power: 50-150 watts
Speaker enclosure type: 2-Way Vented With Powered Sub, Video Shielded
Tweeter (diameter): 1”
Woofer (diameter): 5.25”
Subwoofer (diameter): 8”
Amplifier power: 150 Watts
Dimensions (HxWxD): 41-1/2” X 9-3/4” X 12-1/2”
Weight: 57 pounds each
17
Subwoofer Specifications:
Aperion Audio Intimus S8-APR Powered Subwoofer
Frequency response: 35hz to 180hz
Amplifier power output: 150 watts (RMS)
Speaker enclosure type: Sealed Passive Radiating Design
Variable crossover range: 40-180hz
Phase adjustment: 0 or 180 Degrees
Volume control: Variable
Auto-sensing 3-position power switch
Low & high level inputs & outputs
Woofer diameter: 1-8” Active, 2-8” Passive
Dimensions (HxWxD): 13” x 12-1/4” x 12-1/2”
Weight: 27.5 pounds
Aperion Audio Intimus S-10 Powered Subwoofer
Frequency response: 25hz to 160hz
Amplifier power output: 200 watts (RMS)
Speaker enclosure type: Vented
Variable crossover range: 40-160hz
Variable phase adjustment: 0 to 180 Degrees
Volume control: Variable
Auto-sensing 3-position power switch
Low & High level inputs & outputs
Woofer diameter: 10”
Dimensions (HxWxD): 17-1/2” x 13-1/4” x 19”
Weight: 52 pounds
Aperion Audio Intimus S-12 Powered Subwoofer
Frequency response: 20hz to 160hz
Amplifier power output: 250 watts (RMS)
Speaker enclosure type: Vented
Variable crossover range: 40-160hz
Variable phase adjustment: 0 to 180 Degrees
Volume control: Variable
Auto-sensing 3-position power switch
Low & High level inputs & outputs
Woofer diameter: 12”
Dimensions (HxWxD): 20-1/2” x 15” x 21-1/2”
Weight: 66 pounds
18
Limited Warranty
Aperion Audio provides a transferable ten (10) year limited warranty on our
speakers and a transferable three (3) year limited warranty on our subwoofer
amplifiers which covers all defects in material and workmanship with the
following specific exceptions:
· Damage caused by improper installation or adjustment
· Damage caused by accident, unreasonable use, or neglect
· Damage caused by an act of God
· Damage from failure to follow instructions contained in the
Owner's Manual
· Damage from repairs performed by someone not authorized
by Aperion Audio
· Any unit on which the serial number has been effaced, modified,
or removed
· Damage occurring during shipment, other than that arranged
by Aperion Audio
· Units which have been altered or modified in design, appearance
or construction
This warranty covers only the actual defects within the products themselves.
IT DOES NOT cover costs of installation in (or removal from) a fixed
installation, or normal set-up, claims based on any misrepresentation by
the seller, or performance variations resulting from installation related
circumstances such as signal quality, AC power or incompatibilities with
other system components.
During the warranty period, Aperion Audio will, at its option, either repair
the defect, or replace the defective product, or the defective parts, or
components thereof with the then current product/component in use by
Aperion Audio, at no charge to the owner for parts and labor covered by this
warranty. If necessary repairs are not covered by this warranty, or if a unit
is examined which is not in need of repair, you will be charged for the repairs
and/or the examination.
If non-warranted repairs are needed, we will notify you of the estimated cost
and ask for your authorization to perform said repairs. You must pay shipping
charges incurred in getting your product to the factory. We will pay the return
shipping charges if the repairs are covered by the warranty. Please save the
original shipping cartons, as the unit MUST be returned in the original
carton and packing. (Replacement cartons are available at a modest charge.)
19