1
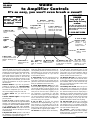
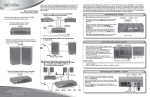
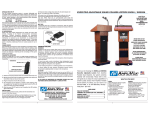
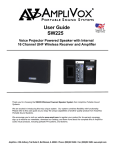
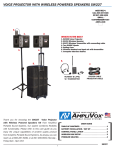
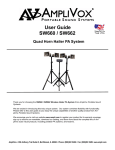
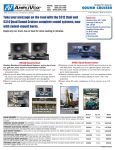
MULTIMEDIA STEREO AMPLIFIER W/INTERNAL WIRELESS
PORTABLE PUBLIC ADDRESS AMPLIFIER
MODEL SW805A
SET UP:
INSTALL POWER SUPPLY
The Battery pack is standard. Optional Power Supplies may be substituted. Model S1460, International
AC Adapter (110/220V, 50/60Hz). Model S1452, 12 Volt DC adapter (automotive cigarette lighter plugin). Model S1465, NiCad battery Pack.
TO INSTALL OR REPLACE BATTERIES
Slip fingernail under battery door on back of amplifier and slide it out. Remove battery holder from
amplifier. Insert 10 new Alkaline “D” cell batteries, observing polarity, or replace with S1465 NiCad
battery pack. Carefully replace battery holder. Slide door back into place.
Do not mix battery types or attempt to recharge alkaline batteries - equipment damage, safety hazard or
fire could result.
TO OPERATE:
Insure the microphone is plugged into DYNAMIC microphone jack. Insure the speaker is plugged into
either SPEAKER jack. Turn amplifier on (large rocker switch located on the front of the amplifier). The
red light will go on, showing that power is available. Push switch on microphone to the on position.
Rotate VOLUME control knob to obtain desired loudness level throughout the coverage area.
ON-OFF
When power switch is in the ON position, the red light will be on.
DC IN
Connection for optional power adapter:
• S1460 International AC Adapter/Recharger (110/220V, 50/60Hz)
• S1452 12 Volt DC (automotive cigarette lighter) Adapter
AUX OUT
Connection for 12 to 15V DC accessory.
VOLUME
Rotate clockwise to increase amplification.
MICROPHONE INPUTS
There are three microphone inputs, which can be used simultaneously:
DYNAMIC
- for standard dynamic cartridge microphones
CONDENSER - for electret or condenser microphones, which require phantom power
(supplied from the amplifier)
WIRELESS
- accepts line-level output from wireless microphone receiver
LINE IN L+R (SEPARATE-COMBINED)
Combines the separate left and right AUX LINE IN channels. This combined signal will be amplified
and appear on both the LEFT and RIGHT channels of the SPEAKER and LINE OUT OUTPUTS.
AUXILIARY
To add pre-recorded music or sound effects during your presentation, just plug your CD player, tape
player or computer sound card into the LINE IN jack. Separate VOLUME and TONE control knobs let
you balance the program source with the live microphones. If using an external wireless receiver, for best
sound quality it should be connected to the LINE IN jack.
OUTPUT
To tape record your speech or program, connect the LINE OUT on the amplifier (using cable with
standard 3.5mm plug) to the input on a tape recorder.
SPEAKERS
Two separately amplified speaker jacks allow you to use one or two speakers for additional sound power
or true stereo output. Note: when using a stereo AUX source with a single speaker, only one of the stereo
channels will be heard. However, all MIC inputs are heard equally on both channels.
ANTENNA
Jack for wireless antenna. (Antenna supplied on ‘C’ Channel for mounting on either side of amplifier or
use Velcro for optional mounting locations.)
INTERNAL WIRELESS RECEIVER(on right side of case)
Power on and off and Frequency A-B switches. Frequency should match wireless transmitter.
PROBLEM SOLVING
HOWLBACK is the howl or screech often heard in sound reinforcement systems. It is caused by sound
from the loudspeaker returning to the microphone. AmpliVox systems utilize proven acoustical
principles to minimize this; however, there is no way to completely eliminate howlback under conditions
of high amplification. If howlback occurs check the following:
1. User’s hand covering the head of the microphone. [Hold microphone under head slots.]
2. Sound can easily re-enter microphone. Keep loudspeaker turned toward audience. Note: sound can be
reflected from a hard surface back through the microphone. [Turn speaker.]
3. User holding microphone in a reflecting position. [Turn microphone.]
4. Volume setting too high. [Reduce microphone channel volume; compensate by speaking louder or
closer to the microphone.]
NO SOUND
Make sure amplifier POWER switch is turned on and red LED is lit. If switch is on and LED is not lit,
check to see that batteries are properly connected and at full charge. If using optional power adapter,
check to see that front panel connector is properly seated, and verify that the power source is live.
IF YOU HAVE ANY QUESTIONS OR PROBLEMS PLEASE CALL OUR CUSTOMER
SERVICE DEPARTMENT AT 1-800-267-5486
S-805A
SW-805A
MODELS
Guide
to Amplifier Controls
It’s so easy, you won’t even break a sweat!
Tuck
this
handy
reference guide in
with the amp, in case
you need to refresh
your memory.
3. Line in L+R—
Separate-combined
switch
4. Mic Volume—
controls all 3 mic
inputs
TOLL-FREE
NUMBER
Just call if you
need help for any
reason.
6. Auxiliary
Volume—
controls the auxiliary input
separately from the mic volume
5. Dynamic Mic
Jack—for wired,
hand-held mic
If you have any questions at all,
just call us. We really mean it. We
put the number on the amp, so you
won’t ever lose it!
7. Tone Control—for
auxiliary input; counterclockwise for more bass;
clockwise for more treble
1-800-267-5486
2. Power
Indicator
Light
8. Left & Right
Speaker Jacks—
connect up to 4
speakers
using
Y-connectors
to
amplify in stereo
1. Power
Switch
ANTENNA
9. DC In Jack— plug
in optional Universal AC
Adapter/ Recharger for
power.
10. Aux Out - for
optional 12-15 volt
accessory.
11. Condenser
Mic Jack - for
lapel or headset
mic
12. Wireless Mic
Jack - for optional
wireless receiver
13. Auxiliary Line In—
add music with a tape player, CD player or computer
sound card
15. Antenna—
Built-in wireless
receiver.
14. Line
Out—
record your presentation with a tape
recorder or a computer sound card
It’s Easy! There are no complicated amplifier
controls to distract you from what is really important. As a quick overview, after your microphone is
plugged into the matching mic jack and the speaker connected to the speaker jack, turn on the
power switch. Then turn on the mic volume so that
your sound reaches everyone in the room. By
reading all the easy-to-follow instructions on this
page and guide on the backside, you will be able
to enjoy and expand the use of your system and
the accessories.
6. Auxiliary Volume Control. Another volume
knob! This volume knob controls the auxiliary volume separately from the mic volume. This is a very
handy feature if you want your voice to be heard
over your background music or if you want the
music to fade in and out.
11. Condenser Mic Jack—with phantom power.
If you don’t know what phantom power is, then
you don’t need to know, but a condenser mic won’t
work without it. If you have AmpliVox’s lapel or
headset mic, plug it in here, unless you’re using it
with the wireless unit, then read no. 12.
7. Tone Control. This knob controls the tone of
the auxiliary input. Turn counter-clockwise for
more bass or clockwise for more treble. (The mic
jacks don’t need a tone control because they have
been pre-optimized for the human voice.)
Toll-Free Number. If you have any questions,
problems or comments, call 1-800-267-5486.
It’s a toll-free call. Of course, if you want to order
accessories to complement your new sound system, we’ll be happy to take your order, too.
8. Left & Right Speaker Jacks. If you only
have one speaker, plug it into the right jack, unless
you feel like plugging it into the left jack. If you
have 2 speakers, I recommend plugging one into
each jack. You can even have 4 speakers, if you
use Y-connectors. A Y-connecter is a nifty, little
device that turns one jack into 2 jacks. Why would
you want to do that? To amplify to a bigger audience or around corners. You can even amplify in
true stereo using 2 or 4 speakers.
12. Wireless Mic Jack. The optional wireless
receiver goes here; that’s the one with the antenna. Then plug AmpliVox’s lapel or headset mic into
the transmitter; that’s the one with the belt clip.
Now you are hands-free anywhere within a 300foot radius of the receiver.
1. Power Switch. See, you knew this one
already!
2. Power Indicator Light. A red light means
you have power.
3. Line in L+R— Separate-combined switch.
Combines the separate left and right AUX LINE IN
channels. This combined signal will be amplified
and appear on both the LEFT and RIGHT channels
of the SPEAKER and LINE OUT OUTPUTS.
4. Mic Volume Control. This knob controls all 3
mic inputs equally. You can actually use all 3 mics
at the same time.
5. Dynamic Mic Jack. Dynamic is one kind of
mic. AmpliVox’s wired, hand-held mic is this type,
so this would be a good place to plug it in.
9. DC In Jack. If you have the optional
International AC Adapter/Recharger, plug it in
here. However, if you actually want to use AC
power, you’ll have to plug the other end into a wall
outlet; a floor outlet will also work. There is also
an optional DC car cigarette lighter adapter.
10. Aux Out. For optional 12-15 volt accessory.
13. Auxiliary Line In Jack. This is how you can
really impress your audience. You can add prerecorded music or sound effects to your presentation. Use the Auxiliary Line In for a tape player, a
CD player, or a computer sound card. If your music
was recorded in stereo, you need 2 (or 4) speakers
to hear all of it. The mic sound comes out of both
speaker jacks equally, so if you only have one
speaker the audience will still hear everything.
14. Line Out Jack. Record your presentation
with a tape recorder (not the same one plugged
into Auxiliary Line In) or a computer sound card.
The Line Out Jack outputs all the sound from the 3
mic inputs and the auxiliary input.
15. Antenna.
Built-in wireless receiver in
SW805A series amplifier. Dual wireless capability.
A & B Frequencies - 2 Wireless presenters - up to
4 presenters simultaneously.
Published\SpecSheets\SW805-S805A-Guide 9/01/00
Quick Setup Instructions
1. Batteries Install 10 fresh Alkaline batteries or
rechargeable AmpliVoxNiCad Battery Pack
(S1465)
OR
Plug optional International AC Adapter/ Recharger
power supply (S1460) into the AC/DC jack on the
amp. Plug into a working electrical outlet.
2. Mic Jack. Plug AmpliVox’s wired, hand-held
mic into the dynamic mic jack on the amp. Or plug
AmpliVox’s lapel or headset mic into the condenser mic jack.
3. Mic Switch. Turn the mic switch on. The switch
is on the side of the mic.
4. Speaker. Plug the speaker into either speaker
jack on the amp.
5. Power Switch. Turn the power switch on; red
light is lit.
6. Volume. Adjust mic volume knob (not auxiliary
volume knob.)
7. Speak! Congratulations! You are the proud
owner of a terrific, new AmpliVox sound system.
You have the power to speak.
Installing or Replacing
Batteries
The amp uses 10 D-cell Alkaline (AmpliVox
S-1430) batteries; or the rechargeable AmpliVox
NiCad Battery Pack (S-1465). Batteries are sold
separately.
Be sure to observe the polarity when putting
batteries in the battery compartment. The negative
(flat) ends go against the springs.
The battery cable comes from the factory
already plugged into the connector. If it comes
loose, push it in securely. (Turn the plug over if it
doesn’t fit; it only fits one way.)
The AmpliVox NiCad Battery Pack (S-1465) can
be recharged with the optional International AC
Adapter/Recharger (S-1460.)
1. Make sure the amp’s power switch is turned on.
The red light next to the power switch should be lit.
Howlback, sometimes called feedback, is the
howl or screech often heard in sound amplification
systems. (Impress your friends with that technical
term!) It will definitely get your audience’s attention, though the traditional tap on the water glass
is usually a better way.
4. Make sure the polarity (+ or -) of the batteries
is correct. The flat end (-) of the battery touches the
spring.
5. Make sure the cable connecting the battery
holder is not loose.
6. Make sure the speaker plug is securely connected to the speaker jack.
7. Make sure the mic plug is securely connected to
the proper mic jack.
8. Make sure the mic switch is turned on. It’s on
the side of the mic.
9. Make sure the mic volume is turned up. Don’t
turn up the auxiliary line in volume by mistake.
10. If you have a condenser mic, make sure it is
plugged into the condenser mic jack and not the
wireless mic jack.
11. If you are using the optional International AC
Adapter/Recharger instead of batteries, make sure
the cables are securely connected and the electrical outlet is working. Bending the prongs in or out
a bit may help.
Wireless
Transmitter &
Receiver
Lift the battery holder out. The plastic dividers
between the batteries help prevent battery corrosion.
Screeching Sounds?
3. Make sure you have not mixed battery types.
Use all alkalines or all nicads.
Enhance the performance of your AmpliVox
sound system with genuine AmpliVox accessories.
The removable plate on the back of the amp is
designed to stay closed until you need to change
the batteries. Slip a finger nail under it and slide it
out.
No Sound?
2. Make sure the batteries are not dead.
Many AmpliVox Accessories
Are Available
Howlback is caused by sound from the loudspeaker returning to the microphone. AmpliVox
systems are designed to minimize howlback,
unfortunately it can never be entirely eliminated.
Headset Mic S-2040
Dual Speaker Module S-1201
& Tripod S-1080
Here are some things you can do to minimize
howlback. Your audience will thank you.
1. Don’t touch the head of the mic. Hold the mic
away from the mic head.
2. Keep the loudspeakers turned toward the audience. Sound can easily be reflected off a hard surface, so keep trying if the first position doesn’t
help.
Lapel Mic S-2030
3. Try standing in a different position on stage to
minimize reflected sound entering the mic.
4. Turn down the volume. You can compensate by
speaking louder or closer to the mic.
5. Test your sound system before your audience
arrives, preferably where you will be speaking. But
even a little practice in your office will help familiarize you with the mic and the amp controls.
12. If you are using the optional International AC
Adapter/Recharger, make sure it is plugged into
the AC/DC in jack and not the lamp jack.
Horn Speaker
S-1260
International A/C
Adapter/Recharger
S-1460 (15 V)
13. A brand new cable is most likely o.k., but over
time a cable can become damaged from too much
flexing near the plugs.
More Important Info
Hold the mic more vertically; not directly in front of
your mouth like a rock star. This will help eliminate
popping sounds. Try saying, “Peter Piper picked a
peck of pickled peppers” with the mic directly in
front of your mouth. The vertical position also
makes the mic last longer because there is less
condensation from your breath inside the mic. (I
know you’re wondering why rock stars can eat the
mic and you can’t. It’s because they use a different
kind of mic and do they really care how long it
lasts?)
Published\Directions\850dir 4/13/98
WARNING:
Never mix different types of batteries. Never recharge alkaline batteries. You could cause an electrical
short, battery leakage and/or corrosion which will damage your
equipment and void your warranty.
Reading Light S-1100