1
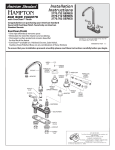
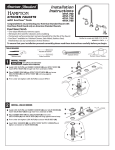
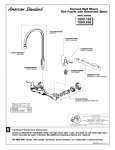
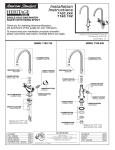
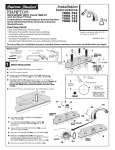
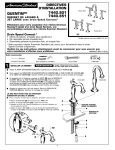
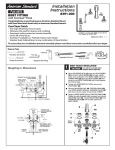
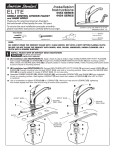
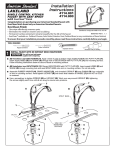
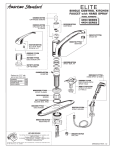
Installation
Instructions
7190 SERIES
7100 SERIES
SINGLE-HOLE BAR/PANTRY
FAUCET WITH SWING SPOUT
with
(7100 SERIES NOT
AVAILABLE WITH
EverClean Finish)
EverClean™ Finish
Congratulations on purchasing your American Standard faucet with
EverClean finish found only on American Standard faucets.
EverClean Finish
• One wipe effortlessly removes spots
• Eliminates the need for cleaners and scrubbing
• Permanent surface protectant remains beautiful
for the life of the faucet
• EverClean™ available on: Polished Chrome, Satin Nickel,
Stainless Steel, Polished Brass (or any combination of these finishes)
Certified to comply with ANSI A112.18.1M
U.S. Patent No. 5,819,789
3&7
To ensure that your installation proceeds smoothly-please read these instructions carefully before you begin.
MODEL 7190
MODEL 7100
012088-YYY0A
SWING SPOUT KIT
012088-YYY0A
SWING SPOUT KIT
066108-YYY0A
AERATOR
066108-YYY0A
AERATOR
012087-0070A
SPOUT SEAL KIT
028611-0070A
HANDLE SCREW
012087-0070A
SPOUT SEAL KIT
030741-0070A
CARTRIDGE SEAL
KIT
028611-0070A
HANDLE SCREW
028610-0070A
CARTRIDGE
A911758-0070A
RUBBER RING
012671-0070
RUBBER RING
M961714-0070A
MOUNTING KIT
012094-0070A
MOUNTING KIT
024220-0070A
SUPPLY NUT
Replace the "YYY" with
appropriate finish code
CHROME
POL. BRASS
SATIN NICKEL
SATIN/BRASS
CHROME/POL. BRASS
028610-0070A
CARTRIDGE
002
099
295
297
299
HOT LINE FOR HELP
For toll-free information and answers to your questions, call:
1 (800) 442-1902
Weekdays 8:00 a.m. to 8:00 p.m. EST
IN CANADA 1-800-387-0369 (TORONTO 1-905-306-1093)
Weekdays 8:00 a.m. to 7:00 p.m. EST
IN MEXICO 01-800-839-12-00
Product names listed herein are trademarks of American Standard Inc.
© American Standard Inc. 1999
Replace the "YYY" with
appropriate finish code
CHROME
WHITE
BONE
POL. BRASS
002
020
021
099
SWING SPOUT ASSEMBLY
CAUTION
Turn off hot and cold water
supplies before beginning.
3
Apply the grease (provided) liberally to the
SPOUT O-RING (1) and SNAP RING (2) areas.
4
Assemble the SPOUT (3) and tighten the
SPOUT NUT (4) until snug on VALVE BODY.
2
1
FITTING INSTALLATION
Remove LOCKNUT (1), BRASS WASHER (2), and
GASKET (3) from fitting.
Place RUBBER RING (4) in recess of fitting.
Insert inlet hoses (on model 7190 only) and
THREADED SHANK through hole of sink making
certain RUBBER RING (4) is properly seated in the
recess of the fitting base.
MODEL 7190
Assemble GASKET (3), BRASS WASHER (2), and
LOCKNUT (1) onto the THREADED SHANK from
underside of sink deck.
MODEL 7100
RECESS
4
RECESS
Tighten the LOCKNUT (1) securely.
For Model 7190 Only
SHANK
Connect the hot water supply to the left inlet hose
and the cold water supply to the right inlet hose
using appropriate connectors.
3
2
For Model 7100 Only
Connect hot or cold water supply lines to shank using
sealant, appropriate connectors, and coupling nuts.
TEST INSTALLED FAUCET
SERVICE
2
To change direction of handle rotation,
proceed as follows:
Turn valve to OFF position.
Remove INSERT and HANDLE SCREW.
Slip HANDLE with ADAPTER off.
Remove SPRING CLIP (1).
Lift STOP WASHER (2), turn 90p and replace.
Replace SPRING CLIP (1).
Replace ADAPTER, HANDLE, SCREW, and INSERT.
FLEXIBLE
INLET HOSES
1
COLD
SUPPLY
NUT
Operate both handles to flush water lines thoroughly.
Checkspout mounting and hose connections for leaks.
Remove AERATOR.
With handle in OFF position, turn on water supplies
and check all connections for leaks.
HOT
Turn handles into OFF position and replace AERATOR.
90p
1
AERATOR may accumulate dirt causing distorted and reduced
water flow. Remove AERATOR and rinse clean.
If spout drips, operate handles several times from OFF to ON
position. Do not force - handles turn only 90p.
Plastic SCREEN (3) in CARTRIDGE (4) may accumulate
dirt causing reduced water flow. To clean, first turn
off hot and cold water supplies, then:
Remove INSERT and HANDLE SCREW.
Slip HANDLE with ADAPTER off.
Unscrew CARTRIDGE (4) with wrench.
Thoroughly rinse plastic SCREEN (3) at
base of CARTRIDGE (4).
Replace CARTRIDGE (4) until flange is
tight against valve body.
Turn valves OFF.
Replace ADAPTER, HANDLE, SCREW,
and INSERT.
4
3
EverClean™ Finish Care Instructions
American Standard’s EverClean finish will wipe clean with a soft, dry cloth. A soft cloth with
clean water may also be used, if desired. No additional cleaning products are required.
DO NOT USE: Soaps, acid, polish, abrasives, harsh cleaners, or a cloth with a coarse surface.
3&7