1
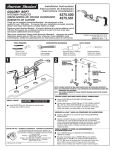
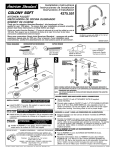
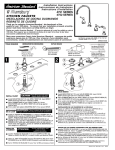
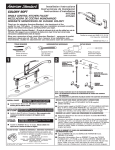
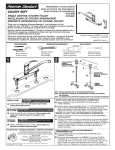
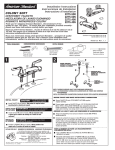
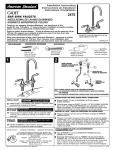
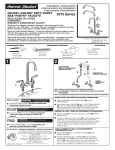
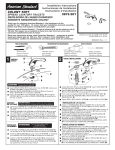
Installation Instructions
Instrucciones de Instalacion
Instructions d'installation
COLONY SOFT
4275.500
4275.501
KITCHEN FAUCETS
MEZCLADORA DE COCINA DUOMANDO
ROBINETS DE CUISINE
Thank you for selecting American-Standard...the benchmark of fine
quality for over 100 years. To ensure that your installation proceeds smoothly-please read these instructions carefully before you begin.
Gracias por preferir American Standard…. El punto de referencia de la más fina calidad por más de
100 años. Para asegurar que su instalación se efectue de la mejor forma favor de leer estas
instrucciones cuidadosamente antes de empezar.
Nous vous remercions d'avoir choisi American Standard... synonyme de qualité
supérieure depuis plus de 100 ans. Pour s'assurer d'une installation sans
inconvénients, veuillez lire attentivement ces instructions avant de commencer.
TOOLS REQUIRED
HERRAMIENTAS NECESARIAS
Channel Locks
Pinzas de Plomero
Pinces de sûreté
Certified to comply with ASME A112.18.1M
Certifié ASME A112.18.1M
M968732B
OUTILS REQUIS
Phillips Screwdriver
Adjustable Wrench
Llave Ajustable
Clé universelle
1
2
Plumbers' Putty or Caulking
Desarmador Regular
Tournevis cruciforme
Masilla de Plomero
Mastic de plomberie
(HAND TIGHTEN)
(APRIETE
MANUALMENTE)
SERRER À LA MAIN
2
1
3
COUPLING NUT
TUERCA DE CONEXION
ÉCROU DE
COUPLAGE
4
FERRULE
ANILLO SELLO
EMBOUT
NOTE: FLEXIBLE SUPPLIES OR BULL-NOSE RISERS MUST BE PURCHASED SEPARATELY.
NOTA: LOS CONECTORES FLEXIBLES O LAS CONTRAHUELLAS REDONDEADAS DEBEN SER
COMPRADOS POR SEPARADO.
NOTE : LEX TUYAUX FLEXIBLES OU TUYAUX D’ÉVENT DÉSAXÉS DOIVENT ÊTRE ACHETÉS
SÉPARÉMENT.
SECURE FAUCET AND MAKE WATER SUPPLY CONNECTIONS
INSTALL FAUCET
CAUTION
Turn off hot and cold water
supplies before beginning.
Install FAUCET (1) on sink. (No sealant is required unless
mounting deck on SINK is uneven)
INSTALACION ADVERTENCIA: Cierre la tuberia de la ali mentación
DE LA LLAVE del agua caliente y fría antes de comenzar lainstalación
Instale la llave (1) sobre el fregadero. (No es necesario sellar
a menos que la cubierta de montaje en el fregadero no este
uniforme).
INSTALLER
LE ROBINET
ATTENTION
Fermer l'alimentation d'eau
chaude et froide
avant de commencer.
Installer le ROBINET (1) sur l'évier. (Aucun scellant n'est
requis sauf si la surface de l'ÉVIER est inégale)
HOTLINE FOR HELP
NUMBERO DE EMERGENCIA
ASSISTANCE TÉLÉPHONIQUE
For toll-free information and answers to your questions, call:
Para información y respuestas a sus preguntas, llame sin costo al:
Pour information et réponses à vos questions, composer sans frais:
1 (800) 223-0068
Weekdays Días laborales de las Sur semaine:
8:00 to 8:00 p.m. EST
CANADA 1-800-387-0369 (TORONTO 1-905-306-1093)
Weekdays Días laborales de las Sur semaine:
8:00 to 7:00 p.m. EST
Product names listed herein are trademarks of American Standard Inc.
Secure FAUCET (1) with ATTACHMENT NUTS (2) supplied.
(HAND TIGHTEN).
Connect water supply to FAUCET (1) with 1/2" IPS FLEXIBLE SUPPLIES
(3) or 3/8" O.D. BULL-NOSE RISERS (4). Use adjustable wrench to
tighten connections. Do not over tighten. Be careful not to kink copper
supply when bending. Use tubing cutter to cut to proper length.
ASEGURE LA LLAVE Y HAGA LAS CONEXIONES DE ALIMENTACION
Asegure la llave(1) con las tuercas de fijación incluidas (2) (APRIETE
MANUALMENTE)
Conecte el suministro de agua a la llave (1)con los conectores flexibles
roscados de 1/2" o con los tubos de cobre de 3/8" con conexiones
macho. Utilice la llave ajustable para apretar las conexiones . No apriete
de manera excesiva Sea cuidadoso, no retuerza los tubos de cobre
cuando los doble. Utilice un cortador para tubo, para cortar a la
longitud apropiada.
FIXER LE ROBINET ET FAIRE LES RACCORDEMENTS
D'ALIMENTATION D'EAU
Fixer le ROBINET (1) avec les ÉCROUS DE FIXATION (2) inclus.
(SERRER À LA MAIN).
Raccorder l'alimentation d'eau au ROBINET (1) avec des TUYAUX
FLEXIBLES DE 1/2" IPS (3) ou des TUYAUX D'ÉVENT DÉSAXÉS DE
3/8" D.E. (4). Serrer les raccords avec la clé universelle. Ne pas trop
serrer. Veiller à ne pas crochir les tuyaux de cuivre en les pliant.
Utiliser une scie à métaux pour ramener le tuyau à la bonne longueur.
C
American Standard Inc. 2000
3
FITTING WITH SPRAY
1
Place SPRAY HOLDER (1) into separate hole of SINK (2) and
assemble NUT (3) onto shank.
From underside of SINK (2) and hand tighten NUT (3).
MEZCLADORA CON REGADERA
Coloque el portaregadera (1) en el orificio separado de el
fregadero (2) y ensamble la tuerca de fijación (3) sobre la
rosca del portaregadera.
Por la parte inferior de el fregadero (2) apriete manua
lmente la tuerca (3)
2
ROBINET AVEC DOUCHETTE
3
4
FITTING WITH SPRAY
Feed SPRAY HOSE (1) through SPRAY HOLDER (2) and
attach COUPLING NUT (3) of HOSE (1) to HOSE ADAPTOR (4)
on valve body. Tighten COUPLING NUT (3) firmly.
Make certain that SPACER WASHER (5) and RUBBER
WASHER (6) are attached to SPRAY HOSE (1) and thread
SPRAY HEAD (7) to NUT (8).
7
6
5
8
4
1
3
MEZCLADORA CON REGADERA
Alimente la manguera de la regadera(1) através del portare
gadera (2) y sujete la tuerca de conexión (3) de la manguera
(1) al adapatador de la manguera (4) sobre el cuerpo de la
valvula. Apriete la tuerca de conexión (3) firmemente.
Asegurese que el empaque espaciador (5) y la arandela de
hule (6) esten unidas a la manguera de la regadera (1) y
enrosque la cabeza de la regadera (7) a la tuerca (8)
ROBINET AVEC DOUCHETTE
2
5
Placer le PORTE-DOUCHETTE (1) dans l'orifice séparé de
l'évier (2) et assembler l'ÉCROU (3) et la tige.
Par dessous l'ÉVIER (2) et serrer l'ÉCROU (3) à la main.
Glisser le BOYAU DE LA DOUCHETTE (1) à travers le PORTEDOUCHETTE (2) et joindre l'ÉCROU DE COUPLAGE (3) de
l'ADAPTEUR (4) BOYAU À BOYAU (1) au corps de la valve.
Serrer fermement l'ÉCROU DE COUPLAGE (3).
S'assurer que la RONDELLE D'ESPACEMENT (5) et la
RONDELLE EN CAOUTCHOUC (6) sont rattachées au
BOYAU DE LA DOUCHETTE (1) et la TÊTE DE LA DOUCHETTE
filetée (7) à l'ÉCROU (8).
TEST INSTALLED FAUCET
Remove AERATOR. With handles in OFF position, turn on water supplies and check all connections for leaks.
Operate both HANDLES to flush water lines thoroughly. Rotate SPOUT in both directions. Replace AERATOR.
Direct SPRAY HEAD into sink and activate SPRAY. Check HOSE connections for leaks.
PRUEBA DE LA LLAVE INSTALADA
Remover el aireador con los manerales en la posición de cerrado, abrir la alimentación de agua y checar todas las
conexiones contra goteo (contra fugas)
Girar ambos manerales para dejar fluir el agua de las tuberias. Girar la salida en ambas direcciones. Reinstalar el aireador.
Dirigir la cabeza de la regadera hacia adentro del fregadero y active la regadera. Checar las conexiones de la manguera contra fugas.
TESTER L'INSTALLATION DU ROBINET
Enlever l'AÉRATEUR. Les poignées en position FERMÉ, ouvrir l'alimentation d'eau et vérifier si les raccords fuient.
Ouvrir les deux POIGNÉES pour rincer les conduits d'eau abondamment. Faire pivoter le BEC dans les deux directions. Replacer l'AÉRATEUR.
En la dirigeant dans l'évier, activer la DOUCHETTE. Vérifier si le BOYAU fuit.
6
If faucet drips proceed as follows:
Aerator may accumulate dirt causing
distorted and reduced water flow.
Remove aerator and rinse clean.
If spout drips, operate handles
several times from OFF to ON position.
Do not force-handles turn only 90˚.
CARE INSTRUCTIONS:
DO: SIMPLY RINSE THE PRODUCT CLEAN WITH
CLEAR WATER. DRY WITH A SOFT COTTON
FLANNEL CLOTH.
DO NOT: DO NOT CLEAN THE PRODUCT WITH
SOAPS, ACID, POLISH, ABRASIVES, HARSH
CLEANERS, OR A CLOTH WITH A COARSE
SURFACE.
Si la llave gotea proceda como sigue:
El aireador tal vez acumule suciedad,
causando un flujo no uniforme del agua
Remover el aireador, enjuagar y limpiar.
Si la salida gotea gire los manerales
varias veces desde la posición de cerrado a la posición de abierto. No force
los manerales, solamente girelos a 90
grados.
INSTRUCCIONES DE CUIDADO
DEL PRODUCTO:
LIMPIE EL PRODUCTO CON AGUA LIMPIA
Y SÉQUELO CON UNA TELA SUAVE DE
FRANELA DE ALGODÓN.
NO LIMPIE EL PRODUCTO CON JABÓN,
ÁCIDOS, PULIDORES, ABRASIVOS,
LIMPIADORES FUERTES O TELAS ÁSPERAS.
Si le robinet coule, suivre les instructions
suivantes:
La saleté peut s'accumuler dans l'aérateur et
causer un débit d'eau plus faible ou inégal.
Enlever l'aérateur et rincer.
Si le bec coule, ouvrir et fermer les poignées
plusieurs fois de suite. Ne pas forcer. Tourner
seulement à 90˚.
INSTRUCTIONS POUR L'ENTRETIEN
FAIRE : SIMPLEMENT RINCER LE PRODUIT AVEC DE
L'EAU CLAIRE JUSQU'À CE QU'IL SOIT PROPRE SÉCHER
AVEC UN LINGE DE FLANELLE DE COTON DOUX.
NE PAS FAIRE : NE PAS NETTOYER LE PRODUIT AVEC
DES SAVONS, DE L'ACIDE, DU POLISH, DES ABRASIFS,
DES NETTOYANTS AGRESSIFS OU UN LINGE À TEXTURE
RUGUEUSE.
M968732B