1
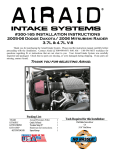
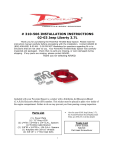
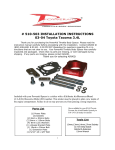
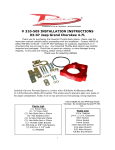
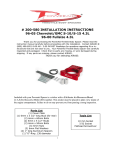
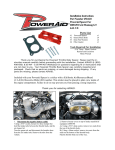
INSTALLATION INSTRUCTIONS
#300-765 Airaid Jr. Kit #300-965 Airaid MIT
2005-07 Dodge Dakota 4.7L V-8
2006-07 Mitsubishi Raider 4.7L V-8
Thank you for purchasing the Airaid Intake System. Please read the instruction manual carefully before
proceeding with the installation. Contact Airaid @ (800) 498-6951 8:00 AM - 5:00 PM MST weekdays for
questions regarding fit or instructions that are not clear to you. Your Airaid Intake System was carefully
inspected and packaged. Check that no parts are missing, or were damaged during shipping. If any parts are
missing, contact Airaid. The air filter element is protected from direct exposure to water and debris; care should
be taken not to drive through deep water. WATER INGESTION IS THE DRIVERS RESPONSIBILTY! The
air filter is reusable and should be cleaned using the Airaid Filter Tune-Up Kit periodically.
Thank you for selecting Airaid.
Packing List:
850-175
KIT965T
KITRDCR01
KITHUMPHS02
KIT765HP
KITHS48
KITHS52
KITHS60
KITGRMT03
Airaid Premium Filter
Modular Intake Tube
Silicone Reducer Hose
Urethane Hump Hose
Hardware & Instructions
#48 Hose Clamp
#52 Hose Clamp
#60 Hose Clamp
Grommet
Tools Required for this Installation:
1
1
1
1
1
1
1
2
1
Flat Head Screwdriver or
5/16” Socket & Ratchet
10mm Socket
Installation Instructions. Read Me!
1. Disconnect negative battery
cable. Loosen hose clamp on
intake tube at the factory airbox
end. For Jr. Kit, replace the
factory air filter with the Airaid
Premium Filter provided.
4. Remove the resonator and
tube from the vehicle.
5. With the resonator turned
over, carefully remove the air temp
sensor by pushing in, and turning
counter clockwise.
7. Install the grommet into the
hole in the MIT as shown.
8. Carefully install the air temp
sensor into the grommet installed
in step 7. Make sure it goes all the
way in.
2. Disconnect the intake air
temperature sensor by squeezing
the tab on the connector.
3. With the 10mm socket,
remove 2 bolts from the base of the
resonator.
6. Install the urethane hump hose
on the factory airbox with the two
#60 hose clamps. (Leave clamps
loose.) Next install the reducer
(small side first with the #48 hose
clamp) on the throttle body. Install
the #52 hose clamp on the outside
of the reducer, and leave loose.
9. Install the MIT into the hump
hose first, and then into the
reducer. Adjust the MIT so that it’s
up against the throttle body, and
then tighten all four hose clamps.
Reconnect the air temp sensor.
10. Double check your work to be
certain that all nuts, bolts, and
clamps are securely fastened.
11. Reconnect the negative
battery cable.
Before
After!
Don’t Forget Your AIRAID
Filter Tune-Up Kit!
P/N 790-550
Instructions Revision
Date: 07/16/08
Airaid Filter Co. 2688 E Rose Garden Ln. Phoenix AZ 85050 (800) 498-6951 [email protected] www.airaid.com