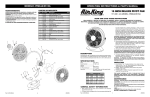
1
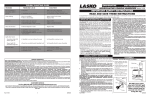
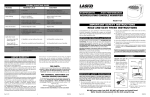
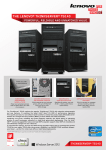
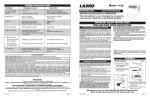
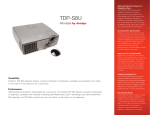
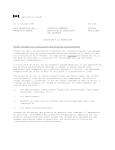
MODEL 3LA80A/9915A
OPERATING INSTRUCTIONS & PARTS MANUAL
RECIRCULATING HUMIDIFIER
3 GALLON MODEL 3LA80A/9915A
READ AND SAVE THESE INSTRUCTIONS
READ CAREFULLY BEFORE ATTEMPTING TO ASSEMBLE, INSTALL, OPERATE OR MAINTAIN THE PRODUCT DESCRIBED.
PROTECT YOURSELF AND OTHERS BY OBSERVING ALL SAFETY INFORMATION. FAILURE TO COMPLY WITH
INSTRUCTIONS COULD RESULT IN PERSONAL INJURY AND/OR PROPERTY DAMAGE!
RETAIN INSTRUCTIONS FOR FUTURE REFERENCE.
DESCRIPTION
The AirKing 3 Gallon (11.4 liter) Humidifier features 3-Speed whisperquiet operation. This unit is capable of humidifying up to 1500 sq. ft.
(166.7 sq. yards) and features a 7.5 ft. (2.3 m) 18/3 cord set.
SERVICING THE HUMIDIFIER. ALWAYS UNPLUG THE POWER CORD.
6. This Humidifier is intended for general use ONLY. It must NOT be
used in potentially dangerous locations such as flammable, explosive, chemical-laden or wet atmospheres.
WARNING: TO REDUCE THE RISK OF FIRE OR ELECTRIC SHOCK,
DO NOT USE THIS HUMIDIFIER WITH ANY SOLID STATE SPEED
CONTROL DEVICE.
7. Always place the Humidifier is on a stable, flat, level surface when
operating, to avoid the chance of the Humidifier overturning. Locate
the Power Cord so the Humidifier or other objects are not resting on it.
Keep the Power Cord away from room traffic.
8. Always direct air flow away from walls and furniture. Excessive moisture
may cause damage.
9. Completely reassemble Humidifier, according to instructions, before
reconnecting to power supply.
10. Humidifiers require regular cleaning to maintain proper operating conditions. Refer to the CLEANING section for proper cleaning procedures.
SPECIFICATIONS
Motor ....................................... 120V / 60Hz
Blade diameter ....................... 6" (15.24 cm)
Speeds .................................... 3
Control .................................... Rotary Switch
Approvals ................................ UL/CUL Listed
MODEL
3LA80A/9915A
SPEED
HIGH
MED
LOW
RPM
Amps
Watts
dB A
1975
0.650
33.7
55
1750
0.500
27.7
52
1550
0.400
22.7
50
GENERAL SAFETY INFORMATION
Rev. A 9/05
4
2084474
1. Make certain that the power source conforms to the electrical requirements of the Humidifier.
2. The power cord is equipped with a three-prong grounded plug that
must be inserted into a matching receptacle. Under no circumstances must the grounding prong be cut off the plug. Where a twoprong wall receptacle is encountered, it must be replaced with a
properly grounded three-prong receptacle installed in accordance
with the National Electrical Code (NEC) and all applicable local
codes and ordinances. This work must be done only by a qualified
electrician, using copper wire only.
WARNING: USE OF A THREE-PRONG TO TWO-PRONG ADAPTER
IS NOT RECOMMENDED. IMPROPER CONNECTION MAY CREATE
THE RISK OF ELECTROCUTION. USE OF SUCH ADAPTERS ARE
NOT PERMITTED IN CANADA.
WARNING: THIS PLUG IS A SAFETY FEATURE. TO REDUCE THE
RISK OF FIRE, ELECTRIC SHOCK AND PERSONAL INJURY, DO NOT
REMOVE, REPLACE, REPAIR OR TAMPER WITH THE ORIGINALLY
SUPPLIED PLUG. IF THE FAN DOES NOT FUNCTION PROPERLY, IT
MAY BE DUE TO THE SAFETY DEVICE INCORPORATED IN THIS
PLUG. RETURN TO AN AUTHORIZED SERVICE CENTER OR CALL
800-233-0268, MONDAY - FRIDAY, BETWEEN 8:00 AM AND 5:00 PM
EST. IF THE PLUG WARNING LABEL IS MISSING OR DAMAGED,
CALL THE TOLL FREE NUMBER FOR A REPLACEMENT LABEL.
3. Where possible, avoid the use of extension cords. If they must be
used, minimize the risk of overheating by ensuring that they are UL
listed and of the proper gage and length. Never use a single extension
cord to operate more than one Humidifier.
4. Do not insert fingers or foreign objects into the Humidifier. Do not block
or tamper with the Humidifier in any manner while it is in operation. Do
not touch the Humidifier while in operation or just after it has been
turned off, as some parts may be hot enough to cause injury.
5. Unplug power cord before filling or servicing the Humidifier.
WARNING: DO NOT DEPEND UPON THE ON-OFF SWITCH AS THE
SOLE MEANS OF DISCONNECTING POWER WHEN FILLING OR
Rev. A 9/05
NOTE: A few droplets of water may be present
in your Humidifier as a result of our quality
testing prior to packaging and shipment.
OPERATION INSTRUCTIONS
1.
It is recommended that all Humidifiers be cleaned prior to
use. Please read CLEANING and FILTER CARE section, for Base cleaning.
2.
Remove the Upper Housing from the Base. Make sure that the
Evaporative Pad is properly placed in the Base. (Figure 1)
Figure 1
Evaporative Pad
1
2084474
MODEL 3LA80A/9915A
3.
4.
MODEL 3LA80A/9915A
CLEANING and FILTER CARE
Even though your Humidifier will produce approximately 3 gallons in a 24 hour period*, the water capacity (amount of water
the Humidifier will hold at one time) is 1.75 gallons.
You may fill your Recirculating Evaporative Humidifier two
different ways:
A) Fill the Base with cool water to level indicated
in Figure 2A.
B) Replace the Upper Housing on the Base and push Water
Lens down to pour water into the Humidifier (Figure 2B)
until it reaches the level indicated in Figure 2A.
Use a dry soft cloth to wipe the Chassis area, which includes
the motor area. DO NOT use water to clean the Motor or
Switch area. Doing so may result in electrical shock or damage to the Humidifier.
10. Commercial "Descalers" and "Bacteriostats" are available at your
local home improvement center.
OFF SEASON STORAGE
Regular cleaning is necessary to ensure proper and efficient
operation. The frequency of cleaning depends on the amount
of impurities which may be found in the water or how often the
Humidifier is in operation. In either instance, it is recommended
that the Humidifier be cleaned at least once a week.
CAUTION: To prevent electric shock, always turn Control Knob
to OFF (0) position and unplug before cleaning.
11. Do not operate Humidifier when there is still cleaner in the water.
1.
2.
Remove Upper Housing from Base. Be careful not to let excess water from pump spill onto furniture or flooring.
Figure 4
Figure 2B
Figure 2A
9.
Water Lens
3.
Maximum Water Level
With water lens pushed
down, the filter may be removed for cleaning or replacing. (Figure 4)
Place Humidifier back in its carton and store in a cool dry place.
PROBABLE CAUSE
SOLUTION
Foul odor
• Filters need to be replaced
• Base/reservoir needs to be cleaned
Replace Filter
Follow Instructions under CLEANING
and FILTER CARE
Follow Instructions under CLEANING
and FILTER CARE
Replace Filter
Follow Instructions under CLEANING
and FILTER CARE
Use filtered or distilled water
No water show
• Mineral deposits in water
• Humidifier needs to be cleaned
• Hard water - Iron in water
• Some humidifier additives can cause
discoloration
• No water in Humidifier
• Hose not connected to water show
• Hose not connected to pump
Fill with cool water
Connect Hose to Water Show
Connect Hose to Pump
1
Figure 6
2
Drip Holes
5
3
Evaporative Pad
6
5. Take extra care to prevent water spillage that may damage furniture or flooring. The manufacturer will not accept responsibility for damage to property caused by water spillage.
7
Key Part Number
6. Always be sure that the Power Control Knob is in the OFF (0)
position when plugging Humidifier into a grounded 120 volt
AC wall outlet.
5.
To increase the life of your Evaporative Pad, unsnap Holder,
remove Pad and flip over. (Figure 6)
Evaporative Pad life may be extended by cleaning the Pad in
a vinegar solution. To clean Pad, mix one part undiluted vinegar with four parts warm tap water. Soak the Pad in this
solution for 20 minutes, rinse Pad thoroughly with warm water to remove vinegar odor.
DO NOT FLATTEN, SQUEEZE OR TWIST FILTER WHEN CLEANING.
6. Discoloration of the Evaporative Pad is normal after extended
use. The discoloration is caused by mineral deposits in the water, and the degree of discoloration will vary depending upon
the amount of mineral content in the water. When the Pad surface area is thoroughly discolored, or you notice reduced water usage, it is a good indicator that the Evaporative Pad needs
to be replaced. The Evaporative Pad should be replaced at
least once every season.
CAUTION: Do not plug Humidifier into electrical outlet with wet hands,
or electrical shock may occur.
7. Set Moisture Control Knob to regulate desired amount of
humidity. (Figure 3)
HIGH (3): For fast humidification of a large
room. This setting will provide approximately 3 gallons of moisture output in
a 24 hour period.*
MED (2):For normal operation.
LOW (1):For quiet, night time operation.
* Calculations based on ambient conditions of 70° F and 30% relative
humidity in a room of average insulation.
8. Water usage will vary depending upon initial humidity level in the
room. If humidity is low, the Unit will use water more rapidly until the
humidity in the room is stabilized. If the humidity is already near or
above 50% relative humidity, water consumption will be low.
CAUTION: Be careful not to direct airflow towards walls or furniture,
as excessive moisture may cause damage.
9. Refill Humidifier when water level in the Base is low.
10. If you do not plan to use your Humidifier for several days, empty
all water from the Unit. Standing water may provide an environment for the growth of algae.
Rev. A 9/05
3.
4
Always carry filled Humidifier carefully.
Never move water filled Humidifier while
plugged in.
Figure 3
Dispose of the Evaporative Pad. Do not store a used Evaporative Pad in the Humidifier. Do not dispose of Pad Holder.
TROUBLE
Filter discoloration
Water discoloration
Figure 5
2.
• Whole humidifier needs cleaning
Remove Evaporative Pad Holder from Base and inspect Small
Water Drip Holes for any blockage. (Figure 5)
It is important that these Drip Holes remain open at all times
for proper water supply to Evaporative Pad.
Evaporative
Pad Holder
Clean and dry Humidifier thoroughly per the CLEANING
and FILTER CARE section. Do not leave any water in the
Unit while storing.
TROUBLE SHOOTING GUIDE
Filter
4.
Do not overfill and never use hot water.
CAUTION: Do not pour water through the Exhaust Grill on the Upper Housing. Doing so
may cause damage and personal injury.
Do not overfill. Overfilling the Unit may
cause motor damage.
1.
The Replacement Pad to be used in this unit is:
7.
8.
2
The Replacement Evaporative Pad
Model 9932 (Available Separately)
TO DESCALE BASE AND DRIP SHIELD: Mix one part undiluted white vinegar with four parts warm tap water. Let vinegar
solution stand for 20 minutes then wipe away any scale buildup
using a soft brush or cloth. Do not use soap or detergents
and never use an abrasive cleaner.
TO DISINFECT BASE AND DRIP SHIELD: Fill with 1 teaspoon
of chlorine bleach and 1 gallon of water. Let solution stand for 20
minutes. Carefully empty Jug and rinse well with water until bleach
smell is gone.
2084474
Description
Qty.
1
2011930
Switch Knob
2
2011931
Top
3
2091163
Spring
4
02010858SS Lens Holder
5
2091224
Screw .139/.149 x 5/16” #6 PTH
6
2011937
Lens
7
2011942
Reticulated Filter Foam
8
02010599
Gasket
9
2011932
Chassis
10
2091223
Screw .139/.149 x 1/2” #6 PTH
11
2011939
Blade
12
2091501
Blade Clamp
13
02030031SG Grounded Motor/Control Box Assembly
14
*
Screw #8 - 1/2” AB PPH
15
2010859SS
Nozzle
16
*
Motor Basket and Lower Pump Housing
17
02010848SS Water Distribution Block
18
2069090
Clear Tubing 1/4” x 8 7/8”
19
2069097
Clear Tubing 1/4” x 14”
20
2011933
Filter Holder Back
21
2010899
Filter
22
2011934
Filter Holder Front
23
2011935G
Drip Shield
24
2011936
Base
25
2010415
Rubber Feet
Included
with
#13
Motor
Assembly
*
1
1
1
1
1
1
1
1
1
15
1
1
1
2
1
1
1
1
1
1
1
1
1
1
4
Rev. A 9/05
3
8
9
10 (6X)
17
11
20
10 (2X)
12
14
13
19
21
10 (3X)
16
22
15
10 (4X)
18
23
24
25 (4X)
2084474