1
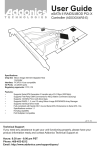
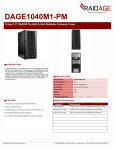
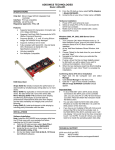
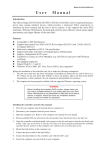
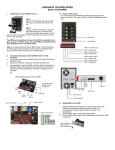
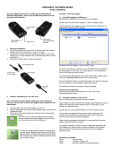
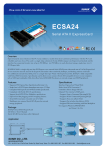
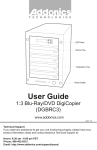
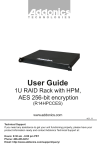
ADDONICS TECHNOLOGIES Model: RTM25N335U3 I. Removing Cover of RAID Tower Mini Loosen the 3 screws at the back of the tower using a Philips screwdriver by turning counter-clockwise. Separate the metal casing of the storage tower from the housing by lifting up the casing as shown on the photo. II. Installing drive into the RAID Tower Mini Using 2.5” SATA hard disk drive, slide the drive into the drive bay. Close the front panel to secure the drive. hard disk drive Using 3.5” SATA hard disk drives, slide the drive into the embedded drive bay and secure the drive to the bay with screws provided. After RAID configuration, it is compatible with any SATA controller (RAID or non RAID). If you have configured individual drives, you need to connect the RAID tower to a port multiplier compatible eSATA host controller, if you plan to use eSATA connection. After RAID configuration and you plan to connect to a USB2.0 or 3.0 port on your system, connect the eSATA to USB3.0 adapter to eSATA cable and plug it into the USB port. Software Installation for SiI4726 Manager A. From the CD start-up menu select SATA RAID Utilities > Other SATARAID Utilities > Windows 2000/XP/2003/Vista. B. Unzip the file SiI_4726_Manager_V4.0.0.9.zip on your drive. The folder name would be SiI4726. C. To install SiI4726 Manager, double click setup.exe In SiI4726 Manager, all the drives connected to the RAID Tower IV will show up. VI. SATA power connector SATA data cable Connect the internal SATA data cable to the data port of the hard drive then connect the 15-pin SATA power connector to the power port on the hard drive. III. a. b. c. d. Setting RAID on the HPM For a complete User’s Guide of SiI4726 Manager refer to our website. Support > User Guides > SiI4726 Manager User Manual V.26 Connecting the power cable and RAID Tower Mini to the computer Connect the power cord provided from the wall outlet to the back of the RAID Tower Mini. Make sure the power is off (power LED light should be off) Connect the provided eSATA cable from the back of the RAID Tower to the eSATA controller card on the computer. We recommend connecting the eSATA port for best performance if this port is available on your computer. If eSATA connection is not available, connect the USB2.0 to eSATA adapter to the other end of the eSATA cable then connect the adapter to the USB port on your computer. IV. Power on/off control Turn on the power to the RAID Tower Mini by pressing the power button on the front. The power LED light should lit indicating the power is on. V. Sil4726 Manager Utility Installation Note: You need to install the SiI4726 Manager on your system to configure RAID sets. RAID configuration is programmed by connecting the hardware port multiplier: to one of Addonics’ SATA controllers that has SIL3124 or SIL3132 chip set. TECHNICAL SUPPORT Phone: 408-453-6212 Hours: 8:30 am - 6:00 pm PST ADDONICS TECHNOLOGIES Model: RTM25N335U3 Email: http://www.addonics.com/support/query/