1
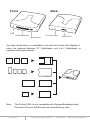
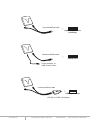
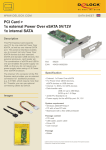
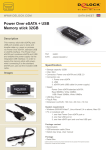
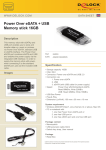
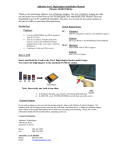
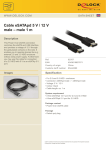
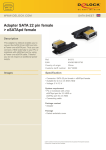
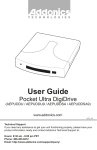
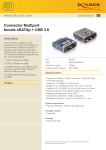
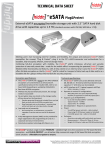
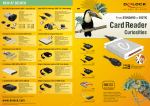
T E C H N O L O G I E S
User Guide
Pocket UDD II
(PUDDEPU3 / PUDDESP / PUDDES
PPROEPU3 / PPROESP / PPROES)
www.addonics.com
v6.1.11
Technical Support
If you need any assistance to get your unit functioning properly, please have your
product information ready and contact Addonics Technical Support at:
Hours: 8:30 am - 6:00 pm PST
Phone: 408-453-6212
Email: http://www.addonics.com/support/query/
Front
LED
Back
Flash Media Slot
5V Power Input
Eject Button
eSATA Port
Any flash media below is compatible to use with the Pocket Ultra Digidrive II,
using the optional Addonics CF DigiAdapter and 4-in-1 DigiAdapter or
equivalent third party adapter.
MD
MS
CF-I
SM
CF-II
SD
CF DigiAdapter
MMC
4-in-1 DigiAdapter
ATA Flash
XD
Note:
PCMCIA Hard Drive
XD Memory Adapter
The Pocket UDD ii is not compatible with Wireless Broadband card,
Panasonic P2 card, SRAM card and Linear Memory card.
www.addonics.com
Technical Support (M-F 8:30am - 6:00pm PST)
Phone: 408-453-6212
Email: www.addonics.com/support/query/
Universal eSATAp Cable
Hybrid eSATA Port
(eSATAp)
Standard eSATAp Cable
eSATA Port
Power Adapter or
USB Power Cable
Universal eSATAp Cable
USB 3.0/2.0 Port
eSATAp to USB 3.0 Adapter
www.addonics.com
Technical Support (M-F 8:30am - 6:00pm PST)
Phone: 408-453-6212
Email: www.addonics.com/support/query/
Operation of the Pocket UDD II
A.
Pocket UDD II is connected via USB.
1.
Insert the media fully into the device using PCMCIA adapters and your operating system
will report new hardware detected and begin to install the device. This may take a few
seconds before a new drive icon appears in the My Computer folder. During this
initialization, the LED light on the Pocket UDD II toggles between red and green color;
and will stay green once the computer recognizes the media.
2.
Once the drive icon appears, the media is now ready and can be used like regular floppy
media.
3.
During the read / write operation, the LED light of the Pocket UDD will blink red.
4.
To remove the media, click on the Safe Remove icon to stop the connection as shown
below. Once the “you may now safely remove window” shows up, you can then remove
the media from the Pocket UDD II by pushing on the eject button.
Note:
If you eject the media from the Pocket UDD without checking the Safe Remove icon, a
warning message will appear from Windows 98SE, Me and 2000. This message is a
reminder that it is safer to use the Safe Remove icon when you remove the media to
prevent possible data loss in case you are in the middle of copying a file to and from the
media. You can go ahead and close this message.
5.
Do not pull the media out of the device without using the eject button. This may crash the
computer, as it does not realize the media has been manually removed from the device.
B.
Pocket UDD II is connected via eSATA
Note:
Before connecting the Pocket UDD II, it is assumed that you have installed the drivers of
the eSATA controller card. You do not need to install any third-party driver for the Pocket
UDD II.
1.
Insert the media fully into the device using PCMCIA adapters and your operating system
will report new hardware detected and begin to install the device. This may take a few
seconds before a new drive icon appears in the My Computer folder. During this
initialization, the LED light on the Pocket UDD II toggles between red and green color;
and will stay green once the computer recognizes the media.
2.
Once the drive icon appears, the media is now ready and can be used like regular floppy
media.
3.
During the read / write operation, the LED light of the Pocket UDD will blink red.
CONTACT US
www.addonics.com
Phone:
Fax:
Email:
408-573-8580
408-573-8588
http://www.addonics.com/sales/query/