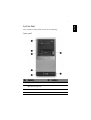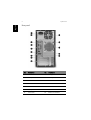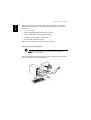
1
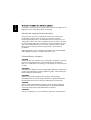
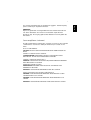
Aspire T310
User’s manual
Copyright© 2003 Acer Incorporated
All Rights Reserved
Aspire T310
User’s manual
Changes may be made periodically to the information in this publication without obligation
to notify any person of such revision or changes. Such changes will be incorporated in new
editions of this manual or supplementary documents and publications. This company makes
no representations or warranties, either expressed or implied, with respect to the contents
hereof and specifically disclaims the implied warranties of merchantability or fitness for a
particular purpose.
Record the model number, serial number, purchase date, and place of purchase information in
the space provided below. The serial number and model number are recorded on the label
affixed to your computer. All correspondense concerning your unit should include the serial
number, model number, and purchase information.
No part of this publication may be reproduced, stored in a retrieval system, or transmitted, in
any form or by any means, electronic, mechanical, photocopy, recording, or otherwise,
without the prior written permission of Acer Incorporated.
Model Number :__________________________________
Serial Number:___________________________________
Purchase Date: ___________________________________
Place of Purchase: ________________________________
Acer and the Acer Logo are registered trademarks of Acer Inc. Other company's product
names or trademarks are used herein for identification purposes only and belong to their
respective companies.
iii
This device has been tested and found to comply with the limits for a
Class B digital device pursuant to Part 15 of the FCC Rules. These limits
are designed to provide reasonable protection against harmful
interference in a residential installation. This device generates, uses,
and can radiate radio frequency energy and, if not installed and used
in accordance with the instructions, may cause harmful interference to
radio communications.
However, there is no guarantee that interference will not occur in a
particular installation. If this device does cause harmful interference to
radio or television reception, which can be determined by turning the
device off and on, the user is encouraged to try to correct the
interference by one or more of the following measures:
•
Reorient or relocate the receiving antenna
•
Increase the separation between the device and receiver
•
Connect the device into an outlet on a circuit different from that
to which the receiver is connected
•
Consult the dealer or an experienced radio/television technician
for help
Notice: Shielded cables
All connections to other computing devices must be made using
shielded cables to maintain compliance with FCC regulations.
Notice: Peripheral devices
Only peripherals (input/output devices, terminals, printers, etc.)
certified to comply with the Class B limits may be attached to this
equipment. Operation with noncertified peripherals is likely to result
in interference to radio and TV reception.
Use conditions
This part complies with Part 15 of the FCC Rules. Operation is subject to
the following two conditions: (1) this device may not cause harmful
interference, and (2) this device must accept any interference received,
including interference that may cause undesired operation.
Notice: Canadian users
This Class B digital apparatus meets all requirements of the Canadian
Interference-Causing Equipment Regulations.
English
FCC notice
English
iv
Remarque à l’intention des utilisateurs canadiens
Cet appareil numérique de la classe B respected toutes les exigences du
Règlement sur le matériel brouilleur du Canada.
Macrovision® copyright protection notice
This product incorporates copyright protection technology that is
protected by method claims of certain U.S. patents and other
intellectual property rights owned by Macrovision Corporation and
other rights owners. Use of this copyright protection technology must
be authorized by Macrovision Corporation, and is intended for home
and other limited viewing uses only unless otherwise authorized by
Macrovision Corporation. Reverse engineering or disassembly is
prohibited.
Apparatus Claims of U.S. Patent Nos. 4,631,603, 4,577,216, 4,819,098,
and 4,907,093 licensed for limited viewing uses only.
Lithium battery statement
CAUTION
Danger of explosion if battery is incorrectly replaced. Replace only with
the same or equivalent type recommended by the manufacturer.
Dispose of used batteries according to local regulations. Recycle if at all
possible.
ADVARSEL!
Lithiumbatteri - Eksplosionsfare ved fejlagtig håndtering. Udskiftning
må kun ske med batteri af samme fabrikat og type. Léver det brugte
batteri tilbage til leverandøren.
ADVARSEL
Eksplosjonsfare ved feilaktig skifte av batteri. Benytt samme
batteritype eller en tilsvarende type anbefalt av apparatfabrikanten.
Brukte batterier kasseres i henhold til fabrikantens instruksjoner.
VARNING
Explosionsfara vid felaktigt batteribyte. Anvãnd samma batterityp
eller en ekvivalent typ som rekommenderas av apparattillverkaren.
Kassera anvãnt batteri enligt fabrikantens instruktion.
VAROITUS
Päristo voi räjähtää, jos se on virheellisesti asennettu. Vaihda paristo
v
VORSICHT!
Explosionsgefahr bei unsachgemäßen Austausch der Batterie Ersatz
nur durch denselben oder einem vom Hersteller empfohlenem
ähnlichen Typ. Entsorgung gebrauchter Batterien nach Angaben des
Herstellers.
Laser compliance statement
The CD or DVD drive used with this computer is a laser product. The CD
or DVD drive’s classification label (shown below) is located on the
drive.
CLASS 1 LASER PRODUCT
CAUTION: INVISIBLE LASER RADIATION WHEN OPEN. AVOID EXPOSURE TO
BEAM.
APPAREIL A LASER DE CLASSE 1 PRODUIT
LASERATTENTION: RADIATION DU FAISCEAU LASER INVISIBLE EN CAS
D’OUVERTURE. EVITTER TOUTE EXPOSITION AUX RAYONS.
LUOKAN 1 LASERLAITE LASER KLASSE 1
VORSICHT: UNSICHTBARE LASERSTRAHLUNG, WENN ABDECKUNG GEÖFFNET
NICHT DEM STRAHLL AUSSETZEN
PRODUCTO LÁSER DE LA CLASE I
ADVERTENCIA: RADIACIÓN LÁSER INVISIBLE AL SER ABIERTO. EVITE
EXPONERSE A LOS RAYOS.
ADVARSEL: LASERSTRÅLING VEDÅBNING SE IKKE IND I STRÅLEN.
VARO! LAVATTAESSA OLET ALTTINA LASERSÅTEILYLLE.
VARNING: LASERSTRÅLNING NÅR DENNA DEL ÅR ÖPPNAD ÅLÅ TUIJOTA
SÅTEESEENSTIRRA EJ IN I STRÅLEN
VARNING: LASERSTRÅLNING NAR DENNA DEL ÅR ÖPPNADSTIRRA EJ IN I
STRÅLEN
ADVARSEL: LASERSTRÅLING NAR DEKSEL ÅPNESSTIRR IKKE INN I STRÅLEN
English
ainoastaan laitevalmistajan suosittelemaan tyyppiin. Hävitä käytetty
paristo valmistajan ohjeiden mukaisesti.
English
vi
Macrovision® copyright protection notice
Lithium battery statement
Laser compliance statement
System Tour
Front panel
Rear panel
System Features
Performance
Multimedia
Connectivity
System peripherals
Mouse(PS/2 or USB, manufacturing option)
Keyboard(PS/2 or USB, manufacturing option)
Speakers
System upgrade
Open the computer
Set up new components
Setting up your computer
Necessary to know before Setup
Select location
Open package
Connecting the peripherals
Starting your computer
Shutting down your computer
iii
iv
iv
v
1
1
2
3
3
3
3
4
4
4
5
6
6
6
7
7
7
7
8
9
9
Troubleshooting
11
Taking Care of your computer
13
Important tips
Cleaning and servicing
To clean your computer and keyboard
To clean your pointing device
To clean your optical mouse
To clean your monitor
When to contact a service technician
Asking for technical assistance
13
13
13
14
14
14
14
14
Contents
FCC notice
Remark: All the drawings in the Guide are diagrams. About
components’s quantity and style, substances shall take precedence.
1
Your computer’s front panel consists of the following:
Front panel
No.
Description
No.
Description
1
Optical Drive
2
Floppy Drive
3
7-in-1 Card Reader
(Manufacturing Option)
4
Power button
5
Speaker or Headphone Jack
6
Microphone Jack
7
USB Ports
English
System Tour
English
2
System Tour
Rear panel
1
2
3
4
5
6
7
8
9
10
13
11
12
14
No.
Description
No.
Description
1
Power cord socket
2
Voltage selector switch
3
Fan Aperture
4
PS/2 Keyboard Port
5
PS/2 Mouse Connector
6
Serial Connector
7
Printer Connector
8
Monitor Connector
9
USB Connectors
10
RJ-45 Ethernet Connector
11
Microphone Jack
12
Line-out Jack
13
Line-in Jack
14
Extension Card Slots
3
Your computer features:
Performance
•
Intel® Pentium® 4/Celeron® CPU
•
System Memory DDR 266/333/400, 2 DIMM Slots, expandable to
2GB
•
Power management function
•
3.5 inch floppy drive
•
CD-ROM, DVD-ROM, CD-RW (52X/24X), DVD/CD-RW combo or
DVD writer
•
High-capacity, Enhanced-IDE drive
•
Support USB 2.0 high performance peripherals
Multimedia
•
3D quality audio system via onboard audio controller
•
Audio-in/Line-in, Audio-out/Line-out, Headphone out and external
Microphone in jacks
Note: the system has two Microphone-in Jacks (front and rear)
However, you can not use both of them at the same time. By
default, you system enables your microphone-in jack in front and
disables the one at the back.
Connectivity
•
Two PS/2 ports for keyboard and mouse
•
One serial port
•
One Parallel port
•
One VGA port
•
Six USB 2.0 ports (two on the front, four on the rear panel)
•
High speed V.92, 56K fax/Data modem (optional)
•
10 Base-T/100 Base-TX Ethernet Network
English
System Features
English
4
System Tour
System peripherals
The Aspire T310 computer consists the system itself, and system
peripherals, like a mouse, a keyboard and a set of speakers (optional).
This section provides a brief description of basic system peripherals.
Mouse(PS/2 or USB, manufacturing option)
The included mouse is a standard two-button wheel mouse. Connect
the mouse to the PS/2 mouse port or USB port on the back panel of the
system.
Keyboard(PS/2 or USB, manufacturing option)
Connect the keyboard to the PS/2 keyboard port or USB port on the
back panel of the system.
5
For systems bundled with speakers, before powering on the system,
connect the speaker cable to the audio out (external speaker) port on
the back panel of the system.
For more detailed information about the speakers, please refer to the
included operating instructions.
Note: speakers are optional and the appearance might be
different depending on the actual product.
English
Speakers
English
6
System Tour
System upgrade
You can expand your Aspire T310 system quickly and easily by adding
components. You can also upgrade the components of your Aspire T310
system.
Open the computer
Before removing any panels or covers, please make sure to shut off the
computer and unplug the power cord from the outlet.
•
Remove the two screws on the side panel.
•
Slide the panel back and off.
Set up new components
You can only use components compatible with Aspire T310 computers.
Before you choose new components, please ask your authorized Acer
dealer whether the part will operate within your Aspire T310 system.
In order to ensure proper setup and installation, please consult the
instructions provided with your new components.
Probable upgrades are:
-
Upgrade to High Capacity HDD
-
Expand high-level memory
-
Upgrade from a CD-ROM drive to CD-RW, DVD-ROM, DVD/CDRW combo, or DVD writer
-
Install additional interface cards in empty PCI slots e.g., PCI
fax/modem card
7
Aspire T310 is a versatile, high-power system, supporting Intel® Socket
478 CPUs. The computer uses Peripheral Component Interface (PCI) and
Accelerated Graphics Port (AGP) design. This improves system
efficiency and helps the system support varied multimedia and
software applications.
Your Aspire T310 has standard I/O (Input/Output) interfaces such as a
serial port, parallel port, PS/2 keyboard and mouse ports, the system
includes six USB ports, two microphone ports and stereo line-out jacks
(one at front and one at rear panel) and a stereo line-in Jack. The
system can accommodate extra peripheral equipment through those I/
O ports.
Your system can also support an optional high-speed fax/data modem
or an additional LAN (local area network) card.
Furthermore, the system is compatible with Windows® XP Home,
Windows® XP Professional operating systems.
Necessary to know before Setup
Prior to setting up your Aspire T310 System:
•
Select a location
•
Open package
Select location
Selecting the optimum location for your computer:
•
Don't place the system too close to other electrical equipment.
•
Don't place the system in high traffic areas or where the power
cord or other cords may be stepped on.
•
Avoid placing the system in any location that is excessively dusty or
damp.
Open package
Open the package carefully and keep all packing materials for later
use.
English
Setting up your computer
English
8
Setting up your computer
Ensure that all items are present and in good condition. If any of the
following items are missing or appear damaged, contact your dealer
immediately.
•
Aspire T310 Series
•
PS/2 or USB keyboard (manufacturing option)
•
PS/2 or USB mouse (manufacturing option)
•
Spearkers ( for selected models only)
•
User's Guide and Starter poster
Other user documentation and third party software.
Connecting the peripherals
Note: Don't connect system power cord before connecting all
peripherals to the system.
After everything is connected, plug the power cord into the system and
insert the other end into a power outlet.
9
After connecting all the peripheral equipment, start your computer
according to the below steps:
1
Power on all peripheral equipment, such as monitor, printer, fax,
speakers etc.
2
Turn on the system. Once the start-up process is complete, you can
begin to use the computer.
Shutting down your computer
From the "Start" Menu, select "Shut Down" and click OK.
In the event of a system crash, press and hold the power button on the
front of the system for four seconds. After the system has shut down,
turn off all peripheral devices.
English
Starting your computer
English
10
Setting up your computer
11
The following questions are possible situations that may arise during
the use of your computer and each is followed by simple answers and
solutions to the situation.
Q: I pressed the power switch but the system did not boot up.
A: Check the LED located above the power switch.
If the LED is not lit, no power is being applied to the system. Do any of
the following:
•
Check if the voltage selector switch located on the rear panel of
the computer is set to the correct voltage.
•
Check if you properly plugged the power cable into an electrical
outlet.
•
If you are using a power strip or AVR, make sure that it is plugged
in and turned on.
If the LED is lit, check the following:
•
Is a non bootable (non system) diskette in the floppy drive? If yes,
remove or replace it with a system diskette and press Ctrl + Alt +
Del to restart your computer.
Q: Nothing appears on the screen.
A: Your computer's power management function automatically blanks
the screen to save power. Press any key to turn the display back on.
If pressing a key does not work, your computer. If restarting your
computer does not work, contact your dealer or the technical support
center for assistance.
Q: The printer does not work.
A: Do the following:
•
Make sure that the printer is connected to a power outlet and that
it is turned on.
•
Make sure that the printer cable is connected securely to the
system's parallel port and the corresponding port on the printer.
•
For additional information concerning the printer, refer to the
printer's documentation.
English
Troubleshooting
English
12
Troubleshooting
Q: No sound comes out from the speakers.
A: Check the following:
•
The volume may be muted. Look for the Volume icon on the
taskbar. If it is crossed-out, click on the icon and deselect the Mute
option. You can also press the volume control/mute knob on your
USB keyboard to toggle the mute function.
•
If headphones, earphones, or external speakers are connected to
the line-out jack of your computer, the internal or built-in
speakers are automatically turned off.
Q: System cannot read diskette, hard disk, CD or DVD information.
A: Check the following:
•
Make sure that you are using the correct type of media.
•
Check if the diskette is formatted correctly. If not, format it again.
Caution: If you reformat a diskette, you will lose any data on it.
Make sure the diskette, CD or DVD is inserted into the drive correctly.
•
Check if the CD or DVD is clean and not scratched.
•
Check your drive by using a good (i.e., undamaged) diskette or a
good disc. If your floppy drive, CD or DVD drive can not read the
information on the good diskette, CD or DVD there may be a
problem with the drive. Contact your dealer or technical support
center for assistance.
Q: System cannot write diskette, hard disk or disc.
A: Check the following:
•
Make sure the media is not write-protected.
•
Make sure that you are using the correct type of diskette. Check if
the diskette is formatted correctly. If not, format it again.
Caution: If you reformat a diskette, you will lose any data on it.
13
Please read the important instructions listed in this section. Following
these instructions will help you maximize the durability of your
computer.
Important tips
•
Do not expose the computer to direct sunlight. Do not place it
near sources of heat, such as a radiator.
•
Do not subject the computer to magnetic fields.
•
Do not expose the computer to rain or moisture.
•
Do not spill water on the computer.
•
Do not subject the computer to heavy shock or vibration.
•
Do not expose the computer to dust and dirt.
•
Never place the system on uneven surfaces.
•
Do not step on the power cord or place heavy objects on top of it.
Carefully route the power cord and any cables away from personal
traffic.
•
When unplugging the power cord, do not pull on the cord itself
but pull on the plug.
•
The total ampere rating of the equipment plugged in should not
exceed the ampere rating of the cord if you are using an extension
cord. Also, the total current rating of all equipment plugged into a
single wall outlet should not exceed the fuse rating.
•
Check the documentation that came with your software programs
to see if you can select other combinations of resolution and color.
These adjustments could make viewing the screen more
comfortable.
Cleaning and servicing
To clean your computer and keyboard
1
Turn off the computer and unplug the power cord.
2
Use a soft cloth moistened with water and gently wipe the exterior
of the computer and the keyboard. Do not use liquid or aerosol
cleaners.
English
Taking Care of your computer
English
14
Taking Care of your computer
To clean your pointing device
To clean your mouse (with rubber ball)
1
Open the circular cover underneath the mouse.
2
Take out the rubber ball and wipe it with a soft, damp cloth.
3
Put the ball back and replace the cover.
To clean your optical mouse
For users of an optical mouse, refer to the documentation that came
with your mouse for maintenance instructions.
To clean your monitor
Make sure that you keep your screen clean. For cleaning instructions,
refer to the documentation that came with your monitor.
When to contact a service technician
•
If you dropped and damaged the computer.
•
If liquid has been spilled into the computer.
•
If the computer is not operating normally.
Asking for technical assistance
For technical assistance, contact your local dealer or distributor. You
may also access the Acer Web site (www.acersupport.com) for
information on how and where to contact the service centers available
in your area.