1
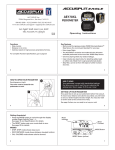
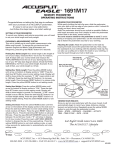
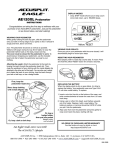
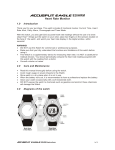
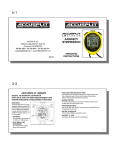
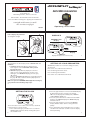
ACCUSPLIT
AH120M9 PEDOMETER
ACCUSPLIT, Inc.
2290A Ringwood Ave., San Jose, CA 95131
800-965-2008 • 925-226-0888 • FAX 925-463-0147
www.ACCUSPLIT.com/support • [email protected]
Eat Right! Walk More! Live Well!
The ACCUSPLIT Lifestyle
990-003B
How to Open your pedometer.
See diagrams at right.
Operating Instructions
DISPLAYS
125379
15:15
785
ACCU
SPLIT
healthe
MODE
CURRENT DAY
Display
MEMORY
ngine
RESET
16:30
8922
7644
1
days
MEMORY
Display
MEMORY
display area (flashes when in memory mode)
2
The pedometer has two display modes: CURRENT DAY and
MEMORY.
1. CURRENT DAY display: Memory display area in
lower right of screen is blank and clock is present
in lower left corner.
2.MEMORY display: Memory display area in lower
right of screen shows which day’s results you are
viewing. To enter MEMORY display, press the gray
“M” button.
Return to CURRENT DAY display by repeatedly pressing
the gray “M” button until the memory display area is
blank, and clock returns.
Make sure you are in CURRENT DAY display when setting up
your pedometer and checking today’s steps.
4
SETTING THE CLOCK
16:30
8922
The clock must be set in order for the memory’s automatic
rollover function to work correctly.
1. Press and hold the gray S1 button for 2 seconds. The
HOUR display will start to blink, showing that you’ve
entered SET mode.
6
3
SETTING UP YOUR PEDOMETER
ACCUSPLIT products use a common setting procedure,
S1-S2-S3-S4.
Press S1 for 2 seconds: Enter the SET mode
Press S2: Change the field to be set
Press S3: Change the field value
Press S4 for 2 seconds: Exit the SET mode
5
2.Press the gray S3 button to increase the HOUR display.
Hold the button down to change hours quickly.
PM hours are displayed in military time (1:00 PM is
13:00, 2:00 PM is 14:00, etc.).
3.Press the yellow S2 button to switch from the HOUR
display to the MINUTE display. The MINUTE display
will start to blink.
4.Press the gray S3 button to increase the MINUTE
display. Hold the button down to change minutes
quickly.
5.Press and hold the yellow S4 button for 2 seconds to
exit SET mode and return to STEP mode. The display
will stop flashing.
7
WEARING YOUR PEDOMETER
While gently holding the metal belt clip open, slide the pedometer onto your belt or the top edge of your pants or skirt.
It should fit snugly and level, above one knee.
Note: the pedometer should be as vertical as possible.
Walkers with larger stomachs may find it helpful to wear the
pedometer farther back on the body, toward one hip.
The cover must be closed for the pedometer to work.
yes
SAFETY LEASH
This pedometer comes with a free safety leash, to help
prevent accidental loss. The leash comes pre-attached to the
pedometer.
To use the leash, simply clasp the waistband of your clothing
with the attached alligator clip. You can also use a safety pin
to fasten the leash to your clothing, loop the leash through
your belt or belt loop, or use a badge holder.
See sketch on next page for details.
no
8
9
VIEWING YOUR RESULTS
Leash is already attached
to the pedometer.
Clasp the waistband of
your clothing with
the attached
alligator clip.
Viewing Today’s Results
Or, loop a
badge holder, then
put into pocket
(Badge holder
not included)
Or, loop a belt
or belt loop
Once you put on your pedometer and close the lid, it will
automatically begin to record your steps.
• STEP mode displays all the step count activity since
last automatic daily reset (at 3:50 AM)
• TIME OF DAY appears in lower left hand corner of
the display.
10
11
STEP count
5:18
8722
Viewing Previous Days’ ResultS
Your pedometer has 9 total memories. There are 7 days
of step memories, plus today’s step count, plus a TOTAL
memory of all steps taken during the past 7 days.
Clock
12
13
87329
7
(no clock in
memory mode)
days
total
MEMORY
display area
To recall the daily memories from the previous 7-day period:
1. Press the gray “M” button to search for the specific
day’s records you would like to recall. For example, if
you would like to review the records of 2 days ago,
press the “M” button until the DAYS display shows
“2 days.”
2.“1 days” is the record for yesterday, “2 days” is for
2 days ago, etc. “7 days total” shows you the total
activity for the past 7 days.
3.Records older than 7 days are automatically
discarded.
(flashes when in memory mode)
14
15
CLEARING THE MEMORIES
Auto Reset: At 3:50 AM every day, the previous day’s STEP
record is automatically saved and STEP display resets to 0.
You do not need to press the RESET button every day.
Manual Reset: To reset today’s STEP data to 0, press and
hold the yellow RESET button for 2 seconds. Note: Resetting
today’s steps before automatic nightly rollover prevents them
from being tallied in memory.
System Reset: To reset all memories to 0 (including the clock),
press the recessed SYSTEM RESET button in the lower left
corner of the front of the display. (Use a pen or the end of
a paper clip.) Note: In case of irregular display due to static
electricity, pressing the SYSTEM RESET button, and then
resetting the CLOCK, will return the unit to normal.
REPLACING THE BATTERY
1. When the figures on the display start to blink, it is
time to replace the battery.
2.The unit uses one Type CR2032 3-volt lithium battery.
3.Insert a coin into the slot at the bottom of the body
case. Twist the coin to remove the front case.
4.Locate the BATTERY HOLDING PLATE at the bottom
left corner of the inside case. Remove the plate by
loosening the two small screws with a small Phillips
head screwdriver.
5.Take out the old battery and replace it with a new
battery. Place the battery’s positive (+) terminal
FACE UP while you install it into the pedometer.
16
17
CAUTION: Please DO NOT TOUCH inner pedometer parts,
other than battery. Touching the sensor mechanism may
affect the accuracy of the pedometer.
6.Reinstall the BATTERY HOLDING PLATE
by tightening the two
screws. Put the case
back together by
matching the
top edges of
the front case
Terminal
Screws
18
and back case together, then pressing the bottom of
the case together. If the two halves don’t go together
easily, check if the front case is upside down!
7. Reset the CLOCK to restore all functions to your
pedometer.
NO-PROOF-OF-PURCHASE LIMITED WARRANTY
Free service for first year of ownership;
$12 fee for service thereafter. See label inside unit for date.
See www.accusplit.com/support for details
19