1
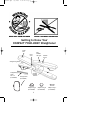
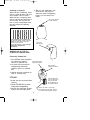
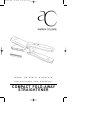
AC8TST.qxd
6/3/2003
4:01 PM
M O D E L
Page 1
N O . A C 8 T S T
I N S T R U C T I O N S
A N D
&
A C 8 T S T G
W A R R A N T Y
C O M PA C T F O L D - AWAY
STRAIGHTENER
AC8TST.qxd
6/3/2003
4:01 PM
Page 1
IMPORTANT SAFEGUARDS
When using electrical appliances, especially when children are
present, basic safety precautions should always be followed, including
the following:
READ ALL INSTRUCTIONS BEFORE USING.
KEEP AWAY FROM WATER.
DANGER: As with most electrical appliances, electrical parts are
electrically live even when the switch is off.
To reduce the risk of death by electrical shock:
1. Always "unplug it" immediately after using.
2. Do not use while bathing, in damp rooms, or over a hand basin or
vessel filled with water.
3. Do not place or store appliance where it can fall or be pulled into
tub or sink.
4. Do not place in or drop into water or other liquid.
5. If an appliance falls into water, "unplug it" immediately. Do not
reach into the water.
6. Never use the appliance with wet hands. Never immerse appliance
in water. Never hold this appliance under running water or allow it
to become wet (as in splashing).
WARNING: To reduce the risk of burns, electrocution, fire, or injury
to persons:
1. Do not leave appliance unattended while it is operating or is
plugged in.
2. Close supervision is necessary when this appliance is used by, on, or
near children or invalids.
3. Use this appliance only for its intended use as described in this
manual. Do not use attachments not recommended by the
manufacturer.
4. Never operate this appliance if it has a damaged cord or plug, if it
is not working properly, if it has been dropped or damaged in any
manner or dropped into water. Contact Consumer Service for
examination and repair or mechanical adjustment.
5. Keep the cord away from hot or heated surfaces. Do not wrap the
cord around the appliance.
6. Never use while sleeping or while drowsy.
1
AC8TST.qxd
6/3/2003
4:01 PM
Page 2
7. Never drop or insert any object into any opening.
8. Do not use outdoors or operate where aerosol (spray) products are
being used. Do not operate where oxygen is being administered.
9. Place unit on a level surface to use. Do not use on a bed or any
soft surface where unit could tip over easily or be covered up.
10.Connect this appliance to a properly grounded outlet only.
11.Unit is hot when in use. To avoid burn hazard, do not touch the hot
plates, they are hot.
12.Do not use an extension cord with this appliance.
13.Do not leave an Adaptor Plug in wall outlet when not in use.
14.Most foreign countries have unstable voltage which may cause your
appliance to shut off due to irregular voltage. This does not harm
the appliance, or indicate a defective product.
15.Before plugging in, read the information about dual voltage
contained in the instruction section of this manual.
SAVE THESE INSTRUCTIONS
THIS PRODUCT IS FOR HOUSEHOLD USE ONLY
THE STRAIGHTENER IS NOT A TOY.
ADDITIONAL IMPORTANT
SAFEGUARDS
1. This Straightener and its Straightening Plates are hot when in use.
Do not let eyes or bare skin touch heated surfaces.
2. Keep fingers out of the Pivot Area.
3. Do not over straighten the hair.
4. Do not use on damaged hair.
5. Do not use styling products in the hair prior to straightening.
6. Do not remove Straightening Combs while the Straightener is ON.
7. Begin straightening hair 1/2 inch away from the scalp.
NOTE: Use on dry hair only. Do not use this appliance on synthetic
hair wigs.
WARNING: Please keep the cord away from hot metal surfaces.
Polarized Plug
This appliance has a polarized plug (one blade is wider than
the other.) To reduce the risk of electric shock, this plug is intended
to fit into a polarized outlet only one way. If the plug does not fit
fully in the outlet, reverse the plug. If it still does not fit, contact a
qualified electrician. Do not attempt to defeat this safety feature.
2
AC8TST.qxd
6/3/2003
4:01 PM
Page 3
Getting to Know Your
COMPACT FOLD-AWAY Straightener
Finger
Pad
Red
POWER
ON Light
Pivot
Area
ON/OFF
Switch
Straightening Plates
Keyholes
Straightening
Comb
Set of 2
(P/N 50568)
Storage Pouch
(P/N 50569)
Handles
Handle
Release
Buttons
Adaptor Plug A
(P/N 50570A)
3
Adaptor Plug B
(P/N 50570B)
Adaptor Plug C
(P/N 50570C)
AC8TST.qxd
6/3/2003
4:01 PM
Page 4
OPERATING THE COMPACT
FOLD-AWAY STRAIGHTENER
FOLD-AWAY
STRAIGHTENER OPERATION
When used correctly, the FoldAway Straightener will
help you to achieve the latest
fashionable styles. With this
salon-quality tool, you will be
able to style your hair from curly
to sleek and straight in no time!
CAUTION: Do not rest
Straightener on its side.
CAUTION: NEVER leave the
Straightener ON and unattended.
WARNING: Finger Pads may
become hot during use. Do not
touch for long periods of time
while styling hair.
BEFORE STYLING THE HAIR
1. Press both Handle Release
buttons.
2. Turn the Handle facing you in
the direction of the "OPEN"
arrow.
3. Keep turning Handle until it
locks into place.
IMPORTANT: Before styling,
ensure that the hair is clean, dry
and tangle-free.
We do not recommend using
styling products in the hair prior
to straightening. Some products
are flammable and will cause the
hair to stick to the Straightening
Plates. Build up from products
will coat the Straightening Plates
and prevent the hair from passing
through smoothly. Use styling/
shine products after the hair is
straightened.
Attention: You may notice a
metallic smell the first time using
the Straightener, this is normal
and will cease with use.
4. Repeat steps 2 and 3 for
opposite Handle.
5. Plug the Power Cord into an AC
electrical outlet.
6. Slide the ON/OFF Switch to the
ON position. The red POWER ON
Light will illuminate.
7. It will take approximately 2
minutes for the Straightener to
heat up.
8. Do not force the Straightener
through the hair; Take smaller
sections.
9. When straightening is
complete, slide the ON/OFF
Switch to OFF. Unplug unit.
DUAL VOLTAGE: This appliance
utilizes a positive temperature
coefficient (PTC) heating element
and operates over a range of
voltages.
Confirm the voltage available at
each location before using the
appliance.
For connection to a 240-volt
supply or above, use an
attachment plug adaptor of the
proper configuration for the
power supply receptacle.
4
AC8TST.qxd
6/3/2003
4:01 PM
Page 5
REMOVING OR REPLACING
STRAIGHTENING COMBS
STYLING TIPS
Timing
1. Slide the ON/OFF Switch to
OFF. Unplug unit.
2. Before replacing or removing
Combs, allow the Straightener
to cool completely.
1. The Straightener uses a ceramic
PTC heating element for fast
heat-up and constant
temperature. You will need to
test how long it takes to
straighten your hair from the
roots to the ends.
2. First test an inconspicuous
section of your hair. Use
thinner sections for thick,
resistant hair.
3. Begin timing at 5 - 8 seconds
for fine, thin hair. Straighten
for 10 - 15 seconds for thick
or coarse hair. Slide the
Straightener from the root area
sliding to the ends of the hair.
If more time is needed, skip to
a new section of hair until you
find the right time needed.
4. If hair requires a second pass to
straighten, use less time for
the second pass.
3. There are 2 Straightening
Combs included with your hair
Straightener. They may be used
in any position that works best
for you.
4. There are 3 studs on the inside
of each comb and 3 keyhole
slots in one side of each of the
plates.
5. To remove a comb, place
thumb on top of the end of the
comb near the handle and push
down and away from the
handle. Once it has moved
about a quarter of an inch lift
the comb out.
6. To replace a comb, fit the
studs through the large ends of
the keyholes and slide the
comb towards the handles. The
rounded end of the comb fits
closest to the Handle end of
the Plate while the pointy end
of the comb should be towards
the open end of the Plate.
Note: Make sure combs are firmly
in place.
7. If small sections are being used
and it is difficult to glide the
Straightener through the hair,
the Straightening Combs may
be removed for ease of use.
Steam
1. If product build up is on the
hair, or a conditioner has been
used, you will notice a slight
amount of steam coming from
the Straightener. This is
normal.
However, if large amounts
of steam are forming,
discontinue straightening.
Press the ON/OFF Switch to
OFF and unplug the unit.
2. Wash your hair with a clarifying
shampoo to remove the buildup. Condition hair with a light
conditioner as necessary, and
dry the hair thoroughly.
3. Proceed in straightening hair.
5
AC8TST.qxd
6/3/2003
4:01 PM
Page 6
Steaming or Singeing?
When the hair is steaming, there
will be a slight product odor and
white steam— this is normal.
When the hair is singeing, there
will be a strong odor and light to
dark "smoke". You can tell the
hair is overly straightened when
the hair frazzles and possibly
discolors.
4. Take a 2 inch wide and 1 inch
thick section and place between the open Straightening
Plates (1/2 inch away from
scalp).
Clip Crown Section
on Top of Head
Frazzled Hair
Over-straightening can frazzle hair!
The hair will appear smooth, but some
strands will form kinks, unlike the
natural curl of the hair.
This is the first sign of hair damage.
Discontinue straightening
immediately.
Clip Front
Side Section
WARNING: DO NOT TRY TO
STRAIGHTEN DAMAGED HAIR!
Chemically Treated Hair
1. Use CAUTION when straightening chemically treated,
colored, or permed hair.
2. Cut down the time used for
straightening chemically
treated, colored, or permed
hair.
3. Smaller sections are better for
thick or resistant hair.
Top Crown Section
Clipped into Place
Back Section
Clipped into Place
STYLING
5-15 seconds from
1/2 inch away from
scalp to the ends.
The straightener is
in constant motion.
1. Divide hair into sections before
starting.
2. Consult STYLING TIPS for proper
Timing before straightening.
3. Section hair and begin straightening in the back nape area.
Take 2 inch wide, 1 inch thick
slices starting in the back, moving
on to sides, finishing with the top.
6
AC8TST.qxd
6/3/2003
4:01 PM
Page 7
For a Straight Look
5. Squeeze the Handles together
to close the Straightening
Plates and gently slide the
Straightener through the hair
towards the end within the
designated time, roots to ends
(5-15 seconds).
Move the Straightener through the
hair, when you get towards the
ends of the hair pull the
Straightener parallel to the
section you made at the scalp.
For a Rounded Look
Move the Straightener through the
hair, when you get towards the
ends of the hair, position the
Straightener so that it rounds the
hair under.
CAUTION: You must keep the
Straightener moving while
straightening to avoid hair
damage.
6. If hair requires a second pass to
straighten, use less time for the
second pass. Do not repeat
straightening for extended
periods of time as hair is
delicate.
7. The hair will be very hot, allow
to cool before touching. Do not
comb or brush through the hair
to allow the hair to "set in".
8. Work your way up, going on to
the sides and finishing with the
top crown area.
9. How fast or slow you move the
Straightener will have an effect
on the end results.
INSTRUCTIONS FOR
ADAPTOR PLUG USE
1. Check wall outlet to determine
shape of Adaptor Plug needed
2. Make sure unit is OFF before
proceeding.
3. Plug the appropriate Adaptor
Plug into wall outlet.
4. Insert Fold-Away Straightener
plug into Adaptor Plug and slide
the ON/OFF Switch to the ON
position.
5. When straightening is complete
slide the ON/OFF Switch to the
OFF position.
6. Unplug the Adaptor and
Straightener Plugs from wall
outlet and allow the unit to
cool.
7
AC8TST.qxd
6/3/2003
4:01 PM
Page 8
USER MAINTENANCE
INSTRUCTIONS
Storage
NOTE: When not in use,
make sure the Straightener is
unplugged.
This appliance requires little
maintenance. It contains no user
serviceable parts. Do not try to
repair it yourself. Contact a
qualified appliance repair
technician if the product
requires servicing.
1.Slide the ON/OFF Switch to the
OFF position. The red POWER
ON Light will turn off.
2. Unplug the Power Cord from
the electrical outlet.
3.
Allow
the appliance to cool
Cleaning
completely. Once the
1. The Straightener must be
Straightener is cooled, fold up
completely cooled and
the Handles by pressing in both
unplugged before cleaning.
Handle Release buttons and
2. Wipe the Straightener with a
turning Handles in the direction
damp cloth. Do not use cleanof the “CLOSE” arrows until
ing solutions on Straightener or
they are locked in position for
Straightening Plates.
compact storage.
3. For stubborn product build up
4. Store in a cool, dry location.
on Straightening Plates,
5. Never wrap the power cord
dampen cloth with warm water
around the Straightener, as this
and rub off. Do not use sharpwill cause the cord to wear
edged metal tools or abrasive
prematurely and break. Check
cleaning pads as they will
the power cord for wear and
scratch the surface of the
damage regularly, particularly
Straightening Plates.
where the cord enters the
4. Make certain the Straightener is
appliance and the plug.
completely dry before using.
CAUTION: If the cord of this
Keep heated surfaces of the
appliance becomes damaged,
Straightener clean and free of
refer to the Service and Repair
dust, dirt, and styling products.
section of the warranty.
8
AC8TST.qxd
6/3/2003
4:01 PM
Page 9
REPLACEMENT PARTS
Replacement parts are available, and may be purchased through our
Consumer Relations Department by calling 1-800-934-7455, Mon-Fri.
9am-5pm Central Time, with Visa, Mastercard, Discover, or American
Express. Please be ready to give the part number(s) when you call.
Or log into our website to order at: www.eSalton.com
ANDREW COLLINGE Fold-Away Straightener (AC8TST & AC8TSTG)
REPLACEMENT PARTS
PART #
DESCRIPTION
50568
Straightening Combs
(Set of 2)
50569
Storage Pouch
50570A
Adaptor Plug A
50570B
Adaptor Plug B
50570C
Adaptor Plug C
9
AC8TST.qxd
6/3/2003
4:01 PM
Page 10
NOTES
10
AC8TST.qxd
6/3/2003
4:01 PM
Page 7
LIMITED ONE YEAR WARRANTY
Warranty: This Andrew Collinge product is warranted by Salton, Inc. to be free from defects in materials or
workmanship for a period of (1) year from the original purchase date. This product warranty covers only the
original consumer purchaser of the product.
Warranty Coverage: This warranty is void if the product has been damaged by accident in shipment,
unreasonable use, misuse, neglect, improper service, commercial use, repairs by unauthorized personnel,
normal wear and tear, improper assembly, installation or maintenance abuse or other causes not arising out
of defects in materials or workmanship. This warranty is effective only if the product is purchased and
operated in the USA, and does not extend to any units which have been used in violation of written
instructions furnished with the product or to units which have been altered or modified or to damage to
products or parts thereof which have had the serial number removed, altered, defaced or rendered illegible.
Implied Warranties: ANY IMPLIED WARRANTIES WHICH THE PURCHASER MAY HAVE ARE LIMITED
IN DURATION TO ONE (1) YEAR FROM THE DATE OF PURCHASE. Some states do not allow limitations
on how long an implied warranty lasts, so the above limitation may not apply to you.
Warranty Performance: During the above one-year warranty period, a product with a defect will be either
repaired or replaced with a reconditioned comparable model (at our option) when the product is returned to
the Repair Center, or the purchase price refunded. The repaired or replacement product will be in warranty for
the balance of the one-year warranty period and an additional one-month period. No charge will be made for
such repair or replacement.
Service and Repair: Should the appliance malfunction, you should first call toll-free 1 (800) 934-7455
between the hours of 9:00 am and 5:00 pm Central Standard Time and ask for CONSUMER SERVICE stating
that you are a consumer with a problem. Please refer to model number AC8TST when you call.
In-Warranty Service (USA): For an appliance covered under the warranty period, no charge is made for
service or postage. Call for return authorization 1 (800) 934-7455.
Out-of Warranty Service: A flat rate charge by model is made for out-of-warranty service. Include
$ 8.00 (U.S.) for return shipping and handling. We will notify you by mail of the amount of the charge for
service and require you to pay in advance for the repair or replacement.
For Products Purchased in the USA, but Used in Canada: You may return the product insured,
packaged with sufficient protection, and postage and insurance prepaid to the USA address listed below.
Please note that all customs duty/brokerage fees, if any, must be paid by you and we will require you to pay
the cost of customs duty/brokerage fees to us in advance of our performing any service.
Risk During Shipment: We cannot assume responsibility for loss or damage during incoming shipment. For
your protection, carefully package the product for shipment and insure it with the carrier. Be sure to enclose
the following items with your appliance: any accessories related to your problem, your full return address and
daytime phone number, a note describing the problem you experienced, a copy of your sales receipt or other
proof of purchase to determine warranty status. C.O.D. shipments cannot be accepted.
To return the appliance, ship to:
ATTN: Repair Center
Salton, Inc.
708 South Missouri Street
Macon, MO 63552
To contact us, please write to, call, or email:
Salton, Inc.
P.O. Box 1637
Columbia, MO 65205-7366
1 (800) 934-7455
E-mail: [email protected]
Limitation of Remedies: No representative or person is authorized to assume for Salton, Inc. any other
liability in connection with the sale of our products. There shall be no claims for defects or failure of
performance or product failure under any theory of tort, contract or commercial law including, but not limited to
negligence, gross negligence, strict liability, breach of warranty and breach of contract. Repair, replacement or
refund shall be the sole remedy of the purchaser under this warranty, and in no event shall Salton be
liable for any incidental or consequential damages, losses or expenses. Some states do not allow
the exclusion or limitation of incidental or consequential damages, so the above limitation or exclusion may
not apply to you.
Legal Rights: This warranty gives you specific legal rights, and you may also have other rights which vary
from state to state.
For more information on Salton products: visit our website: www.eSalton.com
©2003 Salton, Inc. All rights reserved.
P/N 61344
Made in China
Printed in China