1
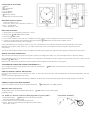
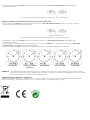
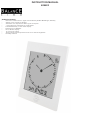
INSTRUCTION MANUAL
406483
SPECIFICATIONS
•
•
•
•
•
•
•
•
•
•
Receive 77.5kHz DCF77 signal trans m itted by PTB at Mainfli ngen, Germany
Analog clock m o ve m en t dis play
Automatic time adj us tm e n t after signal rece ption.
7 Languages for calendar are selectable
Calendar with day- of-th e-w eek dis pla y.
Work week for ISO8601
Hour, Minute displa y.
12 or 24 hour form at.
Th er m om et e r with temperature unit ºC/ºF interchan gea ble
Humidity reado ut
LOCATION OF CONTROL
1. + Button
/ SET Button
2.
3. - Button
4. ºC / ºF Button
5. RESE T Button
6. ON / OFF Sw itch
7. MODE (Photo S ens or button)
BATTERY INSTALLATION
• Open the battery do or.
• Insert new four (4) “AA” batteries in polarity ( +
) and ( - ) as indicated.
• Close the battery doo r.
GETTING STARTED
1. W hen power up, it initiali zes at 2012 Jan 1, 00:00.
2. Slide to the
ON / OFF switch to “ON”.
3. Press the
/ SET button.
4. In a normal conditi on, the clock can complete receiving signal and time a djus t m en t in 10 to 15 m inutes.
5. In case you find the clock cannot set itself, then press & hold
manual clock set instruction at the next page.)
/ SET button for manual set. (Please refer to
As long as batteries are supplying power to the unit, it receives the time s ignal and adjust time autom atic ally. No manual
a djus tm e nt is required after power up. Accurat e a djus tm e nt of the clock base d on the time s ig nal is s up p o rt e d in the
continent al.
You are recommended to leave the clock overnight for searching time signal since night time allows better transmission of time signal .
SIGNAL RECEIVE OPERATION
The unit au tom atic all y re c ei ve the time s ign al e ve r y d a y at midnight and make any requir ed adjustment to the time setting.
The W AVE OK indicator and the antenn a tower icon a ppe ar on the display if the time sig nal is s uc c es s f ull y r ec ei ve d or after manual
pr ess e d
/ SET button.
Important : Do not perform any button or switch operation while a signal receive operation is in progress.
TRIGGERING A RECEIVE OPER ATION M ANU ALLY
You can trigger a signal receive operation at any time by pressing the
signal receive operation.
/ SET button, which cause the unit to perform an immediate
UNSUCCESSFUL SIGNAL RECEPTION
If the automatic update is unsuccessful, the wave on top of the antenn a tower and the W AVE OK icon will be dis app eare d, and the
unit will
re-try to receive the signal again every hour.
If unsuccessful signal reception after battery installation or after reset, the unit will keep trying until time signal reception successful.
UNABLE TO RECEIVE WAVE SIGN AL
If you are not able to receive the wave signal please slide
ON / OFF sw itc h to “OFF” position.
MANU AL SET THE CLOCK
To manual the clock, you should press and hold the
the setting mode :
/ SET button for 2 seconds to enter
1st STEP: To Set the Time Zone & Daylight Saving Time ( DST )
1. Press and hold the
/ SET button for 2 seconds to enter the
Tim e Zone and DST setting mode.
2. Press + button to choose your desired Time Zone.
3. Press - button to toggle between Daylight Saving Time ( DST )
ON or OFF mode.
Time Zone and DST
2nd STEP: To Set the Day of Week Language
1. Single press the
/ SET button again after Time Zone & DST set mode.
2. Press + or - button s e q ue n tiall y to s et DOW Language
( W orkweek Format will be de pe nde d on which
DOW language had been selected:
a. G e rm a n DOW Language - German
W ork w eek ;
b. Non- G erm an DOW Language -- Non- German W orkweek )
3rd STEP: To Set the Calendar Year
1. Single press the
/ SET button again after Language
set mode.
2. Press + or - button sequentially to set Year.
3. Holding down either + or - button to change the Year digits
at high speed.
Year
4th STEP: To Set the Calendar Date and Month
1. Single press the
/ SET button again after Year set mode
2. Press + or - button sequentially to set Date and Month.
3. Holding down either + or - button to change the Date and Month
digits at high speed.
Calendar
5th STEP: To Set Time
1. Single press the
/ SET button again after Date and Month set mode.
2. Press + or - button sequentially to set Tim e , when you press
the + or - button once, the seconds count will be reset to 00.
3. Holding down either + or - button to change the
Tim e digits / hands at high speed.
Digit al Tim e
6th STEP: To Set 12Hr / 24Hr, °C / °F Format
1. Single press the
/ SET button again after Time set mode.
2. Press + button to toggle between the 12 Hr or 24 Hr time
display mode.
3. Press - button to toggle between °C or °F temperature
display mode.
7th STEP: To Resume the Normal Display Mode
1. Single Press
/ SET button after the 12Hr / 24Hr, °C / °F Format set
mode, to quit the set mode and resume normal display mode.
RE-SET THE UNIT
If the unit does not work properly, single press the RESET button to reset the unit
CHANGE THE DISPLAY MODE
The clock is initially preset with auto-scrolling display of different functions .
1. W hen the display is scrolling, the
icon will be shown on the display.
The
icon will be off if it is not in scrolling mode.
Tem perature & Humidity
2. Single tap on / wave off the MODE button (Photo S enso r button ) by “1 SECOND AND RELEASE”, the display will
go to different modes.
with in 2cm above sensor
In a bright environment, Tap or W ave on sensor by 1 second and releas e
SELECT A PARTICULAR DISPLAY WITHOUT AUTO-SCROLLING
1. Tap on / wave off the MODE button (Photo Sensor button ) by “3 SE CONDS AND RELEASE ”, it will turn off auto-sc rolling
display and stay on partic ular display chosen.
with in 2cm above sensor
In a bright environment, Tap or W ave on sensor by 3 seconds and releas e
2. Single tap on / wave off the MODE button (Photo S enso r button) by “1 SECOND AND RELEASE”, the display will
go to different modes.
3. To turn on Auto-scrolling display func tion again, tap on / wave off MODE button (Photo Sensor button) by “3 SECONDS
AND RELEASE”. The
icon will be shown on display.
The sequence of display modes: Calendar > Temperature & Humidity > W orkweek > Digital Tim e> Calendar
CALENDAR
TEMPERAT URE &
HUMIDITY
WORKWEEK
DIGIT AL TIME
CALENDAR
REMARK: The MODE button is NOT designed for use in a Dark en vi r onm e nt . The m otion se nso r use s a p h ot o- s en s in g
tec h n olo g y d es ig n e d for use in a BRIGHT en viro nm ent. In a Dim en viro nm ent, the MODE button may not be able
to s e ns e your motion and may not be operated normall y.
TEMPERATURE & HUMIDITY READING:
Temperature ranges from -9.9 ~ +50.0ºC (14.2 ~ 1 2 2. 0º F ) with 0.1ºC (0.1ºF) res olution and Humidity Range is 5%-99%
(with 1 % resolution). Reading shows “HI” or “LO” if me asu red value exceeds the above ra n ge.