Transcript
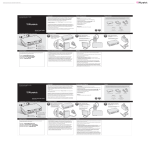
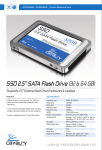
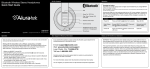
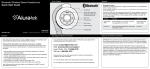
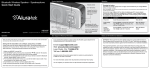
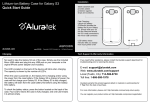
Package Contents
Introduction
eQuarium 8” Digital Aquarium
Quick Start Guide
Thank you for purchasing the eQuarium by Aluratek. In no time you will be able to enjoy a
life-like aquarium in your home or office - digitally! In addition to making sure only quality
materials are used for manufacturing, Aluratek is also dedicated to provide the best
customer satisfaction and support.
Warning Message
Your order has been carefully packaged and inspected. The following should be included in your package. Please
inspect the contents of the package to ensure that you have received all items and that nothing has been damaged.
If you discover a problem, please contact us immediately for assistance.
To reduce risk of electric shock, injury, or death:
Aluratek's eQuarium 8" Digital Aquarium brings everything you love about aquariums to life
with ease without having to purchase an actual aquarium.
aluratek.com
qsg Q10343
eQuarium 8” Digital Aquarium
Power Adapter
ADEQ108F
WARNING! Keep away from water danger
As with most electrical appliances, electrical parts in this product are electrically live even
when the switch is off:
Read this guide thoroughly and follow the installation and operation procedures carefully to
prevent any damage to the unit and / or any of the devices it connects to.
The eQuarium features an 8” ultra crisp display which shows the colorful serene beauty of
the underwater world as if you were really viewing through glass and water. The eQuarium
comes pre-loaded with a continuous looping video of real tropical fish swimming in a real
saltwater tank with real coral and rocks. Additional aquatic environments can be purchased
at: aluratek.com/equarium
!
Aqualens
Quick Start Guide
Stopper
Stand
Warranty / Registration Card
• Please make certain the eQuarium is unplugged when removing / installing the
“aqualens” (water reservoir).
• Please make certain to remove the “aqualens” (water reservoir) from the eQuarium
before filling with water. Never fill the aqualens (water reservoir) while inserted in the
eQuarium!
• Please wipe off any excess water and make certain the rubber plug is secured in place
before installing the aqualens into the eQuarium. Make sure no water leaks out.
• As with all electrical devices, do not use anywhere near water such as tubs, toilets, or
sinks etc.
• In the unlikely event of water leak, please unplug the power adapter first before handling
the eQuarium and contact the Aluratek support department for a complimentary replacement.
Copyright © 2013 Aluratek, Inc. All Rights Reserved.
Creating Your Digital Aquarium
Remove the top cap of the eQuarium.
Fill the Aqualens with water. Gently squeeze and unsqueeze the Aqualens
under the sink to increase water flow into the tank.
Slide out the Aqualens.
3
2
1
Insert the stopper plug and slide the Aqualens back into the frame. Please wipe off any
excess water and make certain the rubber plug is secured in place before installing the
aqualens into the eQuarium. Make sure no water leaks out.
4
Plug in the power adapter. The aquatic video will auto start. In the event the video does not
play automatically, please refer to the operating instructions on the back of this quide.
On-Screen Display
eQuarium Controls
1 Power On, Off
Operating Instructions
The On-screen Display (OSD) will show the Main Menu. Each icon represents the
various functions available on the device.
Hold until power turns on or off
2 Menu
1
(a) Press to return to previous screen
(b) Press and hold to go to the Main Menu
3 Play, Pause, Enter
(a) Press to select options on Main Menu
(b) Press to play or pause
4 Rewind
(a) Press to navigate UP when selecting options
(b) Press and hold to rewind
5 Fast Forward
(a) Press to navigate DOWN when selecting options
(b) Press and hold to fast forward
• To configure Auto On / Off feature, select the Settings icon from the main menu.
• Select the video that you wish to view and press the ►II button.
3
• Adjust the volume of the video playing using the volume buttons.
7
6
5
MENU
2
Memory
The eQuarium
has built-in
internal memory.
Select Memory to
access the video
pre-loaded to the
eQuarium
SD Card
Insert an SD card
up tp 32GB.
Select SD Card
to access your
video on the
card.
USB Drive
Insert a USB
drive / thumb
drive to the USB
port on the side
of the eQuarium
Select USB
Drive to access
your video on
the drive.
Video
Settings
Select Video to
play a video.
Select Settings
to see a list of
settings for your
eQuarium.
Clock Setup
• To set the clock, select the Settings icon from the main menu. Navigate to Clock Setup
using the arrow keys and press the ►II button.
• To exit, press the Menu button.
Video Setup
• Navigate to Power On and press the arrow keys to change between ON / OFF.
• Navigate to Auto Boot Time and use the arrow keys to set the power on time.
• Navigate to Power Off and press the arrow keys to change between ON / OFF.
• Navigate to Auto Shut and use the arrow keys to set the power on time.
• To exit, press the Menu button.
• To customize how videos are played back, press the Settings icon from the main menu
and go to Video Setup. Here, you can choose Display Mode to choose how your video
will be displayed (full screen or original) and Play Mode to choose the duration of how
long your video plays (Repeat, Once or Random).
• To exit, press the Menu button.
Radio and TV Interference Statement
• To exit, press the Menu button.
• Select the source of the videos you wish to play by selecting Memory, SD Card or USB
Drive options and pressing the ►II button.
4
(a) Press and hold to lower volume
(b) Press to navigate LEFT when selecting options
• Use the arrow keys to set the correct date and time.
Auto On / Off Setup
• Navigate to the Video function using the arrow keys and press the ►II button.
6 Volume Up
(a) Press and hold to increase volume
(b) Press to navigate RIGHT when selecting options
7 Volume Down
Playing Videos
Warranty Information
WARNING!!! This equipment has been tested and found to comply with the limits of a
Class B digital device, pursuant to part 15 of the FCC rules. These limits are designed to
provide reasonable protection against harmful interference in a residential installation.
Aluratek warrants this product against defect in material or workmanship for 1 Year
from the date of purchase.This warranty becomes invalid if the factory-supplied serial
number or "warranty void" sticker has been removed or altered on the product.
This equipment generates, uses and can radiate radio frequency energy and, if not
installed and used in accordance with the instruction, may cause harmful interference to
radio communications. However, there is no guarantee that interference will not occur in a
particular installation. If this equipment does cause harmful interference to radio or
television reception, which can be determined by turning the equipment off and on, the
user is encouraged to try to correct the interference by whatever measures may be
required to correct the interference.
This warranty does not cover:
A) Cosmetic damage or damage due to acts of God
B) Accident, misuse, abuse, negligence or modification of any part of the product.
C) Damage due to improper operation or maintenance, connection to improper equipment,
or attempted repair by anyone other than Aluratek.
D) Products sold AS IS or WITH FAULTS.
IN NO EVENT SHALL ALURATEK'S LIABILITY EXCEED THE PRICE PAID FOR THE
PRODUCT FROM DIRECT, INDIRECT, SPECIAL, INCIDENTAL, OR CONSEQUENTIAL
DAMAGES RESULTING FROM THE USE OF THE PRODUCT, IT'S ACCOMPANYING
SOFTWARE, OR IT'S DOCUMENTATION.
Aluratek makes no warranty or representation, expressed, implied, or statutory, with
respect to it's products, contents or use of this documentation and all accompanying
software, and specifically disclaims it's quality, performance, merchantability, or fitness for
any particular purpose. Aluratek reserves the right to revise or update it's product, software
or documentation without obligation to notify any individual or entity.
Technical Support
If you need further assistance, please contact the Aluratek support department for
troubleshooting prior to returning this device.
E-mail: [email protected]
Web: www.aluratek.com/support
Local (Irvine, CA): 714-586-8730
Toll free: 1-866-580-1978