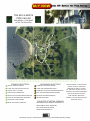
1
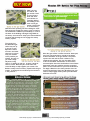
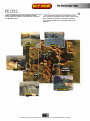
PRIMA OFFICIAL GAME GUIDE
National Training Center .......4
Tug-of-War ................................19
Mission 02: Reunion ............59
Lesson 1: The Camera .......... 4
Weapons of War ..................20
The Bridge ......................... 61
Moving the Camera ......................4
Armor ............................... 21
Panning the Camera .....................4
Heavy Tanks ..............................22
Mouse Look.................................4
Medium Tanks ...........................23
Camera Elevation .........................5
Light Tanks................................24
The Minimap................................5
Armored Transports ...................25
Megamap....................................5
Amphibious Armored
Transports ................................26
Dig In at the
Freeway Entrance ......................61
Rescue the Civilian
Evacuees...................................61
Save the Levinson Family .............62
Hold the Bridgehead ...................62
Prepare Defenses
at the Bridge .............................63
Lesson 2: Moving
and Attacking ...................... 6
Air .................................... 27
Selecting a Unit ...........................6
Heavy Attack Helicopter ..............28
Defend the Southeast
Bridgehead ................................64
Order Palette ..............................6
Medium Attack Helicopter ...........29
Evacuate the Hospital .................65
Movement Orders ........................7
Scout Helicopter ........................30
Waypoints ...................................7
Transport Helicopter ..................31
Assist Bannon and
Charlie Company ........................66
Follow .........................................7
Infantry ............................. 32
Transporting ................................7
Infantry Squad ...........................33
Buildings .....................................7
Infantry Anti-Tank Squad .............34
Attacking ....................................8
Sniper ......................................35
Attack Ground .............................8
Demolition Engineer ....................36
The Town of Pine Valley ....... 70
Special Abilities ............................8
Airborne Infantry Squad ..............37
Secure the Gas Station ...............70
Lesson 3: Command
Points and Objectives ............ 8
Troop Transport .........................38
Transport Truck .........................39
Clear the Way into
Pine Valley.................................71
Command Points ..........................8
Support ............................ 40
Secure the TV Station.................72
Fortifications ...............................9
Heavy Antiair Vehicle ..................40
Defend the Supermarket .............73
Objectives ...................................9
Medium Antiair Vehicle ...............41
Lesson 4: Reinforcements ..... 9
Heavy Artillery ...........................42
Retake the Southeastern
Approach ..................................74
The Reinforcements Menu.............9
Medium Artillery ........................43
Hold the Southeastern
Approach ..................................75
Selecting a Drop Zone ................10
Repair Tank ...............................44
Defend the Town Square .............75
Requesting and Deploying Units ...10
Fortifications ..................... 45
Break the Soviet Offensive...........76
Lesson 5: Tactical Aid ......... 10
Antiair Fortification ...................46
Debriefing.......................... 77
The Tactical Aid Menu .................10
Anti-Tank Fortification .................46
Awards Earned ..........................77
Calling in a Tactical Aid ...............11
Machine Gun Fortification ...........47
Hotkeys............................. 12
Tactical Aids ...................... 47
Strategy and Tactics ............13
Nondestructive ..........................47
Mission 04: Into
the Mountains ......................78
General Tactics .................. 13
Objectives .................................13
Selective Strikes ........................48
Indiscriminate Strikes .................49
Debriefing.......................... 67
Awards Earned ..........................67
Mission 03: Battle
for Pine Valley ......................68
River Crossings .................. 80
Secure the Two River Fords .........80
Secure the Bridge ......................82
Selecting the Right Unit ..............14
Mission 01: Invasion ............50
Organizing Your Units .................14
Soviets on the Waterfront ... 52
Hold the Bridge until
Bannon Arrives ..........................83
Reconnaissance .........................14
Recon the Harbor ......................52
Debriefing.......................... 85
Using Terrain .............................14
Rescue the Infantry ....................53
Awards Earned ..........................85
Maneuver..................................15
Secure the Supply Depot .............53
Mission 05: Last Stand.........86
Fire Support ..............................15
Recon the Route to
the Kingdome ............................54
Three Bridges .................... 88
Clear the Route to
the Kingdome ............................55
Secure and Hold the
East Bridge ...............................88
Clear the LZ at
the Kingdome ............................55
Secure and Hold the
West Bridge ..............................90
Set up a Perimeter
at the Kingdome ........................56
Secure and Fortify
the North Bridge........................91
Evacuate the Remaining
Guardsmen ...............................56
Hold the North Bridge ................92
Teamwork .................................18
Multiplayer Game Modes ..... 18
Clear the Underpass...................57
Regroup at the High School .........93
Domination ................................19
Debriefing.......................... 58
Call In the Nuclear Strike ............93
Assault .....................................19
Awards Earned ..........................58
Counter Battery Fire ..................15
Capturing a Command Point ........16
Combined Arms ................. 16
Strategy ............................ 16
Multiplayer Tactics ............. 17
The Roles ..................................17
Retake the Town Center ..............92
2
PRIMAGAMES.COM
Protected by copyright. Unauthorized or unlawful copying or downloading expressly prohibited.
Contents
Debriefing.......................... 94
Awards Earned ..........................94
Mission 06: Seeing
the Elephant .........................95
The French Riviera .............. 97
Secure the Soviet Firebase ..........97
Destroy the Harpoon
Launchers ...............................134
Secure the Russian
Main Camp..............................163
Destroy All Hostiles
on Liberty Island ......................135
Debriefing........................ 165
Assist in Securing
Fort Jay ..................................136
Help Defend Fort Jay ................136
Debriefing........................ 137
Awards Earned ........................165
Mission 14: One
Last Fight ............................166
Awards Earned ........................137
Sunset on the Space
Needle ............................ 168
Hold the Village........................101
Mission 11: Aftermath........138
Save Seattle ............................168
Debriefing........................ 102
Along the River ................ 140
Awards Earned ........................102
Destroy the Soviet
Guard Post..............................168
Keep Your Units Alive ...............140
Mission 07: Deep Strike.....103
Protect the Diner .....................169
Rendezvous with Webb
at the Ford ..............................140
Clear the Way to
the Harbor ..............................169
Support Webb
with Repairs ............................141
Secure the Harbor ...................171
Clear Out the Village
Defenders ...............................100
The Soviet Headquarters ... 105
Secure the Bridges...................105
Protect the Bridges ..................107
Clear Out the Town
Defenders ...............................107
Destroy the Enemy
Headquarters ..........................109
Defend the Bridges...................109
Debriefing........................ 110
Awards Earned ........................110
Mission 08: Beyond
the Iron Curtain ..................111
Rescue and Recovery ........ 113
Repair All Units at
the Rally Point .........................141
Repair the Abandoned
Vehicles ..................................142
Repair All Units at
the Rally Point .........................143
Follow Webb to the
Rally Point ...............................144
Secure the Soviet
Main Base...............................172
Survive the Soviet
Counterattack .........................173
Destroy All Remaining
Enemy Forces ..........................174
Debriefing........................ 175
Awards Earned ........................175
Follow Webb to a
Safe Location ..........................144
The Multiplayer Maps ........176
Clear the Riverbank
of Enemies ..............................144
Airbase ........................... 177
Bridge ............................ 178
Secure the Crash Site ..............113
Fight Off the Soviet
Counterattack .........................145
Dome ............................. 179
Destroy the AA ........................113
Debriefing........................ 146
Farmland ........................ 180
Hold the Crash Site ..................115
Awards Earned ........................146
Highway ......................... 181
Search the Train Station ...........116
Mission 12: Once More
unto the Breach ..................147
Hillside ............................ 182
Search the Apartment
Complex ..................................117
Clear the Extraction Route ........118
Clearwater Creek ............. 149
Island ............................. 184
Debriefing........................ 119
Secure the Soviet
Outpost ..................................149
Liberty ........................... 185
Awards Earned ........................119
Mission 09: Lair of
the Bear ..............................120
Secure the Southern
Part of Town............................150
Hometown ...................... 183
Power Plant .................... 186
Quarry ........................... 187
Secure the Sawmill...................151
Radar ............................. 188
Defend the Sawmill...................153
Riverbed ......................... 189
Secure Submarine One .............122
Break Through the
Soviet Lines .............................153
Riviera ............................ 190
Secure Submarine
Three Before It Leaves ..............123
Secure the Town Square ...........154
Ruins ............................. 191
The Submarine Base ......... 122
Hold Submarine Three ..............125
Deal with All Remaining
Soviet Forces...........................154
Secure the
Residential Area.......................126
Debriefing........................ 155
Hold Submarine One ................127
Awards Earned ........................155
Awards Earned ........................128
Mission 13: Before
the Storm............................156
Mission 10: Liberty Lost .....129
Sandfish Island ................. 158
Air Assault ...................... 131
Destroy the AA
Emplacements .........................158
Debriefing........................ 128
Assist in Securing
Ellis Island South ......................131
Assist in Securing
Ellis Island North......................133
Help Secure a Beachhead .........133
Capture Both ASM
Launchers ...............................159
The ASM Launchers
Must Remain Intact..................160
Seaside .......................... 192
Silo ................................ 193
Space Needle .................. 194
Typhoon ......................... 195
Wasteland ...................... 196
Xmas .............................. 197
Unit Stats ...........................198
U.S. Units ....................... 198
NATO Units...................... 200
Soviet Units ..................... 202
Fortifications ................... 204
Defend the ASM Launchers .......163
3
Protected by copyright. Unauthorized or unlawful copying or downloading expressly prohibited.
PRIMA OFFICIAL GAME GUIDE
3
5
6
7
2
Now that you are familiar with how to look around
the battlefield, it is time to learn how to give orders
to your units.
1
8
9
10
11
12
13
14
15
4
2
Selecting a Unit
The first thing you
must do is select a
unit. This is simple.
Just left-click on a
unit to select it. To
select more than
one unit, you can
left-click and hold
on the screen while
moving the cursor
to drag a box around the units you want to select.
Double-clicking on a unit selects all units of that
same type on the screen. You can also select units
by clicking on their markers in the unit display at the
bottom of the screen. If you double-click on a marker
here, it selects all units of that type no matter
where on the map they are. Finally, another way to
select multiple units is to select one, then, while
holding down S, left-click on additional units.
All units have markers to hhelp you spot them on the battlefield
and to designate what type of unit they are. These markers are
colored differently depending on to whom the unit belongs.
Your units have green markers, friendly units have blue
markers, and enemy units have red markers. When you select
a unit, the border of the marker turns white to indicate a
currently selected unit.
#
NAME
DESCRIPTION
HOTKEY
1
Resupply
Squad
Reinforce the selected
infantry squad.
I
2
Next/
Previous
Special
Ability
Cycle through the special
abilities if there is more
than one type of unit
selected.
E/S
+R
3
Offensive
Ability
Activate one of your unit’s
special abilities.
E
4
Defensive
Ability
Activate one of your unit’s
special abilities.
R
5
Stop
Order your selected units to
stop moving.
T
6
Attack
Ground
Order your selected units
to fire on the selected
coordinates rather than a
target.
F
7
Hold Fire
Order your selected units to
stop firing.
G
8
Move
Issue a move order to
selected units.
N
9
Move
Backward
Issue a reverse move order.
S+N
10
Unload All
Unload all infantry from
selected transports or
buildings.
U
11
Repair
Issue a repair order on
one of your own or friendly
units.
J
12
Waypoints
Issue a move order with
multiple waypoints.
S
13
Follow Unit
Order selected units to
follow another unit.
I
14
Enter
Nearest
Transport
Tell selected infantry
to enter nearest empty
transport vehicle.
Y
15
Enter
Nearest
Building
Tell selected infantry
to enter nearest empty
building.
H
Order Palette
Some orders can be given to units by right-clicking
on a location or other unit. You can also give orders
with the order palette in the lower-right corner of
the screen. To give an order using this method,
left-click on the desired button, then follow the
directions that appear at the bottom of the screen.
Some orders happen automatically while others
require you to left-click on a target. Below is a list
of the orders available on the order palette. For
more information on some of these orders, continue
reading.
6
PRIMAGAMES.COM
Protected by copyright. Unauthorized or unlawful copying or downloading expressly prohibited.
S+
Strategy and Tactics
Succeeding requires a basic understanding of both
strategy and tactics. Strategy is the overall plan you
form to complete your objectives. You then employ
tactics to make the strategy work. For example,
your objective may be to capture several command
points during a mission. While planning a strategy,
you would determine in which order you would
capture the command points as well as the types of
support you might need. Tactics come into play as
you determine how you will capture each command
point, the units you need, and how you will use
them. A good commander always considers tactics
when planning the overall strategy.
Tactics take many things into consideration. The U.S. Army has created an acronym that helps ensure you
consider everything important before going into battle—METT-T. This stands for mission, enemy, terrain,
troops and support, and time available.
Objectives
Objectives—
essentially your
orders—are
actions that must
be completed to
win the mission
or game. It is
important to
carefully read your
objectives—and
to read them often. During the heat of battle,
objectives may change, and frequently you receive
new objectives based on how well you completed
previous objectives. During the single-player
campaign, you get new objectives all the time. Your
commanding officer is conducting the strategy
and giving you new orders as situations develop.
You receive messages about objectives along the
left side of the screen. But be sure to take time
to open the objective menu to read the specifics.
The description explains what you must do to
complete the objective as well as what constitutes
a failure. For example, you may be ordered to hold
a command point. If the enemy takes control of the
position and fortifies it, then you failed the objective.
ctive.
Some objectives also list a time limit. If so,
you must consider how quickly you must move to
complete the objective before time runs out, which
results in failure. Multiplayer games are all time
based, so time is an important factor in determining
which tactics to use to complete your mission.
The tactics in this chapter are by no means the only ones
use. Part of the fu
fun of playing World in Conflict is
you can use
experimenting with tactics you create yourself or discover as
you play against the computer opponents during the singleplayer campaign or live opponents during multiplayer games.
Be ready for those "That was so cool!" moments as you try
something on a whim or out of desperation and are rewarded
with a great result.
13
Protected by copyright. Unauthorized or unlawful copying or downloading expressly prohibited.
Strategy and Tactics
Domination
Tug-of-War
In domination
mode, each team
fights for control
over a number of
command points on
the map. As one
team controls more
command points,
the domination
bar moves in their
favor. If you take control of all the command points,
the domination bar moves twice as fast. Once the
bar fills completely for one side, the game is over.
Otherwise, whichever side has most of the bar when
the timer runs out is the winner.
Tug-of-war can be
one of the most
intense game
modes. A single
command point
of 2–4 perimeter
points serves
as a front line.
Once one team
captures all of these
points, then another command point line appears
on the opposing side’s part of the map. When
this command point is captured a third and final
waypoint appears. If the advancing team captures
it, the game is over. However, if the defenders can
hold it and capture the previous command point,
they push the line back the other way. If neither side
pushes the line all the way before the timer runs
out, the side that controls most of the map is the
winner.
When playing domination games, it is a good
idea to get as many command points as quickly
as possible. The goal is to get the bar moving in
your favor early on to give you time to get some
fortifications built at the command points. As you
get more reinforcements points, you can then send
heavier, slower units forward to hold the command
points from enemy attack.
Assault
Assault mode games
are played in two
rounds. During the
first round, one
player is the attacker
and the other the
defender. While
there are several
command points to
capture, only one
appears at a time. As soon as the attacker takes
control of the perimeter points for a command point,
it disappears and the next command point appears.
When the attacker has captured all the command
points or the timer runs out, the second mode starts
and the defending player now gets to be the attacker
and vice versa. The new attacker is trying to beat
the other player’s results by either capturing more
command points or capturing them all in less time.
This game mode requires you to spread out your
force and advance along a wide front. As you begin
to push the line, you must not only try to capture
the new command point line, but also defend the
old one, since that is how the enemy can push the
line back. It is great to have a teammate playing the
support role, since this person can bombard the
perimeter points in advance of your units to clear
them out so you can roll right onto them without
fighting. As you advance the line, your deployment
zone also advances across the map, allowing you to
drop reinforcements right next to the line.
The fighting is usually concentrated around the
current command point, but it is a good idea, whether
you are the attacker or defender, to send units to
the locations for the next command point so you can
either secure it or defend it as soon as the current
command point is captured. When playing as a team,
you might even have some of your teammates head
to the next command point while you secure the first
one. Then once that is accomplished, you head to the
third command point while your teammate secures the
second, thus leapfrogging across the map to the last
command point.
19
Protected by copyright. Unauthorized or unlawful copying or downloading expressly prohibited.
Weapons of War
THE DAMAGE MODEL
Once a projectile hits a unit, the actual damage done is calculated with the following formula. "Damage" and
"armor piercing" are per-unit attacker variables; "armor" is a target variable.
Armor Piercing
if < 0.2 the deflect - (Random 0 to 0.2)
if > 1.0 then clamp to 1.0
= Damage dealt
Armor
• If the armor piercing/armor ratio is less than
0.2, the projectile simply cannot penetrate the
armor and no damage is done.
• If the projectile does penetrate the armor, a
random value between 0 and 0.2 is subtracted
from the armor piercing/armor ratio. This
introduces a small random element, the
effect of which is most pronounced when the
projectile barely penetrates the target. If the
armor-piercing value is much larger than the
armor value, this random element will have no
effect; if the projectile just barely penetrates,
occasionally no damage at all will be dealt.
Armor combines firepower with mobility. These
vehicles are protected from small-arms fire by their
armor and can cause a lot of damage to other units,
including enemy armor. Because of this, tanks are
great for spearheading an attack as well as for
defending a position. The other members of the
armor category, the transports, are also protected
by armor and armed with weapons that complementt
the tanks’ main guns. An armored force with both
tanks and transports can engage any type of enemyy
on the battlefield.
• If the ratio is larger than 1 even after the
random subtraction, full damage is dealt. The
maximum damage dealt cannot be larger than
the unit’s scripted damage value.
Armor units can run over and kill infantry units. For armor
players, the Force Move key (N
(N]
players
N is most valuable when
attempting to run over infantry in the open.
21
Protected by copyright. Unauthorized or unlawful copying or downloading expressly prohibited.
PRIMA OFFICIAL GAME GUIDE
Amphibious Armored Transports
Amphibious armored transports have lighter armor than
other armored units, and move as slowly as a heavy tank.
While not armed with as heavy firepower as an armored
transport, they have the ability to attack all types of units,
including helicopters. However, this unit’s ability to move
through water can give you some tactical flexibility, allowing
you to cross deep water, such as rivers, without having to
use fords and bridges. They can also be used on coastal
maps to flank the enemy by traveling on the water around
defensive positions on land.
OFFENSIVE SPECIAL ABILITY: MK-19 Grenade Launcher
(U.S.) or HEI Rounds (U.S.S.R. and NATO)
U.S.: AAVP7A1
These special abilities are very effective against infantry and
light vehicles. The U.S. MK-19 fires several grenades within
a small radius that attack everyone in the area. HEI (highexplosive incendiary) rounds are fired by the same gun as
the normal ammunition, but they have an added blast as well
as fire effect, increasing the damage inflicted.
DEFENSIVE SPECIAL ABILITY: Smoke Screen
These transports have smoke mortars, which can be fired
to provide an instant cloud of smoke around the tank. This is
useful when you come under attack and want to withdraw.
STATS
Cost Infantry
850
Cost Armor
U.S.S.R.: BTR-80
650
Cost Support
1,000
Cost Air
1,000
Score
16.9
Health
1,102
Max Speed
Armor (front/side/rear/top)
12 m/s
400/350/300/300
View Range
145 m
Perception Range
Offensive Special Ability
20 m
Grenade launcher barrage or HEI rounds
Recharge Time
Defensive Special Ability
25 s
Smoke screen
Recharge Time
45 s
Projectile Type
Straight
Fire Range
NATO: Luchs
140 m
Max Direct Damage
158
Armor Piercing
120
Max Blast Damage
168
Blast Armor Piercing
80
Blast Radius
4m
Target Ground Vehicles
Yes
Target Infantry
Yes
Target Air
Yes
Transport Infantry
Yes
26
PRIMAGAMES.COM
Protected by copyright. Unauthorized or unlawful copying or downloading expressly prohibited.
Mission 03: Battle for Pine Valley
THE HILLS ABOVE
PINE VALLEY
1000 HOURS • FOUR DAYS
AFTER THE INVASION
1
4
4
2
2
2
1
2
7
8
6
3
5
3
6
5
5
PRIMARY OBJECTIVES
SECONDARY OBJECTIVES
1
SECURE THE GAS STATION.
1
ELIMINATE THE SOVIET SNIPER.
2
CLEAR THE WAY INTO PINE VALLEY.
2
CLEAR THE STRONGPOINTS ASAP.
3
SECURE THE TV STATION.
3
ELIMINATE THE SOVIET FORWARD OBSERVER.
4
DEFEND THE SUPERMARKET.
4
HELP CAPTAIN BANNON WITH REPAIRS.
5
RETAKE THE SOUTHEASTERN APPROACH.
5
DESTROY THE ENEMY MORTARS.
6
HOLD THE SOUTHEASTERN APPROACH.
6
AID THE ARTILLERY.
7
DEFEND THE TOWN SQUARE.
8
BREAK THE SOVIET OFFENSIVE.
THE BATTERED U.S. BATTALION
LED BY COLONEL SAWYER IS
ORDERED TO MAKE A STAND
IN THE TOWN OF PINE VALLEY.
DESTROY THE SOVIET AIRBORNE
TROOPS ALREADY PRESENT,
AND PREPARE DEFENSES
AGAINST THE ONCOMING SOVIET
INVASION FORCE.
SUGGESTED STARTING COMMAND
M2A2 BRADLEY IFV ARMORED TRANSPORT (3)
M1025 HMMWV TROOP TRANSPORT
ANTI-TANK INFANTRY SQUAD
DEMOLITION ENGINEER (3)
69
Protected by copyright. Unauthorized or unlawful copying or downloading expressly prohibited.
PRIMA OFFICIAL GAME GUIDE
SECONDARY ORDERS: ELIMINATE
THE SOVIET SNIPER
A SOVIET SNIPER HAS TAKEN UP POSITION
SOMEWHERE NEAR THE GAS STATION. LOCATE
AND ELIMINATE HIM.
You must complete all ssecond
secondary objectives to earn the
Star.
Silver Star
Pine Valley is a small
town where there
is going to be a big
fight. Your drop
zone is northeast
of town. You begin
your attack from
this area.
Secure the Gas Station
ORDERS
SOVIET UNITS ARE ALREADY OCCUPYING PINE
VALLEY. IN ORDER TO RECLAIM THE TOWN,
WE ARE MOUNTING A HASTY ATTACK AGAINST
PERIMETER TARGETS. FIRST RECLAIM THE GAS
STATION AND THEN DIG IN. FURTHER ORDERS WILL BE GIVEN
ONCE THE OBJECTIVE HAS BEEN ACCOMPLISHED.
Unlike in the
previous missions,
you do not begin
with any units.
However, you do
have a quantity
of reinforcements
points that you can
use to order up
your initial force.
yo
Request the units you need to
Bradley
armored
Br
start this mission.
transports are the
tra
only
nly armor you have, so take along three of these.
In addition, a Humvee can repair your vehicles as
they take damage. An anti-tank infantry squad can
take cover in buildings near the gas station and
help take out enemy armor. Finally, you have access
to three demolition engineers. These units are
great for blowing up buildings. Though they are not
required for this mission, you can still use them and
get some practice with their special abilities. Order
your units and position your drop zone so you can
get your units on their way.
An enemy sniper
perches on the
smokestack near
your drop zone.
He could cause a
lot of damage to
your infantry; you
must eliminate this
threat. One way
to do it is to order
your Bradleys to
The sniper is on this
attack. This takes
smokestack. Try sending in
a demolition engineer to
a while but is safe
destroy the smokestack. Use a
since the sniper’s
smoke screen and the armored
rifle cannot damage
protection of a Bradley.
your armored
transports. A more exciting
citing way to complete this
secondary objective is to load one of your demolition
engineers inside a Bradley and drive it right next to
the smokestack. Use the Bradley’s smoke screen
ability to hide the area, then unload the engineer.
Quickly order him to place a demolition charge on the
smokestack and then get back into the Bradley. Drive
the Bradley back to your drop zone and unload the
engineer. Click on the ability button again to detonate
the charge and bring the smokestack crashing to the
ground, and the sniper along with it.
70
PRIMAGAMES.COM
Protected by copyright. Unauthorized or unlawful copying or downloading expressly prohibited.
Mission 03: Battle for Pine Valley
Now it is time
to head for the
gas station. Load
up your infantry
units and drive
your vehicles to
a position behind
the building to the
north of the gas
station. Unload the
sta
Advance on the gas station.
anti-tank infantry
an
and
for cover.
nd send them sprinting into the building
b
This squad can engage the enemy armor as well as
the fortifications. Position your Bradleys in a line to
the west of the building and begin firing TOWs at
the enemy armored units. Keep your Humvee behind
to repair their damage and to engage the enemy
infantry squads.
The cavalry has
five Sheridan light
tanks they can fly
in for you to use.
Open the tactical
aid menu and order
them one at a time.
They are airlifted
to the position you
choose. As soon as
Request the Sheridan tanks
you have enough
from the tactical aid menu.
TA points, bring
them in as quickly as you
can. It takes a while for
u can
them to arrive. Once they do, move them over
to the Bradleys to help support your attack. The
Soviets usually have an infantry squad inside the gas
station, so engage them and destroy the structure
in the process.
Historical Sidebar
Not many people know that the United States and
the Soviet Union came very close to war in 1984.
Soviet spies were watching the Pentagon, the
White House, and other government buildings;
their job was to count the number of lighted
windows each night. The idea was that if the
U.S. was planning a war or something major,
strategists would be putting in long hours with
lots of people working late into the night.
Before you rush to capture both of the command points around
station, wait for so
some of the Sheridans to arrive. They
the gas station
come in handy as the Soviets counterattack.
Anti-tank infantry take position on the
rooftop of the police station.
After the
he gas station is either cleared or destroyed,
send your anti-tank infantry squad to the police
station southwest of the gas station. They move
up onto the roof and fire their rockets at any
nearby enemy vehicles. You can also order them
to fire on the Soviet fortifications at the eastern
command point. Once the fortifications have all been
destroyed, move your vehicles onto the command
points so the construction of your own fortifications
can begin. Watch out for enemy attacks from the
south and southeast. Keep your Bradleys near your
tanks to help engage infantry while your Sheridans
deal with the armor.
Clear the Way into Pine Valley
ORDERS
PHASE TWO OF THE ATTACK TO RETAKE PINE
VALLEY HAS BEGUN. YOU ARE ORDERED TO
CLEAR THREE ENEMY DEFENSIVE POSITIONS
ALONG THE OUTER PERIMETER. BANNON AND
CHARLIE COMPANY WILL ATTACK ALONG THE WESTERN
FLANK IN THE DIRECTION OF THE TOWN SQUARE WITH WEBB
AND ALPHA COMPANY IN SUPPORT.
The U.S. and NATO were planning a major
military exercise in 1984. Since there was a
lot to do to get ready for this exercise, many
people worked late. The Soviets feared that the
exercise might be a ruse disguising a surprise
attack. The Soviet military went on high alert,
and the leadership even considered a preemptive
strike against the West—with nuclear weapons.
Luckily, cooler heads prevailed, the exercise
was only an exercise, and war was avoided.
SECONDARY ORDERS: CLEAR
THE STRONGPOINTS ASAP
THE SOVIET MAIN FORCE IS NOT FAR OUT, AND
THE SOONER WE GAIN ENTRY TO THE CITY THE
BETTER. DESTROY THE SOVIET FORTIFICATIONS
BEFORE YOU RUN OUT OF TIME.
71
Protected by copyright. Unauthorized or unlawful copying or downloading expressly prohibited.
The Multiplayer Maps
This map can be tough for the attackers since
they must push through narrow canyons that funnel
their advance right into the defenders. Artillery
fire and tactical aids can really help break up the
defenses.
Under a scorching desert sun, Soviet and U.S.
forces battle for control of an important airbase in
the Nevada desert.
GAME MODE: Assault
MATCH TIME: 10 minutes
MAIN GATE
HOUSING AREA
Main Gate
Housing Area
Radar
Outer Perimeter
Attacker
Deployment
RADAR
Airflied
OUTER PERIMETER
AIRFIELD
177
Protected by copyright. Unauthorized or unlawful copying or downloading expressly prohibited.
Airborne
Infantry
Squad
Troop
Transport
Transport
Truck
Light Tank
Medium
Tank
Heavy Tank
Demolition
Engineer
FV101
Scorpion
Chieftain
Mk 5
Leopard 2A4
800
500
600
N/A
550
300
N/A
1,000
N/A
1,000
N/A
N/A
900
N/A
700
N/A
600
800
1,200
850
N/A
N/A
600
N/A
550
N/A
N/A
1,200
N/A
1,000
N/A
N/A
900
N/A
850
N/A
N/A
1,200
N/A
14.3
16.9
5.2
6.5
10.4
11.7
6.5
15.6
20.8
31.2
Health
490 (each
soldier)
490 (each
soldier)
490
490
490 (each
soldier)
857
1,225
1,408
1,592
1,837
Max Speed
5 m/s
5 m/s
5 m/s
5 m/s
5 m/s
18 m/s
17 m/s
16 m/s
14 m/s
12 m/s
Armor (front/side/
rear/top)
100/100/
100/100
100/100/
100/100
0/0/0/0
100/100/
100/100
100/100/
100/100
150/150/
150/150
150/150/
150/150
475/300/
275/275
650/500/
375/375
1,100/800/
550/550
Unit Name
NATO AntiTank Squad
Cost for Infantry
Role
650
Cost for Armor Role
Cost for Support
Role
Cost for Air Role
Score
Sniper
TRM 4000
Anti-Tank
Infantry
Squad
D90
Infantry
Squad
NATO
Airborne
Infantry
Squad
Unit Type
PRIMA OFFICIAL GAME GUIDE
NATO Sniper
NATO
Demolition
Engineer
NATO
Infantry
Squad
View Range
220 m
220 m
220 m
220 m
220 m
145 m
145 m
100 m
105 m
120 m
Perception Range
50 m
50 m
50 m
50 m
50 m
50 m
50 m
20 m
20 m
20 m
Offensive Special
Ability
Grenade
launcher
barrage
N/A
N/A
Demolition
charge
Direct
artillery
Armorpiercing
bullets
N/A
HESH round
WP shell
HEAT shell
Recharge Time
20 s
N/A
N/A
30 s
90 s
30 s
N/A
30 s
40 s
30 s
Defensive Special
Ability
Sprint
Sprint
Sprint
Sprint
Sprint
N/A
N/A
Smoke
screen
Smoke
screen
Smoke
screen
Recharge Time
20 s
20 s
20 s
20 s
20 s
N/A
N/A
45 s
45 s
45 s
Projectile Type
Straight
Straight
Straight
Straight
Straight
Straight
N/A
Straight
Straight
Straight
Fire Range
100 m
100 m
100 m
100 m
100 m
100 m
N/A
190 m
230 m
250 m
Max Direct Damage
321 against
infantry,
46 against
helicopters,
33 against
ground
vehicles
166 against
infantry,
100 against
ground
vehicles
2,500
83
333
121
N/A
70
50
51
Armor Piercing
55 (rifleman
and medic)
65 (machine
gunner) 450
(AA soldier)
600 (AT
soldier)
55 (rifleman
and medic)
600 (AT
soldiers)
30
55
55
80
N/A
175
250
500
Max Blast Damage
0
0
0
0
0
0
N/A
40
33
9
Blast Armor
Piercing
0
0
0
0
0
0
N/A
120
120
120
Blast Radius
0
0
0
0
0
0
N/A
4m
6m
2m
Target Ground
Vehicles
Yes
Yes
No
No
No
Yes
N/A
Yes
Yes
Yes
Target Infantry
Yes
Yes
Yes
Yes
Yes
Yes
N/A
Yes
Yes
Yes
Target Air
Yes
No
No
No
No
Yes
N/A
No
No
No
Transport Infantry
No
No
No
No
No
Yes
Yes
No
No
No
Repairing HP
N/A
N/A
N/A
N/A
N/A
30/s
N/A
N/A
N/A
N/A
200
PRIMAGAMES.COM
Protected by copyright. Unauthorized or unlawful copying or downloading expressly prohibited.
Medium
Antiair
Vehicle
Heavy
Antiair
Vehicle
Medium
Artillery
Heavy
Artillery
Repair Tank
Heavy
Attack
Helicopter
Medium
Attack
Helicopter
Transport
Helicopter
Scout
Helicopter
FV510
Warrior
Luchs
Gepard
Roland
FV432
LARS 110
SF 2
AAVR
A129
Mangusta
SA-341
Gazelle
SA-330
Super Puma
PAH-1
1,000
850
850
N/A
1,200
N/A
N/A
N/A
1,200
850
800
750
650
1,000
N/A
1,000
N/A
N/A
N/A
1,400
1,000
900
1,100
1,000
650
900
900
1,900
900
N/A
1,400
1,000
900
1,100
1,000
1,000
N/A
1,000
N/A
N/A
1,200
900
650
600
18.2
16.9
13
13
18.2
45.5
19.5
15.6
15.6
13
11
1,225
1,102
1,225
1,225
1,102
1,347
1,837
980
980
1,225
980
16 m/s
12 m/s
14 m/s
14 m/s
16 m/s
9 m/s
14 m/s
34 m/s
36 m/s
30 m/s
40 m/s
400/350/
300/300
400/350/
300/300
300/300/
300/300
300/300/
300/300
275/275/
275/275
350/350/
350/350
300/285/
240/240
350/350/
350/350
350/350/
350/350
350/350/
350/350
250/250/
250/250
145 m
145 m
150 m
150 m
120 m
120 m
90 m
250 m
250 m
175 m
300 m
20 m
20 m
20 m
20 m
20 m
20 m
20 m
5m
5m
5m
5m
Deliver smoke
screen
Emergency
repairs
HOT missile
Mistral
missile
N/A
IR scan
Armored
Transport
Amphibious
Armored
Transport
Unit Stats
AP rounds
Incendiary
ammunition
Ground
support
N/A
White
phosphorus
round
45 s
25 s
10 s
N/A
20 s
40 s
30 s
50 s
30 s
N/A
20 s
Smoke
screen
Smoke
screen
N/A
Smoke
screen
N/A
N/A
Field repairs
Drop flares
Drop flares
Drop flares
Drop flares
45 s
45 s
N/A
45 s
N/A
N/A
30 s
30 s
30 s
30 s
30 s
Straight
Straight
Straight
Homing
Ballistic
Ballistic
N/A
Straight
Straight
N/A
Straight
140 m
140 m
150 m
150 m
550 m
750 m
N/A
125 m
125 m
N/A
90 m
185
158
714
233
175
300
N/A
61
183
N/A
63
120
120
250
450
700
1,000
N/A
370
160
N/A
100
246
168
0
133
125
294
N/A
91
174
N/A
103
80
80
0
55
130
276
N/A
150
80
N/A
100
4m
4m
0
10 m
20 m
12 m
N/A
7m
4m
N/A
4m
Yes
Yes
No
No
Yes
Yes
N/A
Yes
Yes
N/A
Yes
Yes
Yes
No
No
Yes
Yes
N/A
Yes
Yes
N/A
Yes
Yes
Yes
Yes
Yes
No
No
N/A
Yes
Yes
N/A
No
Yes
Yes
No
No
No
No
No
No
No
Yes
No
N/A
N/A
N/A
N/A
N/A
N/A
40/s
N/A
N/A
N/A
N/A
201
Protected by copyright. Unauthorized or unlawful copying or downloading expressly prohibited.
PRIMA OFFICIAL GAME GUIDE
Written by Michael Knight
The Prima Games logo is a registered trademark of Random
House, Inc., registered in the United States and other countries.
Primagames.com is a registered trademark of Random House, Inc.,
registered in the United States.
© 2007 by Prima Games. All rights reserved. No part of this book
may be reproduced or transmitted in any form or by any means, electronic or
mechanical, including photocopying, recording, or by any information storage
or retrieval system without written permission from Prima Games. Prima
Games is a division of Random House, Inc.
Product Manager: Jason Wigle
Editor: Rebecca Chastain
Manufacturing: Stephanie Sanchez
Copyeditor: Deana Shields
Design and Layout: Calibre Grafix
© 2007 Massive Entertainment AB. All rights reserved. World in Conflict,
Massive Entertainment and the Massive Entertainment logo are registered
trademarks of Massive Entertainment AB in the U.S. and/or other countries.
Sierra and the Sierra logo are registered trademarks or trademarks of
Sierra Entertainment, Inc. in the U.S. and/or other countries. The NVIDIA
logo, GeForce and “The Way It’s Meant To Be Played” logo are registered
trademarks or trademarks of NVIDIA Corporation in the United States and/or
other countries. Alienware and the Alienware logo are registered trademarks
and trademarks of Alienware Corporation. All other trademarks are property
of their respective owners.
All products and characters mentioned in this book are trademarks of their
respective companies.
Please be advised that the ESRB Ratings icons, “EC,” “E,” “E10+,” “T,”
“M,” “AO,” and “RP” are trademarks owned by the Entertainment Software
Association, and may only be used with their permission and authority. For
information regarding whether a product has been rated by the ESRB, please
visit www.esrb.org. For permission to use the Ratings icons, please contact
the ESA at esrblicenseinfo.com.
Important:
Prima Games has made every effort to determine that the information
contained in this book is accurate. However, the publisher makes no
warranty, either expressed or implied, as to the accuracy, effectiveness, or
completeness of the material in this book; nor does the publisher assume
liability for damages, either incidental or consequential, that may result from
using the information in this book. The publisher cannot provide any additional
information or support regarding gameplay, hints and strategies, or problems
with hardware or software. Such questions should be directed to the support
numbers provided by the game and/or device manufacturers as set forth
in their documentation. Some game tricks require precise timing and may
require repeated attempts before the desired result is achieved.
ISBN: 978-0-7615-5790-6
Library of Congress Catalog Card Number: 2007931832
MICHAEL KNIGHT
Michael Knight has worked in the
computer/video game industry since
1994 and has been an author with
Prima Games for ten years, writing over
60 guides during this time. Michael
has used both his degree in Military
History and experience as a high school
teacher to formulate and devise effective
strategies and tactics for hit titles such
as the Tom Clancy’s Rainbow Six and Hitman series.
He has also authored several titles in the Star Wars
universe including Star Wars Republic Commando,
Star Wars Episode III: Revenge of the Sith, Star Wars
Battlefront II, and Star Wars: Empire at War. Michael
has also developed scenarios/missions and written game
manuals for SSI, Red Storm Entertainment, and Novalogic.
When he is not busy at work on an upcoming strategy
guide, Michael likes to spend time with his wife and four
children at their home in Northern California. It was with
their help that Michael used his abilities and experience
to write three travel/strategy guides on Disneyland and
Southern California, in which he developed tips and hints
to help vacationing families save time and money while
maximizing their fun.
We want to hear from you! E-mail comments and feedback
to [email protected].
Printed in the United States of America
07 08 09 10 GG 10 9 8 7 6 5 4 3 2 1
ACKNOWLEDGMENTS
I would like to thank Rebecca Chastain and Jason Wigle at Prima Games for
all their help in making this book possible. I would also like to thank my wife
Trisa and our children for their patience and understanding while I fought
against communist aggression both day and night. I love and appreciate all
that you do for me.
PRIMA GAMES
A Division of Random House, Inc.
3000 Lava Ridge Court, Suite 100
Roseville, CA 95661
www.primagames.com