1
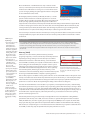
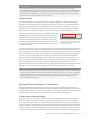
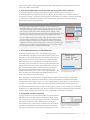
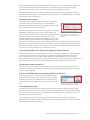
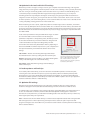
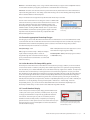
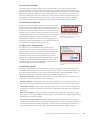
Adobe Photoshop CS5 and Photoshop CS5 Extended White Paper Adobe® Photoshop® CS5 performance Promoting a faster Photoshop experience for all users Table of contents 1:Essential hardware 5:Key steps to optimize Photoshop CS5 performance The depth and spread of tools and features in Adobe Photoshop CS5 and Photoshop CS5 Extended software make the two editions applicable to a variety of work environments and suitable for a wide range of tasks by image-makers of all skill levels, from enthusiasts to professionals. In some environments, Photoshop is employed in a dedicated, standalone fashion, while in others, it is a pivotal part of a larger suite of programs. Making sure that your computer meets the minimum system requirements is an essential first step in ensuring that all features function correctly. Optimizing your Photoshop CS5 setup to suit your work environment and the tasks you regularly perform is the next step. All users will benefit from such optimization, but those who work with video, 3D content, or other large files—or those who process multiple files at once—will see the greatest performance gains. This paper provides guidance on best practices to optimize Photoshop CS5 performance with a combination of careful hardware selection and informed program setup. What type of Photoshop user are you? Determining how you typically use Photoshop will help you make more informed decisions about the best ways to optimize your setup. For instance, the photographer who regularly processes high-resolution images will greatly benefit from increasing the amount of system RAM available to Photoshop, whereas the designer who works with 3D models will obtain far better performance by installing a faster video card containing more video RAM. So, itemize the tasks that you regularly perform in Photoshop and then use the recommended setup details contained in this paper as the basis for optimizing your system. Essential hardware Computers are built with a variety of components. Each performs a different function, and together they affect the overall performance of Photoshop. The following sections describe system components and the roles they play in the image-editing and enhancement process. 64-bit architecture Photoshop CS5 provides 64-bit support on both Mac and Windows® systems. Substantial performance gains can be achieved by switching from running Photoshop in 32 bit to the 64-bit version of the program, especially when working with large or complex files or when processing multiple images at a time. The 64-bit architecture supports management of larger amounts of RAM and better processing of larger amounts of imaging data. Note that to run Photoshop CS5 in 64-bit mode, your hardware and operating system must both be 64-bit compatible. Microsoft® Windows 7 and Windows Vista® ship in 32-bit or 64-bit versions, and Photoshop CS5 will only work in 64-bit mode when the 64-bit version of Windows 7 is running. You can check which version you are running by viewing the system type information in the System section of Windows Control Panel. On the Apple platform, however, the Mac OS, Mac OS X, is a 64-bit Check the version information on the Photoshop CS5 startup splash screen to see which version of system and will run both 64- and 32-bit applications on all current the program is running. hardware. Most computers running Mac OS X start in the 32-bit mode of the operating system by default, even if they have hardware that supports 64 bit. In this situation, Photoshop CS5 will still detect the ability of the hardware to support 64 bit and will run the program in 64-bit mode. This means that users working with Mac OS X in 32-bit mode, but running Photoshop CS5 64 bit, will still be able to take advantage of performance gains resulting from the 64-bit structure and in particular the ability of Photoshop to address larger amounts of RAM. The easiest way to check which version of Photoshop is running is to view the details on the splash screen that is displayed when the program starts. Next to the version number you will see x64 for 64-bit mode or x32 for 32-bit mode. Pfeiffer report key findings* •Photoshop CS5 in 64-bit mode can address substantially more memory than when working in 32-bit mode. This leads to significant productivity gains when working with a system that provides 64-bit support and contains high amounts of RAM. •Photoshop CS5 on 64-bit Windows 7 opens a 2GB file 15 times faster than Photoshop CS4 on a 32-bit Windows 7 machine. •Opening and saving files with Photoshop CS5 is up to six times faster on a 64-bit system than on a 32-bit system. •Processing large files (over 500MB) is significantly faster with Photoshop CS5 on a 64-bit system with memory configurations of 8GB or more. *Pfeiffer Consulting, “Adobe Photoshop CS5: 64-Bit Performance and Efficiency Measures,” 2010. For more details, read the full report at www.pfeifferconsulting. com. Recommendations If you regularly work with large files, process multilayered Photoshop documents, and/or enhance multiple highresolution raw files, then running the 64-bit version of Photoshop CS5 will increase your productivity. Your computer hardware and operating system must support the 64-bit structure before you can run the program in this mode. Note that Mac users with 64-bit capable hardware but running Mac OS X in 32-bit mode can still run Photoshop CS5 in 64-bit mode. Memory (RAM) RAM is the short-term memory where Photoshop (and other programs), image data, and various Undo steps and History States are kept during the image-editing and enhancement process. RAM is different from hard-drive or DVD disk memory, as the information stored in RAM is lost when your computer is switched off. For efficient photo editing, the amount of RAM your computer contains is just as Check the amount of RAM you have installed by important as the overall processing power of your system. In general, viewing the installed memory values in the more RAM means better Photoshop performance. This is especially System section of the Control Panel (Windows) or true of 64-bit systems, where larger amounts of memory can be the Apple > About This Mac dialog box for Mac addressed and used more efficiently. Keep in mind that Photoshop will computers. be sharing available RAM with the computer’s operating system as well as other programs and utilities running at the same time. So not all the RAM installed in the system can be used by or should be allocated to Photoshop. How Photoshop shares the memory is controlled by the settings in the Performance panel of the Preferences dialog box. Refer to the “Key steps to optimize Photoshop CS5 performance” section for details about optimizing the settings in the Preferences dialog box. The total amount of RAM that can be installed on your system, and used by Photoshop CS5, is determined by the hardware specifications of your computer and your operating system. When Photoshop is running in 32-bit mode, it can only directly access up to approximately 3GB of RAM. On a 64-bit operating system running on a compatible 64-bit architecture with Photoshop CS5 running in 64-bit mode, the program can directly access as much RAM as the computer supports, but for best performance, you should leave room for the operating system and other programs to run. Note that the performance gains obtained by increasing RAM are more noticeable when adding RAM to a system with a low amount, such as 1GB, and are less dramatic on systems with higher amounts of installed RAM, like 32GB. Also, users who regularly process large files (over 500MB) and/or complex documents with many layers will see greater performance improvements with the addition of extra RAM than those working with smaller, less complex images. For more details about how to determine if your system could benefit from more RAM, read the “Key steps to optimize Photoshop CS5 performance” section. Adobe Photoshop CS5 and Photoshop CS5 Extended White Paper 2 Recommendations In general, you should buy as much memory as you can afford and your system can support, since adding more RAM is one of the simplest ways to improve overall Photoshop performance. But remember that only 64-bit systems can effectively address more than 4GB of RAM. How do I know what is the total amount of memory (both RAM and scratch disk space) available to Photoshop during editing operations? Photoshop displays RAM and scratch disk usage and allocation in the Scratch Sizes section of the status bar. The number on the left represents the amount of memory currently being used by the program to display all open images. The number on the right represents the total amount of RAM available for processing these images. Storage (hard disk) Which RAID setting should I use? Scratch disks RAID 0: The fastest RAID setup is level 0, but it offers no data protection (if one of the drives goes bad, you lose all the data). This setting is typically used for scratch disks. RAID 1: RAID level 1 mirrors your data across multiple drives (if one fails, you still have your data). This option is best for storing your image files. RAID 5: RAID level 5 combines the two for faster performance and redundant data storage. This makes RAID 5 a good option for data storage. The hard drive in your computer performs three key functions when processing your image files: • Provides access to the operating system and programs like Photoshop • Stores your image files • Gives extra memory resources (called virtual memory or scratch disks) to Photoshop when processing requirements exceed available RAM All three tasks are essential for image processing and ensuring that your hard drive is fast; has plenty of spare space; is free from errors; and is regularly defragmented, which will improve performance in all these key areas. For maximum performance, a fast, dedicated drive should be allocated for each of these tasks. A typical setup would include a startup drive for system and program files, a data drive for storing all image and project files, and a scratch disk drive for virtual memory. Startup drive Both Photoshop CS5 and your operating system have minimum requirements for hard-drive free space. For Photoshop, it is 2GB, and for most operating systems, the minimum requirement is 20GB. But keep in mind that these are minimum requirements, and the more free space, the better. Speed is also a factor with this drive, and many high-performance systems now use solid-state drives (SSDs) for startup, as they provide very fast read and write access. Assign the drives to be used as a scratch disk, and the sequence in which they will be used, with the settings in the Performance section of the Photoshop Preferences dialog box. When Photoshop needs more memory than that available, it uses a portion of the hard drive as virtual memory or scratch disks. This process allows you to work with large image changes that exceed the capacity of your system RAM. The more hard-drive space available and the faster the drive access speed, the more efficient this process becomes. As a rule of thumb, aim for hard drives with faster disk rotation (usually classified in RPM) and faster read/write speeds. If you have the budget, then take a look at SSDs. Ideally, you should use a dedicated, empty hard drive that is not your startup disk, but if empty drives are not possible, at least make sure that the free space on your scratch disks is not fragmented. To view or adjust your scratch disk settings, choose Photoshop/Edit > Preferences > Performance and look at the scratch disks area in the middle of the panel. The panel will show you a list of all hard drives attached to your system, and you can arrange both the order in which Photoshop uses them and which drives to use at all. Up to 64EB of scratch disk space is supported on a total of four volumes (an exabyte is equal to 1 billion gigabytes). If you have more than one drive and you want to include your startup drive as part of the scratch disk, be sure it is last in order for maximum efficiency. You should also use hard drives with fast access (read/ write) speeds and as a general rule avoid removable or networked drives, which cause performance lags due to the time required for communication to and from the disks. Faster drive access can be achieved by using an SSD or by installing multiple drives in a RAID system. RAID setups require two or more disk drives and a special hard drive controller. Many motherboards now have RAID controllers built in, reducing the need to buy and install a separate board. When first creating the RAID setup, Photoshop users should set their scratch disk to operate in RAID level 0. This mode uses two or more drives to provide extra performance by writing information across multiple drives. Adobe Photoshop CS5 and Photoshop CS5 Extended White Paper 3 Data drive The speed of your data drive will affect how long it takes to open and save files—faster drives will increase read and write performance in Photoshop. For this reason, many professionals also employ a RAID drive system to store their photos and project files. But keep in mind that with data, it is also important to ensure that the files are secure and regularly backed up. Select a different RAID mode such as level 1, which mirrors the files over the disks, or level 5, which combines performance and security measures. For the best performance, avoid network or external drives due to their relatively slow access times. Recommendations For maximum performance, use separate, dedicated physical drives for startup, data, and scratch drives. All drives should be fast and regularly defragmented. Also, when possible, multiple drives set up in a RAID 0 array should be used for your scratch disks and data drives, and an SSD should be used for startup. GPU-accelerated features in Photoshop CS5 Photoshop CS5 harnesses increasing hardware power and speed by introducing new features, like Adobe Repoussé that take advantage of modern video card technology. Other GPU features added in Photoshop CS5 include: •Scrubby Zoom •Heads-up display (HUD) color picker •Color sampling ring •Brush dynamic size and brush hardness control •Bristle Brush preview •Rule of Thirds crop grid overlay •3D overlays (including ground plane, light guides, and bounding boxes for mesh and materials) GPU-accelerated features in Bridge CS5 include •Preview panel •Full-screen preview •Review mode Processor (CPU) CPU chips are the engine of your computer and, as such, determine how quickly many of the features in Photoshop will function. For many years, processor performance was categorized in terms of clock speed. The higher the value, the more powerful the chip, and the better the image-processing performance. But processor speed alone no longer tells the whole story. Some of the best chips for intensive image-editing Photoshop uses multiple cores, or CPUs, to split the processing workload. tasks (filtering in particular) are not those with the highest clock speeds, but rather those with multiple cores and 64-bit architecture support. This is especially true for specific Photoshop processes, like Radial Blur, that have been optimized for multicore hardware. Other functions, such as file opening and closing, are processed with a single core only, so you will not see a performance improvement in these areas. Note also that the greatest performance gain will be experienced by users changing from a single-core setup to a multicore machine. Users migrating from a multicore system to one with even more cores will see an improvement, but not of the same magnitude. Recommendations If you regularly process large files; build complex, multilayered Photoshop documents; or work with multiple images at a time, then a multicore 64-bit processor will reduce the time to complete complex enhancement steps. Video or graphics card The video card is the essential link between computer and monitor. At the most basic level, this component determines the number of colors and the resolution the screen will display as well as the speed at which images will be refreshed. Increasingly though, Photoshop is taking advantage of the powerful processor contained on these cards (called the graphics processing unit or GPU) to help speed up performance and activate a set of special GPU-accelerated features such as canvas rotation, panning and zooming, Adobe Repoussé, and Adobe Pixel Bender® filters (available for download from labs.adobe.com). Photoshop CS5 uses the GPU when the installed video card supports the OpenGL standard and has a least 256MB of VRAM (512MB or more Compatible video cards will be recognized and is better for 3D work). Most basic models sold by leading computer displayed in the Detected Video Card section of the Performance section of the Preferences dialog manufacturers today meet these minimum requirements, but the box. simplest way to verify is to check the GPU Settings area of the Performance panel. If Photoshop CS5 detects a compatible video card, it will be displayed, and the Enable OpenGL option will be activated. You can view the amount of VRAM present on your video card by referring to the Video Card Memory information displayed in the System Info dialog box (choose Help > System Info in Photoshop). For details about optimizing GPU acceleration in Photoshop CS5, refer to the “Key steps to optimize Photoshop CS5 performance” section. Adobe Photoshop CS5 and Photoshop CS5 Extended White Paper 4 Recommendations For best performance, pick a card from the Photoshop CS5 supported video card list (kb2.adobe.com/cps/831/ cpsid_83117.html) that has a fast processor and as much memory (VRAM) as you can afford. If you’re working with video files and want to take advantage of GPU acceleration in Adobe Premiere® Pro CS5 software, you should also consult the supported video card list (www.adobe.com/products/premiere/systemreqs) for that program to find an option that suits both Photoshop CS5 and Adobe Premiere Pro CS5 environments. Screen or monitor The role the monitor plays as a preview mechanism cannot be understated. In addition to enabling a fully color-managed Photoshop workflow from capture to output, the quality of your monitor and its regular calibration are essential to ensure the accurate representation of your images on screen. Both Windows and Mac systems ship with software-based display calibration utilities designed to neutralize color casts and standardize contrast and brightness. For more accurate calibration, use a combined hardware and software solution that measures the colors and tones on screen and then creates a custom profile for your monitor. The minimum pixel dimensions for monitors is 1024x768 pixels, with 1280x800 pixels recommended. But displays with higher dimensions will allow more efficient arrangement of the Photoshop application framework (for example, panels, menu, and toolbar). You may also benefit from spreading the Photoshop workspace over more than one screen, which provides the option to work with images on one screen and panels on another. Windows 7 users with compatible video card and monitors can take advantage of extra color and tonal rendition by activating 10–bit mode in the driver settings for the card. The range of tones and colors that can be displayed by your system is determined by the abilities of both the video card and the monitor. The minimum specification for color depth is 16–bit color, but most video card and monitor combinations exceed this recommendation by using a 24–bit color system. This equates to an 8–bitsper-channel pathway for red, green, and blue channels from card to monitor, which is more than enough for most users, as it is possible to display up to 16.7 million colors. But Photoshop is capable of working with higher bit rates when supported by higher-bit-rate-capable cards and monitors. Employing a video card and monitor combination capable of 10 bits per channel increases the display palette to a possible 1.07 billion colors, making it suitable for color-conscious professional photographers who want to see smoother gradations of tones and colors. More details about activating high-bit display mode, currently available only to Windows 7 users, can be found in the “Key steps to optimize Photoshop CS5 performance” section. Recommendations Always employ a fully color managed and calibrated system. If you are working with high-resolution or complex images, consider employing a multimonitor display system, but make sure that the video card you use is capable of supporting a multimonitor setup. Windows users who want the ultimate in color and tonal rendition can opt for a card and monitor setup that supports 10-bits-per-channel display. Look for display port connections when searching for cards and monitors that support high-bit display. Key steps to optimize Photoshop CS5 performance Knowing which hardware works best for your work environment is just part of the performance story. To ensure that your carefully selected hardware works to its full potential, optimize Photoshop and fine-tune your operating system. And if you’re unable to change hardware, use the following guidelines to adjust Photoshop and your operating system preferences to realize performance gains without added expense. 1. Allocate your scratch disk correctly To set your scratch disk, choose Edit > Preferences > Performance (Windows) or Photoshop > Preferences > Performance (Mac). Then, in the Scratch Disk section of the panel, select the drive that has the most free space—preferably not your system or startup drive. If you have other drives listed, you can also allocate these as extra scratch drives. Photoshop will use the drive listed first until it is full and then move to the next drive if even more memory is needed. You can change the order in which the drives will be used by selecting a drive and then using the Up or Down Arrow keys to change its position in the list. Place your system or startup drive in last position. The performance of systems whose Efficiency result (see boxout below for details) regularly Adobe Photoshop CS5 and Photoshop CS5 Extended White Paper 5 falls below 95% when conducting simple operations will be improved by the correct allocation of fast scratch disks or the addition of extra RAM. 2. Separate the Photoshop scratch disk from operating system virtual memory As most operating systems employ a virtual memory system similar to the one in Photoshop, it is recommended that scratch disks be positioned on a different drive than the one your computer uses for its virtual memory system. In general, the operating system’s virtual memory, or swap file, is stored on the startup or system drive. To help with overall Photoshop and Windows/Mac performance, ensure that you don’t position the scratch disk on the same drive. How do I know if my system could benefit from more RAM? Photoshop contains a simple built-in monitor that can help you determine how efficiently the RAM in your system is being used to process your photos. To test the current memory settings, select the Efficiency setting from the pop-up menu of the Status Bar at the bottom of the document window (or the Info palette), and then perform a series of standard editing actions in Photoshop. If only RAM memory is being used during these editing steps, then the Efficiency result displayed will be 100%. The value actually represents the percentage of time spent performing the operation instead of reading or writing data to the scratch disk. If the value falls below 100%, Photoshop is using the scratch disk in place of RAM and is therefore operating more slowly than if more memory were available. Regular occurrences of values below 95% means that you need to allocate more RAM to Photoshop, close programs running at the same time as Photoshop, or install more RAM memory. Select Efficiency from the display menu in the Status Bar. Check the values displayed after different processing steps to ensure that they are close to 100%. 3. Set the RAM percentage used by Photoshop Photoshop shares the RAM on your computer with the operating system (Windows or Mac OS X) and any other programs running at the same time. The percentage designated in the Memory Usage section of the Preferences Performance panel determines the upper amount of RAM memory that can be used by Photoshop. Most new users push this setting as high as possible, some as much as 90%, thinking that this will speed up the processing of their files. But if this allocation is set too high, both the operating system and Photoshop may need to move information from the fast RAM memory to the slower hard-drive memory while processing. This action is called “page swapping,” as the data is moved back and forth between the different memory spaces, and it causes Photoshop to run more slowly. Use the RAM slider in the Performance section of the Preferences dialog box to adjust the amount of memory allocated to Photoshop. When adjusting the amount of memory allotted to Photoshop in the Performance panel, it’s best to keep within the ideal range displayed. Check the Efficiency value on the Status Bar to test whether the settings currently being used are optimal. If you do choose to adjust the Memory Usage settings, change them by no more than 5% at a time, and then restart Photoshop and test the new settings before changing them again. Remember that with Photoshop CS5 running in 32-bit mode, the program can only directly access up to 2.1GB of RAM for Mac or 3GB for Windows—even if more is installed. In contrast, on 64-bit systems with compatible 64-bit hardware, Photoshop CS5 can directly access as much RAM as is installed on your system. 4. Defragment your drives regularly As images and files are saved and resaved to disk, they tend to become fragmented. This means that rather than the whole file being saved in one continuous space on the hard drive, the information is broken into bits and stored in several locations (wherever there is empty disk space). When the file is reopened, the document is reconstructed from each of the individual pieces. This file fragmentation slows down the opening and saving of files, as well as the running of programs such as The Windows Disk Defragmenter utility allows you to analyze and defragment the hard drives installed on your system. Similar utilities are available for Mac computers. Adobe Photoshop CS5 and Photoshop CS5 Extended White Paper 6 Photoshop, if they were fragmented when initially installed. The efficiency of scratch disks is also degraded if the space used for virtual memory is fragmented. You can achieve real performance gains by regularly defragmenting the drives you use for scratch disks, image storage, and application loading. Both Windows and Mac operating systems have defragmentation utilities built in. Consult your computer’s Help files to ensure that utilities are activated and, if need be, perform a manual defragmentation of all drives to ensure their continued performance. 5. Minimize History States The ability to jump backward and forward through the editing steps stored in the History panel in Photoshop is a very useful feature. Photoshop implements this feature by storing additional copies, called History States, of the image on your hard drive. A full copy at the original size is stored for every operation you perform that affects the entire image. Smaller changes, like individual paint The number of History States used by Photoshop strokes, require less information per state. The more editing you do, the can be altered via the History States setting in the Performance section of the Preferences more hard-drive space will be used for the History States of the dialog box. document. The History States setting in the Performance panel is set to a default of 20 but can be adjusted from 1 to 1,000, depending on the amount of scratch disk space available and the complexity of your normal image-editing work. If you find that Photoshop is running slowly after you’ve made a few editing changes, then try reducing the number of states. Fewer History States does mean less opportunity to reverse editing changes, but this action frees up memory resources and can bring new life back to a slow-running machine. 6. Avoid “Out of RAM” errors when running memory-intensive features Some Photoshop features, such as Content-Aware Scaling, 3D, and Liquify and filters such as the Distort filters are more memory-intensive than others. If when you’re working with these features, Photoshop starts to respond slowly, doesn’t respond, or returns “Out of Memory” or “Out of RAM” errors, then increase the amount of RAM and scratch disk space and close any other programs running at the same time as Photoshop. If the problem persists, then switch to a 64–bit system with more available RAM and scratch disk space. 7. Reduce the number of open files The more pictures you have open in Photoshop, the more resources your machine is using just to maintain each open file. To speed up processing, make sure that you open (and keep open) only files that are essential for your current editing task. 8. Clear all available memory: Purge Undo, Clipboard, or Histories The Edit > Purge command can be used to free up RAM space that is being used to store Undo, Clipboard, and Histories entries. Since this command cannot be undone, it should be your last resort when you need to eliminate an “Out of RAM” error during a memory-intensive task. Use the Edit > Purge command to remove information currently being stored in memory. 9. Run Photoshop by itself A simple way to speed up Photoshop is to make sure that no other programs or utilities are running at the same time. After closing unnecessary programs, use your operating system tools to determine which utilities are still running hidden in the background. The golden rule is that if the program or utility is not essential for the editing task, then close the software. This is especially true if you are using features that rely heavily on the GPU (mainly 3D). Having another application that also relies on the GPU and VRAM open while using these GPU features in Photoshop CS5 will significantly degrade overall performance. Adobe Photoshop CS5 and Photoshop CS5 Extended White Paper 7 10. Optimize Cache Level and Cache Tile settings Whenever you make a change to an image onscreen, your computer must redraw the image. The larger the image, the more processing power and time required. To make screen redrawing as fast as possible, Photoshop CS5 uses caching to continuously update a lower resolution version as you work. The default setting is four cache levels, but if you routinely work with images that have large pixel dimensions, you can improve redrawing performance by setting the level higher. Conversely, if you typically work with small-dimension images that contain many layers, you may want to set Cache Level to a level of two. As the cache is also used for other operations, such as the Healing Brush, it is not recommended to set a value of one as this will turn off caching completely, reducing performance in these allied areas. When Photoshop processes a photo, it splits the picture into smaller image sections called tiles, and it works on each in turn. By default, the size of each tile is 128Kb. You can alter the amount of memory allocated for the processing of each tile via the options in the Cache Tile Size pull-down menu in the Performance panel. Larger tile sizes reduce the amount of time Photoshop takes to process an image, especially on computers with more than 1GB of RAM. You’ll notice improvements in the speed with which images are drawn to screen when both Cache Level and Cache Tile settings are optimized. To help with accurately setting values, the History & Cache section of the Performance panel in the Preferences dialog box now contains three buttons to help match settings with your work environment. The values set by these buttons will vary depending on the amount of RAM and number of processors in your computer. Click the option that best fits your workflow to set both Level and Tile settings. Tall and Thin—Best for users working with images with smaller document dimensions and many editing and enhancement layers. Default—Designed for general use when a user will be working with a variety of document types. This is the default setting. Big and Flat—Works well with large images and few editing or enhancement layers. Setting the History and Cache values is easier in Photoshop CS5 thanks to the inclusion of three buttons—Tall and Thin, Default, and Big and Flat—in the Performance section of the Preferences dialog box. Select the option that best matches your workload. 11. Reduce patterns and brush tips Each custom pattern and brush tip you load increases the overall RAM required to run Photoshop CS5, increasing the scratch disk size in the process. If you load up all the patterns and brush tips that ship with Photoshop CS5, your scratch disk file will grow by hundreds of megabytes. To reduce the total RAM used, minimize the number of patterns and brush tips and reduce the number of patterns used in Layer Styles that use Bevel and Emboss Texture or Pattern Overlay. 12. Optimize GPU settings With the increasing ability of Photoshop to use of the video card GPU for extra processing power, the Preferences dialog box now includes dedicated GPU settings in both its Performance and 3D sections. If a suitable video card is installed on your system, it will appear in the GPU Settings area of the Performance section. To enable GPU acceleration, make sure that the Enable OpenGL Drawing option is selected. To fine-tune the card’s performance, click the Advanced Settings button and select Basic, Normal, or Advanced, matching the option with your requirements. Basic—Uses the least amount of GPU memory to run the most basic OpenGL features when sharing the GPU with other applications or when experiencing slow responsiveness. Select this option if you have other programs running that also use the GPU or if you notice bad screen redraws or slower performance when using GPU-accelerated features. Adobe Photoshop CS5 and Photoshop CS5 Extended White Paper 8 Normal—Is the default setting. It uses a large amount of GPU memory to support advanced OpenGL features and should be selected if you regularly use the GPU-accelerated features in Photoshop. Advanced—Uses the same amount of memory as the Normal mode, but enables more advanced features to improve drawing performance. This setting is best when working in 3D or when working extensively with the GPU-accelerated features in Photoshop CS5 Keep in mind that mode changes will only take effect after Photoshop is restarted. The 3D section of the Performances dialog box contains a VRAM slider similar to the memory control located in the Performance section. Use the slider to determine the upper limit of VRAM available to the Photoshop 3D engine. The total value is a percentage of the overall VRAM available. A setting of 100% will still reserve a portion of the overall VRAM for use with the operating system. Higher values will help with overall 3D performance but may compete with other GPU-enabled applications. The slider in the 3D section of the Preferences dialog box adjusts the amount of VRAM available to Photoshop. 13. Choose the appropriate Photoshop file type The file type you choose will determine both the functions and features that can be saved with the file as well as the maximum size. PSD and PSB files maintain the most functionality but at the cost of file size, especially if the Maximize PSD and PSB File Compatibility option is selected. The maximum image sizes possible in standard Photoshop CS5 documents are as follows: PSD (Photoshop)—2GB PSB (Large Document Format)—4EB (Four exabytes equals 4 million terabytes, which is orders of magnitude larger than available hard-drive storage space, but the format has been built to accommodate future innovation.) TIFF—4GB (Note that most other applications cannot work with TIFF images larger than 2GB.) Photoshop PDF—10GB (Individual pages are limited to 200x200 inches.) 14. Set the Maximize File Compatibility option Photoshop CS5 is the 12th version of the software and includes many changes, additions, and enhancements since its initial release. In addition, today many other software applications are capable of opening Photoshop PSD documents, such as Adobe After Effects® CS5 and Adobe Photoshop Lightroom® 3 software. To help ensure that earlier versions of Photoshop or other applications such as Photoshop Lightroom can open your saved files, Photoshop CS5 by default stores a flattened copy of the image within the PSD or PSB document when it is saved. The advantage of this feature is backwards compatibility with Photoshop itself and better integration with other applications, but the tradeoff is larger file sizes and slower opening and saving of documents. By default, Photoshop CS5 will ask if you want to maintain compatibility whenever you save a PSD or PSB file, but this behavior can be adjusted by choosing Photoshop/Edit > Preferences > File Handling. In the File Compatibility section, you can use the menu labeled Maximize PSD and PSB File Compatibility to set Photoshop to either always or never save this extra flattened image within the file. 15. Turn off thumbnail display Some of the panels in Photoshop CS5 display preview thumbnails of content, such as the Layers, Channels, and Paths panels. As you edit an image, these thumbnails are dynamically updated to reflect the new content. The more layers or paths in a document, the more thumbnails need to be built, drawn, and updated, each requiring system resources. To free up the resources allocated to this task, open the panel menu and choose Panel Options and then select None to turn off thumbnail display. Select None in the Layers Panel Options dialog box to free up the resources Photoshop uses to draw thumbnail previews. Adobe Photoshop CS5 and Photoshop CS5 Extended White Paper 9 16. Reduce color bit depth In Photoshop CS5, the number of functions that can be performed on 16- and 32-bit images has been increased. However, these images require considerably more processing power and hard-drive space than standard 8-bit images. For images destined for output to standard devices or the web, you can use the Image > Mode menu to lower the bit depth to 8 bit for maximum performance. The exception to this general rule is when you are working with 3D images, as the Ray Tracer engine renders at 32-bit color depth. So if you are working with 3D, start with a 32-bit file with a resolution of 72ppi, and when it comes time to output the finished document, use the tone mapping features in Photoshop to reduce the bit depth to 16 or 8 bits. 17. Deselect Export Clipboard Whenever you exit Photoshop CS5, anything you have cut or copied is placed on the operating system clipboard. The benefit of this feature is that the content is then available to paste into another application, but exporting the image to the clipboard is time-consuming and processorintensive. If you don’t require or use the system clipboard to copy and paste between Photoshop and other applications, you can turn off this function by deselecting Export Clipboard in the Options area under Photoshop/Edit > Preferences > General. Note that dragging layers or entire images between documents bypasses the clipboard entirely and is more efficient, even if Export Clipboard is enabled. Deselect the Export Clipboard option in the General section of the Photoshop Preferences dialog box to stop storing copied documents to the operating system clipboard. 18. Adjust or turn off font preview Each active font on your computer requires system resources. Photoshop CS5 also uses resources to draw previews of each font in the font and style menus in the Character panel and in the Options bar when a Type tool is enabled. To maximize performance, use font management software to activate only the fonts that you need. In addition, you can adjust the size of the font menu previews, or turn off previews, by choosing Photoshop/Edit > Preferences > Type. Under Font Preview Size, use the menu to adjust the size of the previews, or deselect the option to turn them off altogether. Turning off font previews or selecting a smaller preview size helps reduce the resources used for this task. 19. Optimize image files Many factors impact the size of your Photoshop CS5 image files, including resolution and pixel dimensions; color depth and mode; number and complexity of layers, channels, and paths; number of Smart Objects; and more. Very large files take longer to open, and they redraw more slowly as you work with them. They also require much more hard-drive space for storage. Ways to optimize image files include: • Minimize file dimensions—Resize the image to the desired size for output rather than working with a very large image and resizing it downward at the end of editing. • Minimize complexity—Merge layers that no longer need to be kept separate, and eliminate channels and paths that are no longer needed. Note that this includes blank layers, which also use significant disk space. • Choose RGB over CMYK—If your images are going to the web rather than offset printing, use the RGB color model. With one less color channel to save and maintain, an RGB image is 25% smaller than an equivalent CMYK image. • Minimize print resolution—Keep your image to the optimal minimum size for the output device, ranging from 72dpi for screen display to 600dpi for high-quality laser printing. Never use a resolution higher than the printing device is capable of outputting. • Start with low-resolution 3D files and resize to suit—When working with 3D content, start with smaller, low-resolution documents such as those generally used for the web. The smaller size will provide better and more responsive performance when manipulating and editing the 3D content. As the 3D components are vector-based imagery, the completed image can be resized nondestructively to a different resolution. Adobe Photoshop CS5 and Photoshop CS5 Extended White Paper 10 For more information Photoshop CS5: www.adobe.com/products/photoshop/photoshop Photoshop CS5 Extended: www.adobe.com/products/photoshop/photoshopextended Adobe Systems Incorporated 345 Park Avenue San Jose, CA 95110-2704 USA www.adobe.com Adobe, the Adobe logo, Adobe Premiere, After Effects, Lightroom, Photoshop, and Pixel Bender are either registered trademarks or trademarks of Adobe Systems Incorporated in the United States and/or other countries. Apple, Mac, and Mac OS are trademarks of Apple Inc., registered in the U.S. and other countries. Microsoft, Windows, and Windows Vista are either registered trademarks or trademarks of Microsoft Corporation in the United States and/or other countries. All other trademarks are the property of their respective owners. © 2011 Adobe Systems Incorporated. All rights reserved. Printed in the USA. 95012374 2/11 11