1
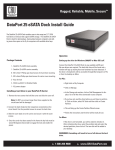
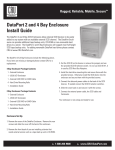
Rugged, Reliable, Mobile, Secure
TM
DataPort 25 Dual Port SAS Install Guide
The DataPort 25 Dual Port SAS is a high-performance small form factor
enclosure designed to make any capacity 2.5” SAS or SATA HDD removable
from a 3.5” peripheral bay. SAS provides the highest levels of performance and
reliability. The DataPort 25 Dual Port SAS can support Dual Port SAS operation
with a SAS drive. The DataPort 25 Dual Port SAS can also support a single
SATA drive or when used with the DataPort 25 dual drive SATA carrier, two
SATA drives.
Package Contents
JP 7
1 - DataPort 25 SAS frame assembly
1 - DataPort 25 SAS carrier assembly
4 - M3 x 4mm Phillips pan-head screws for hard drive mounting
4 - M3 x 5mm Phillips pan-head screws for frame mounting with
rails
4 - M3 x 4mm Phillips pan-head screws for frame mounting in
case
2 - M3 x 4mm Phillips pan-head screws for carrier cover mounting
SAS/SATA
Port 1
SAS/SATA
Port 2
JP9
Power Connector
2 - Keys for lock
Figure 1: Back of Frame
Installing the Frame Into Your Computer
1. Locate an available external 3.5” drive bay and remove the front bezel.
4. C onnect the data cables to the rear of the frame. See Operations section for details on proper cabling.
2. To mount the frame assembly in the drive bay:
Your frame assembly is complete.
a. C heck the drive bay to see if mounting rails are required (they
should be provided by your computer system manufacturer.) If
required, install one on each side of the frame. Then slide the
frame in the computer and check that it is secure.
b. If mounting rails are not required, attach the frame directly to
the PC case using the screws provided. Either the side or bottom mount holes on the frame may be used.
The Activity LED is normally on when the hard disk drive is ready
and will flash during drive activity.
3. Locate and connect an available 4-pin power connector (the type used
for floppy drives) to the back of the DataPort 25 frame. For SAS drive
operation, 12 volt power is required.
Installing a Hard Disk Drive in Your DataPort 25 Carrier
1. R emove the two screws that hold the cover and slide the cover off.
Note: Do NOT use screws longer than those supplied as the hard
disk drive will be damaged.
2. C onnect the hard drive to the connector on the circuit board. Use the
provided screws to secure the hard drive.
Note: The DataPort 25 dual port carrier supports SAS, SATA and
SATA Flash drives up to 15.4 mm in height.
1-800-260-9800
www.CRU-DataPort.com
Rugged, Reliable, Mobile, Secure
TM
LED Activity
The front of the DataPort 25 has two LEDs; a green LED that lights up
when the power to the hard drive is on and an amber LED that flashes
when the drive is active, provided the hard disk drive supports the LED.
Note: To make the host drive the activity LED, connect the host
LED driver to JP7 on the DataPort 25 frame. Connect the host LED
activity to pin 1 and the ground to pin 2. This feature may conflict
with the hard disk drive status.
Note: The green LED will flash if an incorrect data cable for the
carrier is connected. For single port SAS use, remove the jumper
on JP9 (see Figure 1) and use SAS/SATA port 1 (JP4).
Figure 2: Installing Hard Drive
3. Slide the cover back on to the carrier and secure it with the cover
screws.
Product Warranty
CRU-DataPort (CRU) warrants the DataPort 25 to be free of significant
defects in material and workmanship for a period of three years from
the original date of purchase. CRU’s warranty is nontransferable and is
limited to the original purchaser.
4. Once the carrier has been seated in the frame the key lock must be
turned 90 degrees (horizontal) to engage the lock and enable the power.
Operation
Limitation of Liability
Warning! Please do not touch the connector on the back of the
carrier. Internal damage could result from electrostatic discharge.
The lock on the DataPort 25 serves as a power switch. It must be engaged for the DataPort 25 to power up and function properly.
SATA Operation
The DataPort 25 dual port SAS frame can be used with the DataPort 25
SATA carrier with SATA hard drives.
For Serial ATA operation, the lower drive is supported by the left SATA
connector on the rear of the frame (JP4). The upper drive is supported
by the right SATA connector on the rear of the frame (JP5).
SAS Operation
The DataPort 25 Dual Port SAS frame supports dual SAS operation. To
enable the dual port SAS operation the frame must be connected to two
different hosts. The dual port SAS operation provides redundant host
support for the drive. In the event of a host failure, dual port SAS units
will continue to store data.
The warranties set forth in this agreement replace all other warranties. CRU expressly disclaims all other warranties, including but not
limited to, the implied warranties of merchantability and fitness for
a particular purpose and noninfringement of third-party rights with
respect to the documentation and hardware. No CRU dealer, agent or
employee is authorized to make any modification, extension, or addition
to this warranty. In no event will CRU or its suppliers be liable for any
costs of procurement of substitute products or services, lost profits,
loss of information or data, computer malfunction, or any other special,
indirect, consequential, or incidental damages arising in any way out of
the sale of, use of, or inability to use any CRU product or service, even
if CRU has been advised of the possibility of such damages. In no case
shall CRU’s liability exceed the actual money paid for the products at issue. CRU reserves the right to make modifications and additions to this
product without notice or taking on additional liability.
Register your product at www.CRU-DataPort.com.
A5-025-0008 Rev. 1.0
For single port SAS operation with the DataPort 25 Dual Port SAS frame
connect the data cable to either SAS/SATA port 1 or port 2.
1-800-260-9800
www.CRU-DataPort.com