1
Manual (English)
Version: 1.0 from: 7/27/05
CE Declaration
We:
TerraTec Electronic GmbH, Herrenpfad 38, D-41334 Nettetal, Germany
hereby declare that the product:
ReceiverSystem TerraTec Cinergy 1400 DVB-T,
to which this declaration refers is in compliance with the following standards or standardizing
documents:
1. EN 55022 Class B
2. EN 55024.
The following are the stipulated operating and environmental conditions for said compliance:
residential, business and commercial environments and small-company environments.
This declaration is based on:
test report(s) of the EMC testing laboratory
The information in this document is subject to change without notice and shall not be deemed as a warranty by the
seller. No warranties, express or implied, are made with regard to the quality, suitability or accuracy of this
document. The manufacturer reserves the right to change the contents of this document and/or the associated
products at any time without the provision of prior notice to specific persons or organizations. The manufacturer
shall not be held liable for damages of any kind arising from the use, or the inability to use this product or its
documentation, even if the possibility of such damage is known. The information in this document is subject to
copyright. All rights are reserved. No part of this manual may be reproduced or transmitted in any form or for any
purpose without the express written permission of the copyright holders. Product and brand names contained in
this document are used for identification purposes only. All registered trademarks, product designations or brand
names used in this document are the registered property of their respective owners.
©TerraTec® Electronic GmbH, 1994 – 2005. All rights reserved (7/27/05).
2
Cinergy 1400 DVB-T XE (English)
Contents
Welcome!.............................................................................................................................. 4
Scope of delivery .................................................................................................................. 5
System requirements ............................................................................................................ 6
System recommendations .................................................................................................... 6
Hardware at a glance ............................................................................................................ 7
The TV card........................................................................................................................ 7
Installing the hardware ......................................................................................................... 8
Installing the TV card ......................................................................................................... 8
Installing the drivers ............................................................................................................. 9
Driver installation under Windows 2000 ............................................................................ 9
Driver installation under Windows XP ...............................................................................10
Recording via the Video input ..............................................................................................10
Introduction .....................................................................................................................10
Connecting the source......................................................................................................10
Recording with VirtualDub. ............................................................................................... 11
Service at TerraTec. .............................................................................................................. 15
Broken?! ..............................................................................................................................16
Cinergy 1400 DVB-T XE (English)
3
Welcome!
We're pleased that you have chosen a TerraTec ReceiverSystem and would like to congratulate
you on this decision. With the TerraTec Cinergy 1400 DVB-T you've purchased a sophisticated
product representing the state of the art of PC/TV technology. We're convinced that our
product will prove extremely useful to you and provide you with a great deal of entertainment.
The manual provided tells you in complete detail all about the ReceiverSystem TerraTec
Cinergy 1400 DVB-T and how to use it correctly.
Superior picture clarity. TerraTec's Cinergy 1400 DVB-T offers your eyes a needle-sharp TV
picture that is always comfortably calm. Digital technology (DVB-T) provides you with TV
reception at a quality level you would expect from a DVD.
Comprehensive software equipment. From current video drivers for Microsoft's BDA technology (BDA stands for Broadcast Driver Architecture) and a powerful TV software with numerous
settings and recording functions, to useful bundled software programs, the Cinergy software
package is both highly functional and comprehensively designed.
And here is an overview of its major features...
•
Digital TV and radio reception via antenna (DVB-T)
•
Windows Media Center Edition (MCE) compatibility
•
Quality DVB-T tuner
•
MPEG-2 TS/PS recording for archiving video material on DVD
•
Dolby Digital (AC3) support for real cinema sound
•
Time shifting of live programs
•
Electronic program guide for the scheduling of TV and radio recording sessions (EPG)
•
High-speed teletext
We hope you enjoy your ReceiverSystem TerraTec Cinergy 1400 DVB-T and would like to
suggest that you browse this hopefully entertaining manual when you get the chance. In
addition to the important information about its technology, we have outlined a number of
typical applications wherever appropriate. We're convinced that even experienced users will
profit from this guide. Thanks for your attention—enjoy!
...your TerraTec Team
4
Cinergy 1400 DVB-T XE (English)
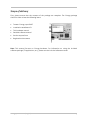
Scope of delivery
First, please ensure that the contents of the package are complete. The Cinergy package
should include at least the following items:
•
Terratec Cinergy 1400 DVB-T
•
Installation & software CD
•
This hardware manual
•
Detailed software manual
•
Service request form
•
Registration documents
Note: This manual focuses on Cinergy hardware. For information on using the included
software package (TV application, etc.), please see the included software manual.
Cinergy 1400 DVB-T XE (English)
5
System requirements
Your PC must meet the following minimum requirements for the Cinergy to function correctly:
•
1.0 GHz Intel Pentium or AMD Athlon CPU
•
1 free PCI 2.1 slot (with busmaster support)
•
128 MB RAM
•
100 MB free hard drive space for a complete software installation
•
Sound card with DirectX support
•
AGP graphics card with DirectX and video overlay support
•
CD or DVD drive (to install drivers/software)
•
DirectX 9.0 or higher
•
Windows 2000 or Windows XP
•
Digital antenna reception (DVB-T)
System recommendations
To fully enjoy all of the Cinergy's functions, your computer should have at least the following
specifications. As so often in life, bigger and faster is better.
•
1.5 GHz Intel Pentium or AMD Athlon CPU
•
1 free PCI 2.1 slot (with busmaster support)
•
256 MB RAM
•
100 MB free hard drive space for a complete software installation
•
Sound card with DirectX support
•
AGP graphics card with DirectX and video overlay support
•
CD or DVD drive (to install drivers/software)
•
DirectX 9.0 or higher
•
Windows XP
•
Antenna reception (DVB-T)
6
Cinergy 1400 DVB-T XE (English)
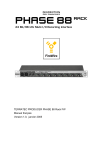
Hardware at a glance
The TV card
The following is an overview of the PCI card and its terminals.
1. The antenna input. Connect your DVB-T antenna here.
2. The antenna output. Use this connector to provide DVB-T signals to other devices such as
set-top boxes. Please note that the signal will not be amplified if your computer is not
running. The board must be powered up to enable the amplifier. This may result in signal
quality fluctuations, especially when bridging long distances.
3. Combined video input. Use the included plug adapter on this input to connect and record
FBAS and SVHS sources. Specialist retailers stock inexpensive SCART adapters with which
you can connect your VCR to your PC, letting you copy old VHS recordings and archive
them on DVD. For more information, see Chapter !!! .
4. Input for optional remote control sensor (not included)
Cinergy 1400 DVB-T XE (English)
7
Installing the hardware
The subsequent sections provide step-by-step instructions on installing and configuring the
card and accessories and on the driver configuration.
Installing the TV card
1. Switch off your PC and all connected peripheral devices such as your printer and monitor.
Leave the AC power cable connected for the time being, so that your computer is still
grounded.
2. Touch the metal chassis at the rear of the PC to ground and to discharge static. Now
unplug the cord from the AC socket.
3. Remove the cover from the case of your PC.
4. Look for a free PCI expansion slot. When selecting the PCI slot, note that TV cards should
not be plugged into PCI slot 1 in conjunction with an AGP graphics card because PCI slot 1
very frequently is assigned the same interrupt as the AGP slot. This would give both cards
the same interrupt, which can lead to crashes or performance impairment during operation! The numbers assigned to the PCI slots are listed in your motherboard manual.
5. Carefully remove the card from its packaging and pick it up by the edges with one hand
while your other hand is touching a metal part of the PC. This will ensure that your body is
completely discharged via your computer without damaging the TV card.
6. Align the holder at the rear of the TV card in the expansion slot in such a way that the
card’s connectors are directly in line with the slot’s socket.
7. Push the TV card firmly into the slot, ensuring good contact.
8. Fasten the TV card with an appropriate screw.
9. Reinstall the cover of your PC case.
10. Reconnect the antenna cable, the AC power cable as well as all other cables. Make sure
that your speakers are set to low volume.
11. Switch your computer on again to begin installing the software.
8
Cinergy 1400 DVB-T XE (English)
Installing the drivers
WHQL-certified. A few advance remarks before we get into the details. To make
the installation of the Cinergy as pleasant an experience as possible, we
spared no trouble or bureaucratic hurdles and had the Windows drivers
certified by the Microsoft Windows Hardware Qualification Lab (WHQL). That
means that if you do not have a current copy of the Cinergy CD, Windows will
download the drivers from a Microsoft server via the Internet, and that the
drivers will be integrated in future Windows versions, wherever possible.
Nevertheless, we suggest that you follow the instructions below. The reason for this recommendation is that the operating system sees the Cinergy as several individual devices. The
installation—including downloading, decompressing, security checks, etc.—would therefore
take an unnecessarily long time. And, as can be found out there in the far reaches of the
Internet, many users have concerns—well-founded or not—that Microsoft may be obtaining
more information from them than absolutely necessary for the installation of these specific
drivers. Either way, let's get started!
Driver installation under Windows 2000
As we already pointed out above, the operating system sees the various components of the
Cinergy as individual devices. This means repeating the following installation steps until
Windows stops recognizing new devices. That may seem a bit tiresome, but necessary to
ensure that the driver installation is complete and correct. Off we go…
If you have not already done so, place the TerraTec Cinergy 1400 DVB-T Installation CD into
your CD-ROM drive.
1. The next time you start your computer, Windows 2000 will recognize a new multimedia
controller and will launch the hardware installation wizard. Click “Next”.
2. In the appearing dialog window, select the “Search for a suitable driver for my device
(Recommended)” item. Click “Next”.
3. Select the option “CD-ROM drives” and deselect all other sources. Click “Next”.
4. Windows 2000 will automatically find the correct driver on the TerraTec Cinergy 1400 DVBT installation CD. Confirm by clicking “Next”.
5. Conclude the installation by clicking “Finish”.
6. This completes the installation of the drivers and you can now start installing the application programs.
Cinergy 1400 DVB-T XE (English)
9
Driver installation under Windows XP
As we already pointed out above, the operating system sees the various
components of the Cinergy as individual devices. This means repeating
the following installation steps until Windows stops recognizing new devices. That may seem
a bit tiresome, but necessary to ensure that the driver installation is complete and correct. Off
we go…
If you have not already done so, place the TerraTec Cinergy 1400 DVB-T Installation CD into
your CD-ROM drive. If the autostarter launches, please ignore it for the time being.
1. The next time you start your computer, Windows XP will recognize a new “multimedia
controller” and will launch the hardware installation wizard. Next, select “Install the software automatically [Recommended]” and click “Next”.
2. Windows XP will automatically find the correct driver on the TerraTec Cinergy 1400 DVB-T
installation CD.
3. In the following dialog box, Windows XP will inform you that the TerraTec Cinergy 1400 DVB
driver did not pass the “Windows Logo test”. Click “Continue”.
4. Conclude the installation by clicking “Finish”.
5. This completes the installation of the drivers and you can now start installing the application programs.
Recording via the Video input
Introduction
From old to DVD. We recommend using VirtualDub for recording via the combined S Video and
Video input. VirtualDub is an open-source project being pursued by a number of developers
worldwide. And the best thing about it: you can download and use it free of charge. If you
really like it, please visit the website below for more information on making a donation to
thank the developers for their generous efforts.
Standard recording drivers leave your options open. VirtualDub is simply an example of the
applications that communicate with the Cinergy via its standard interface. In other words, any
application capable of processing video data in this manner will also work with the Cinergy.
These include programs from a variety of sectors, from VJ to webcam and surveillance
software. There's plenty of information available on the Internet on this topic as well. Our
recommendation: www.resolume.com.
Connecting the source
Separate video and audio. As you may have noticed, the Cinergy does not have a dedicated
audio input. If you would like to copy the content of VHS tapes to your PC, for example, you
must connect the video output—generally using a SCART adapter, as described below—to the
10
Cinergy 1400 DVB-T XE (English)
Cinergy, and the audio output of the VCR—from the SCART adapter or Line audio output—to
the Line input of your sound card. The Line input socket is usually color-coded blue and
marked with the icon shown below.
Recording with VirtualDub.
Distinguishing a fine wine from an outstanding one is not always easy—especially without the
help of an expert. Things are much the same with the universal VirtualDub video tool. Despite
its modest exterior, this is one of the most versatile utilities of its class. Don't be put off by its
cut-and-dried appearance and be sure to take the time to test its various functions. For the
latest version, please visit
http://www.virtualdub.org
This is the home of the English parent to all of the various VirtualDub versions floating around
the Net. As the source code is open to anyone, a number of localized versions are available.
The German version, for example, can be found at
http://www.virtualdub.net
We will be using the original English version for reference purposes. One of the main reasons
we chose VirtualDub is its ability to keep recordings made with different drivers (sound card
and Cinergy) synchronized, keeping video and audio in step on any computer with sufficiently
high performance. So, download it, install it and get going!
Cinergy 1400 DVB-T XE (English)
11
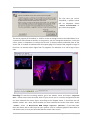
The first time you launch
VirtualDub, a splash screen
will be displayed. Select
'Start VirtualDub' to
go to the main program.
The actual purpose of VirtualDub, in addition to the recording functions described below, is to
convert one video format to another. In the process, you can change the resolution, correct the
colors, select a compressor to reduce the file size, or simply remove undesired parts of the
source file. A number of websites offer third-party plug-ins to expand the program's range of
functions—to remove station logos from TV programs, for example, or to add a logo of your
own.
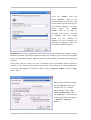
Recording! To start the recording module, go to the 'File' menu and select 'Capture
AVI'. Please ensure that the audio driver of your sound card is correctly configured and that
you have selected the correct input—according to the diagram above, it should be the one
marked 'Line In'. Next, check whether you have selected the correct video driver. Under
'Video', select '0 Microsoft WDM Image Capture (Win32)'. If you have more
than one device with a video input on your system, such as a modern graphics board with its
own video input, be sure you have selected the correct video source.
12
Cinergy 1400 DVB-T XE (English)
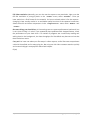
Go to the 'Video' menu and
select 'Source'. Here you can
choose whether you want to record
from an FBAS (normal RCA plug via
the included adapter) or S Video
source.
Ignore
the
'Video
Tuner'
item, as no signal is
available at this source. To record
TV programs with the Cinergy,
please use the included TV
software. For more information on
recording TV programs, please see
the included software manual.
Background: This source originates in parts of the driver responsible for the Cinergy's chipset.
While this versatile chipset also supports analog tuner modules, your TV card is not equipped
with one. No problem though, digital is better—usually anyway, or at least in this particular
instance.
Please note that you cannot use your TV software and the VirtualDub capture module in
parallel, as this causes nasty confusion at the driver level, ending in an error message from
one or the other program. To start the capture, select 'Capture Video' from the 'Capture' menu.
When using the default settings,
the file capture.avi will be
created on C:\. To change
these settings, select 'Capture Preferences' from
the 'Capture’ menu and enter
a name and path for the capture
('Default capture
file').
Cinergy 1400 DVB-T XE (English)
13
Full video resolution. Naturally, you can also set the capture to any resolution, right up to the
full PAL resolution of 720x576 pixels. In the 'Video' menu, select 'Format'. Once you
have settled on a final format for the material, it's best to already select it for the capture—
changing it later usually results in an avoidable quality loss due to the repeated conversion.
Select the audio and video compressors in the 'Compression' menu under 'Audio' and
'Video'.
One more thing: your hard drives. It's becoming rarer as a system performance bottleneck, but
it can't hurt to keep it in mind: if you repeatedly have problems with dropped frames, check
the performance of your hard drive. If a number of programs are continuously reading and
writing data in the background, the data throughput for VirtualDub may become so low that
these omissions result.
Carry on! You have now taken your first steps in video capture, so feel free now to experiment
a bit with VirtualDub and its many plug-ins. Not only your old video cassettes stand to quickly
and economically gain new pep from these little helpers.
Enjoy!
14
Cinergy 1400 DVB-T XE (English)
Service at TerraTec.
“Rien ne va plus—Nothing's working” can happen to the best systems. If this happens to you,
the TerraTec team is happy to offer its service and support.
Hotline and Internet
In case of a serious problem—where you can neither solve the problem on your own nor with
the guided help found in this manual, nor with the help of your dealer—please contact us
directly.
If possible, try our Internet support system first: under http://www.terratec.com/ you will
always find current answers to frequently asked questions (FAQ) and the latest drivers.
If these options do not provide the necessary help, please contact our phone hotline or
contact us online. To do so, visit us at http://supporten.terratec.net/. In either case, please
have the following information handy:
•
your registration number,
•
this documentation,
•
a printout of your configuration files,
•
the manual of your motherboard, and
•
a screen shot of your BIOS configuration.
In addition, it would be helpful to our technicians if you are at your computer during the phone
call so that you can carry out our tips and tricks directly. Please do not forget to write down the
name of the respective support technician if you contact our Support Team.
You will need this name if a defect is present and your card needs to be mailed to us.
Cinergy 1400 DVB-T XE (English)
15
Broken?!
Before you send the card back, be sure to contact us! Make a note of the name of your support
contact and follow these simple instructions:
•
Please fill out the service request form provided with your card clearly and completely. The
more clearly and detailed you describe the problem, the faster we will be able to help.
Cards sent in without a description of the problem cannot be processed and will be returned to you at your expense.
•
Be sure to include a copy of your purchase receipt (not the original) with the package. If we
do not receive a copy of a receipt, we will assume that the warranty for the product has
expired and will bill you for the repair.
•
Please use a sufficiently strong and padded mailing package. We recommend using the
original package. Remember that the card is a sensitive electronic component.
Be sure to include enough postage—we will cover for the postage for the return to you.
Before returning a product—and you should only do this after being instructed to do so by the
hotline—please take the time to read our warranty terms carefully at
www.terratec.de/garantie.htm
(German)
www.terratec.com/warranty.html
(English)
16
Cinergy 1400 DVB-T XE (English)