1
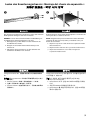
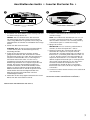
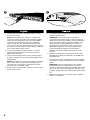
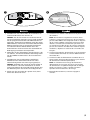
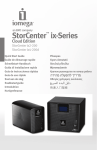
StorCenter Pro 400e ™ Quick Start Guide Guide de démarrage rapide Schnellstart-Handbuch Guía de instrucciones rápidas Guia de uso rápido クイック スタート ガイド 快速入门指南 빠른 시작 설명서 If you have a problem, we can help. Please do NOT return this product to the store! Your answer is on the web. Visit our award-winning web support site www.iomega.com. Select your region, then select Support. Si vous avez un problème, nous pouvons vous aider. NE RENVOYEZ PAS ce produit au magasin ! Votre réponse est sur le Web. Site Web d’assistance primé www.iomega.com. Sélectionnez votre région, puis sélectionnez Support. Wenn Sie ein Problem haben, können wir Ihnen helfen. Bringen Sie dieses Produkt NICHT zu Ihrem Händler zurück! Ihre Antwort steht im Netz. Preisgekrönte Support-Website www.iomega.com. Wählen Sie Ihre Region aus und anschließend Support. Si tiene algún problema, podemos ayudar. ¡Por favor, NO devuelva este producto a la tienda! Su respuesta está en la web. Destacado sitio Web de atención al cliente www.iomega.com. Elija su región y luego seleccione Asistencia técnica. Se você tiver um problema, nós podemos ajudar. NÃO devolva esse produto à loja! A resposta para você está na web. Site da web vencedor de prêmios www.iomega.com. Selecione a sua região e, então, Suporte. ハードウエアを接続する前に、ソフトウエアのインストールを開始してくだ さい。問題がある場合は、弊社がお手伝いいたします。 回答は Web 上に掲載されています。Web サポート サイト www.iomega.com。地 域を選択し、次に「サポート」を選択します。 如果遇到问题, 我们可以帮助您。切勿将产品退回商店! 您可以在网上找到答案。饮誉四方的支持网站 www.iomega.com。请选择您所在的 地区,然后选择“支持”。 문제가 발생하는 경우 도움을 받으실 수 있습니다. 제품을 대리점으로 반송하지 마 십시오! 웹 사이트에서 해결책을 찾으실 수 있습니다. 수상 경력이 있는 웹 지원 사이트 www.iomega.com. 지역을 선택한 후 “지원”을 선택합니다. Contents • Matières • Inhaltsverzeichnis • Contenido • Conteúdo • 目録 • 目录 • 목차 Mounting the Expansion Chassis . . Montage du châssis d’extension . . Laden des Erweiterungschassis . . Montaje del chasis de expansión . . Montagem do chassi de expansão . 拡張シャーシのマウント . . . . . 安装扩展底盘 . . . . . . . . . . . . 확장 새시 장착 . . . . . . . . . . . . . . . . . . . . . . . . . . . . . . . . . . . . . . . . . . . . . . . . . . . . . . . . . . . . . . . . . . . . . . . . . . . . . . . . . . . . . . . . . . . . . . . . . . . . . . . . . . . . . . . . . . . . . . . . . . . . . . . . . . . . . . . . . . . . . . . . . . . . . . . . . . . . . . . . . . . . . . . . . . . . . . . . . . . . . . . . . . . . . . . . . . . . . . . . . . . . . . . . . . . . . . . . . . . . . . . . . . . . Connect the StorCenter Pro . . Connexion de StorCenter Pro . Anschließen des Geräts . . . . Conectar StorCenter Pro . . . . Conexão do StorCenter Pro . . StorCenter Pro の接続 . . . . . 连接 StorCenter Pro . . . . . . StorCenter Pro를 연결합니다. . . . . . . . . . . . . . . . . . . . . . . . . . . . . . . . . . . . . . . . . . . . . . . . . . . . . . . . . . . . . . . . . . . . . . . . . . . . . . . . . . . . . . . . . . . . . . . . . . . . . . . . . . . . . . . . . . . . . . . . . . . . . . . . . . . . . . . . . . . . . . . . . . . . . . . . . . . . . . . . . . . . . . . . . . . . . . . . . . . . . . . . . . . . . . . . . . . . . . . . . . . . . . . . . . . . . . . . . . . . . . . . . . . . . . . . . . 6 . 6 . 7 . 7 10 10 11 11 Troubleshooting . . . . . . Dépannage . . . . . . . . . Fehlerbehebung . . . . . . Solución de problemas . . Solução de problemas . . . トラブルシューティング 故障排除 . . . . . . . . . . 문제 해결 . . . . . . . . . . . . . . . . . . . . . . . . . . . . . . . . . . . . . . . . . . . . . . . . . . . . . . . . . . . . . . . . . . . . . . . . . . . . . . . . . . . . . . . . . . . . . . . . . . . . . . . . . . . . . . . . . . . . . . . . . . . . . . . . . . . . . . . . . . . . . . . . . . . . . . . . . . . . . . . . . . . . . . . . . . . . . . . . . . . . . . . . . . . . . . . . . . . . . . . . . . . . . . . . . . . . . . . . . . . . . . . . . . . . . . . . . . . . . . . . . . . . . . . . . . . . . . . . . . 14 14 14 14 15 15 15 15 Customer Support . . Assistance clientèle . Kundenunterstützung Asistencia técnica . . Assistência ao cliente カスタマ サポート . 客户支持 . . . . . . . 고객 지원 . . . . . . . . . . . . . . . . . . . . . . . . . . . . . . . . . . . . . . . . . . . . . . . . . . . . . . . . . . . . . . . . . . . . . . . . . . . . . . . . . . . . . . . . . . . . . . . . . . . . . . . . . . . . . . . . . . . . . . . . . . . . . . . . . . . . . . . . . . . . . . . . . . . . . . . . . . . . . . . . . . . . . . . . . . . . . . . . . . . . . . . . . . . . . . . . . . . . . . . . . . . . . . . . . . . . . . . . . . . . . . . . . . . . . . . . . . . . . . . . . . . . . . . . . . . . . . . 16 16 16 16 16 16 16 16 . . . . . . . . . . . . . . . . . . . . . . . . 4 4 5 5 4 4 5 5 Mounting the Expansion Chassis • Montage du châssis d’extension • Montagem do chassi de expansão • 拡張シャーシのマウント • The Iomega® StorCenter™ Pro can be stacked or mounted in most rack systems. Iomega StorCenter Pro peut être empilé ou monté dans la plupart des systèmes de baies. NOTE: Make sure the StorCenter Pro has sufficient airflow (6" or 127 mm) both in front of and behind the unit. 1. Attach a bracket to each front corner of the StorCenter Pro. REMARQUE : Faites-en sorte que StorCenter Pro dispose d’un débit d’air suffisant (127 mm) à l’avant et à l’arrière de l’unité. 1. Fixez un support à chaque angle de StorCenter Pro. 2. Attach a rail to each of the rear rack posts. 2. Fixez un rail à chaque montant arrière de la baie. 3. Attach the StorCenter Pro to the rails. Secure the front brackets to the rack. 3. Fixez StorCenter Pro aux rails. Fixez les supports avant à la baie. O Iomega StorCenter Pro pode ser empilhado ou montado na maioria dos sistemas de rack. Iomega StorCenter Pro は縦に積むことができます。ま た、ほとんどのラックに搭載できます。 NOTA: Certifique-se de que o StorCenter Pro possua ventilação adequada (127 mm ou 6 pol.) tanto na parte traseira, como na parte dianteira da unidade. 1. Encaixe uma haste em cada canto dianteiro do StorCenter Pro. 注記:StorCenter Pro の前後には、十分な空間 (127 mm) を確保してください。 1. StorCenter Pro 前面のそれぞれの角にブラケットを 取り付けます。 2. Encaixe um trilho em cada um dos pinos traseiros do rack. 3. Encaixe o StorCenter nos trilhos. Fixe as hastes dianteiras ao rack. 4 2. 各リア ラック ポストにレールを取り付けます。 3. レールに StorCenter Pro を取り付けます。フロント ブラケットをラックに固定します。 Laden des Erweiterungschassis • Montaje del chasis de expansión • 安装扩展底盘 • 확장 새시 장착 Das Iomega StorCenter Pro-Gerät lässt sich in den meisten Racksystemen einlegen oder fest montieren. El StorCenter Pro de Iomega puede apilarse o montarse en la mayoría de los sistemas de rack. HINWEIS: Lassen Sie ausreichend Platz zur Belüftung vor und hinter dem Gerät (mindestens 127 mm). 1. Befestigen Sie je einen Halter an allen vier Ecken der Frontblende des Geräts. NOTA: Asegúrese de que StorCenter Pro tiene suficiente corriente de aire (127 mm) tanto por delante como por detrás de la unidad. 1. Sujete un soporte en cada una de las esquinas frontales de StorCenter Pro. 2. Bringen Sie an beiden hinteren Racksäulen je eine Schiene an. 3. Hängen Sie das StorCenter Pro an den Schienen ein. Sichern Sie die Halter vorn am Rack. 2. Sujete un raíl a cada uno de los postes del rack traseros. 3. Sujete el StorCenter Pro a los raíles. Asegure los soportes frontales al rack. Iomega StorCenter Pro 可叠放或安装在大多数机架系统 中。 Iomega StorCenter Pro는 대부분의 랙 시스템에 설치하거 나 장착할 수 있습니다. 注意:确保 StorCenter Pro 设备前后两端通风良好(6 英寸 或 127 毫米)。 1. 在 StorCenter Pro 的每个前角都连接一个支架。 주: 장치 앞뒤에 모두 충분한 통풍구(6인치 또는 127mm)가 있어야 합니다. 1. StorCenter Pro의 각 전면 모서리에 브래킷을 장착합 니다. 2. 在每个后机架柱上都连接一条导轨。 3. 将 StorCenter Pro 连接到该导轨上。将前端支架固定 到机架上。 2. 후면 랙 포스트에 레일을 장착합니다. 3. StorCenter Pro를 레일에 장착합니다. 전면 브래킷을 랙에 고정합니다. 5 Connect the StorCenter Pro • Connexion de StorCenter Pro • Up Start en route Mise Start Inicio ização Inicial ción Instala 8 7 200 3 s dow Win Mac 13 Avvio on. m mega.coCorporati Iomega www.io 2004 reserved. Copyrigh t © rights All 1. Install the software from the Solution CD on your Iomega server. NOTE: This drive is intended for use with an Iomega StorCenter Pro or Iomega NAS 400r server. The Solution CD contains patches and drivers for Iomega servers only. 2. Power down the server. CAUTION! Failure to power down may damage the server, the expansion chassis, or both. 3. Set the StorCenter Pro to an appropriate SCSI ID. The StorCenter Pro requires a set of 4 IDs. The StorCenter Pro comes preconfigured to use SCSI IDs 0–3. You can also set it to IDs 8–11 or 12–15. You can connect up to three StorCenter Pro expansion units to your computer. You can use any set of SCSI IDs that does not contain an ID that is already in use by another device. See your SCSI card’s utility or drive properties for information on the IDs of connected devices. 4. Connect the 68-pin wide connector on the SCSI cable to the StorCenter Pro. INSTRUCTIONS CONTINUE ON PAGE 8 1. Installez le logiciel à partir du CD Solution sur votre serveur Iomega. REMARQUE : Ce lecteur est prévu pour être utilisé avec un serveur Iomega StorCenter Pro ou Iomega NAS 400r. Le CD Solution comprend des correctifs et des pilotes pour les serveurs Iomega uniquement. 2. Mettez le serveur hors tension. ATTENTION ! Un échec de la mise hors tension peut endommager le serveur, le châssis d’extension ou les deux. 3. Définissez une identification SCSI appropriée pour le StorCenter Pro. Le StorCenter Pro requiert un ensemble de 4 identifications. Le StorCenter Pro est livré pré-configuré pour l’utilisation des identifications SCSI 0–3. Vous pouvez également le configurer avec les identifications 8–11 ou 12–15. Vous pouvez connecter jusqu’à trois unités d’extension StorCenter Pro à votre ordinateur. Vous pouvez utiliser tout ensemble d’identifications SCSI qui ne comporte pas une identification déjà utilisée par un autre périphérique. Consultez votre utilitaire de carte SCSI ou les propriétés du lecteur pour obtenir des informations sur les identifications des périphériques connectés. 4. Raccordez le connecteur large à 68 broches du câble SCSI au StorCenter Pro. SUITE DES INSTRUCTIONS PAGE 8 6 Anschließen des Geräts • Conectar StorCenter Pro • 1. Installieren Sie die Software von der Lösungs-CD oder von Ihrem Iomega Server aus. HINWEIS: Dieses Laufwerk ist für den Gebrauch mit einem Server des Typs Iomega StorCenter Pro oder Iomega NAS 400r vorgesehen. Die Lösungs-CD enthält Patches und Treiber ausschließlich für Iomega Server. 2. Fahren Sie den Server herunter. ACHTUNG! Wird der Server nicht heruntergefahren, so kann dieser (bzw. das Erweiterungschassis) beschädigt werden. 3. Legen Sie das StorCenter Pro-System auf eine geeignete SCSI-ID fest. Der StorCenter Pro-Server benötigt eine Gruppe von 4 IDs. Das StorCenter ProGerät ist auf die SCSI-IDs 0 bis 3 vorkonfiguriert. Sie können diese auch auf 8–11 oder 12–15 einstellen. Es können bis zu drei StorCenter ProErweiterungseinheiten am Computer angeschlossen werden. Sie können eine beliebige Gruppe von SCSI-IDs verwenden, die keine ID enthält, welche bereits von einem anderen Gerät verwendet wird. Weitere Informationen zu den IDs angeschlossener Geräte finden Sie unter den Eigenschaften des Dienstprogramms Ihrer SCSI-Karte oder den Laufwerkeigenschaften. 4. Verbinden Sie den 68-poligen Flachstecker des SCSIKabels mit dem StorCenter Pro-Gerät. 1. Instale el software del CD de soluciones en el servidor Iomega. NOTA: esta unidad está diseñada para su uso con el servidor Iomega StorCenter Pro o Iomega NAS 400r. El CD de soluciones sólo contiene parches y controladores para los servidores Iomega. 2. Apague el servidor. PRECAUCION: en caso contrario, puede dañar el servidor, el chasis de expansión o ambos. 3. Asigne StorCenter Pro al ID de SCSI adecuado. StorCenter Pro requiere un conjunto de 4 ID. StorCenter Pro está preconfigurado para utilizar los ID de SCSI 0–3. También puede utilizar los ID 8–11 o 12–15. Puede conectar hasta tres unidades de expansión StorCenter Pro a su ordenador. Puede utilizar cualquier ID de SCSI que no contenga un ID que ya esté siendo utilizado por otro dispositivo. Consulte la utilidad de la tarjeta SCSI o las propiedades de unidad de disco para obtener información acerca de los ID de los dispositivos conectados. 4. Conecte el conector de 68 contactos en el cable SCSI a StorCenter Pro. LAS INSTRUCCIONES CONTINÚAN EN LA PÁGINA 9 FORTSETZUNG DER ANLEITUNG AUF SEITE 9 7 5. Connect the other end of the SCSI cable to a SCSI port on your server. NOTE: The StorCenter Pro requires a 68-pin wide connector. Iomega provides a 68-pin wide to VHDCI cable. If your SCSI adapter does not have a VHDCI connector, you will need to purchase a different cable. Consult the documentation that came with your server to find the appropriate connector type for the other end of the cable. For best results, purchase a SCSI cable with locking screws. 6. Connect the included SCSI terminator or another properly terminated device to the StorCenter Pro VHDCI SCSI connector. 7. Connect the included power cord to the back of the Iomega StorCenter Pro and an Uninterruptible Power Supply (UPS). NOTE: Never plug your Iomega StorCenter Pro directly into a wall socket or power strip. Unexpected loss of power may corrupt data or damage the Iomega StorCenter Pro operating system. 8. Power up the StorCenter Pro expansion chassis, then power up the server. 5. Connectez l’autre extrémité du câble SCSI à un port SCSI sur votre serveur. REMARQUE : Le StorCenter Pro nécessite un connecteur large à 68 broches. Iomega fournit un câble large à 68 broches VHDCI. Si votre adaptateur SCSI ne comporte pas de connecteur VHDCI, vous devrez acheter un câble différent. Consultez la documentation fournie avec votre serveur pour déterminer le type de connecteur approprié pour l’autre extrémité du câble. Pour de meilleurs résultats, achetez un câble SCSI muni de vis de blocage. 6. Branchez la terminaison SCSI fournie ou un autre périphérique adapté au connecteur SCSI VHDCI du StorCenter Pro. 7. Connectez le cordon d’alimentation fourni à l’arrière du système Iomega StorCenter Pro et à un onduleur (UPS). REMARQUE : Ne raccordez jamais votre systéme Iomega StorCenter Pro directement à une prise murale ou à une fiche électrique multiple. Une panne de courant pourrait endommager les données ou le système d’exploitation du serveur Iomega StorCenter Pro. 8. Mettez StorCenter Pro sous tension, puis mettez le serveur sous tension. 8 5. Schließen Sie das andere Ende des SCSI-Kabels an einen SCSI-Anschluss des Servers an. HINWEIS: Für das StorCenter Pro-Gerät wird ein 68poliger Flachstecker benötigt. Iomega stellt ein Kabel mit 68-poligem Flachstecker und VHDCI-Stecker zur Verfügung. Verfügt Ihr SCSI-Adapter nicht über einen VHDCI-Stecker, müssen Sie ein anderes Kabel kaufen. Weitere Informationen zu geeigneten Anschlüssen am anderen Ende des Kabels finden Sie in der Dokumentation zu Ihrem Server. Ein SCSI-Kabel mit Befestigungsschrauben wird empfohlen. 6. Verbinden Sie den beigefügten SCSI-Terminator oder ein anderes, korrekt verschaltetes Verbindungsstück mit dem VHDCI SCSI-Anschluss des StorCenter ProGeräts. 7. Schließen Sie das im Lieferumfang enthaltene Netzkabel an der Geräterückseite und an einer unterbrechungsfreien Stromversorgung (USV) an. HINWEIS: Schließen Sie das Gerät niemals direkt an eine Steckdose oder eine Steckerleiste an. Durch einen unerwarteten Stromausfall können Daten oder das Betriebssystem des Geräts beschädigt werden. 8. Fahren Sie das StorCenter Pro-System hoch, dann fahren Sie den Server hoch. 5. Conecte el otro extremo del cable SCSI al puerto SCSI del servidor. NOTA: StorCenter Pro requiere un conector de 68 contactos. Iomega proporciona uno de 68 contactos para el cable VHDCI. Si el adaptador SCSI no dispone de un conector VHDCI, necesitará comprar un cable distinto. Consulte la documentación que viene con su servidor para hallar el tipo de conector adecuado para el otro extremo del cable. Para obtener mejores resultados, adquiera un cable SCSI con tornillos de bloqueo. 6. Conecte el terminador SCSI incluido u otro dispositivo correctamente terminado al conector VHDCI SCSI de StorCenter Pro. 7. Conecte el cable de alimentación suministrado a la parte trasera de Iomega StorCenter Pro y un sistema de alimentación ininterrumpida (UPS). NOTA: no enchufe nunca Iomega StorCenter Pro directamente en una toma de pared o una regleta de alimentación. La pérdida inesperada de energía puede corromper los datos o dañar el sistema operativo de StorCenter Pro de Iomega. 8. Encienda StorCenter Pro, entonces apague el servidor. 9 Conexão do StorCenter Pro • StorCenter Pro の接続 • Up Start en route Mise Start Inicio ização Inicial ción Instala 8 7 200 3 s dow Win Mac 13 Avvio on. m mega.coCorporati Iomega www.io 2004 reserved. Copyrigh t © rights All 1. Instale o software do CD Soluções no servidor Iomega. NOTA: Esta unidade destina-se a ser usada com um servidor Iomega StorCenter Pro ou Iomega NAS 400r. O CD Soluções contém arquivos de correção e drivers apenas para servidores Iomega. 2. Desligue o servidor. CUIDADO! Se o servidor não for desligado, poderão ocorrer danos ao servidor, ao chassi de expansão ou a ambos. 3. Defina uma ID SCSI apropriada para o StorCenter Pro. O StorCenter Pro requer um conjunto de 4 IDs. O StorCenter Pro vem pré-configurado para usar as IDs SCSI 0–3. Também é possível definir as IDs 8–11 ou 12–15. É possível conectar até 3 unidades de expansão StorCenter Pro a um computador. É possível usar qualquer conjunto de IDs SCSI que não contenha uma ID que já esteja sendo usada por outro dispositivo. Consulte o software utilitário da placa SCSI ou as propriedades da unidade para obter informações sobre as IDs dos dispositivos conectados. 4. Conecte o conector estendido de 68 pinos do cabo SCSI ao StorCenter Pro. AS INSTRUÇÕES CONTINUAM NA PÁG. 12 10 1. ソフトウェアをソリューションズ CD から Iomega サーバにンストールします。 注記:このドライブは、Iomega StorCenter Pro ま たは Iomega NAS 400r サーバで使用することを 目的としています。ソリューションズ CD には、 Iomega サーバ用パッチおよびドライバのみ含まれ ています。 2. サーバを終了します。 注意!電源障害によって、サーバ、拡張シャーシ、 またはその両方が破損する場合があります。 3. StorCenter Pro に適切な SCSI ID を設定します。 StorCenter Pro は、4 つの ID から成るセットを必 要とします。StorCenter Pro は、SCSI ID 0 から 3 を使用する設定で出荷されます。8 から 11 または 12 から 15 の ID を設定することもできます。最大 3 台の StorCenter Pro 拡張ユニットをコンピュータ に接続することができます。すでに他のデバイス が使用している ID を含まない SCSI ID のセットを 使用することができます。接続デバイスの ID 情報 については、SCSI カード ユーティリティまたはド ライブのプロパティを参照してください。 4. SCSI ケーブルの 68 ピン ワイド コネクタを StorCenter Pro に接続します。 12 ページに続く 连接 StorCenter Pro • StorCenter Pro를 연결합니다 1. 从 Iomega 服务器中的“解决方案 CD”安装软件。 注意:此驱动器用于与 Iomega StorCenter Pro 或 Iomega NAS 400r 服务器一起使用。“解决方案 CD”只 包含用于 Iomega 服务器的补丁程序或驱动程序。 2. 关闭服务器电源。 当心!不关闭电源可能会损坏服务器、扩展底盘,或将 两者都损坏。 3. 为 StorCenter Pro 设置正确的 SCSI ID。StorCenter Pro 需要包含 4 个 ID 的一个 ID 组。StorCenter Pro 预配置为使用 SCSI IDs 0–3。您也可将其设置为 IDs 8–11 或 12–15。您最多可将 3 个 StorCenter Pro 扩 展设备与您的计算机相连。您可使用任何 SCSI ID 组,前提是该组中不能包含有其他设备已在使用的 ID。有关连接设备的 ID 的信息,请参阅 SCSI 卡的实 用程序或驱动器属性。 4. 使用 SCSI 缆线上宽度为 68 针的接头与 StorCenter Pro 连接。 第 13 页中的说明(续) 1. Iomega 서버의 Solution CD에서 소프트웨어를 설치 합니다. 주: 이 드라이브는 Iomega StorCenter Pro 또는 Iomega NAS 400r 서버와 함께 사용하도록 설계되었 습니다. Solution CD에는 Iomega 서버 전용 패치 및 드라이버가 포함되어 있습니다. 2. 서버 전원을 끕니다. 주의! 종료하지 않으면 서버나 확장 새시가 손상되 거나 둘 다 손상될 수 있습니다. 3. StorCenter Pro를 올바른 SCSI ID로 설정합니다. StorCenter Pro는 4개의 ID로 된 세트가 필요합니 다. StorCenter Pro는 0–3개의 SCSI ID를 사용하도록 미리 구성되어 제공됩니다. 또한 StorCenter Pro를 8–11 또는 12–15개의 ID로 설정할 수 있습니다. 최 대 세 개의 StorCenter Pro 확장 장치를 컴퓨터에 연 결할 수 있습니다. 다른 장치에서 이미 사용 중인 ID가 포함되지 않은 SCSI ID 세트를 사용할 수 있습 니다. 연결된 장치의 ID에 대한 정보를 보려면 SCSI 카드 유틸리티 또는 드라이브 등록 정보를 참조하십 시오. 4. SCSI 케이블의 68-핀 커넥터를 StorCenter Pro에 연 결합니다. 자세한 설명은 13페이지에 나와 있습니다 11 5. Conecte a outra extremidade do cabo SCSI a uma porta SCSI no computador. NOTA: O StorCenter Pro requer um conector estendido de 68 pinos. A Iomega fornece um conector estendido de 68 pinos para cabo VHDCI. Se o seu adaptador SCSI não tiver um conector VHDCI, será preciso comprar outro cabo. Consulte a documentação que acompanha seu servidor para saber o tipo de conector adequado à outra extremidade do cabo. Para obter melhores resultados, adquira um cabo SCSI com parafusos de fixação. 6. Conecte o terminador SCSI que acompanha o produto, ou outro dispositivo de terminação apropriado, ao conector VHDCI SCSI do StorCenter Pro. 7. Conecte o cabo de alimentação, que acompanha o produto, à parte traseira do Iomega StorCenter Pro e a uma fonte de alimentação ininterrupta (UPS). NOTA: Nunca conecte o Iomega StorCenter Pro diretamente a uma tomada elétrica ou extensão. Uma perda inesperada de energia pode corromper dados ou danificar o sistema operacional do Iomega StorCenter Pro. 8. Inicie o StorCenter Pro, então ligue o servidor. 12 5. SCSI ケーブルの片側を、サーバの SCSI ポートに 接続します。 注記: StorCenter Pro は、68 ピン ワイド コネクタ を必要とします。68 ピン - VHDCI ケーブルが同梱 されています。お使いの SCSI アダプタに VHDCI コネクタがない場合、別のケーブルを購入して頂 く必要があります。ケーブルの SCSI アダプタ側の 適切なコネクタの種類を確認するには、SCSI アダ プタに付属していたマニュアルを参照してくださ い。確実に機能させるには、固定用のネジが付い た SCSI ケーブルを購入してください。 6. 付属の SCSI ターミネータ、または、他の適切に ターミネートされているデバイスを StorCenter Pro VHDCI SCSI コネクタに接続します。 7. 付属の電源コードで Iomega StorCenter Pro の背面 と UPS (無停電電源装置) を接続します。 注記:Iomega StorCenter Pro を壁のコンセントや スイッチ付きのタップに直接接続しないでくださ い。予期せぬ停電が発生した場合にデータが壊れ たり、StorCenter Pro オペレーティング システムに 障害が出たりする可能性があります。 8. StorCenter Pro の電源を投入します, そして サーバ の電源を投入します。 5. 将 SCSI 缆线另一端连接到服务器的 SCSI 端口上。 注意:StorCenter Pro 要求使用宽度为 68 针的接头。 Iomega 为 VHDCI 缆线提供宽度为 68 针的接头。如 果 SCSI 适配器不具有 VHDCI 接头,则您将需要采购 其他的缆线。查看随服务器提供的文档,以找出适合 缆线另一端的接头类型。为了获得最好的效果,请购 买带有锁紧螺钉的 SCSI 缆线。 6. 将附带的 SCSI 端接器或其他相应的端接设备与 StorCenter Pro VHDCI SCSI 连接器连接。 7. 将随附的电源线连接到 Iomega StorCenter Pro 的背 面和不间断电源 (UPS)。 注意:切勿将 Iomega StorCenter Pro 直接插入墙壁插 座或插线板中。意外断电可能会损坏数据或 Iomega StorCenter Pro 操作系统。 8. 接通 StorCenter Pro 的电源, 然后 打开服务器电源。 5. SCSI 케이블의 다른 끝을 컴퓨터에 있는 SCSI 포트 에 연결합니다. 주: StorCenter Pro는 68핀 커넥터가 필요합니다. Iomega는 68핀을 VHDCI 케이블에 제공합니다. SCSI 어댑터에 VHDCI 커넥터가 없는 경우, 다른 케이블을 구입해야 합니다. 케이블의 다른 한쪽 끝에 대해 올 바른 커넥터 유형을 찾으려면 서버와 함께 제공된 문서를 참조하십시오. 최상의 결과를 얻으려면 잠금 나사가 있는 SCSI 케이블을 구입하십시오. 6. 동봉된 SCSI 연결단자 또는 기타 올바르게 종단된 장치를 StorCenter Pro VHDCI SCSI 커넥터에 연결합 니다. 7. 동봉된 전원 코드를 Iomega StorCenter Pro 및 UPS(Uninterruptible Power Supply)의 뒤쪽에 연결합 니다. 주: Iomega StorCenter Pro를 전원 콘센트나 전원 스 트립에 직접 연결하지 마십시오. 예상치 못한 전원 손실로 인해 데이터 또는 Iomega StorCenter Pro 운 영 체제가 손상될 수 있습니다. 8. StorCenter Pro 전원을 켭니다, 그때 서버 전원을 켭 니다. 13 Troubleshooting Most SCSI installation and performance problems can be resolved by following these four basic steps: • Make sure your drive has power. • Check the SCSI cable to make sure it is connected properly and the cable has no bent pins. • Ensure the SCSI chain is properly terminated. • Ensure the StorCenter Pro SCSI IDs are not being used by any other SCSI device. For help with problems that are not covered in this Quick Start Guide, please visit the Support & Download area of www.iomega.com. Dépannage La plupart des problémes d’installation et de performances SCSI peuvent être résolus à l’aide des quatre étapes de base suivantes : • Assurez-vous que le lecteur est sous tension. • Vérifiez le câble SCSI et assurez-vous qu’il est connecté correctement et qu’aucune broche n’est pliée. • Assurez-vous que la chaîne SCSI est correctement “terminée”. • Assurez-vous que l’identification SCSI du StorCenter Pro n’est pas utilisée par un autre périphérique SCSI. Pour obtenir de l’aide concernant les problémes non cités dans ce manuel, visitez la section Support et Téléchargements du site www.iomega.com. Fehlerbehebung Die meisten Probleme bei der Installation und mit der Leistung von SCSI-Geräten können durch folgende vier Schritte behoben werden: • Stellen Sie sicher, dass das Laufwerk mit Strom versorgt wird. • Überprüfen Sie das SCSI-Kabel, um sicherzustellen, dass es korrekt angeschlossen ist und keine verbogenen Stifte aufweist. • Stellen Sie sicher, dass die SCSI-Kette korrekt terminiert ist. • Stellen Sie sicher, dass die StorCenter Pro SCSI-IDs nicht von einem anderen SCSI-Gerät verwendet werden. Wenn Sie Hilfe zu Problemen benötigen, die hier nicht aufgeführt sind, besuchen Sie den Bereich Support & Download der Webseite www.iomega.com. Solución de problemas La mayoría de los problemas de rendimiento e instalación de SCSI pueden resolverse siguiendo estos cuatro pasos básicos: • Compruebe que la unidad recibe alimentación. • Compruebe el cable SCSI para asegurarse de que está conectado correctamente y que no tiene ninguna patilla doblada. • Asegúrese de que la cadena SCSI está correctamente terminada. • Asegúrese de que ningún otro dispositivo SCSI está utilizando los ID de SCSI de StorCenter Pro. Si desea recibir ayuda con relación a problemas no tratados en este manual, visite el área de asistencia y descargas del sitio www.iomega.com. 14 Solução de problemas A maioria dos problemas de instalação e funcionamento do SCSI pode ser resolvida seguindo estas quatro etapas básicas: • Certifique-se de que a unidade esteja recebendo energia. • Verifique o cabo SCSI para certificar-se de que esteja conectado corretamente e não haja pinos tortos. • Confirme se a cadeia SCSI está terminada corretamente. • Confirme se as IDs SCSI do StorCenter Pro não estão sendo usadas por outro dispositivo SCSI. Para obter ajuda com problemas que não são abordados neste Guia de introdução rápida, visite a área Suporte e Downloads no site www.iomega.com. トラブルシューティング 取り付けやパフォーマンスに関して SCSI で発生するほとんどの問題は、以下で説明する 4 つの同じ基本的な手順 で解決できます。 • ドライブの電源が入っていることを確認します。 • SCSI ケーブルをチェックして、正しく接続されているか、ケーブルに曲がったピンがないかを確認します。 • SCSI チェーンが適切にターミネートされているか確認します。 • StorCenter Pro SCSI ID が他の SCSI デバイスに使用されていないか確認します。 このクイック スタート ガイドで扱いのない問題については、www.iomega.com の [Support & Downloads (サポート とダウンロード)] 領域にアクセスしてください。 故障排除 大多数 SCSI 安装和性能问题都可以通过以下四个基本步骤来解决: • 请确保驱动器已接通电源。 • 请检查 SCSI 缆线,确保其已正确连接且针脚没有弯曲。 • 请确保 SCSI 链端接正确。 • 请确保 StorCenter Pro SCSI ID 未被任何其他 SCSI 设备使用。 对于本《快速安装指南》中未涉及的问题,请访问 www.iomega.com 的支持和下载区域。 문제 해결 대부분의 SCSI 설치 및 성능 문제는 다음과 같은 4가지 기본 단계에 따라 해결할 수 있습니다. • 드라이브에 전원이 공급되고 있는지 확인합니다. • SCSI 케이블이 제대로 연결되어 있고 구부러진 핀은 없는지 확인합니다. • SCSI 체인이 제대로 종단되었는지 확인합니다. • StorCenter Pro SCSI ID가 다른 SCSI 장치에서 사용되지 않는지 확인합니다. 빠른 시작 설명서에 수록되지 않은 문제를 해결하려면 www.iomega.com의 Support & Download 영역을 방문하십시 오. 15 Customer Support • Assistance clientèle • Kundenunterstützung • Asistencia técnica • Assistência ao cliente • カスタマ サポート • 客户支持 • 客戶支援 • 고객 지원 For service and support for your Iomega product, visit us at http://www.iomega.com. Pour obtenir du service et de l’assistance pour votre produit Iomega, visitez notre site à l’adresse suivante : www.iomega.com. Servicedienstleistungen und Kundendienst für Ihr Iomega Produkt finden Sie unter www.iomega.com. Para obtener información sobre servicio y asistencia técnica para su producto Iomega, visítenos en www.iomega.com. Para obter serviços e suporte para seu produto Iomega, visite-nos no site www.iomega.com. Iomega 製品のサービスとサポートについては、www.iomega.com にアクセスしてください。 有关 Iomega 产品的服务与支持信息,请访问我们的网站 www.iomega.com。 Iomega 제품에 대한 서비스 및 지원을 보려면, www.iomega.com을 방문하십시오. Copyright © 2005 Iomega Corporation. All rights reserved. Iomega, the stylized “i” logo, StorCenter, and all Iomega brand blocks are either registered trademarks or trademarks of Iomega Corporation in the United States and/or other countries. Microsoft and Windows are either registered trademarks or trademarks of Microsoft Corporation in the United States and/or other countries. Certain other product names, brand names, and company names may be trademarks or designations of their respective owners. 31548400 10/18/05 b