1
™
Dynamic Edge 4.1
™
PSC604 with PSA2
User’s Guide
Philips Sound Solutions
August 2002
PHILIPS
Philips Sound Solutions
Software End User License Agreement
ATTENTION: THIS SOFTWARE IS SUBJECT TO THE LICENSE TERMS DESCRIBED BELOW. USE OF THIS SOFTWARE INDICATES
ACCEPTANCE OF THE LICENSE TERMS. IF YOU DO NOT ACCEPT THESE LICENSE TERMS, YOU MAY RETURN THE SOFTWARE
FOR A FULL REFUND. IF THE SOFTWARE IS PACKAGED WITH ANOTHER PRODUCT, YOU MAY RETURN THE ENTIRE UNUSED
PRODUCT FOR A FULL REFUND.
*************************************************************************************************************************************************************
© KONINKLIJKE PHILIPS ELECTRONICS N.V. 2002 All rights reserved. Reproduction in whole or in part is prohibited without the written
consent of the copyright owner. This software has been made available for use by end users only.
*************************************************************************************************************************************************************
Software End User License Agreement
PLEASE READ THE FOLLOWING TERMS AND CONDITIONS CAREFULLY. If you (end user, either an entity or an individual) do not
agree with these terms and conditions, click on the "No" button and/or do not install the software. This End User License Agreement is a
contract between you and Philips Consumer Electronics B.V, including its suppliers and licensors ("Philips") for this software program
("Licensed Software"). Installing the Licensed Software, using the Licensed Software, or clicking the "Yes" button, you agree to and accept
the terms and conditions of this End User License Agreement. YOU AGREE THAT YOUR USE OF THE LICENSED SOFTWARE
ACKNOWLEDGES THAT YOU HAVE READ THIS END USER LICENSE AGREEMENT, UNDERSTAND IT, AND AGREE TO BE BOUND
BY ITS TERMS AND CONDITIONS:
1.
Copyright
The Licensed Software is a proprietary product of Philips, and is protected by copyright laws. Title, ownership rights and intellectual
property rights in and to the Licensed Software shall remain with Philips.
2.
Right to use
Philips hereby grants you the personal, non-exclusive license to use the Licensed Software only on and in conjunction with one (1)
computer at one time. You may not sell, rent, redistribute, sublicense or lease the Licensed Software, or otherwise transfer or assign
the right to use it. You may not decompile, disassemble, reverse engineer, or in any way modify program code, except where this
restriction is expressly prohibited by applicable law. Except for one (1) copy which may be made for backup purposes only, you may
not copy the Licensed Software. You are not allowed to alter or remove any proprietary notices, including copyright notices, in the
Licensed Software.
3.
Disclaimer of Warranty
THE LICENSED SOFTWARE IS PROVIDED AS IS WITHOUT WARRANTY OF ANY KIND. THE ENTIRE RISK OF USE OF THE
LICENSED SOFTWARE REMAINS WITH YOU. TO THE MAXIMUM EXTENT PERMITTED BY LAW, PHILIPS MAKES NO FURTHER
REPRESENTATIONS OR WARRANTIES EXPRESSLY OR IMPLIED SUCH AS BY WAY OF EXAMPLE BUT NOT OF LIMITATION
REGARDING MERCHANTABILITY OR FITNESS FOR ANY PARTICULAR PURPOSE, OR THAT LICENSED SOFTWARE IS ERROR
FREE, OR THAT THE USE OF THE LICENSED SOFTWARE OR ANY COPIES THEREOF WILL NOT INFRINGE ANY PATENT,
COPYRIGHT, TRADEMARK OR OTHER RIGHT OF THIRD PARTIES.
4.
Updated
This license does not grant you the right to any upgrades or updates of the Licensed Software. However, Philips will be entitled to offer
updates and/or modifications to the Licensed Software at its discretion.
5.
Changes of the agreement
No changes of this Agreement are valid unless with Philips' and your written approval. Any terms and conditions provided by you are
inapplicable, whether or not contained in order forms or otherwise, unless specifically accepted by Philips in writing by means of a duly
signed addition to this Agreement.
6.
Limitations of liability
PHILIPS ACCEPTS NO LIABILITY FOR ANY DAMAGES, INCLUDING ANY LOSS OF PROFIT, LOSS SAVINGS, LOSS OF DATA,
BUSINESS INTERRUPTIONS, OR ANY DIRECT, INDIRECT, INCIDENTAL, CONSEQUENTIAL, SPECIAL OR PUNITIVE DAMAGES
ARISING OUT OF YOUR USE OR INABILITY TO USE THE LICENSED SOFTWARE, EVEN IF PHILIPS OR ITS
REPRESENTATIVES HAVE BEEN ADVISED OF THE POSSIBILITY OF SUCH DAMAGES, OR FOR ANY CLAIM BY ANY OTHER
PARTY. SINCE SOME JURISDICTIONS DO NOT ALLOW THIS LIMITATION OF LIABILITY, THIS LIMITATION OF LIABILITY MAY
NOT APPLY TO YOU.
7.
Validity and Termination
The license granted hereunder shall terminate automatically and without notice if you do not comply with all the terms and conditions of
this End User License Agreement. In the event of termination, you shall immediately stop any use of the Licensed Software and
destroy all copies thereof. In addition, in the event of termination because of your failure to comply with your obligations, Philips
reserves the right to invoke any and all other remedies available to it in law or contract including the right to claim damages.
8.
Applicable Law
This contract shall exclusively be governed by the laws of the Kingdom of The Netherlands without regard to its conflict of law
provisions.
9.
Competent Court
The competent court for any dispute between you and Philips pursuant to this End User License Agreement is the court of 'sHertogenbosch, the Netherlands.
© Philips Consumer Electronics B.V., 1999-2002, Eindhoven, The Netherlands
V-1 991214
Dynamic Edge™ Soundcard User’s Guide
ii
Philips Sound Solutions
Philips Dynamic Edge™
4.1 Channel PCI Soundcard
© Copyright 2002
Dynamic Edge™ is a trademark of Philips Sound Solutions.
Philips Sound Agent2™ is a trademark of Philips Sound Solutions.
QSound™, QEM™, QSound Environment Modeling, QSound Multi-Speaker Systems, QMSS™, Q3D™,
QSound QXpander™, QInteractive3D™, Audio Pix™, and the Q logo are trademarks of QSound Labs,
Inc.
EAX™ and Environmental Audio Extensions are trademarks of Creative Technology Ltd. In the United
States and other countries.
Microsoft™ and Windows™ are registered trademarks of Microsoft Corporation.
DirectX™ and DirectSound™ are trademarks of Microsoft Corporation.
All other trademarks are the property of their respective owners.
Dynamic Edge™ Soundcard User’s Guide
0
Philips Sound Solutions
Table Of Contents
1. Introduction ...............................................................................4
1.1.
KEY FEATURES ........................................................................................................ 5
1.2.
Minimum System Requirements ................................................................................. 6
1.3.
What Is Included In the Package ................................................................................ 7
2. Soundcard Installation Procedure ...........................................8
2.1.
Before Installing Your New Soundcard ....................................................................... 8
2.1.1.
Identify Your Old PC Sound System ................................................................... 9
2.1.2.
Disabling the Integrated Sound ........................................................................... 9
2.1.3.
Uninstalling the Old Soundcard and Drivers...................................................... 10
2.2.
Installing the New Soundcard ................................................................................... 11
2.2.1.
2.3.
Soundcard External Connection........................................................................ 12
Software Installation ................................................................................................. 13
3. Using The Philips Sound Agent 2 (PSA2) .............................14
3.1.
Basic interface operation .......................................................................................... 14
3.2.
Details of Compact Control Panel ............................................................................. 15
3.2.1.
Master Volume.................................................................................................. 15
3.2.2.
Mute.................................................................................................................. 15
3.2.3.
Resize............................................................................................................... 15
3.2.4.
Close ................................................................................................................ 15
3.2.5.
Default .............................................................................................................. 16
3.2.6.
Help .................................................................................................................. 16
3.2.7.
Reverb .............................................................................................................. 16
3.2.8.
QSizzle ............................................................................................................. 16
3.2.9.
QRumble .......................................................................................................... 16
3.2.10.
Normalize.......................................................................................................... 16
3.2.11.
3D Effects ......................................................................................................... 16
3.2.12.
EQ .................................................................................................................... 17
3.3.
Main Control Panel ................................................................................................... 18
3.3.1.
Accessing the Main Control Panel .................................................................... 18
3.3.2.
Effects Tab........................................................................................................ 18
3.3.2.1.
QSizzle...................................................................................................... 18
Dynamic Edge™ Soundcard User’s Guide
1
Philips Sound Solutions
3.3.2.2.
QRumble................................................................................................... 19
3.3.2.3.
Normalization ............................................................................................ 19
3.3.2.4.
3D Effects ................................................................................................. 19
3.3.3.
Equalizer Tab.................................................................................................... 20
3.3.4.
Setup Tab ......................................................................................................... 20
3.3.4.1.
Headphones.............................................................................................. 21
3.3.4.2.
Stereo Speakers ....................................................................................... 21
3.3.4.3.
Quad Speakers mode ............................................................................... 21
3.3.4.4.
Digital Output (S/PDIF).............................................................................. 21
3.3.4.4.1
3.3.4.5.
Preamp Slider ........................................................................................... 22
3.3.4.6.
Fader Slider .............................................................................................. 22
3.3.4.7.
Center Slider ............................................................................................. 22
3.3.4.8.
LFE Slider ................................................................................................. 22
3.3.4.9.
Balance Slider ........................................................................................... 22
3.3.4.10.
Test Button................................................................................................ 22
3.3.5.
Mixer Tab.......................................................................................................... 23
3.3.5.1.
Playback source controls........................................................................... 23
3.3.5.2.
Recording Source Control ......................................................................... 24
3.3.5.3.
Advanced Tab........................................................................................... 25
3.3.5.3.1
Microphone Boost ................................................................................... 25
3.3.5.3.2
S/PDIF Capture....................................................................................... 25
3.3.5.3.3
Select S/PDIF-In to Digital or Analog Out................................................ 25
3.3.5.3.4
Select S/PDIF Input Device # 1 or # 2..................................................... 25
3.3.6.
Presets Tab ...................................................................................................... 26
3.3.6.1.
Load.......................................................................................................... 26
3.3.6.2.
Save.......................................................................................................... 26
3.3.6.3.
Save As..................................................................................................... 26
3.3.6.4.
Delete........................................................................................................ 26
3.3.7.
3.4.
AC3/DTS Pass-Through.......................................................................... 22
Info Tab ............................................................................................................ 27
Visualization Panel ................................................................................................... 28
4. Uninstalling Software Drivers ................................................29
5. Technical Support And Warranty ..........................................30
Dynamic Edge™ Soundcard User’s Guide
2
Philips Sound Solutions
5.1.
Internet Address: ...................................................................................................... 30
5.2.
Technical Support Information: ................................................................................. 30
5.3.
Warranty Statement.................................................................................................. 31
6. Appendix A ..............................................................................33
6.1.
Useful Tips For Speaker set-up, And More ............................................................... 33
6.1.1.
6.2.
Ideal Listening Scenario (Speakers).................................................................. 33
Ideal Listening Scenario (Headphones) .................................................................... 33
6.2.1.
Avoid Reflective Surfaces (Speakers) ............................................................... 33
6.2.2.
Balance the Speakers and Headphones ........................................................... 33
7. Appendix B ..............................................................................35
Uninstalling the Old Drivers and the Soundcard ................................................................... 35
8. Appendix C ..............................................................................36
Disabling the Integrated Sound ............................................................................................ 36
Dynamic Edge™ Soundcard User’s Guide
3
Philips Sound Solutions
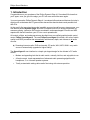
1. Introduction
Congratulations on your purchase of the Philips Dynamic Edge 4.1 Soundcard! We know that
you’ll agree, once you give it the edge, your PC will never sound the same again.
Your next generation Philips Dynamic Edge 4.1 soundcard offers advanced features for today’s
digital music enthusiasts and PC gamers who demand the absolute best sound possible from
their PCs.
As the world’s first soundcard to provide incredible surround sound from any stereo source, your
new feature packed Dynamic Edge 4.1 offers a complete suite of rich audio components for
awesome gaming, immersive DVD movie soundtracks, and supercharged CD audio and MP3
reproduction that will transform your PC into a sonic powerhouse!
All controls, effects, and enhancements are bundled into a new unified graphical audio control
center, Philips Sound Agent 2. The new Philips Sound Agent 2 includes a full suite of studio
quality audio DSP processes that automatically add features, depth, and richness to all audio
sources:
★ Streaming Internet media, DVD movie audio, CD audio, WAV, MP3, WMA – any audio
source is automatically upgraded to higher fidelity!
The Sound Agent 2 user interface is a simple yet elegant design for the ultimate in PC audio
control:
•
Modern and appealing look that is audio centric, naturally intuitive, and enjoyable to use.
•
A fresh concept, visual representation of advanced audio processing algorithms for
headphone, 2, or 4 channel speaker systems.
•
Totally customizable settings allow audio fine-tuning with extreme precision.
Dynamic Edge™ Soundcard User’s Guide
4
Philips Sound Solutions
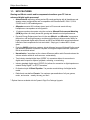
1.1. KEY FEATURES
Gaming and Music-centric audio components transform your PC into an
advanced digital audio processor!
•
QInteractive3D technology offers precise 3D sound positioning with all headphone and
speaker output configurations and is compatible with DirectSound3D, EAX 1.0, EAX
2.0/I3D Level 2, A3D enabled games.
•
QXpander converts ANY ordinary stereo input to 3D surround sound with any
headphone or two-speaker set configuration.
•
15 unique reverb environments using the exclusive QSound Environmental Modeling
(QEM) algorithms for totally immersive gaming and dramatic musical performances.
•
Dynamic Energy Enhancement found in the new QSizzle* and QRumble* components
feature low, mid and high frequency enrichment algorithms to improve sonic fidelity for
highly compressed digital audio files such as MP3s and WMAs with natural replacement
harmonics that compensate for lost sonic detail. Simply put, it makes MP3’s sound
great.
•
Exclusive QMSS technology creates a virtual 4-channel surround field and fills the sound
gap between speakers to create a complete 360-degree wraparound audio experience
that is smooth and natural.
•
Normalization * smoothes out the volume differences within audio files and reduces the
volume variation within all audio sources - automatically.
•
Two Industry standard digital input (S/PDIF In) connectors allows for connection to
digital audio outputs for capture, playback, recording, or monitoring.
•
Industry standard digital output (S/PDIF Out) allows for connection to digital speakers or
external Dolby Digital™ or DTS™ decoders.
•
Professional style 10-Band Equalizer * for precise sound tailoring of all digital audio
media.
•
Default and user defined Presets * for maximum personalization of all your games,
music, and movies – exactly the way you like it.
* Optional features available with the Dynamic Edge Plus Package Upgrade.
Dynamic Edge™ Soundcard User’s Guide
5
Philips Sound Solutions
1.2. Minimum System Requirements
-
233 MHz CPU
32 MB RAM
One CD ROM Drive
One open PCI slot
800 X 600 Screen resolution (1024 X 780 recommended)
Headphones, or amplified speakers
35 MB of available hard drive space
Windows® 98SE, Windows® ME, Windows® 2000, and Windows® XP.
Please Note: Each operating system has its own minimum requirements that should
be observed. In addition various games and DVD software applications may require
higher limits than listed above.
Dynamic Edge™ Soundcard User’s Guide
6
Philips Sound Solutions
1.3. What Is Included In the Package
You will find the following items in your Dynamic Edge package:
The Dynamic Edge Soundcard
The Dynamic Edge installation CD
The Dynamic Edge User’s Guide (on the installation CD)
Quick Start Guide (QSG)
Analog audio cable to connect CD-ROM/DVD-ROM drive to soundcard
Bundled applications (on the installation CD)
Warranty card (Europe only)
Dynamic Edge™ Soundcard User’s Guide
7
Philips Sound Solutions
2. Soundcard Installation Procedure
Installing your Philips Dynamic Edge soundcard is easy. Please take a moment to read all the steps
before proceeding with the installation. The installation Video on this CD can provide you with a
quick overview of how to install your new soundcard. If you need more details, read through this
user’s guide.
Note: Computers come in different shapes and sizes. The installation procedure in this manual is
general in nature and you should compare the illustrations shown here with your computer hardware
before starting your soundcard installation.
2.1. Before Installing Your New Soundcard
Before starting the installation of your new soundcard you need to determine if your PC already has
a soundcard, or integrated sound device on the motherboard. Your system can only have one active
sound system. Therefore, you should remove or disable the existing sound system before installing
Dynamic Edge. This is very important and failure to do so may result in your Dynamic Edge
not working properly.
If your PC does not have any type of sound system, proceed to Soundcard Installation section of
this manual.
If you know your PC has an add-on soundcard skip to Uninstalling the Old Soundcard and
Drivers section of this document.
If you know your PC has integrated sound system skip to Disabling the Integrated Sound section
of this manual.
If you don’t know which type of sound system your PC has, the following text and illustrations will
help you determine the type of your PC sound system. Once you know the type, go to the
appropriate section to disable, or remove the old sound system.
Dynamic Edge™ Soundcard User’s Guide
8
Philips Sound Solutions
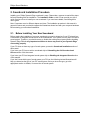
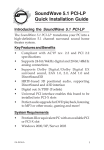
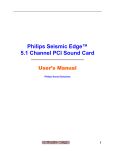
2.1.1. Identify Your Old PC Sound System
Check the back of your computer in the area of PCI slots (usually toward the bottom (on the tower
and mini tower cases) or to the right side (on desktop cases). All the connectors line up in one row
on a 4-inch end bracket (similar to your Dynamic Edge end bracket).
Line In
Mic In
Front Out
Rear Out
S/PDIF Out
Add-in
Soundcard
MIDI/Game
Port
Figure 1
Look for the standard soundcard connectors. The standard labels for the connectors are shown in
Figure 1.
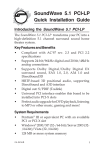
If the sound system is integrated on the motherboard, usually, the connectors are similar to the addon card, but they are not on a bracket. They might be stacked up in two rows. Figure 2 shows
examples of on-board audio connectors.
Figure 2
2.1.2. Disabling the Integrated Sound
To disable your integrated sound (on-board audio) you will have to enter the system BIOS utility.
Warning: Do not alter any other settings of your BIOS, or your system may not function properly.
Refer to your system documentation on how to activate the BIOS utility.
For useful examples on how to disable the on-board audio please refer to Appendix C.
Dynamic Edge™ Soundcard User’s Guide
9
Philips Sound Solutions
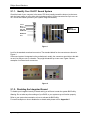
2.1.3. Uninstalling the Old Soundcard and Drivers
Uninstall the drivers for any previously installed soundcards. This is very important and failure to
do so may result in your Dynamic Edge soundcard not working properly. You should remove
the drivers before you take the old soundcard out of your system. Consult the documentation of your
old soundcard for details. Appendix B contains some useful general instructions on how to uninstall
the old audio drivers.
After you remove the old audio drivers, turn off your computer and disconnect the power cable
and all devices that are connected to the computer.
CAUTION: STATIC ELECTRICITY CAN CAUSE PERMANENT DAMAGE TO YOUR
SOUNDCARD
To Prevent Damage:
1. Always hold your soundcard by its edges. Avoid touching any electronic components on your
soundcard.
2. Use a grounding strap or touch any non-painted surface of your computer chassis before you
begin installation to discharge static electricity.
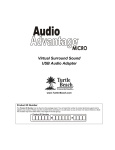
Follow these steps to remove the old card (Figure 3).
• Unscrew the soundcard and save the screw for the new soundcard.
• Remove the analog audio cable (if connected) from the old soundcard. This cable is usually
connected to your CD ROM drive or DVD ROM drive.
• Remove the old soundcard by firmly pulling it out.
• If no soundcard, select an available PCI slot and remove its cover plate.
Figure 3
Dynamic Edge™ Soundcard User’s Guide
10
Philips Sound Solutions
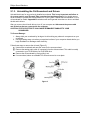
Figure 4
2.2. Installing the New Soundcard
Follow these steps to install the Dynamic Edge card (Figure 4).
• Remove the Dynamic Edge Soundcard from the anti-static bag.
• Align your soundcard with the selected PCI bus slot and firmly push it into the slot. Be sure
the soundcard is aligned properly and fits snugly into the slot.
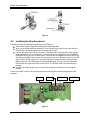
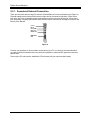
• Connect the cable to the CD-In connector on top edge of the card (Figure 5). There are two
analog connectors (CD In, and Aux In). You can connect the analog lines from CD ROM or
DVD ROM drive to any one of these inputs. There are also two digital input lines (S/PDIF IN).
Any standard S/PDIF output line can be connected to any one of these two inputs. If your CD
player has an S/PDIF output line, it is perfectly all right to connect both the analog and the
digital outputs of a CD ROM player to the appropriate input. You can select from the Mixer
Panel which one to be used as the sound source. The S/PDIF cable is not included in the
package.
• Use the screw from the slot cover to secure the soundcard to the frame of the computer
chassis.
Put the cover back on the PC and connect the power cord and all the required peripherals to the
computer.
Aux In
CD In
Figure 5
Dynamic Edge™ Soundcard User’s Guide
11
S/PDIF 1
S/PDIF 2
Philips Sound Solutions
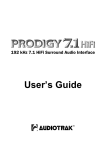
2.2.1. Soundcard External Connection
There are five jacks and one large D-connector (Game/Midi port) on the end bracket (see Figure 6).
External analog stereo sources with line level output can be connected to light blue 3.5mm stereo
jack at the top of the soundcard bracket. A microphone can be connected to the pink 3.5mm mono
jack. An analog or digital joystick and/or MIDI devices can be connected to the large connector at the
bottom of the bracket.
Line In
Mic In
Front Out
Rear Out
S/PDIF Out
MIDI/Game
Port
Figure 6
Connect your speakers to the soundcard on the back of your PC. It is strongly recommended that
you refer to the documentation that came with your speakers to determine the type and connection
specification.
Power up the PC and have the installation CD that came with your new soundcard ready.
Dynamic Edge™ Soundcard User’s Guide
12
Philips Sound Solutions
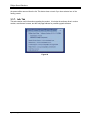
2.3. Software Installation
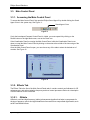
During the boot process, your operating system will detect the new soundcard and will launch the
“Found New Hardware Wizard” program. Cancel the Wizard, put the installation CD into your CDROM drive, and let the Dynamic Edge driver installation program install the drivers for you. Your PC
will detect the CD and automatically bring up the application launch panel (see Figure 7). Click on
the “Install Philips Soundcard Drivers” button and follow the directions on your screen.
If for any reason the installation program is not launched from the CD, click on the Windows
Start menu, and select Run. Type the following in the window that opens and press Enter:
D:\autolauncher.exe
Where D:\ is the name of your CD Drive.
Once the installation is complete, the installation program will ask you to restart your PC. After
the PC reboots, the Sound Agent icon will appear in your Windows System Tray (normally lower
right hand corner), as shown in Figure 8.
If you want to install any or all of the included applications from the launcher panel, reinsert the
CD or follow the above direction to bring up the launcher panel.
Figure 7
Dynamic Edge™ Soundcard User’s Guide
13
Philips Sound Solutions
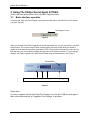
3. Using The Philips Sound Agent 2 (PSA2)
PSA2 is the visual audio interface for the Dynamic Edge soundcard.
3.1. Basic interface operation
To launch and setup your Sound Agent control panel, double click on the PSA2 icon in the System
Tray (see Figure 8).
Sound Agent 2 icon
Figure 8.
When you first launch the PSA2 it appears in the fully expanded form, but you can resize it using the
Resize button. The compact control Panel contains top-level controls, which allow you enable or
disable all of the features and effects provided by PSA2. The purpose of this panel is to take up very
little space on your screen while providing easy access to most common controls. To set or change
settings, you need to expand to the Main Control Panel using the Resize Button. See Figure 9.
Resize Button
Features available with Dynamic Edge Plus Package upgrade
Figure 9.
Please Note:
It is easy to upgrade with Dynamic Edge Plus Package. Go to the INFO TAB in Sound Agent 2
Main control panel and click on "Upgrade to Plus Package" to purchase.
Dynamic Edge™ Soundcard User’s Guide
14
Philips Sound Solutions
The Main Control Panel is in the center of the expanded mode, and is covered by the Visualization
Panel, which slides up and down. The Main Control panel provides access to advanced settings for
most PSA2 controls, which are grouped in five separate tabs. To uncover the Main Control Panel,
click on the pull down arrow at the bottom of the panel. See Figure 10.
Pull down arrow
Figure 10
The Visualization Panel provides a graphic representation for advanced audio processing features of
the Dynamic Edge. It also includes controls to enable the environmental effects. The Visualization
Panel appears only in the expanded mode as a sliding cover for the Main Control Panel.
3.2. Details of Compact Control Panel
The Compact Control Panel contains the following controls:
3.2.1. Master Volume
Master Volume controls the overall output level of the soundcard.
3.2.2. Mute
Toggles all sound on or off.
3.2.3. Resize
Resize Toggles between the compact mode (basic controls) and the expanded mode (for more
advanced options).
3.2.4. Close
Closes the PSA2 control panel without affecting audio operation.
Dynamic Edge™ Soundcard User’s Guide
15
Philips Sound Solutions
3.2.5. Default
Pushing the Default button resets all controls to a predefined state. All effects except 3D & Reverb
effects are turned off. Speaker mode selection and 3D effects remain unchanged. All playback mixer
sliders except microphone are un-muted. Record sliders remain as set by user. Fader and volume
sliders are set to their factory default levels, and Presets go to Neutral.
3.2.6. Help
This button launches the on-line help system. It contains detailed descriptions of all features of the
PSA2 interface.
3.2.7. Reverb
This button toggles the QSound Environmental Modeling (QEM) on or off. However, some games
apply their own environmental effects, which are not controlled by this button. Environmental
modeling uses reverb (reflected sound) and delay to create the impression that the listener is in a
particular environment.
QEM provides a wide range of high-quality environmental modeling effects that are selectable from
the Visualization panel. By selecting a default environment, you impose the effects of that
environment for music, movies, or games that do not use the EAX feature,
PSA2 responds automatically to games that use the EAX and EAX2.0 commands. These games
automatically control the selection of environments (regardless of what is selected from the
Visualization panel) to match various scenes and locations, and change these selections as the
environment changes. The applied intensity of reverb is controllable by a slider in the Visualization
panel. If the level of Reverb is not as expected, check the slider in the Visualization panel and adjust
properly.
3.2.8. QSizzle
Turn on or off the QSizzle effect. When on, enhances the mid/high-frequency range of the audio
stream. The button label lights up when QSizzle is enabled.
3.2.9. QRumble
Turn on or off the QRumble effect. When on, it enhances the low frequency range of the audio
stream. The button label lights up when QRumble is enabled.
3.2.10.
Normalize
Toggles Normalization (automatic volume leveling) on or off. The button label lights up when
Normalization is enabled.
3.2.11.
3D Effects
Toggles 3D Effects on or off. This does not affect 3D audio games, but does affect non-3D audio
games utilizing the 2D to 3D remixing feature. The button label lights up when 3D Effects are
enabled.
Dynamic Edge™ Soundcard User’s Guide
16
Philips Sound Solutions
3.2.12.
EQ
Toggles the 10-band Equalizer on and off. The button label lights up when the Equalizer is enabled.
When the button is not activated the EQ remains inoperative.
Dynamic Edge™ Soundcard User’s Guide
17
Philips Sound Solutions
3.3. Main Control Panel
3.3.1. Accessing the Main Control Panel
To access the Main Control Panel, first open the Philips Sound Agent 2 by double clicking the Sound
Agent 2 icon in the system tray. See Figure 11.
Sound Agent 2 icon
Figure 11
If only the bar-shaped Compact Control Panel is visible, you must expand it by clicking on the
Resize button on the right hand corner, next to the Close icon.
If the Visualization Panel is covering the Main Control Panel, slide the Visualization Panel cover
down to reveal the Main Control Panel by clicking on the arrow at the middle of the lower edge of the
Visualization Panel.
Once the Main Control Panel is open, you can choose any of the tabs to select the desired set of
controls. See Figure 12.
Figure 12
3.3.2. Effects Tab
The Effects Tab is the first of the Main Control Panel tabs. It contains controls and indicators for 3D
enhancements, and active / adaptive frequency and level control processors. Below is a description
of all the features on the Effects tab.
3.3.2.1.
QSizzle
QSizzle is a mid and high frequency (treble) enhancement algorithm that helps to compensate for
the loss of presence, punch and signal detail that often results from compressed digital media, such
as MP3 and WMA formats.
Dynamic Edge™ Soundcard User’s Guide
18
Philips Sound Solutions
QSizzle self-adjusts in real time according to frequency response of the input signal. This is different
from the Equalizer, which is a fixed frequency processor. The Equalizer does not monitor the input
signal or perform self-adjustment. The label QSizzle Active appears in illuminated text when
QSizzle is enabled, and QSizzle Off when disabled.
3.3.2.2.
QRumble
QRumble is a powerful low frequency enhancement algorithm that helps to compensate for loss of
bass that may result from digital file encoding such as ripping MP3’s or WMA files, or when using
lower quality speaker systems.
QRumble responds in real time to the varying nature of the input signal, automatically adjusting itself
accordingly. This is very different from the Equalizer, which is a static frequency processor. The
Equalizer does not monitor the input signal or perform self-adjustment.
The label QRumble Active appears in illuminated text when QRumble is enabled, and QRumble
Off when disabled.
3.3.2.3.
Normalization
Normalization automatically adjusts the volume variations in various audio files or streams. Quieter
signals are amplified to match the level of louder ones, so that the listening volume maintains a
consistent level. This means that when playing files with various output levels, constantly adjusting
your speaker volume becomes a thing of the past.
The label Normalization Active appears in illuminated text when Normalization is enabled, and
Normalization Off when disabled.
3.3.2.4.
3D Effects
The goal of 3D effects processing is to maximize immersion and realism for any type of listening
material and every type of output hardware – two or more speakers, headphones, or even the
unique combination of speakers with headphones.
Four separate 3D audio enhancement algorithms are provided to maximize the spatial experience
no matter what the combination of signal type and output hardware.
When 3D Effects are enabled the audio processor will automatically choose the appropriate
algorithm (3D mode) according to your output configuration and the type of input signal. The 3D
Effect indicators on the Effects Tab light to show which algorithm is active at any given time.
QXpander is optimal for 2-channel (stereo) input played over 2 speakers (or 2 satellite speakers plus
a subwoofer). QXpander provides a wider sound field, way beyond the physical position of the
speakers
QSurround is optimal when a multi channel source is played (e.g. a 4.1 channel DVD). QSurround
optimizes the sound to create “virtual” speakers and immerse the listener in surround sound.
QMSS is optimal for multi-channel speaker set-ups (4 or 4.1 channel) when a stereo source is used.
The majority of sources are stereo (e.g. MP3’s, CD music tracks, Wave files, etc) and QMSS
transforms these into immersive multi channel experiences with 4 or 4.1 separate channels
depending on your speaker set-up.
Dynamic Edge™ Soundcard User’s Guide
19
Philips Sound Solutions
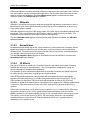
3.3.3. Equalizer Tab
The Equalizer (EQ) controls the frequency response of the system by increasing or decreasing the
frequency response of ten independent frequency bands.
This Equalizer works very much the same as the equalizers in high quality sound systems. Each
slider controls the relative level of a band (range) of frequencies. The number listed above each
slider column is the center frequency of the band controlled by that slider. When a slider is set to the
center position, frequencies within this band left flat and the gain is 0dB. See Figure 13.
Figure 13
To boost the level of a given band, move its slider above the centerline. To cut the relative level of a
given band, move its slider below the centerline. Maximum boost or cut is ±12dB on each direction.
Sliders can be individually centered by right clicking anywhere within the slider area, or collectively
by clicking the Reset button on top right corner of the panel. Sliders can also be collectively centered
by clicking the Default button on the compact panel. Please note that the default button resets
several other features as well.
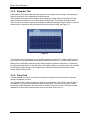
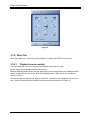
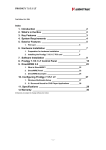
3.3.4. Setup Tab
This tab contains the controls to select and configure your speaker mode based on the type and
number of speakers you have.
Your Dynamic Edge soundcard supports a wide range of speakers. From the list on the left side of
the Setup tab, you can choose the desired output configuration. This sets up the nature of audio
processing, spatial algorithms, and the number of outputs, to suit your choice. Following is a detail
explanation of each output mode and each control on this tab. See Figure 14.
Dynamic Edge™ Soundcard User’s Guide
20
Philips Sound Solutions
Figure 14
3.3.4.1.
Headphones
This option selects the headphone sound processing algorithms.
3.3.4.2.
Stereo Speakers
This option selects the stereo processing algorithms. Use this option with any stereo speaker
system.
We recommend that you enable the 3D Effects in this mode while listening to music and enjoy the
surround sound effect that is built into your new PC sound system. For more information read the
QXpander section of this manual.
3.3.4.3.
Quad Speakers mode
This mode supports two sets of stereo speakers that are evenly spaced around the listening
position. The speakers are set up as front left, front right, rear left and rear right,
3.3.4.4.
Digital Output (S/PDIF)
Philips Dynamic Edge soundcard features two digital inputs and one digital output. You can select
either one of the inputs to come out either on the analog or digital (S/PDIF-Out) line. See Digital
Input Sources under Mixer tab.
The S/PDIF Out and the Center/LFE share the same connector. For this reason when you select
Digital Output mode, your analog output automatically changes to Stereo Speakers mode and only
the contents of the front speakers come out of the S/PDIF output. To go back to analog mode,
simply click on Quad Speakers, or 4.1 Channel Speakers mode.
Dynamic Edge™ Soundcard User’s Guide
21
Philips Sound Solutions
3.3.4.4.1
AC3/DTS Pass-Through
Dynamic Edge passes AC3 or DTS digital audio data from a DVD to S/PDIF OUT. This feature
allows you to play a DVD on your PC using a soft-DVD player, utilizing an external AC3/DTS
decoder. Examples of an external decoder are receivers, speaker sets with built in AC3 decoder, or
a stand-alone AC3 decoder boxes. AC3 is available when using a compatible soft-DVD player
capable of streaming AC3 or DTS data to the soundcard. To enable AC3/DTS Pass-Through, you
must select Digital Output (S/PDIF) in the Setup Tab.
3.3.4.5.
Preamp Slider
The Preamp Level control allows you to boost the audio signal before it passes through the
amplification circuitry. To the outside world it has the same effect as the master volume has.
Caution: If you notice any distortion in the sound, lower the Preamp Slider level to eliminate the
distortion.
3.3.4.6.
Fader Slider
Fader controls the balance between the front and the rear speakers.
3.3.4.7.
Center Slider
Center controls the level of output on the center speaker only. Use this slider to adjust the volume on
the center speaker.
3.3.4.8.
LFE Slider
This slider provides control for the volume level of the subwoofer.
3.3.4.9.
Balance Slider
This slider allows you to balance the left and the right speakers. It affects the front and the rear
speakers.
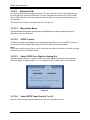
3.3.4.10. Test Button
The Test button opens a window, which allows you test your speakers one by one. Testing a
speaker channel enables you to ensure that the speakers or headphones are properly connected.
The test utility displays a button for each of the possible output channels, but the number of active
buttons depends on your selected output mode. Click any active speaker button to send the test
sound to the corresponding speaker. See Figure 15.
The “Loop Sounds” button allows you to repeat the test sound until you click Stop. If the Loop
Sounds is off, the sound will only play once for each click of a speaker button.
The Auto button sends the test sound to each speaker once and moves it to the next speaker
automatically.
The Close button exits the test utility and returns you to the Main Control Panel Setup Tab.
Dynamic Edge™ Soundcard User’s Guide
22
Philips Sound Solutions
Figure 15
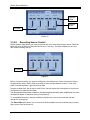
3.3.5. Mixer Tab
Mixer Tabs allow you to select and control playback, recording, and S/PDIF input sources.
3.3.5.1.
Playback source controls
You can individually mute or un-mute as many playback sources as you wish.
Volume sliders set the playback level for each source.
Balance sliders adjust the relative left and right output levels for each stereo source. Balance sliders
should normally be left in the center, which is the default position. Right-click any of the balance
sliders to center it.
The viewing area on the Mixer Tab displays controls for a maximum of four playback sources at one
time. Use the Playback Source Scrollbar to reveal more source controls. See Figure 16.
Dynamic Edge™ Soundcard User’s Guide
23
Philips Sound Solutions
Balance
Slider
Volume
Slider
Scrollbar
Figure 16
3.3.5.2.
Recording Source Control
Philips Dynamic Edge allows you to record sounds and music from various input sources. Select the
Mixer tab, go to the bottom of the panel and click on “recording”. This panel enables you to select
and control recording sources.
Scrollbar
Figure 17
Before you start recording, you need to configure the recording source. Select a source by clicking
the appropriate “Select” button. Each source has its own level and balance controls. To set each
slider in its default position, right click on that slider.
Drag the scrollbar from side to side to scroll Source Controls across the viewing area to reveal more
controls that may otherwise be hidden.
The Microphone Boost button located on the Advanced tab provides extra amplification for weak
microphone signals. If distortion occurs, turn Boost off.
To view additional sources, drag the scrollbar to slide the set of source controls back and forth
through the viewing area.
The Stereo Mix option allows you to record from all the available sources simultaneously, provided
that you have input to the source.
Dynamic Edge™ Soundcard User’s Guide
24
Philips Sound Solutions
3.3.5.3.
Advanced Tab
Your new soundcard has two digital input lines. They are located on top of the soundcard and can
be accessed from inside the computer box. They are designed to be connected to your CD ROM
and/ or DVD ROM drives. The audio signal fed to these inputs can be recorded and monitored on
your speakers.
The following controls are on the Advanced tab. See Figure 18.
3.3.5.3.1
Microphone Boost
The Microphone Boost button provides extra amplification for weak microphone signals. If
distortion occurs, turn Boost off.
3.3.5.3.2
S/PDIF Capture
This button enables recording from one of the digital input lines. If you select S/PDIF Capture to
be the source for recording the Recording sub tab of the Mixer becomes unavailable.
Note:
S/PDIF input recording is limited to 44.1 KHz, 16-bit stereo and 48 KHz 16-bit stereo. Any other recording
formats may produce unpredictable results.
3.3.5.3.3
Select S/PDIF-In to Digital or Analog Out
These two options allow you to enable monitoring the input digital signal that is being captured to
either your digital or analog speakers. You can select the type of output mode on the Setup tab.
Figure 18
3.3.5.3.4
Select S/PDIF Input Device # 1 or # 2
Only one of the two inputs may be selected as a source for recording at a time.
Dynamic Edge™ Soundcard User’s Guide
25
Philips Sound Solutions
3.3.6. Presets Tab
The Preset functions enable you to make snapshots of the state of all Philips Sound Agent 2
controls, so that you can conveniently reload the same settings at any time.
Figure 19
The Preset system enables you to save the state of your Philips Sound Agent 2 controls once you
have adjusted them for a certain purpose, so you can bring back that entire settings in one click the
next time you want to listen to a similar sound stream.
For example, if you have been listening to drums’n’bass, and have adjusted the controls to suit your
taste, you can quickly save a preset called Drums’n’Bass. Whenever you listen to this type of music
again, simply load this preset, and all the controls will return to the settings you had in effect when
you saved it.
Your Sound Agent comes with several factory presets as listed on the Presets tab.
3.3.6.1.
Load
Clicking on this button loads an existing preset.
3.3.6.2.
Save
When you load one of your presets and make changes to it, you can save it by clicking on the Save
button. If you have selected one of the factory presets, you will not able to use the save button. The
Sound Agent will not overwrite a factory presets, but you can overwrite your presets.
3.3.6.3.
Save As
You can load an existing preset (factory or one of yours), modify it to your taste, and save it as a
new preset.
3.3.6.4.
Delete
Deletes the selected preset permanently from the list. When you select one your presets and click
on this button, a confirmation dialog box will appear and when you confirm by clicking the OK button,
Dynamic Edge™ Soundcard User’s Guide
26
Philips Sound Solutions
the preset will be removed from the list. This button does not work if you have selected one of the
factory presets.
3.3.7. Info Tab
This tab contains useful information regarding the product. It includes the software driver’s version
number, manufacturer’s name, and the web page address for possible upgrade software.
Figure 20
Dynamic Edge™ Soundcard User’s Guide
27
Philips Sound Solutions
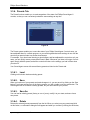
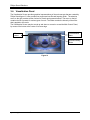
3.4. Visualization Panel
The Visualization Screen provides graphical representations of the environments that are created by
Philips Sound Agent 2. It also contains two menus and one Reverb Intensity Slider. The selection
menu on the right contains all the choices for Reverb environmental effects. The menu on the left
contains the list of presets for various types of music. The Slider controls the intensity of the effect
that is applied to the music.
The Visualization Screen may be moved up and down to conceal or reveal the Main Control Panel,
by means of the button at the center of its lower edge.
Environmental
Menu
Presets
Menu
Reverb Intensity
Slider
Figure 21
Dynamic Edge™ Soundcard User’s Guide
28
Philips Sound Solutions
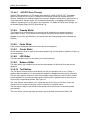
4. Uninstalling Software Drivers
If it becomes necessary to uninstall your Philips Dynamic Edge drivers, you can choose one of the
two methods available. You may go to the system control panel and launch the “Add/Remove
Programs” utility as shown in Figure 22 (from Windows XP). From the list of programs find Philips
Sound Agent 2 and click on it so it is highlighted. Click the “Add/Remove” button in Windows 98/ME,
or “Change/Remove” in Windows 2000/XP.
OR, you may choose the uninstall program that comes with the Philips Sound Agent 2 program. For
this you click on the Windows Start button, click on the “Programs”, (or “All Programs” in XP) tab,
and click on the Philips Sound Agent 2 tab and select the Uninstall program.
Figure 22
Dynamic Edge™ Soundcard User’s Guide
29
Philips Sound Solutions
5. Technical Support And Warranty
Before calling the technical support number please make sure you have the following information
available:
• Model number and date of purchase.
• Computer type, processor speed, and memory available.
Computer operating system (IE; Windows® 98SE, ME, etc.).
•
•
On-screen error information.
Other hardware connected to your soundcard.
5.1. Internet Address:
You can find vast amount of useful information on the web. The URL for USA web site is
http://www.philips.com/ce
The web site for Europe is
http://www.philips.com/sound
5.2. Technical Support Information:
Toll-Free telephone numbers:
USA:
Elsewhere:
1-800-835-3506
See Warranty Sheet in your package.
Dynamic Edge™ Soundcard User’s Guide
30
Philips Sound Solutions
5.3. Warranty Statement
Philips Sound Cards Warranty Conditions
For Personal Use Only
USA and North American Customers Only
One-Year Free Parts, Labor and Technical Support
WHO IS COVERED?
You must have proof of date of purchase to receive warranty service. A sales receipt or other
document showing when you purchased the product is considered ample proof of date of
purchase.
WHAT IS COVERED?
Warranty coverage begins the day you buy your product. For one year thereafter, all parts will
be repaired or replaced, with free labor. After one year from the day of purchase, you must pay
for the replacement or repair of all parts, and for all labor charges. All parts, including repaired
and replaced parts, are covered only for the original one-year warranty period. When the
warranty on the product expires, the warranty on all replaced and repaired parts also expires.
WHAT IS EXCLUDED?
Your warranty does not cover:
• Labor charges for installation or setup of the product, adjustment of customer controls on the
product, and installation or repair of other systems outside of the product.
• Product repair and/or part replacement due to misuse, accidents, unauthorized repair or other
external causes not within the control of Philips Consumer Electronics.
• A product that requires modification or adaptation to enable it to operate in any country other
than the country for which it was designed, manufactured, approved and/ or authorized, or
repair of products damaged by these modifications.
• Incidental or consequential damages resulting from the product. (Some states do not allow the
exclusion of incidental or consequential damages, so the above exclusion may not apply to you.
This includes, but is not limited to, pre- recorded material, whether copyrighted or not
copyrighted.)
• A product used for commercial or institutional purposes.
WHERE IS SERVICE AVAILABLE?
Warranty service is available in all countries where the product is officially distributed by Philips
Consumer Electronics. In countries where Philips Consumer Electronics does not distribute the
product, the local Philips service organization will attempt to provide service (although there
may be a delay if the appropriate spare parts and technical manual(s) are not readily available).
WHERE CAN I GET MORE INFORMATION?
For more information, contact the Philips Customer Care Center by calling
(800) 835-3506 (U. S. A. customers only).
Dynamic Edge™ Soundcard User’s Guide
31
Philips Sound Solutions
BEFORE REQUESTING SERVICE...
Please check your owner’s manual before requesting service. Adjustments of the controls
and/or procedures covered in the manual may save you a service call.
TO GET WARRANTY SERVICE IN U. S. A., PUERTO RICO,
OR U. S. VIRGIN ISLANDS...
A Return Merchandise Authorization (RMA) number must be obtained by calling (800) 8353506.
Write the RMA number conspicuously on the outside of the product carton. Ship the product in
its original carton and packaging material prepaid to the Philips repair center listed below. If you
do not have the original carton and packaging material, call the number above. Philips will
advise you on proper packaging and shipping procedures. Charges to ship the product to the
repair center are the customer’s responsibility. After repair/ replacement, the return product
shipment is made by Philips.
The repair center may keep defective parts.
Repair Center Address: Philips Electronics
1001 Snapps Ferry Rd
Greeneville, TN 37745
Make sure you write your name, address, RMA number, and model number in at least two
places on the package. The RMA desk will provide returning shipping address.
(In U. S. A., Puerto Rico, and U. S. Virgin Islands, all implied warranties, including implied
warranties of merchantability and fitness for a particular purpose, are limited to the duration of
this expressed warranty. But, because some states do not allow limitations on how long an
implied warranty may last, this limitation may not apply to you.)
We recommend that you print a copy of this warranty for your records and record below the
model and serial numbers found on the product.
MODEL No. ________________________________________________
SERIAL No. ________________________________________________
This warranty gives you specific legal rights. You may have other rights which vary from
state/ province to state/ province.
For more information write to: Philips Customer Care Center, P. O. Box 520890, Miami, FL
33152
Dynamic Edge™ Soundcard User’s Guide
32
Philips Sound Solutions
6. Appendix A
6.1. Useful Tips For Speaker set-up, And More
Following is some suggestions to help you set up your audio hardware for best results.
6.1.1. Ideal Listening Scenario (Speakers)
The ideal way to experience proper imaging, whether stereo, surround, or 3D, is to begin by
arranging each pair of speakers as symmetrically as possible.
Front speakers should be at the same height, angle and distance relative to the listener. You will
obtain best imaging if the distance between you and speakers are about the same distance as
between the speakers.
A typical multimedia set-up, with the speakers placed just to either side of the computer monitor, is
ideal for stereo or quad listening. However, if your system has a center speaker, then it is advisable
to move the left and right front speakers further apart, maintaining equal distance from the listening
position.
Surround speakers should be placed behind the listener, and ideally be no further than the front
speakers from the listener. They also need to be at the same height and angle as the front speakers.
6.2. Ideal Listening Scenario (Headphones)
When using headphones, many of the potential problems associated with speaker listening are
essentially eliminated. For example, you are automatically positioned in the center, and if you move
around, this doesn’t change your position relative to the speakers.
In case you wish to use the Speaker + Headphone output mode, you should not select the types that
completely cover your ears and isolate the sound coming from the front speakers. Special
headphones (sometimes called open-air headphones), or the compact types as well as ear bud
headphones can be used successfully.
6.2.1. Avoid Reflective Surfaces (Speakers)
If possible, keep your speakers away from reflective surfaces. For example, if your setup is in a
corner and one speaker is very close to a sidewall, this will degrade imaging. This is because sound
waves will bounce off the wall and arrive at your ears slightly later than the waves originating directly
from the speaker.
This is true of any environment except an anechoic (echo-free) chamber. However, when the
surface is close to the speaker, the reflected sound energy will be only slightly delayed and still quite
strong compared to the original, which will reduce the clarity of the signal you hear.
The same can be true of placing your speakers directly on a hard desktop. If possible, elevate your
speakers on stands so they are further away from the reflective surface. This will slightly improve the
imaging and effects.
6.2.2. Balance the Speakers and Headphones
Any imaging, including stereo, surround and especially 3D audio, can be degraded by left/right
channel imbalances. If your speakers or amplifier(s) incorporate balance controls, we strongly
recommend adjusting them to their center position. Many physical balance controls have a mark to
identify the center position.
Dynamic Edge™ Soundcard User’s Guide
33
Philips Sound Solutions
If each speaker has separate volume controls, try to set them as equally as possible. You can use
the Philips Sound Agent 2 test utility to help you judge the volumes.
This practice applies to headphones as well.
Dynamic Edge™ Soundcard User’s Guide
34
Philips Sound Solutions
7.
Appendix B
Uninstalling the Old Drivers and the Soundcard
Regardless of which one of the supported operating systems you have, the following general steps
are used to remove the old drivers. It is recommended that you remove the drivers before you take
the old soundcard out of your computer.
•
•
•
•
•
•
Click on the start button
Click on the Settings and select Control Panel
Double click on Add/Remove Programs
Find the audio drivers on the list. Warning: Be sure you select the right drivers and you are
not deleting any other program.
Click on the Remove (or Add/Remove) button.
When uninstall is finished removing the drivers, click OK, close all applications.
In most cases the above procedure removes the drivers. However, it is a good idea to check the
Device Manager to be sure every thing is removed. If you are not familiar with Device Manager just
follow these steps:
•
•
•
•
•
•
•
Right click on My Computer icon and select Properties. If your desktop does not show an
icon for My Computer, click on the Start button and Right click on My Computer, then select
Properties. A new window will open.
On Windows 2000 and XP, select the Hardware tap on top and click on the Device manager
button at the middle of the window.
On Windows 98SE and ME select the Device Manager tab on top.
In the Device Manager window locate “Sound, video, and game controllers”.
Click on the + next to it. A list of devices will drop down from this selection.
Select your soundcard, right click on it.
From the drop down menu select Remove. Click on OK.
There may be more than one component to the old soundcard, such as a game port. Make sure you
remove all components before exiting the Device Manager.
Close Device Manager and shut down your system to proceed with removing the old soundcard out
of your PC. Please go back to Soundcard Installation section of this document.
Dynamic Edge™ Soundcard User’s Guide
35
Philips Sound Solutions
8. Appendix C
Disabling the Integrated Sound
To disable the on-board audio you need to enter the system BIOS setup. Most computers only
allow you to enter the setup right after power up and just before the operating system starts
loading. A message may appear briefly to inform you that you can enter the setup. Typically,
this message shows up at one of the corners of the screen and says something like
“Press Del to enter setup”, or “Press F1 to enter setup”.
Some computers allow you to enter setup at any time. Refer to your PC’s documentation on
how to enter the setup utility. Find out how to enter the setup utility in your system and invoke it.
Warning: Do not change anything that you are not sure what it is, or your system may not
function properly.
In the setup utility usually there is a list of options. One is the Standard Features that includes the
time/date, and PC’s basic peripherals such as hard drive, keyboard, mouse, etc. Another is the
Advanced BIOS Features. Yet another is PnP and/or PCI Configuration. You may enter each of
these menus and look at the list of the options they provide. Use the arrow keys on the keyboard to
navigate through the setup utility.
Find the menu that contains the controls for the audio and sound feature. Select the menu by
moving the highlight on this menu, and hit Enter.
Locate the Audio or Sound device and select it using the arrow keys. Read the direction at the
bottom of the screen on how to change the settings. It may be the Page Up/Down keys, or +/- or
something else. Change the setting from “On” to “Off”, or from “Enable” to “Disable”, or
whatever the options are in your PC.
Save your settings and exit.
Dynamic Edge™ Soundcard User’s Guide
36