1
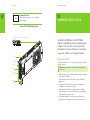
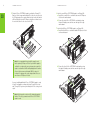
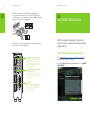
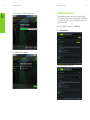
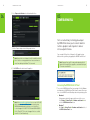
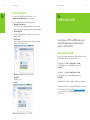
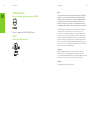
USER GUIDE GEFORCE GTX TITAN X INSTALL ATION GUIDE NVIDIA GeForce GTX TITAN X Table of Contents Table of Contents Introduction1 About This Guide 1 Minimum System Requirements 2 Unpacking3 Equipment3 Hardware Installation5 Safety Instructions 5 Before You Begin 6 Installing the GeForce Graphics Card 6 Software Installation GeFore Experience Software Installation Driver Installation 11 11 13 Configuring SLI Accessing NVIDIA Control Panel Enabling/Disabling SLI 15 15 16 Configuring HDMI Enabling Audio Over HDMI 17 17 Features 19 Compliances 23 Table of Contents Introduction 1 01 Introduction Thank you for choosing the NVIDIA® GeForce® GTX TITAN X graphics card. The GTX TITAN X is a powerful graphics card that gives you the fast, smooth, quiet gaming you’re looking for in all your favorite titles. With features like GPU Boost 2.0, NVIDIA TXAA, and NVIDIA PhysX, this graphics card will give you the best your games have to offer. Plus, with NVIDIA’s GeForce Experience built right into its drivers, you can take advantage of NVIDIA’s tens of thousands of hours of testing to optimize your gameplay settings with one click. About This Guide This installation guide discusses the installation and operation of the NVIDIA GeForce GTX TITAN X graphic card. Note: It is important to register your product in order to receive online and phone support. Consult the registration card included in the retail packaging for more information on registering your product. 2 01 Introduction Minimum System Requirements >> Motherboard PCI Express® or PCI Express 3.0-compliant motherboard with one dual-width x16 graphics slot. 3 Unpacking 02 Unpacking >> System Power Supply Minimum 600 W or greater system power supply with two 6-pin PCI Express supplementary power connectors. >> Operating System zz Microsoft Windows 8, 32-bit or 64-bit zz Microsoft Windows 7, 32-bit or 64-bit zz Linux, 32-bit or 64-bit zz FreeBSD x86 >> System Memory 8 GB system memory (16 GB recommended) >> DVD-ROM drive or internet connection for driver installation >> 300 MB of available hard disk space Prior to unpacking your new NVIDIA GeForce GTX TITAN X graphics card, it is important to make sure you meet all the system requirements listed on page 2 for a smooth installation. Be sure to inspect each piece of equipment shipped in the packing box. If anything is missing or damaged, contact your reseller. Equipment The following equipment and documentation are included in the GeForce GTX TITAN X graphics card box. NVIDIA Driver Installation Disc Contains: GeForce Experience Software For other operating systems and to keep your drivers current, visit www.nvidia.com/drivers and download the latest drivers • Digital version of this Manual and Driver • Quick Start Guide Fast and easy steps to install the GeForce graphics card. 4 02 Unpacking Hardware Installation Registration Card WELCOME Register to gain priority access to online and phone support. 5 03 Hardware Installation GeForce GTX TITAN X Graphics Card One 6-Pin and one 8-Pin Power Connectors SLI Connector DisplayPort Connector (Qty Three) HDMI Connector DisplayPort Connectors DVI Connector Installing the NVIDIA GeForce GTX TITAN X graphics card hardware involves opening up your computer. Follow all of the safety instructions provided here to ensure that there is no damage to you, your computer, or the graphics board. Safety Instructions To reduce the risk of fire, electric shock, or injury, always follow basic safety precautions. Note: All hardware must be installed prior to installation of the drivers. >> Remove power from your computer by disconnecting the AC main source before installation. >> Do not operate this product near water or when your hands or body are wet. >> Do not place this product on soft surfaces that could block the ventilation slots and cause overheating. >> Do not place this product near a heating register or radiator. >> Place this product securely on a stable surface. Serious damage to this product may result if it falls. >> Do not allow anything to rest on the power cord. Do not place this product where a person can step or trip on the power cord. 6 03 Hardware Installation Before You Begin The GeForce GTX TITAN X graphics card is a PCI Express 3.0 ×16 graphics card. Your computer may already have a graphics card installed in the PCI Express slot. If so, you will need to remove that graphics card and replace it with the GeForce GTX TITAN X graphics card. If you do not have a graphics card, this means that your motherboard has on-board graphics (there is a graphics chip installed on your motherboard or integrated in the motherboard chipset). If this is the case, there is no action that needs to be taken before installing your new graphics card. Installing the GeForce Graphics Card Hardware Installation 3 Remove any existing graphics card (if there is one). Save hardware (such as screws and brackets) to use when installing the NVIDIA graphics card. ! Attention: If your system has been running for a period of time prior to opening the panels, it is very important that you wait until the graphics card in your system has cooled before taking the card out of the system. Graphics cards get very hot when they have been operating for any length of time. 4 Remove two adjacent slot covers if you do not have a graphics card installed. Because there are so many different computer systems on the market, the procedure to install the GeForce GTX TITAN X graphics card can vary from system to system. Use the following instructions as a guideline and consult the documentation for your computer system for any further information on your individual system. Note: It is important that all power to the computer be disconnected before you install the graphics card. Discharge your body’s static electricity by touching a grounded surface before touching the graphics card. A grounded surface is the computer chassis, or some other surface you know to be grounded. Use the following procedure to install the GeForce GTX TITAN X graphics card into your computer system. 1 Turn off your computer and monitor and disconnect the power cord. Depending on your computer system, you may need to disconnect the cable going to the back of your system. Mark the cables so you can make sure you reconnect them properly. 2 Open your computer by removing the cover/side panel. Refer to your computer documentation from the original manufacturer for assistance. 7 Note: The GeForce GTX TITAN X card is double-wide so it will require removing two slot covers. 8 03 Hardware Installation 5 Plug the GeForce GTX TITAN X graphics card into the Primary PCI Express x16 slot on your motherboard. This is often the slot closest to the CPU but may be the second or third slot. Look for the slot labeled ×16. It will likely be the only PCI Express slot with a retention lever on the end of the slot or the one closest to the CPU 9 Hardware Installation 6 Install a second GeForce GTX TITAN X graphic card (2-way SLI): a)Install the second GeForce card into the outer most PCI Express x16 slot on the motherboard. b)Connect the two GeForce GTX TITAN X cards together using the dual SLI bridge connector that came with your SLI-ready motherboard. 7 Install a third GeForce GTX TITAN X graphic card (3-way SLI): a)Install the third GeForce card into the middle PCI Express x16 slot on the motherboard. SLI Note: It is recommended that you install the graphics card into the primary PCI Express x16 slot. If you install the graphics card into the secondary slot, your system may not recognize the graphics card and there will be nothing displayed on the monitor. Also note that on some motherboard SBIOS, the physical location of the primary slot can be configured when there are more than one PCI Express x16 slots. If you are installing additional GeForce GTX TITAN X graphics cards for an SLI configuration, continue with step 6 (2-way SLI) or step 6 and 7 (3-way SLI). If you are only installing one GeForce card, go on to step 8. Note: All of the graphics cards in an SLI configuration must be identical. Therefore, you must have all GeForce GTX TITAN X graphics cards. b)Connect the three GeForce GTX TITAN X cards together using the tripple SLI bridge connector that came with your SLI-ready motherboard. SLI 10 03 Software Installation Software Installation 8 Connect one 6-pin and one 8-pin PCI Express auxiliary power connectors to the top edge of the GeForce GTX TITAN X graphics card. Note that the connectors and sockets on the graphics card have a unique shape and connect one way only. 9 Reinstall the cover on your computer and reconnect any cables that you removed earlier in the installation. 04 Software Installation With the hardware installed, it is now time to install the GeForce Experience software and the graphics driver. GeForce Experience Software Installation DisplayPort Connector (Qty Three) Supports single-lane transfer rates over a single cable. The interface is primarily used to connect a video source to a display device such as a computer monitor. HDMI (High-Definition Multimedia Interface) Connector Supports output of both video and audio from the PC to a high-definition television. DVI Connector Use this to connect a digital display. Note: If you are connecting a VGA display, you will need to obtain a DVI-to-VGA adapter, 1 Go to http://www.geforce.com/geforce-experience/download. to download GeForce Experience software. 2 Accept the NVIDIA software license agreement by selecting AGREE AND CONTINUE. 11 12 04 Software Installation Software Installation The GeForce Experience software begins to install. NVIDIA Driver Installation 13 To install/update your graphics driver, use the newly installed GeForce Experience. GeForce Experience automatically checks NVIDIA servers for the latest GeForce drivers each day, and notifies users if a new driver is available 1 Open GeForce Experience and select the Drivers tab. 2 Select Download driver. 3 Select Close to finish the installation. Your GPU driver begins to download. 14 04 Software Installation 3 Select Express installation when the download finishes. Configuring SLI 15 05 Configuring SLI CONFIGURING GeForce Express begins to install the graphics driver. Note: It may take several minutes for the installation to take place. Your screen may go blank for a few seconds one or more times during installation. This is normal. 4 Click CLOSE when the driver install completes. SLI is a revolutionary technology developed by NVIDIA that allows you to connect identical GeForce graphics cards together to deliver increased performance. You can enable SLI by either clicking on the SLI capable system balloon in the system tray or by going to the NVIDIA Control Panel. Note: You must have an SLI-ready motherboard and 2 or 3 identical SLI-ready GeForce graphics cards installed in your PC in order to enable SLI. Accessing the NVIDIA Control Panel 1 To access the NVIDIA Control Panel, you can right-click the Windows desktop and select NVIDIA Control Panel from the menu. Other ways to access the NVIDIA Control Panel depends on the operating system. Note: Visit www.nvidia.com/support to access our 24 x 7 x 365 online support system. GeForce customers purchasing NVIDIA-branded products also have access to toll free technical support at 1-800-797-6530 from 8:00AM-5:00PM Pacific Time, M-F. The technical support line is accessible from the U.S. and Canada only. >> Windows 8 Using a mouse, point to the upper-right corner of the screen, click Settings Control Panel Hardware and Sound and select the NVIDIA Control Panel icon. >> Windows 7 Go to Start Control Panel Hardware and Sound and select the NVIDIA Control Panel icon. 16 05 Configuring SLI Enabling / Disabling SLI 1 Once you have the NVIDIA Control Panel open, click on Configure SLI, Surround, PhysX in the left task pane. 2 Select from the following multi-GPU configurations: Configuring HDMI 17 06 CONFIGURING HDMI >> Maximize 3D performance Select this mode when you want your graphics cards to work together to increase your rendering performance and image quality. >> Acivate all displays Activate all displays disables SLI and activates all connected displays (heads). >> PhysX settings PhysX settings switches which GPU runs PhysX and can also dedicate a GPU to PhysX only. Connecting your HDTV via HDMI allows you to output both digital audio and video from your graphics card to an HDTV. Enabling Audio Over HDMI If you are connecting to your display over HDMI, you may need to set the HDMI output to be your default audio device. In Windows 8, select Start Control Panel Sound. On the Playback tab, select your HDMI display and select Set Default. >> Disable SLI Default Selection. 3 Click Apply. In Windows 7, select Start Control Panel Sound. On the Playback tab, select your HDMI display and select Set Default. Congratulations! Your GeForce graphics card(s) is now ready to use! For detailed instructions on using the NVIDIA Control Panel, consult the Control Panel User’s Guide found at www.geforce.com/drivers (select your driver, then click on Documentation to download the User’s Guide). 18 06 Configuring HDMI Features 19 07 FEATURES >> NVIDIA Maxwell™: This is NVIDIA’s most advanced architecture ever, delivering incredible performance and unmatched power efficiency. Plus, it offers cutting-edge features like advanced sampling and Dynamic Super Resolution technology that delivers 4K fidelity—even on 1080p displays. >> GeForce® Experience™: Ensures the best gaming experience, the day a game releases, by automatically updating your game-ready drivers. Plus, it allows users to optimize the game settings to their PC with a single click. GeForce Experience also includes NVIDIA ShadowPlay™ that lets you capture and share your favorite gaming moments. >> Multi-Frame sampled Anti-Aliasing (MFAA): MFAA delivers a 30% performance boost while maintaining smooth, high-quality edges by alternating sample calculations across each frame and each pixel. >> Dynamic Super Resolution (DSR): This innovative feature can delivers 4K fidelity to 1080p displays for exceptional detail and image quality. >> Voxel Global Illumination (VXGI): Part of the NVIDIA GameWorks™ library for developers, VXGI accelerates dynamic lighting effects for a truly immersive, cinematic experience. >> NVIDIA GameStream™1: GeForce GPU support for NVIDIA PhysX technology, enabling a totally new class of physical gaming interaction for a more dynamic and realistic experience with GeForce. >> NVIDIA G-SYNC™-Ready2: NVIDIA G-SYNC monitors feature revolutionary NVIDIA technology that eliminates screen tearing while also reducing input lag. The result is a smoothest, fastest, and most responsive gaming monitor experience ever seen. 20 07 Features >> DirectX 12 Support: Support for the latest Microsoft DirectX API to enable next-generation gaming. >> NVIDIA GPU Boost™ 2.0: Dynamically maximizes clock speeds based on workload and allows enthusiast-class controls such as temperature target and fan controls, extra over-voltage headroom, and optimizations for water-cooling solutions. This allows gamers to push performance to new levels. >> NVIDIA Adaptive Vertical Sync: Dynamically enable vertical sync based on your current frame rates for the smoothest gaming experience. >> NVIDIA CUDA™: Unlock the power of the GPU’s processor cores to accelerate demanding tasks such as video transcoding, physics simulation, ray tracing, and more, delivering incredible performance improvements over traditional CPUs. >> DisplayPort: Drive the latest DisplayPort panels with support for resolutions up to 4096x2160. >> HDMI3: Support for HDMI includes 4K resolution at 60 Hz, GPUaccelerated Blu-ray 3D support, x.v.Color, HDMI Deep Color, and 7.1 digital surroundsound. >> Dual-link DVI: Drive flat-panel displays up to 2560x1600 resolution over a DVI connector. >> PCI Express 3.0: This card is designed for the new PCI Express 3.0 bus architecture, offering the highest data transfer speeds for the most bandwidth-hungry games and 3D applications. It also maintains backwards compatibility with existing PCI Express motherboards for the broadest support. Compliances 08 COMPLIANCES The NVIDIA GeForce GTX TITAN X graphics card is compliant with the following regulations: >> Federal Communications Commission (FCC) >> Industry Canada (IC) >> Conformité Européenne (CE) >> Australian Communications and Media Authority (C-tick) >> Voluntary Control Council for Interference (VCCI) >> Bureau of Standards Metrology and Inspection (BSMI) >> Korean Certification (KC) >> Underwriters Laboratories (UL, cUL) >> ISO 9241-307 Visual Display Ergonomics UNITED STATES 1.NVIDIA GameStream requires an NVIDIA GameStream-ready device. 2.NVIDIA G-SYNC requires an NVIDIA G-SYNC-ready monitor. 3.Blu-ray 3D playback requires the purchase of a compatible software player from CyberLink, ArcSoft, Corel, or Sonic. Upgrade your GPU to full 3D capability with NVIDIA 3DTV Play software, enabling 3D gaming, picture viewing and 3D web video streaming. See www.nvidia.com/3dtv for more details 21 Federal Communications Commission (FCC) NVIDIA CORP Model: PG600 This equipment has been tested and found to comply with the limits for a Class B digital device, pursuant to Part 15 of the FCC Rules. These limits are designed to provide reasonable protection against harmful interference in a residential installation. This equipment generates, uses and can radiate radio frequency energy and, if not installed and used in accordance with the instructions, may cause harmful interference to radio communications. 22 08 Compliances Compliances However, there is no guarantee that interference will not occur in a particular installation. If this equipment does cause harmful interference to radio or television reception, which can be determined by turning the equipment off and on, the user is encouraged to try to correct the interference by one or more of the following measures: JAPAN 23 Voluntary Control Council for Interference (VCCI) >> Reorient or relocate the receiving antenna. >> Increase the separation between the equipment and receiver. >> Connect the equipment into an outlet on a circuit different from that to which the receiver is connected. >> Consult the dealer or an experienced radio/TV technician for help. CANADA Industry Canada (IC) This Class B digital apparatus complies with ICES-003 Cet appareil numérique de la classe B est conforme à la norme NMB-003 du Canada. Operation is subject to the following two conditions: (1) this device may not cause interference, and (2) this device must accept any interference, including interference that may cause undesired operation of the device. This is a Class B product based on the standard of the VCCI Council. If this is used near a radio or television receiver in a domestic environment, it may cause radio interference. Install and use the equipment according to the instruction manual. KOREA Radio Research Agency (RRA) EUROPEAN UNION European Conformity; Conformité Européenne (CE) KCC-REM-NVA-PG600 This device complies with the EMC Directive for Class B, I.T.E equipment. AUSTRALIA & NEW ZEALAND Australian Communications and Media Authority (C-tick) This product meets the applicable EMC requirements for Class B, I.T.E equipement B급 기기(가정용 방송통신기기) 이 기기는 가정용(B급)으로 전자파적합등록을 한 기기로서 주로 가정에서 사용하는 것을 목적으로 하며, 모든 지역에서 사용할 수 있습니다. Class B Equipment (For Home Use Broadcasting & Communication Equipment) This equipment is home use (Class B) electromagnetic wave suitability equipment and to be used mainly at home and it can be used in all areas. 24 08 Compliances Compliances TAIWAN COMPLIANCE Notice Bureau of Standards, Metrology and Inspection (BSMI) This device complies with CNS 13438 (2006) Class B SAFETY Underwriters Laboratories (UL) 25 ALL NVIDIA DESIGN SPECIFICATIONS, REFERENCE BOARDS, FILES, DRAWINGS, DIAGNOSTICS, LISTS, AND OTHER DOCUMENTS (TOGETHER AND SEPARATELY, “MATERIALS”) ARE BEING PROVIDED “AS IS.” NVIDIA MAKES NO WARRANTIES, EXPRESSED, IMPLIED, STATUTORY, OR OTHERWISE WITH RESPECT TO THE MATERIALS, AND EXPRESSLY DISCLAIMS ALL IMPLIED WARRANTIES OF NONINFRINGEMENT, MERCHANTABILITY, AND FITNESS FOR A PARTICULAR PURPOSE. Information furnished is believed to be accurate and reliable. However, NVIDIA Corporation assumes no responsibility for the consequences of use of such information or for any infringement of patents or other rights of third parties that may result from its use. No license is granted by implication or otherwise under any patent or patent rights of NVIDIA Corporation. Specifications mentioned in this publication are subject to change without notice. This publication supersedes and replaces all information previously supplied. NVIDIA Corporation products are not authorized for use as critical components in life support devices or systems without express written approval of NVIDIA Corporation. Trademarks NVIDIA, the NVIDIA logo, CUDA, GeForce, GeForce GTX, GeForce Experience, GigaThread, Lumenex, PureVideo, and PhysX Technology are trademarks or registered trademarks of NVIDIA Corporation. Other company product names may be trademarks of the respective companies with which they are associated. Copyright © 2014 NVIDIA Corporation. All rights reserved. www.nvidia.com