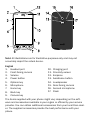
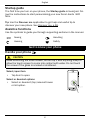
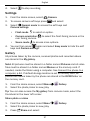
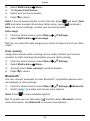
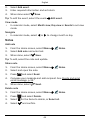
1
®
Doro Liberto 820 Mini
English
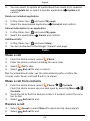
1
15
12
2
11
14
13
3
16
17
10
4
9
5
6
7
8
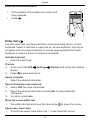
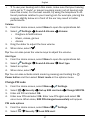
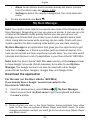
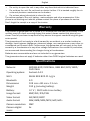
Note! All illustrations are for illustrative purposes only and may not
accurately depict the actual device.
English
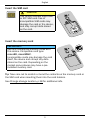
1. Headset port
2. Front-facing camera
3. Volume
4. Power button
5. Options key
6. Microphone
7. Home key
8. Back key
9. Camera key
10.
11.
12.
13.
14.
15.
16.
17.
Charging port
Proximity sensor
Earpiece
Assistance button
Loudspeaker
Rear-facing camera
Second microphone
Flash
The items supplied with your phone might vary depending on the software and accessories available in your region or offered by your service
provider. You can obtain additional accessories from your local Doro dealer. The supplied accessories provide the best performance with your
phone.
English
Contents
Congratulations on your purchase ............................................................... 1
Get started..................................................................................................... 1
Insert memory card, SIM card and battery.......................................... 1
Charge the phone.................................................................................. 3
Turn the phone on and off .................................................................... 4
Screen lock ............................................................................................ 5
Startup guide ......................................................................................... 6
Assistive functions................................................................................. 6
Get to know your phone ................................................................................ 6
Handle your phone
......................................................................... 6
Use the phone keys............................................................................... 7
Home screen ......................................................................................... 8
Home screen shortcuts......................................................................... 9
Lock screen............................................................................................ 9
Application list ..................................................................................... 10
Status and notifications bar ...............................................................11
Enter text
.......................................................................................12
Screenshot........................................................................................... 14
Phone settings..................................................................................... 14
Wireless networks (Wi-Fi)....................................................................18
Software update ..................................................................................19
Battery performance ...........................................................................20
Dock mode................................................................................................... 21
My Doro Manager........................................................................................22
Download the application ...................................................................22
Connect a helper to a Doro Liberto 820 Mini user..........................23
Doro Selection ............................................................................................. 24
Google ........................................................................................................ 24
Google Play................................................................................................. 24
Calls..............................................................................................................26
Make a call...........................................................................................26
Make a call from contacts ..................................................................26
Receive a call.......................................................................................26
Call options .......................................................................................... 27
Call log..................................................................................................28
Voicemail..............................................................................................28
®
™
™
English
SOS calls ..............................................................................................29
Contacts .......................................................................................................29
Add new contact ..................................................................................29
Import contacts ................................................................................... 31
ICE (In Case of Emergency)
................................................................... 31
Messages.....................................................................................................32
Text and picture messages .................................................................32
E-mail ...................................................................................................33
Camera.........................................................................................................36
Take a picture ......................................................................................36
Record a video.....................................................................................36
Settings ................................................................................................ 37
Gallery .................................................................................................. 37
Assistance button........................................................................................38
Connectivity ................................................................................................. 41
Network services and costs................................................................ 41
Data connectivity................................................................................. 41
Bluetooth ............................................................................................42
Network setup .....................................................................................43
Flight mode ..........................................................................................43
Connect the phone to a computer .....................................................44
Internet (web browser) ................................................................................45
Use the web browser...........................................................................45
Additional applications................................................................................46
Google apps.........................................................................................46
Music....................................................................................................46
FM Radio.............................................................................................. 47
Alarm ....................................................................................................48
Calendar...............................................................................................48
Notes ....................................................................................................49
Torch.....................................................................................................50
Timer ....................................................................................................50
Calculator.............................................................................................50
Sound recorder....................................................................................50
Code safe ............................................................................................. 51
Reset the phone ..................................................................................52
Status icons .........................................................................................53
®
English
Safety instructions.......................................................................................54
Network services and costs................................................................54
Operating environment .......................................................................54
Medical units .......................................................................................54
Areas with explosion risk ....................................................................55
Li-ion battery ........................................................................................55
Protect your hearing ............................................................................55
Emergency calls...................................................................................56
Vehicles................................................................................................56
Care and maintenance ...............................................................................56
Warranty....................................................................................................... 57
Specifications .............................................................................................. 57
Copyright and other notices................................................................58
Hearing aid ..........................................................................................59
Specific Absorption Rate (SAR) ..........................................................59
Declaration of Conformity ...................................................................59
FCC ...............................................................................................................59
FCC notice............................................................................................59
RF exposure information (SAR) ..........................................................60
Care and maintenance ....................................................................... 61
English
Congratulations on your purchase
Packed with support features like a built-in coach and My Doro Manager,
this pocket-friendly, big-hearted smartphone is perfect for first-time users.
It can be remotely managed by someone you trust, and the Assistance
button offers extra security. With Doro Liberto 820 Mini it’s easy to access your main contacts and functions right from the home screen. And
when placed in the charging cradle, watch your pictures come to life in a
smile-inducing slideshow. For more information about accessories or other Doro products please visit www.doro.com.
®
Get started
IMPORTANT!
Turn off the phone and disconnect the charger before removing the
battery cover.
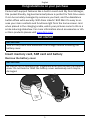
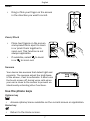
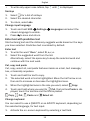
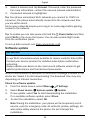
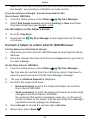
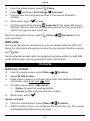
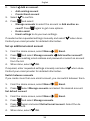
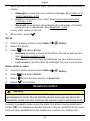
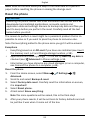
Insert memory card, SIM card and battery
Remove the battery cover
IMPORTANT!
Be careful not to damage your fingernails when you remove the battery
cover. Do not bend or twist the battery cover excessively as it may be
damaged.
1
English
Insert the SIM card
8
35
23 12
6
89 053
10 64
8
33
CAUTION
This device accepts micro SIM
or 3FF SIM card. Use of
incompatible SIM cards may
damage the card or the device,
and may corrupt data stored
on the card.
S IM
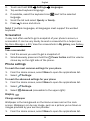
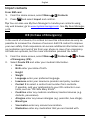
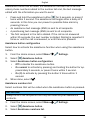
Insert the memory card
IMPORTANT!
Use only compatible memory cards with
this device. Compatible card type:
microSD, microSDHC.
Incompatible cards may damage the card
itself, the device and corrupt any data
stored on the card. Depending on the
market some phones may have a preinstalled memory card.
GB
GB
Tip: Take care not to scratch or bend the contacts on the memory card or
the SIM card when inserting them into the card holders.
See Change storage location, p.18 for additional info.
2
English
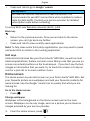
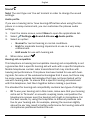
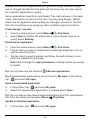
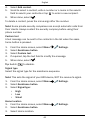
Insert the battery
Charge the phone
CAUTION
Only use batteries, chargers and accessories that have been approved
for use with this particular model. Connecting other accessories may
be dangerous and may invalidate the phone's type approval and
guarantee.
B
A
3
English
When the battery is running low,
heard.
1.
is displayed and a warning signal is
Connect the mains adapter to a wall socket and to the charging
socket (A) or place the device in the cradle (B).
2. When the phone is fully charged,
is shown.
If the phone is turned off during charging, the phone is still charging.
Press the ! Power button to view charging status.
Save energy
When you have fully charged the battery and disconnected the charger
from the device, unplug the charger from the wall socket.
Note! To save power, the display is locked after a while. Press the !
Power button to activate the screen.
Turn the phone on and off
Turn on the phone
1. Press and hold the ! Power button until the phone vibrates.
2. Enter your SIM card PIN if requested,
then select
to confirm. Select
to
delete character.
3. Wait for the phone to start.
Note! When turning on your phone, the
installed applications may need to be
updated and this can take a few minutes
depending on Internet connection. It is
preferable to use a Wi-Fi connection to
reduce data costs and to increase speed.
If the wrong PIN code is entered several times Enter PUK is displayed
and you need to enter your PUK code (Personal Unblocking Key). Contact
your service provider for more information about PIN and PUK code.
See Change PIN code, p.17 for information about changing the PIN code.
4
English
Turn off the phone
1. Press and hold the ! Power button until the options menu opens.
2. In the options menu, select Power off
OK.
Screen lock
The screen lock prevents unwanted actions on the touch screen when
you are not using the phone. Your display is locked when left idle for a
set period of time, depending on the set screen timeout. See Phone settings, p.14
Activate and unlock the screen
.
1. Briefly press the
2. Slide
up to unlock.
Lock the screen manually
• Briefly press the ! Power button.
Screen lock settings
1. To replace the screen lock (you can’t remove the screen lock entirely) go to
Menu to open the applications list.
2.
Select
Settings
select Screen lock
:
up with your fin• Slide (default setting) to unlock you slide
ger (no security).
• Pattern to unlock you trace a pattern with your finger on the
screen (medium security).
Note! You can trace over the dots in any order, but you can
trace over the same dot only once. The pattern must cover at
least four dots (medium to high security).
•
Passcode to unlock you type a PIN code.
IMPORTANT!
It makes sense to choose a PIN code or a pattern that is easy to
remember, but try to make it difficult enough so that others can’t guess
it. If you activate it, keep the code/pattern in a safe place, since it will
be needed if you need to reset. To avoid having to remember codes
and patterns, it is recommended that you keep the default setting
Slide.
5
English
Startup guide
The first time you turn on your phone, the Startup guide is launched. Follow the instructions to start personalising your new Doro Liberto 820
Mini.
®
Tip: Use the Discover me application to get help and useful tip to
discover your new phone. See Discover me, p.18.
Assistive functions
Use the symbols to guide you through supporting sections in the manual.
Seeing
Handling
Hearing
Safety
Get to know your phone
Handle your phone
CAUTION
Avoid scratching the touch screen, do not tap it with anything sharp or
allow the touch screen to come into contact with water. Do not touch
the screen if the glass is cracked or shattered.
Select/open item
• Tap item to open.
Select or deselect options
• Select or deselect (tap) relevant boxes
or list option.
6
English
Scroll
•
Drag or flick your finger on the screen
in the direction you want to scroll.
Zoom/Pinch
•
•
Place two fingers on the screen
and spread them apart to zoom
in or pinch them together to
zoom out. This function is not
always applicable.
@
@
to zoom
If available, select
in or
to zoom out.
Sensors
Your device has sensors that detect light and
proximity. The sensors adjust the brightness
of the screen, if set to automatic. It also turns
the touch screen off during voice calls when
your ear is close to the screen to prevent unintentionally activating other functions.
Use the phone keys
Options key
•
Access options/menu available on the current screen or application.
Home key
•
Return to the Home screen.
7
English
•
™
Press and hold to go to Google search.
IMPORTANT!
You need an Internet connection to use this service. It is
recommended to use Wi-Fi connections when available to reduce
costs for data traffic. Contact your service provider for detailed
subscription costs before activating.
To set up Wi-Fi, see Wireless networks (Wi-Fi), p.18.
Back key
•
•
Return to the previous screen. Once you are back to the Home
screen, you can’t go back any further.
Press and hold to view recently used applications.
Note! To fully close some third party applications, you may need to press
and select Exit or similar in the running application.
Soft keys
®
Android smart phones like your Doro Liberto 820 Mini, as well as most
Android applications, feature common icons. Many icons that you see onscreen are actually buttons on the touchscreen. If you don’t see the text,
images or information that you want, try to touch the screen or to tap an
icon for a pick list or to reach another menu.
Home screen
®
The Home screen is your start screen on your Doro Liberto 820 Mini. Set
your favourite picture as a wallpaper and add your favourite contacts for
quick access. Use the Google search bar to quickly find what you are
looking for.
™
Go to the Home screen
.
• Press
Change wallpaper
Wallpaper is the background on the Home screen and on the Lock
screen. Wallpaper can be any image, such as a picture you’ve taken or
images provided by your service provider.
1.
From the Home screen, press
.
8
English
2.
Select Change wallpaper.
3.
4.
Select All pictures or Favourites and
.
Select the picture you want and crop it to select the portion that you
want for the Home screen.
When done, select
.
5.
Settings
Tip: You can also select Menu
Change to change wallpaper.
Display
Wallpaper
Home screen shortcuts
You can add shortcuts directly on the Home screen for the items you use
the most.
. The shortcuts can be quick dials to contacts that you frequently call or
text, a favourite function such as the Magnifier or your most used application from Google Play.
Add quick dials and application shortcuts
1.
2.
From the Home screen, select .
Select what to add as shortcut from the pick list.
3.
When done, select
.
Note! When all shortcuts are in use you need to delete one of them
before you can replace it with a new shortcut.
Replace or delete shortcuts
1.
2.
3.
4.
.
From the Home screen, select
Select Remove shortcut.
Tap the shortcut that you want to delete or replace.
Select what to do from the pick-list.
5.
When done, select
.
Lock screen
The lock screen is the screen shown when waking the phone from screen
lock. The display shows time and date as well as any notifications like
missed calls or messages. To set up the screen lock and change Lock
, p.14.
screen wallpaper, see Display
9
English
Application list
Application is another word for program or software, a common way to
shorten the term application is App. The applications list contains the applications that come pre-installed on your Doro Liberto 820 Mini and any
you choose to download. The applications list extends beyond the regular
screen width, so tap on the number tabs at the bottom to change screen
within the applications list.
®
Open the applications list
• From the Home screen, select Menu.
Close the applications list
or .
• Press
Applications list settings
1.
2.
3.
From the Home screen, press
.
Select Home screen settings
Select Shortcuts and widgets.
• Swipe to enable or disable swiping on the screen.
• Weather forecast display to set how to display the weather
forecast.
Note! If needed, allow to turn on location services.
4.
5.
6.
Select App. menu settings.
• Drag and drop to enable drag and drop on long press. This allows you to touch and hold applications on-screen, slide your
finger to the item's new location, lift your finger to drop it in its
new place.
• Application sorting to arrange your applications by download
date, alphabetically or by your most used apps.
Select Easy mode to resize the application icons and make text easier to read.
Select Themes (not available with Easy mode enabled) to change
the screen colour theme. Select Change theme and swipe the
screen horizontally to see the available themes.
10
English
Contextual help
Some applications provide contextual help that guide you step by step
through the most used functions within that application. When you
launch the application, simply select if you want the Step by step guide or
if you want to Skip it. If you check Do not ask me again, you will not get
the help option the next time you start the application.
Reactivate the contextual help
1.
2.
3.
From the Home screen, select Menu to open the applications list.
Select
Settings.
Select Contextual help
Reset contextual help.
Status and notifications bar
The status bar, located at the top of your screen, shows signal strength,
ongoing and new applications as well as battery status. You are notified
when something new happens, like new a message or missed call. The
notification panel contains more information and from there you can view
notifications about applications or enable quick phone settings like Wi-Fi
or Flight mode.
Open the notifications panel
1.
Drag the status bar downwards:
• To view updates or information about
an application, select it from the Notifications list.
• To clear the list, select X.
• To enable or disable connectivity status,
select Wi-Fi, Bluetooth, Data connection or Flight mode in the top menu.
in the upper right
• Use the shortcut
corner to reach the Settings and the
Advanced.
11
English
Close the notifications panel
•
•
At the bottom of the status bar, select and
drag upwards.
Press .
Enter text
You can enter text, numbers and other characters using the on–screen
keyboard. Select a text field to open the on–screen keyboard. You can also adjust your on-screen keyboard in various ways eg adjust the haptic
feedback or select a theme to improve readability.
Activate keyboard
• Select the text field.
Themes
Settings
1. Touch and hold 123
theme.
2. Press
to save and return.
Themes and check the desired
Select character
• Select the desired character.
Special characters and numerals
1. Select 123 for more characters.
2. Select the desired character or select {&= to view additional
characters.
3. To return, select abc.
Move the cursor within text
•
Tap within the text and move the blue arrow
Upper case, lower case
• To write one upper case letter, tap
12
to move the cursor.
in the lower left corner.
English
•
To write only upper case letters, tap
until
is displayed.
Smileys
1.
2.
3.
for a list of smileys.
Select
Select the desired character.
To return, select abc.
Change input language
1.
2.
Touch and hold 123
Settings
chosen language to enable.
Press
to save and return.
Languages and select the
Enter text with predictive text
Start entering text and the dictionary suggests words based on the keys
you have selected. Predictive text is enabled by default.
Enter text
1. To write the word “Doro”, select D, o, r, o.
2. Select the suggested word from the list.
Alternatively, select the space key to keep the selected word and
continue with the next word.
Cut, copy and paste
Cut, copy, select all, and paste features inside an email, text message/
box, or basically anywhere.
1.
2.
Touch and hold the text to copy.
The selected word or text is highlighted. Move the half arrow on either end to increase or decrease the highlighted area.
3.
When the highlighted area is the size you want, select
4.
Touch and hold where you want to
Cut, the text box Paste is displayed, touch the text box and the text is pasted.
Copy,
Cut,
, Paste and
Copy.
Select all.
Change keyboard
You can select to use a QWERTY or an AZERTY keyboard, depending on
the selected language, for text input.
1.
Activate the on–screen keyboard by selecting a text field.
13
English
2.
3.
Touch and hold 123
Settings
Tap wanted keyboard language.
4.
If available, select the keyboard icon
next to the selected
language.
Scroll the list and select Qwerty or Azerty.
Press
to save and return.
5.
6.
Languages.
Note! If multiple languages, all languages must support the wanted
keyboard.
Screenshot
It easy and often useful to get a snapshot of your phone’s screen, a
screenshot. It can be very handy to send a screenshot to a helper (see
My Doro Manager, p.22). View the screenshots in My gallery, see Gallery,
p.37.
Take a screenshot
1. Find the screen you want to get a snapshot of.
2. Simultaneously press and hold the ! Power button and the volume
minus key on the right side of the phone.
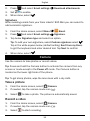
Phone settings
To reach the most common settings for your phone
1. From the Home screen, select Menu to open the applications list.
Settings:
2. Select
To reach the advanced settings for your phone
1. From the Home screen, select Menu to open the applications list.
Settings.
2. Select
3.
Select
Advanced (accessible to the upper right):
Display
Change wallpaper
Wallpaper is the background on the Home screen and on the Lock
screen. Wallpaper can be any image, such as a picture you’ve taken or
images provided by your service provider.
1.
From the Home screen, select Menu to open the applications list.
14
English
2.
3.
4.
Select
Settings
Display
Wallpaper
Home screen or
Lock screen
Change.
Select a picture from All pictures or tap on it to get Favourites.
Select the picture you want and crop it to select the portion that you
want for the Home/Lock screen.
5. When done, select
.
Select Reset to return to the original Wallpaper (default setting).
from the Home screen to change wallpaper.
Tip: You can also press
Text size
1. From the Home screen, select Menu to open the applications list.
Settings
Display
Text size
Normal/Large/Ex2. Select
tra large.
3.
When done, select
.
Brightness
You can adjust the brightness of the display.
1.
2.
3.
4.
From the Home screen, select Menu to open the applications list.
Select
Settings
Display.
Select Brightness and switch Automatic to
to adjust the screen
brightness manually.
Drag the slider, the higher value, the better contrast.
5.
When done, select
.
Tip: To save battery, set the brightness to Automatic.
Screen timeout
Your display is locked when left idle for a set period of time, depending
on set screen timeout.
1.
2.
Settings
Display
From the Home screen, select Menu
Screen timeout.
In Screen timeout delay select the time delay until the screen lock is
on.
15
English
Sound
Note! The alert type can’t be set to silent in order to change the sound
settings.
Audio profile
If you use a hearing aid or have hearing difficulties when using the telephone in a noisy environment, you can customise the phones audio
settings.
1.
2.
3.
From the Home screen, select Menu to open the applications list.
Settings
Sound & Volume
Audio profile.
Select
Select an option:
• Normal for normal hearing in normal conditions.
• High for moderate hearing impairment or use in a very noisy
environment.
• HAC mode for use with hearing aid.
4.
When done, select
.
Hearing aid compatible
This telephone is hearing aid compatible. Hearing aid compatibility is not
a guarantee that a specific hearing aid will work with a specific telephone.
Mobile telephones contain radio transmitters that may interfere with
hearing aid performance. This phone has been tested for use with hearing aids, for some of the wireless technologies that it uses, but there may
be some newer wireless technologies that have not been tested yet for
use with hearing aids. To ensure that a specific hearing aid works well
with this telephone, test them together before making a purchase.
The standard for hearing aid compatibility contains two types of ratings:
•
M: To use your hearing aid in this mode, make sure that your hearing
aid is set to "M-mode" or acoustic coupling mode, and position the
telephone's receiver near the hearing aid’s built-in microphone. For
the best results, try using the telephone in different positions relative to your hearing aid—for example, placing the receiver slightly
above the ear may result in better performance for hearing aids with
microphones positioned behind the ear.
16
English
•
T: To use your hearing aid in this mode, make sure that your hearing
aid is set to "T-mode" or telecoil coupling mode (not all hearing aids
have this mode). For the best results, try using the telephone in different positions relative to your hearing aid—for example, placing the
receiver slightly below or in front of the ear may result in better
performance.
Volume
1. From the Home screen, select Menu to open the applications list.
2. Select
Settings
Sound & Volume
Volume:
• Ringtone & Notifications
• Music, videos, games
• Alarms
3. Drag the slider to adjust the tone volume.
4.
When done, select
.
Tip: You can also press the volume keys to adjust the volume.
Alert type
1. From the Home screen, select Menu to open the applications list.
2. Select
Settings
Sound & Volume
Alert type.
3. Select an option.
4.
When done, select
.
Tip: You can also activate silent mode by pressing and holding the !
Power button and then select Silent mode in the options menu.
Change PIN code
1.
From the Home screen, select Menu
Settings.
2.
3.
4.
Select
Security
Set up SIM card lock
Change SIM PIN.
Enter old PIN and select OK.
Enter new PIN and select OK. Enter new PIN again and select OK
once more. When done, SIM PIN changed successfully will appear.
PIN code options
1.
From the Home screen, select Menu
2.
Select
Security
Lock SIM card:
17
Settings.
English
•
Check to activate PIN code. You need to enter the PIN code
every time the phone is started.
Uncheck to deactivate PIN code.
•
WARNING
If the SIM card is lost/stolen it is unprotected.
Change storage location
If you insert a compatible external memory (micro SD card) into your Doro
Liberto 820 Mini, it is recommended you change the default storage location. This allows you to save more files on your device, like pictures
and videos.
®
1.
2.
3.
Settings.
From the Home screen, select Menu
Select Storage management
Default storage:
• Internal memory
• SD-card
.
When done, select
Note! This option is only available when a compatible external memory is
inserted in the device.
Discover me
Get guided help and discover the basics of your phone.
•
From the Home screen, select Menu
er me.
Settings
Discov-
Wireless networks (Wi-Fi)
®
To get the most out of your Doro Liberto 820 Mini, you need Internet access. It is recommended to use Wi-Fi connections when available to reduce costs for data traffic. Contact your service provider for detailed
subscription costs before activating.
Note!
is shown in the status bar when connected.
Settings
Wi-Fi.
1.
From the Home screen, select Menu
2.
Switch
to enable. Available networks are displayed in a list. The
networks can be open or secured ( ).
18
English
3.
4.
Select a network and tap Connect. If secured, enter the password.
For more information, contact the relevant network administrator.
Connected network is highlighted.
Tip: Your phone remembers Wi-Fi networks you connect to. If Wi-Fi is
turned on, the phone automatically connects to the network next time
you are within reach.
Some open networks require you to log in to a web page before gaining
access to the network.
Tip: To enable you can also press and hold the ! Power button and then
select Wi-Fi in the menu that opens. You can also enable flight mode
from the notification panel.
To set up data account, see Data connectivity, p.41.
Software update
IMPORTANT!
You need an Internet connection to use this service. It is recommended
to use Wi-Fi connections when available to reduce costs for data traffic.
Contact your service provider for detailed subscription costs before
activating.
Always update your device to the most recent software version to get
optimal performance and the latest enhancements.
When a new software is available, a notification message is shown in the
status bar. Select it to start downloading. The download time may vary
depending on Internet connection.
Check for software updates
1.
2.
3.
4.
Settings.
From the Home screen, select Menu
Select About device
System update
Update.
If new update, select Yes to start downloading the installation.
If no available software update, select Close.
To start the installation, select OK.
Note! During the installation, your phone will be temporarily out of
service, even for emergency calls. All contacts, photos, settings, etc.
will remain safely stored in the phone. Do not interrupt the
installation.
19
English
5.
Select OK to restart your phone. The restart may take a while, when
successfully completed use your phone as usual.
Battery performance
Information and statistics about your phone, like phone status, battery
usage and data usage are found in the About device menu.
1.
2.
Settings.
From the Home screen, select Menu
Select About device
Battery status.
• The Battery Percentage is shown.
• Tap More options and check Battery Percentage to hide the
current battery status at the top of the screen.
• Tap each item to view its details.
Improve battery performance
• Charge your phone often, preferably every day. Charging does not affect the lifetime of the battery.
• When not downloading data from the Internet, which is power consuming, disable data connections over mobile networks. Data is still
transmitted over wireless networks.
• Turn off Bluetooth and Wi-Fi when not needed. Use the connectivity
status in the status bar to disable the features.
• Synchronise your applications manually, like your email, calendar
and contacts.
• Use the Battery status menu in your device to see which applications use the most power.
• Lower the screen brightness level. See Phone settings, p.14.
• When in areas with no network coverage, turn off your device or activate the Flight mode. The device repeatedly scans for available networks which consumes power. See Flight mode, p.43.
• Use Doro original handsfree devices to listen to music. Handsfree
devices consume less battery than your device's own loudspeakers.
• Lock the screen when not in use, press the ! Power button and
your display goes to sleep. See Screen lock, p.5.
20
English
Dock mode
You may think of the dock mode as a a screensaver that turns your Doro
Liberto 820 Mini into a side-table clock, a photo frame, a music player
and more.
®
Turn Dock mode on and off
1. Dock mode is launched automatically when the device is placed in
the charging cradle.
Dock mode.
To launch it manually select Menu
2. Remove the device from the cradle to exit.
To exit whilst device is in the cradle press the Home key .
Dock mode menu
1. In Dock mode, select:
• Phone to make calls.
• Slideshow to use the device as a photo frame.
• Do not disturb to activate press once and simply press it again
to deactivate.
Note! Do not disturb is a helpful setting for when you do not
want to be disturbed, at night time or at meetings. All
notifications, alerts and calls are stopped from making any
noise, vibration or lighting up the phone screen. Please also
note that all network traffic will be switched off, so no incoming
or outgoing calls or messages is allowed. You can schedule
quiet hours to be repeated at the same time every day. Select
to enable or disable the sound of the alarm clock during Do not
disturb.
•
Music to select music to be played (mirrors 1 from the Music
app, see Music, p.46).
Note! If you like to fall asleep to music you can set the sleep
Music
Sleep timer to turn the music off
timer Settings
after you’ve fallen asleep.
1. Parts of what you see in the Dock fashion derive/originate from other
apps (in this case as replicas of Music Player and Alarm clock). To make
changes and delete content you must go to the source app (Music Player
and Alarm clock).
21
English
•
2.
Alarm to set alarms and to handle already set alarm (mirrors 2
from the Alarm app, see Alarm, p.48).
• Settings to select the display background, the clock style and
more.
To step backwards use Back .
My Doro Manager
Note! You need to have Internet access to use most of the features in My
Doro Manager. Depending on how you use your phone, it can use up a lot
of Internet bandwidth really quickly. Before you use your phone, we
strongly recommend that you contact your mobile operator about data
rates. Using data services while roaming can be costly. Check with your
mobile operator for data roaming rates before you use data roaming.
My Doro Manager is an application that gives you the opportunity to get
help from a helper i.e. a friend or relative (with an Android device). The
help can be carried out from anywhere (remote help). You can also watch
tutorials and discover a lot of possibilities in your Doro Liberto 820 Mini.
®
®
Note! Both the Doro Liberto 820 Mini user and any of the helpers needs
to have Google accounts (Gmail adresses) to be able to use My Doro
Manager. The Google account can also be used with other Google
products like YouTube, Google+, Google Play, and Google Drive.
™
Download the application
®
For the user (on the Doro Liberto 820 Mini)
™
If you already have a Google account connected to the
Doro Liberto 820 Mini
®
1.
2.
From the Home screen, select Menu
My Doro Manager.
Select account and tap First name to get the keyboard and enter
the user’s profile.
2. Parts of what you see in the Dock fashion derive/originate from other
apps (in this case as replicas of Music Player and Alarm clock). To make
changes and delete content you must go to the source app (Music Player
and Alarm clock).
22
English
Note! You must use the same first and last name as associated with
the Google account since verification is made on this.
™
™
If you do not have a Google account connected to the
Doro Liberto 820 Mini
®
1.
2.
From the Home screen, select Menu
My Doro Manager.
Select Add Google account and select Existing or New and follow
the instructions. See also Google , p.24.
™
For the helper (on the helper’s device)
1.
Go to
Play Store.
2.
Download the
er's device.
My Doro Manager helper application to the help®
Connect a helper to a Doro Liberto 820 Mini user
For the helper (on the helper's device)
1. Add/invite your Doro Liberto 820 Mini user by entering their Gmail
address.
2. Once the request has been sent from your helper device, go back to
the user’s device.
®
®
On the Doro Liberto 820 Mini
1.
From the Home screen, select Menu
My Doro Manager.
Tip: Can also be reached from the notification panel, drag down to
open the panel and select the My Doro Manager message.
2.
3.
4.
The pop up Relative Request is displayed.
Decide if the helper shall have:
• Read permission to grant the helper permission to read the
Doro Liberto 820 Mini.
• Write permission to grant the helper permission to write/make
changes to the Doro Liberto 820 Mini.
No personal information (messages, notes etc.) on the user’s
phone is visible to the helper, only the actual My Doro Manager
application and its settings are displayed.
Select Accept to access the remote help or Decline.
5.
When done, select Save
®
®
.
23
English
Doro Selection
The easlest way to look for applications is to use the Doro Selection.
Searches are made easier thanks to categories with a selection of apps
for such as home, digital life, news, health and wellness, finance etc. You
will also find apps Recommended by Doro as well as Recommended offered to you via My Doro Manager.
From the Home screen, select Menu
cated at the upper left corner and select:
•
•
•
•
•
Add new applications lo-
Recommended by Doro to scroll among some selected apps.
Recommended by Doro. Select a category and
Doro Selection
confirm with
.
Search on Google Play Store to reach
Play Store.
My applications to see the applications you have downloaded.
Recommended to see any recommendation sent to you via My Doro
Manager see My Doro Manager, p.22.
™
Google
™
To get the most out of your phone, you need to have a Google account.
It’s a convenient way to manage your phone’s applications, contacts, calendar events, reminders and more. You can also back up your information in case you should lose your phone.
™
Google Play
IMPORTANT!
You need an Internet connection to use this service. It is recommended
to use Wi-Fi connections when available to reduce costs for data traffic.
Contact your service provider for detailed subscription costs before
activating.
™
Note! You need to have a Google account to use Play Store. Your Gmail
account is also your Google Account, so you can use your same Gmail
username and password to use other Google products like YouTube,
Google+, Google Play, and Google Drive.
24
English
Browse the available applications and games through different categories or through the lists like Top paid and Top Free. You can also search
for a specific application or game.
Some applications need to be purchased. The cost is shown in the application description as well as if it is free. You pay using Google Wallet,
which can be registered when setting up a Google account or the first
time for a purchase or by using any other available payment method.
™
™
™
Create Google account
1.
2.
From the Home screen, select Menu
Play Store.
Select New and follow the instructions. If you already have an account, select Existing.
Download an application
1.
2.
3.
From the Home screen, select Menu
Play Store.
Find an item you wish to download by browsing categories or by using the search function.
Tap the item to view its details, and follow the instructions to complete the installation/purchase.
Note! Read through the App permissions carefully before you accept
to install.
Tip: You can also use the shortcut
Add new applications.
Tip: All downloaded applications can be found in My apps. In Play Store,
tap
and select My apps.
Open a downloaded application
1.
2.
and select My apps.
In Play Store, tap
Select the downloaded application. If needed select Open.
Tip: You can also access downloaded applications from the applications
list. From the Home screen select Menu
Play Store.
Update an installed application
1.
In Play Store, tap
and select My apps.
25
English
2.
You can select to update all applications that needs to be updated,
Update and
select Update all, or select a specific application
confirm.
Delete an installed application
1.
2.
and select My apps.
In Play Store, tap
Select the downloaded application
Uninstall and confirm.
Cancel subscription to an application
1.
2.
and select My apps.
In Play Store, tap
Select the application
Cancel and confirm.
Additional info
1.
2.
In Play Store, tap
and select Help.
You are re-directed to the Google Support web page.
™
Calls
Make a call
1.
2.
From the Home screen, select
Phone.
Enter the phone number including the area code.
3.
4.
Select
Select
Call to dial.
End call to end or cancel.
Tip: For international calls, use the international prefix + before the
country code. Touch and hold 0 until + is shown.
Make a call from contacts
1.
2.
3.
From the Home screen, select
Phone
Contacts.
From the Home screen you can also open by selecting Menu
Contacts.
Scroll the list to find the desired contact. If needed, select the number to dial.
Select
End call to end.
Receive a call
1.
2.
Select
Select
Accept or select Reject to reject directly (busy signal).
End call to end.
26
English
Call options
Volume control
• Use the volume keys to adjust the sound volume during a call. The
volume level is indicated on the display.
Mute
1.
During a call, select
2.
To disable, select
.
.
Dialer (tone sending)
1.
2.
3.
During a call, select
Enter number.
To close, select .
.
Loudspeaker
1.
2.
3.
During a call, select .
Speak clearly into the microphone at a maximum distance of 1 m.
Use + or – to adjust the loudspeaker volume.
To disable, select .
Hold
1.
During a call, press
2.
To return to the call, press
and select . Hold is displayed.
and select
.
Add call
1.
2.
3.
4.
and select . The first call is set on hold.
During a call, press
Enter a number or select a saved contact from Contacts.
Press
and select:
• Swap to return to the first call. To swap back to the other call,
repeat from step 3. The current number/contact is displayed.
• Merge calls to start a Conference call (group call). To add more
contacts, repeat from step 1.
• Split (when in group call) to split the group call. You can then
swap between the calls.
Press End call to end all active calls.
27
English
Headset
• Connect a headset to the headset socket. The internal microphone
in the phone is automatically disconnected.
CAUTION
Using a headset at high volume may damage your hearing. Adjust the
volume level carefully when using a headset.
Call log
1.
From the Home screen, select
2.
All calls are displayed in the list:
Incoming.
Select a number in the call log.
3.
Phone
Call log.
Missed,
Outgoing or
•
To call, select
•
To write and send a text message (SMS), select
•
To write and send an e-mail message, select
•
To edit an existing contact, press
•
To add as a new contact, select
•
To delete, press
•
Select
•
To view the history, press
.
.
.
.
.
and select Delete.
for the items to delete, or Select all.
and select View history.
Delete number/s
1.
From the Home screen, select
2.
3.
Press
Select
4.
Select
Phone
Call log.
and select Delete.
for the items to delete, or Select all.
and to confirm select Delete.
Voicemail
If your subscription includes an answering service, callers can leave a voicemail message when you cannot answer a call. Voicemail is a network
service and you may need to subscribe to it first. For more information
and for the voicemail number, contact your service provider.
28
English
1.
From the Home screen, select
2.
3.
Press
and select Call settings
Voicemail.
Check/enter the name and number to the service provider’s
mailbox
to save.
When done, select
4.
5.
Phone.
Call the voicemail by tapping
Voicemail in the upper left corner.
The first time you call, you will get instructions from the service provider to set up your own voicemail.
Tip: From the Home screen, select
your voicemail.
Phone
Voicemail to call
SOS calls
As long as the phone is switched on, you can always make an SOS call.
Enter the main local emergency number for your present location and seCall.
lect
Some networks accept calls to emergency numbers without a valid SIM
card. Contact your service provider for more information.
Contacts
Add new contact
1.
2.
3.
4.
5.
From the Home screen, select Menu
Contacts.
Select Add contact.
Enter name, number/s including area code and additional desired
information. See Enter text
, p.12.
To add a picture, select Add picture:
• Gallery to select an existing picture.
• Camera to take a picture with the camera.
When done, select
.
Search contacts
1.
From the Home screen, select Menu
2.
Start to enter a name or a number in the search bar
are displayed and filtered as you type.
29
Contacts.
. The results
English
3.
Select the correct match by tapping it.
Edit contact
1.
2.
3.
4.
From the Home screen, select Menu
Open an existing contact.
Select Edit.
Enter updates.
5.
When done, select
Contacts.
Save.
Add favourite
1.
2.
3.
4.
5.
From the Home screen, select Menu
Contacts.
Open an existing contact.
Select Edit.
Select
to add the contact as a favourite.
When done, select
.
Tip: The favourite-contacts are easily found with . To remove as
favourite, repeat step 1–3 and select
and
to confirm.
Send contact details
1.
2.
From the Home screen, select Menu
Open an existing contact.
3.
Press
and select
Share:
• Messages to send item in a picture message. See Create and
send messages, p.32.
• Email to send item in an e-mail. See Create and send email
message, p.35.
Contacts.
Delete contact
1.
From the Home screen, select Menu
2.
3.
Press
Select
and select Delete.
for the items to delete, or Select all.
4.
Select
to confirm.
30
Contacts
English
Import contacts
From SIM card
1.
From the Home screen, select Menu
2.
Press
Contacts
and select Import and confirm.
Tip: You can also use My Doro Manager to handle your contacts using
any web browser, go to www.mydoromanager.com. See My Doro Manager,
p.22.
ICE (In Case of Emergency)
In the event of a trauma, it is critical to have this information as early as
possible to increase the chances of survival. Add ICE contact to improve
your own safety. First responders can access additional information such
as medication and next of kin from your phone in case of an emergency.
All fields are optional, but the more information provided the better.
1.
2.
Contacts
In Case
From the Home screen, select Menu
of Emergency (ICE).
Select Create ICE and enter your medical information.
• Name
• Birth enter your date of birth.
• Height
• Weight
• Language enter your preferred language.
• Insurance enter your insurance provider and policy number.
• Contact 1 to select a contact and number from contacts.
If possible, add your relationship to your ICE contacts in contacts, such as “ICE Wife Mary Smith”.
• Condition enter any medical conditions/medical devices (e.g.
diabetic, pacemaker).
• Allergies enter any known allergies (e.g. penicillin, bee stings).
• Blood type
• Vaccination enter any relevant vaccination.
• Medication enter any medication that you are treated with.
31
English
•
3.
Other info enter other information (e.g. organ donor, living will,
consent to treat).
When done, select
.
Tip: The ice-contacts are easily found with
.
Messages
You need specific settings which are provided by your service provider, to
send and receive text and picture messages.
Note! If you choose to add multiple recipients, you are charged for each
recipient (maximum 10).
Text and picture messages
Create and send messages
1.
2.
3.
4.
From the Home screen, select
Messages.
Scroll to select a contact, write a number or a name in the search
field to search your contacts or tap
to enter a new recipient.
Select Write message and compose your message.
If desired, press
to select:
• Attach file to add attachment.
• Add subject or Remove subject.
• Add recipient and Recipient list.
•
5.
In the Recipient list select
list.
When done, select
Send.
to remove a recipient from the
Text messages settings
Text messages requires a message centre number, this is normally automatically set on your phone. The number can be obtained from the network operator.
1.
From the Home screen, select
2.
3.
Select
.
Select Messages settings
Messages.
SMS.
32
English
4.
5.
If required, tap the text field to modify the SMS central center
number.
to enable Delivery reports.
Switch
6.
When done, select
.
Picture messages settings
Picture messages require an MMS profile and that both you and the recipient have subscriptions that support picture messages. The MMS profile is often pre-installed, if not contact your service provider for
information.
Messages.
1.
From the Home screen, select
2.
3.
4.
Select
.
Select Messages settings
MMS.
If required, tap MMS Profile to modify the MMS profile.
5.
Switch
to enable Delivery reports.
6.
Switch
to enable Read reports.
7.
When done, select
.
Note! In order to access the Internet and to send and receive picture
messages, you need to have the correct account provider settings. For
some service providers, the account provider has to be selected
manually. See Data connectivity, p.41.
E-mail
IMPORTANT!
You need an Internet connection to use this service. It is recommended
to use Wi-Fi connections when available to reduce costs for data traffic.
Contact your service provider for detailed subscription costs before
activating.
Tip: Gmail is always available under Google apps.
Set up existing email address
Set up an existing email account that supports imap/pop3.
1.
From the Home screen, select Menu
33
Email.
English
2.
3.
4.
Select Add an account.
• Add existing account
• Create Gmail account
Select
to confirm.
Press
and select:
• Manage accounts to select the account or Add another account? Press
again to get more options.
• Delete email
• Email settings to do your own settings.
If needed enter requested settings manually and select
Contact your email provider for detailed information.
when done.
Set up additional email account
1.
From the Home screen, select Menu
2.
3.
Press
and select Manage accounts
Add another account?.
Enter your existing email address and password or select an account
from the list.
When done, select
OK.
4.
Email.
If required, enter requested settings manually and select
Contact your email provider for detailed information.
when done.
Switch between accounts
If you create more than one email account, you can switch between them.
1.
From the Home screen, select Menu
2.
Press
Email.
select Manage accounts and select the desired account.
Set default account
1.
From the Home screen, select Menu
2.
Press
3.
Press
again and select Default email account. Select the desired account.
When done, select
OK.
4.
Email.
and select Manage accounts.
34
English
Create and send email message
1.
2.
3.
From the Home screen, select Menu
Email.
Select Write email and select a contact from your list, tap Search
name or email or tap
to enter the email address manually and
select
to validate. Press
and select Recipient list to add additional contacts.
Compose your message.
4.
5.
If desired, select to add attachment. Tap OK to confirm.
Send.
When done, select Next
Inbox/Sent/Draft
1.
2.
3.
From the Home screen, select Menu
Email.
Tap the screen’s top box to select an email folder.
If required, select Check for new emails to update the inbox.
Synchronisation
Select when to allow synchronisation for your email account/s.
1.
From the Home screen, select Menu
2.
Press
and select Email settings
Synchronisation. Select
your Email refresh frequency from the list:
• Manual
• 15 minutes
• 30 minutes
• 1 hour
• 3 hour
• As they come
3.
When done, select
Email.
.
Tip: To reduce data costs and save battery, select Manual.
Download attachments
Select to automatically download attachments.
1.
From the Home screen, select Menu
35
Email.
English
2.
Press
and select Email settings
3.
4.
Set
to enable.
When done, select
Download attachments.
.
Signature
®
When sending emails from your Doro Liberto 820 Mini you can select to
add automatic signature.
Email.
1.
From the Home screen, select Menu
2.
3.
Press
and select Email settings
Signature.
Tap below Signature type and select an option.
Tip: To add your own signature, select Custom signature select
.
Tap in the white square below (default setting: Sent from my Doro)
to get the keyboard and enter desired text. Tap Next to confirm
4.
When done, select
.
Camera
Use the camera to take photos or record videos.
Tip: Press and hold the Camera button to activate the camera from any
screen or mode except in the Power off mode. The Camera button is
located on the lower right side of the phone.
Tip: To get sharp photos, wipe the lens clean with a dry cloth.
Take a picture
1.
2.
From the Home screen, select
Camera.
If needed, tap the camera mode icon ( ).
3.
Select
to take a photo. The picture is automatically saved.
Record a video
1.
2.
From the Home screen, select
Camera.
If needed, tap the camera mode icon ( ).
3.
Select
to start recording.
36
English
4.
Select
to stop recording.
Settings
1.
From the Home screen, select
2.
3.
To access camera soft keys press
and select:
Select
Normal mode to access the soft keys and
Camera settings.
•
Flash mode
•
Camera orientation
to select the front-facing camera or the
rear facing camera.
Scene mode to access more options.
•
4.
Camera.
to select an option.
You can then press
again and select Easy mode to hide the soft
keys and Camera settings.
Gallery
All pictures taken by the camera, received photos and recorded videos
are stored in the My gallery.
Note! All pictures must be stored in a folder named Pictures and all video
files must be stored in a folder named Movies on the memory card. If
needed, create the folder using a computer. See Connect the phone to a
computer, p.44. If default storage location is set to memory card, all
photos and videos taken by the phone are stored in the DCIM folder on
the memory card.
1.
2.
From the Home screen, select Menu
Select the photo/video to view/play.
Gallery.
Tip: You can also access the My gallery from camera mode, select the
thumbnail in the lower left corner.
Share photo or video
1.
2.
From the Home screen, select Menu
Select the photo/video to view/play.
3.
Press
Share and select:
37
Gallery.
English
Tip: If you don’t see the soft keys, tap the screen once to make them
visible.
•
Messages to send item as a picture message. See Create and
send messages, p.32.
• Email to send item in an email. See Create and send email
message, p.35.
• Bluetooth to send item using Bluetooth technology. If needed,
allow to turn on Bluetooth. See Bluetooth , p.42.
or any other option in the list.
®
4.
When done, select
.
Set as
1.
2.
From the Home screen, select Menu
Select the photo.
3.
Press
and select Set as:
• Contacts to select a saved contact from the list or add as new.
See Add new contact, p.29.
• Wallpaper to set the item as wallpaper for your Home screen.
• Lock screen to set the item as wallpaper for your Lock screen.
Gallery.
Delete photo or video
1.
From the Home screen, select Menu
2.
3.
Press
Select
4.
Select
Gallery.
and select Delete.
for the items to delete, or Select all.
and confirm.
Assistance button
CAUTION
When an assistance call is activated the phone is pre-set to handsfree/
speakerphone mode. Do not hold the device near your ear when the
handsfree mode is in use, because the volume may be extremely loud.
In order to possibly make every day safer, the phone has an assistance
. The assistance button makes it easy to contact the help numbutton
bers you have predefined in the Assistance number list . Before the
38
English
assistance button can be used, the assistance function has to be activated, phone numbers added to the number list and, the text message
edited with the information you want to send.
•
•
•
•
for 3 seconds, or press it
Press and hold the assistance button
twice within 1 second. The assistance call begins after a delay of 5
seconds. In this time you can prevent a possible false alarm by
pressing Cancel.
An assistance text message (SMS) is sent to all recipients.
A positioning text message (SMS) is sent to all recipients.
The first recipient in the list is dialled. If the call is not answered
within 25 seconds, the next number is dialled. Dialling is repeated 3
times or until the call is answered, or until Cancel is pressed.
Assistance button configuration
Select how to activate the assistance function when using the assistance
button.
1.
From the Home screen, select Menu
2.
3.
Select
Assistance button.
Select Assistance button configuration:
• Off to disable the assistance button.
• On normal to activate by pressing and holding the button for approximately 3 seconds, or press it twice within 1 second.
• On (3) to activate by pressing the button 3 times within 1
second.
When done, select
.
4.
Settings.
Assistance numbers list
Select numbers that will be called when the assistance button is pressed.
IMPORTANT!
Always inform the recipients that they are listed as your assistance
contacts.
1.
From the Home screen, select Menu
2.
3.
Select
Assistance button.
Select Assistance numbers list.
39
Settings.
English
4.
5.
Select Add contact.
Scroll to select a contact, write a number or a name in the search
field to search your contacts or tap
to enter a new recipient.
6. When done, select
.
To delete a contact, press the minus sign after the number.
Note! Some private security companies can accept automatic calls from
their clients. Always contact the security company before using their
phone number.
Custom text
A text message can be sent to the contacts in the list when the assistance button is pressed.
1.
2.
3.
4.
From the Home screen, select Menu
Settings.
Select Assistance button.
Select Custom text.
If required, tap the text field to modify the message.
5.
When done, select
Tip: Switch
.
to disable.
Signal type
Select the signal type for the assistance sequence.
Note! This sets the signal of your 820-device, NOT the receiver's signal.
1.
2.
3.
From the Home screen, select Menu
Select Assistance button.
Select Signal type:
• High
• Low
• Silent
Home location
1. From the Home screen, select Menu
2. Select Assistance button.
3. Select Home location.
40
Settings.
Settings.
English
4.
Tap Search.
When done, select
.
Connectivity
Network services and costs
Your device is approved for use on the WCDMA 900/2100 MHz, GSM
850/900/1800/1900 MHz networks. To use the device, you need a subscription with a service provider.
Using network services may result in traffic costs. Some product features
require support from the network, and you may need to subscribe to
them.
Some operations and features are SIM card and/or network dependent
or dependent on the compatibility of devices and the content formats
supported. Some services are subject to a separate charge.
Data connectivity
You can select to use a data connection (also called mobile data) on your
device when an Internet connection is needed. Contact your service provider for detailed subscription costs before activating. Make sure that the
account provider is the same as your network operator in order to use data connectivity.
Tip: To connect to a Wi-Fi network, see Wireless networks (Wi-Fi), p.18.
Enable data
1. From the Home screen, select Menu
2. Select Mobile data.
3. Switch
to enable.
4. When done, select
.
Settings.
Account provider
In order to access the Internet and to send and receive picture messages, you need to have the correct account provider settings. For some
service providers, the account provider has to be selected manually.
1.
From the Home screen, select Menu
41
Settings.
English
2.
3.
4.
5.
Select Mobile data
More….
Tap Access Point Names.
Select your account provider.
Press
to return.
and select New
Note! If your account provider is not in the list, press
APN and enter needed information. When done, press
and select
Save. For correct settings, contact your account provider.
Data usage
1.
2.
Settings.
From the Home screen, select Menu
Select Mobile data
Data usage.
Tip: You can reset the data usage every month to keep track of your data
costs.
Data roaming
Using data services while roaming can be costly. Contact your service
provider for data roaming rates before you use data roaming.
1.
2.
3.
4.
Settings.
From the Home screen, select Menu
Select Mobile data
More….
Tap and check Data roaming to enable/disable.
Press
to return.
Bluetooth
®
®
You can connect wirelessly to other Bluetooth compatible devices such
as headsets or other phones.
1.
2.
Settings
From the Home screen, select Menu
Switch
to enable and access more options.
Note! Press
Bluetooth.
to view available options.
Tip: To enable you can also select
and then select Bluetooth. in the
menu that opens. Tap Bluetooth to access more options.
42
English
Network setup
Your phone automatically selects your (service provider's) home network
if within range. If not within range, you can use another network, provided
your network operator has an agreement that allows you to do so. This is
called roaming. Contact your service provider for more information.
Note! Using data services while roaming can be costly. Contact your
service provider for data roaming rates before you use data roaming. See
Data roaming, p.42.
1.
2.
3.
4.
Settings.
From the Home screen, select Menu
Select Mobile data.
Select More…
Network operators:
• Select manually to view a list of available network operators
(displayed after a short delay).
• Choose automatically.
Press
to return.
Flight mode
Activate Flight mode to turn off the network and radio transceivers to
prevent disturbance to sensitive equipment. You can still play games, listen to music, watch videos and other content, as long as all this content
is saved on your memory card or internal storage.
1.
From the Home screen, select Menu
2.
Select Flight mode and switch
3.
When done, select
Settings.
to enable.
.
Tip: To enable you can also press and hold the ! Power button and then
select Flight mode in the menu that opens. You can also enable flight
mode from the notification panel.
Enable Flight mode when in areas with no network coverage to save
battery since the phone repeatedly scans for available networks and this
consumes power. You can be notified by alarms, if alarms are activated.
43
English
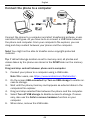
Connect the phone to a computer
Connect the phone to a computer and start transferring pictures, music
and other file types. All you have to do is connect a USB cable between
the phone and computer. From your computer's file explorer, you can
drag and drop content between your phone and the computer.
Note! You might not be able to transfer some copyright-protected
material.
Tip: If default storage location is set to memory card, all photos and
videos taken by the phone are stored in the DCIM folder on the memory
card.
Drag and drop content between phone and a computer
1. Connect your phone to a computer using a USB cable.
Note! Mac users, see https://www.android.com/filetransfer/.
2.
3.
4.
5.
6.
On the screen USB connected tap Turn on USB storage to enable access to storage.
Wait until the phone/memory card appears as external disks in the
computers file explorer.
Drag and drop selected files between the phone and the computer.
Select Turn off USB storage to disable access to storage. If necessary, also use the Safe to remove hardware function on your
computer
When done, remove the USB cable.
44
English
Note! When the phone/memory card is mounted to the computer, the
phone cannot access the memory card. Some functionality and
applications in the phone, such as the camera, may not be accessible.
You can transfer files by using a USB cable on most devices and
operating systems supporting a USB Mass Storage interface.
Internet (web browser)
IMPORTANT!
You need an Internet connection to use this service. It is recommended
to use Wi-Fi connections when available to reduce costs for data traffic.
Contact your service provider for detailed subscription costs before
activating.
1.
2.
Internet.
From the Home screen, select Menu
Select Search word/address. Enter a web address or a search term
and select Search.
Use the web browser
When opening the web browser, a search page is displayed as default.
Tap
•
to go to My bookmarks. Use Search to get to your favourites.
•
to go to My pages and see your recently done searches.
When the search result is displayed, you can tap:
•
in the upper left corner to do a new search.
•
to save the search result as a favourite.
Tip: Press
to view available options.
Refresh
•
Select
located on the top right in the search bar, to refresh the
current web page.
Share
1.
2.
In the web browser when viewing a web page, press
Select Share:
45
.
English
•
Messages to send item as a picture message. See Create and
send messages, p.32.
Email to send item in an email. See Create and send email
message, p.35.
Or any other of the options in the list.
•
•
Additional applications
Applications can be a program or game that you can use on your Doro
Liberto 820 Mini. Depending on market and service provider, the pre-installed applications can vary. Some applications need Internet access.
Contact your service provider for detailed subscription costs before activating. Some applications need to be purchased. The cost is shown in
the application description as well as if it is free. Using downloaded and
installed applications does not cost anything, except if an Internet connection is needed.
®
™
Use Doro Selection or Google Play to download and install all the applications you need.
Tip: You can use the shortcut
Add new applications.
Google apps
IMPORTANT!
You need an Internet connection to use this service. It is recommended
to use Wi-Fi connections when available to reduce costs for data traffic.
Contact your service provider for detailed subscription costs before
activating.
™
All pre-installed Google applications can be found in Google Apps. Depending on the market, the pre-installed applications can vary.
•
™
From the Home screen select Google apps to open the Google
applications.
or
•
From the Home screen select Menu
applications.
Google to open the Google
Music
Use the music player to listen to music or other audio files.
46
™
English
Play music
1.
2.
3.
4.
From the Home screen, select Menu
Music.
Select to sort by Title, Artist (default), Album, Genre or Favourites
using the drop down menu.
Select a track from the list. The next track is automatically played.
• Select to pause the track.
to return to the Home screen. The music continues to
• Press
play.
:
Press
• Mark as favourites to select song as favourite.
• Loop to play the songs repeatedly.
• Set as and select:
• Ringtone to set the song as ringtone.
• Alarm sound to set the song as alarm tone.
• Delete.
•
Select
•
Select
for the items to delete, or Select all.
and to confirm select Delete.
Note! All audio files must be stored in a folder named Music on the
memory card or the internal memory. If needed, create the folder using a
computer. See Connect the phone to a computer, p.44.
FM Radio
The FM radio has a frequency range from 87.5 to 108.0 MHz.
Tip: For best sound quality, set the phone in sleep mode by briefly
pressing the ! Power button.
Turn on the radio
1. Connect the headset to the headset socket.
2. From the Home screen, select Menu
FM Radio.
The radio is turned on. The tuned frequency is displayed.
3.
or
to scan channels and press
to play.
Select
Slide on the scale to set the frequency manually.
Use the side keys +/– to adjust the volume.
47
English
Tip: Select
to save a selected channel as favourite.
to return to the Home screen. The radio continues to play.
Press
4.
Disconnect the headset to turn off the radio.
Options
1.
:
In Radio, press
• Loudspeaker on to play radio in the loudspeaker.
Use the side buttons +/– to adjust the sound volume.
• Exit to turn off the radio.
Alarm
The phone must be powered on in order for the alarm to function
properly.
1.
2.
3.
From the Home screen, select Menu
Select Add alarm.
Enter the alarm time (HH:MM), select
4.
5.
If desired, select alarm sound, confirm with
.
If desired, select Repeat and tick the required days. When done, select
.
When done, select
Save.
6.
Alarm.
.
Tip: To save battery and prevent incoming calls or messages, you can
turn on Flight mode to keep the alarm function, see Flight mode, p.43.
Turn an alarm time on and off
1.
To turn on and off switch
.
Edit or delete an alarm
1. Select the alarm:
•
Enter updates and select
•
Press
Save.
and select Delete
.
Calendar
Add event
1.
From the Home screen, select Menu
48
Calendar.
English
2.
3.
Select Add event.
Enter required information and set alarm.
4.
When done select
Save.
Tip: To edit the event, select the event
Edit event.
View mode
• In calendar mode, select Month view, Day view or Events to set view
mode.
Navigate
• In calendar mode, select < or > to change month or day.
Notes
Add note
1.
2.
3.
From the Home screen, select Menu
Select Add note and enter text.
When done, select
Save.
Notes.
Tip: To edit, select the note and update.
Share note
Notes.
1.
2.
From the Home screen, select Menu
Select and open the note.
3.
4.
Press
and select Send.
Compose your message and add recipient. See Create and send
email message, p.35.
5.
When done, select
Send.
Delete note
1.
From the Home screen, select Menu
2.
3.
Press
Select
4.
Select
Notes.
and select Delete.
for the items to delete, or Select all.
and confirm.
49
English
Torch
• From the Home screen, select Menu
.
To turn off, switch
Torch.
Timer
1.
From the Home screen, select Menu
Timer.
2.
3.
Use v and V to set minutes and seconds. Confirm with
When done, select Start.
.
Tip: You can use the phone as usual when the timer application is
running as long as the phone is turned on.
Calculator
1.
2.
3.
From the Home screen, select Menu
Calculator.
Enter the first number, select an operation (+, -, x, ÷) and enter next
number. Repeat if needed.
Select = to calculate the result.
Sound recorder
Use the sound recorder to record notes and messages.
Record
1.
From the Home screen, select Menu
2.
Select the
button to start recording.
3.
Select the
button to stop recording.
4.
When the recording time is blinking, select
Recorder.
to save the recording.
Listen to recording
1.
2.
3.
From the Home screen, select Menu
Select Records list.
Select a recording to listen.
Tip: You can also select
Recorder.
directly after recording.
50
English
Share recording
1.
From the Home screen, select Menu
2.
Select Records list. Press
Recorder.
, select Send
3.
Check the selected recordings or Select all. Confirm with .
• Messages to send item in a picture message. See Create and
send messages, p.32.
• Email to send item in an email. See Create and send email
message, p.35.
or any other option in the list.
Delete recording
1.
2.
3.
4.
From the Home screen, select Menu
Recorder.
Select Records list.
Press
and select Delete.
Select for the items to delete, or Select all.
5.
Select
and confirm.
Code safe
1.
From the Home screen, select Menu
Code safe.
2.
3.
4.
5.
Enter a 3 number code to get started. When done, select
.
Enter the same 3 number code and turn the handle downwards.
Select Add.
Enter your note and select
Save when done.
• To edit a note, select the note, tap on the white writing area to
Save when
get the keyboard. Edit the note and then select
done.
Delete safe note
1.
2.
Press
Select
3.
Select
and select Delete.
for the items to delete, or Select all.
and confirm.
Note! All safe notes will be deleted if the wrong 3 number code is entered
three (3) times.
51
English
Note! Write all the safe notes you keep in the Code safe on a piece of
paper before resetting the phone or erasing the storage card.
Reset the phone
IMPORTANT!
Resetting the phone means that most information will be lost such as
downloaded and installed applications, accounts, system and
application data and settings. Be sure to backup any data and files you
want to keep before you perform the reset. Carefully read all the text
below before you start.
The reason to perform a reset might be a persistent problem that is impossible to solve or if you want to pass the phone to someone else.
Note that everything added to the phone since you got it will be erased.
Exceptions
• Everything saved on an SD-card if you have one installed (see Insert
the memory card, p.2 and Change storage location, p.18).
• Applications and data by Google — if the box by Back up my data is
Advanced in Phone settings, p.14.
checked (see
• Information you have stored in any cloud storages (or on a computer,
see Connect the phone to a computer, p.44).
™
Reset the phone
1.
2.
3.
4.
5.
From the Home screen, select Menu
Settings
Advanced.
Scroll to and select Backup & reset.
Select Factory data reset. Carefully read the information on screen,
it is important!
Select Reset phone.
At last select Erase everything.
Note! No more questions will be asked, this is the final step!
6.
After your phone resets, it will be set back to factory defaults and will
be just like it was when it came out of the box.
52
English
Status icons
Signal strength
2.5G GPRS data
No signal
EDGE data
Roaming (in other network)
3G data
Vibrate mode
HSPA data
Data transmission:
data in , data out
Silent mode
Google Play Store software
updates available
Google Play Store, update
completed
.
Wi-Fi AP connected
Bluetooth on
Unread e-mail
New text message or multimedia message
Connected to computer
Flight mode activated
Charger connected
Error occurred or caution
required
Battery level
Alarm active
Missed call
Headset connected (without
microphone)
Headset connected (with
microphone )
Call ongoing
SIM card not inserted
Call forwarding on
Memory full
GPS activated
Examples of soft keys
Validate
Add picture
Discard
Add current location
Advanced
Add template text
Call contact
Add video
Write text or picture
message (SMS/MMS)
Add voice recording
53
English
Examples of soft keys (cont'd.)
Write email
Bring up the keypad
Handle attachments
Safety instructions
CAUTION
The unit and the accessories can contain small parts. Keep all of the equipment out
of the reach of small children.
The mains adapter is the disconnect device between the product and mains power.
The mains socket outlet must be close to the equipment and easily accessible.
Network services and costs
Your device is approved for use on the WCDMA 900/2100 MHz, GSM 850/900/1800/
1900 MHz networks. To use the device, you need a subscription with a service provider.
Using network services may result in traffic costs. Some product features require support from the network, and you may need to subscribe to them.
Operating environment
Follow the rules and laws that apply wherever you are, and always turn off the unit
whenever its use is prohibited or can cause interference or hazards. Only use the unit in
its normal user position.
This unit complies with guidelines for radiation when it is used either in a normal position against your ear, or when it is at least 1.5 cm from your body. If the unit is carried
close to your body in a case, belt holder or other holder, these holders should not contain any metal, and the product should be placed at the distance from your body specified above. Make sure that the distance instructions above are followed until the
transfer is complete.
Parts of the unit are magnetic. The unit can attract metal objects. Do not keep credit
cards or other magnetic media near the unit. There is a risk that information stored on
them can be erased.
Medical units
The use of equipment that transmits radio signals, for example, mobile phones, can interfere with insufficiently protected medical equipment. Consult a doctor or the manufacturer of the equipment to determine if it has adequate protection against external
radio signals, or if you have any questions. If notices have been put up at health care facilities instructing you to turn off the unit while you are there, you should comply. Hospitals and other health care facilities sometimes use equipment that can be sensitive to
external radio signals.
54
English
Implanted medical devices
To avoid potential interference, manufacturers of implanted medical devices recommend a minimum separation of 15.3 cm between a wireless device and the medical device. Persons who have such devices should:
• Always keep the wireless device more than 15.3 cm from the medical device.
• Should not carry the phone in a breast pocket.
• Hold the wireless device to the ear opposite the medical device.
If you have any reason to suspect that interference is taking place, turn the phone off
immediately If you have any questions about using your wireless device with an implanted medical device, consult your health care provider.
Areas with explosion risk
Always turn off the unit when you are in an area where there is a risk of explosion. Follow all signs and instructions. There is a risk of explosion in places that include areas
where you are normally requested to turn off your car engine. In these areas, sparks
can cause explosion or fire which can lead to personal injury or even death.
Turn off the unit at filling stations, and any other place that has fuel pumps and auto repair facilities.
Follow the restrictions that apply to the use of radio equipment near places where fuel
is stored and sold, chemical factories and places where blasting is in progress.
Areas with risk for explosion are often – but not always – clearly marked. This also applies to below decks on ships; the transport or storage of chemicals; vehicles that use
liquid fuel (such as propane or butane); areas where the air contains chemicals or particles, such as grain, dust or metal powder.
Li-ion battery
This product contains a Li-ion battery. There is a risk of fire and burns if the battery pack
is handled improperly.
WARNING
Danger of explosion if battery is incorrectly replaced. To reduce risk of fire or burns,
do not disassemble, crush, puncture, short external contacts, expose to temperature
above 60° C (140° F), or dispose of in fire or water. Recycle or dispose of used
batteries according to the local regulations or reference guide supplied with your
product.
Protect your hearing
This device has been tested to comply with the Sound Pressure Level requirement laid
down in the applicable EN 50332-1 and/or EN 50332-2 standards.
55
English
WARNING
Excessive exposure to loud sounds can cause hearing damage. Exposure
to loud sounds while driving may distract your attention and cause an
accident. Listen to a headset at a moderate level, and do not hold the
device near your ear when the loudspeaker is in use.
Emergency calls
IMPORTANT!
Mobile phones use radio signals, the mobile phone network, the terrestrial network
and user-programmed functions. This means that connection cannot be guaranteed
in all circumstances. Therefore, never rely only on a mobile phone for very important
calls such as medical emergencies.
Vehicles
Radio signals can affect electronic systems in motor vehicles (for example, electronic
fuel injection, ABS brakes, automatic cruise control, air bag systems) that have been incorrectly installed or are inadequately protected. Contact the manufacturer or its representative for more information about your vehicle or any additional equipment.
Do not keep or transport flammable liquids, gases or explosives together with the unit
or its accessories. For vehicles equipped with air bags: Remember that air bags fill with
air with considerable force.
Do not place objects, including fixed or portable radio equipment in the area above the
airbag or the area where it might expand. Serious injuries may be caused if the mobile
phone equipment is incorrectly installed and the airbag fills with air.
It is prohibited to use the unit in flight. Turn off the unit before you board a plane. Using
wireless telecom units inside a plane can pose risks to air safety and interfere with telecommunications. It may also be illegal.
Care and maintenance
Your unit is a technically advanced product and should be treated with the greatest care.
Negligence may void the warranty.
•
•
•
•
Protect the unit from moisture. Rain/snowfall, moisture and all types of liquid can
contain substances that corrode the electronic circuits. If the unit gets wet, you
should remove the battery and allow the unit to dry completely before you replace
it.
Do not use or keep the unit in dusty, dirty environments. The unit’s moving parts
and electronic components can be damaged.
Do not keep the unit in warm places. High temperatures can reduce the lifespan
for electronic equipment, damage batteries and distort or melt certain plastics.
Do not keep the unit in cold places. When the unit warms up to normal temperature, condensation can form on the inside which can damage the electronic circuits.
56
English
•
•
Do not try to open the unit in any other way than that which is indicated here.
Do not drop the unit. Do not knock or shake it either. If it is treated roughly the circuits and precision mechanics can be broken.
• Do not use strong chemicals to clean the unit.
The advice applies to the unit, battery, mains adapter and other accessories. If the
phone is not working as it should, please contact the place of purchase for service.
Don’t forget the receipt or a copy of the invoice.
Warranty
This product is guaranteed for a period of 12 months from the date of purchase. In the
unlikely event of a fault occurring during this period, please contact the place of purchase. Proof of purchase is required for any service or support needed during the guarantee period.
This guarantee will not apply to a fault caused by an accident or a similar incident or
damage, liquid ingress, negligence, abnormal usage, non-maintenance or any other circumstances on the user’s part. Furthermore, this guarantee will not apply to any fault
caused by a thunderstorm or any other voltage fluctuations. As a matter of precaution,
we recommend disconnecting the charger during a thunderstorm.
Batteries are consumables and are not included in any guarantee.
This guarantee does not apply if batteries other than DORO original batteries are used.
Specifications
Network:
Operating system:
WCDMA 900/2100 MHz, GSM 850/900/1800/
1900 MHz
Android 4.4.2
Wi-Fi:
WLAN IEEE 802.11 b/g/n
Bluetooth:
Dimensions:
Weight:
4.0
126 mm x 66 mm x 11 mm
132 g (including battery)
Battery:
3.7 V / 1500 mAh Li-ion battery
Image format:
BMP/GIF/JPG/PNG
Video format:
AVI/MP4/3GPP
Audio format:
WAV/AMR/MIDI/MP3/AAC/AAC+
Camera resolution:
Camera digital
zoom:
5MP
4x
57
English
Display resolution:
480 x 800
Memory:
4 GB
Operating ambient
temperature:
Min: 0° C (32° F)
Max: 40° C (104° F)
Charging ambient
temperature:
Min: 0° C (32° F)
Max: 40° C (104° F)
Storage
temperature:
Min:–20° C (–4° F)
Max: 60° C (140° F)
Copyright and other notices
®
Bluetooth is a registered trademark of Bluetooth SIG, Inc.
vCard is a trademark of the Internet Mail Consortium.
™
eZiType is a trademark of Zi Corporation.
Wi-Fi is a trademark or a registered trademark of the Wi-Fi Alliance.
microSD is a trademark of SD Card Association.
Java, J2ME and all other Java-based marks are trademarks or registered trademarks of
Sun Microsystems, Inc. in the United States and other countries.
The contents of this document are provided "as is". Except as required by applicable
law, no warranties of any kind, either express or implied, including, but not limited to,
the implied warranties of merchantability and fitness for a particular purpose, are made
in relation to the accuracy, reliability or contents of this document. Doro reserves the
right to revise this document or withdraw it at any time without prior notice.
Google, Google Maps™, Gmail, Google Calendar, Google Checkout, Hangouts, YouTube,
the YouTube logo, Picasa and Android are trademarks or registered trademarks of Google, Inc.
This product is licensed under the MPEG-4 visual and AVC patent portfolio licenses for
the personal and noncommercial use of a consumer for (i) encoding video in compliance with the MPEG-4 visual standard ("MPEG-4 video") or the AVC standard ("AVC video") and/or (ii) decoding MPEG- 4 or AVC video that was encoded by a consumer
engaged in a personal and non-commercial activity and/or was obtained from a video
provider licensed by MPEG LA to provide MPEG-4 and/or AVC video. No license is
granted or shall be implied for any other use. Additional information including that relating to promotional, internal and commercial uses and licensing may be obtained from
MPEG LA, L.L.C. See www.mpegla.com. MPEG Layer-3 audio decoding technology licensed from Fraunhofer IIS and Thomson.
Other product and company names mentioned herein may be the trademarks of their
respective owners.
Any rights not expressly granted herein are reserved. All other trademarks are property
of their respective owners.
58
English
To the maximum extent permitted by applicable law, under no circumstances shall Doro
or any of its licensors be responsible for any loss of data or income or any special, incidental, consequential or indirect damages howsoever caused.
Doro does not provide a warranty for or take any responsibility for the functionality, content, or end-user support of third-party apps provided with your device. By using an app,
you acknowledge that the app is provided as is. Doro does not make any representations, provide a warranty, or take any responsibility for the functionality, content, or enduser support of third-party apps provided with your device.
Content copyright
The unauthorised copying of copyrighted materials is contrary to the provisions of the
Copyright Laws of the United States and other countries. This device is intended solely
for copying non-copyrighted materials, materials in which you own the copyright, or materials which you are authorised or legally permitted to copy. If you are uncertain about
your right to copy any material, please contact your legal advisor.
Hearing aid
This device should work with most hearing aid equipment in the market. However, full
compatibility with all equipment can not be promised.
Specific Absorption Rate (SAR)
This device meets applicable international safety requirements for exposure to radio
waves. The highest SAR value under the ICNIRP guidelines for use of the device at the
ear is 0.971 W/kg measured over 10 g tissue.
The maximum limit according to ICNIRP is 2.0 W/kg measured over 10 g tissue.
Declaration of Conformity
®
Doro hereby declares that Doro Liberto 820 Mini conforms to the essential requirements and other relevant regulations contained in the Directives 1999/5/EC (R&TTE)
and 2011/65/EC (RoHS). A copy of the Declaration of Conformity is available at
www.doro.com/dofc.
FCC
FCC notice
This device complies with part 15 of the FCC Rules. Operation is subject to the following
two conditions: (1) This device may not cause harmful interference, and (2) this device
must accept any interference received, including interference that may cause undesired
operation.
This equipment has been tested and found to comply with the limits for a Class B digital
device, pursuant to part 15 of the FCC Rules. These limits are designed to provide reasonable protection against harmful interference in a residential installation. This equipment generates, uses and can radiate radio frequency energy and, if not installed and
used in accordance with the instructions, may cause harmful interference to radio
59
English
communications. However, there is no guarantee that interference will not occur in a
particular installation. If this equipment does cause harmful interference to radio or television reception, which can be determined by turning the equipment off and on, the
user is encouraged to try to correct the interference by one or more of the following
measures:
•
•
•
Reorient or relocate the receiving antenna.
Increase the separation between the equipment and the receiver.
Connect the equipment to an outlet on a circuit different from that to which the receiver is connected.
• Consult the dealer or an experienced radio/TV technician for help.
The FCC can require you to stop using your unit if such interference cannot be
eliminated.
Doro has not approved any changes or modifications to this device by the user. Any
changes or modifications could void the user’s authority to operate the equipment.
RF exposure information (SAR)
This model phone meets the government’s requirements for exposure to radio waves.
This phone is designed and manufactured not to exceed the emission limits for exposure to radio frequency (RF) energy set by the Federal Communications Commission of
the U.S. Government.
The exposure standard for wireless mobile phones employs a unit of measurement
known as the Specific Absorption Rate, or SAR. The SAR limit set by the FCC is 1.6W/kg.
*Tests for SAR are conducted using standard operating positions accepted by the FCC
with the phone transmitting at its highest certified power level in all tested frequency
bands. Although the SAR is determined at the highest certified power level, the actual
SAR level of the phone while operating can be well below the maximum value. This is because the phone is designed to operate at multiple power levels so as to use only the
poser required to reach the network. In general, the closer you are to a wireless base
station antenna, the lower the power output.
The highest SAR value for the model phone as reported to the FCC when tested for use
at the ear is 0.72 W/kg and when worn on the body, as described in this user guide, is
1.36 W/kg (Body-worn measurements differ among phone models, depending upon
available enhancements and FCC requirements.)
While there may be differences between the SAR levels of various phones and at various positions, they all meet the government requirement. The FCC has granted an
Equipment Authorization for this model phone with all reported SAR levels evaluated as
in compliance with the FCC RF exposure guidelines. SAR information on this model
phone is on file with the FCC and can be found under the Display Grant section of
http://www.fcc.gov/oet/ea/fccid after searching on FCC ID: WS5DORO820M
For body worn operation, this phone has been tested and meets the FCC RF exposure
guidelines for use with an accessory that contains no metal and the positions the handset a minimum of 5/8 inch (1.5 cm) from the body. Use of other enhancements may not
ensure compliance with FCC RF exposure guidelines. If you do not use a body-worn accessory and are not holding the phone at the ear, position the handset a minimum of 5/
8 inch (1.5 cm) from your body when the phone is switched on.
60
English
*In the United States, the SAR limit for mobile phones used by the public is 1.6 watts/
kilogram (W/kg) averaged over one gram of tissue. The standard incorporates a substantial margin of safety to give additional protection for the public and to account for
any variations in measurements. SAR values may vary depending on national reporting
requirements and the network band.
Care and maintenance
Your unit is a technically advanced product and should be treated with the greatest care.
Negligence may void the warranty.
•
•
•
•
•
•
•
•
•
•
•
•
•
•
•
•
Protect the unit from moisture. Rain/snowfall, moisture and all types of liquid can
contain substances that corrode the electronic circuits. If the unit gets wet, you
should remove the battery and allow the unit to dry completely before you replace
it.
Do not use or keep the unit in dusty, dirty environments. The unit’s moving parts
and electronic components can be damaged.
Do not keep the unit in warm places. High temperatures can reduce the lifespan
for electronic equipment, damage batteries and distort or melt certain plastics.
Do not keep the unit in cold places. When the unit warms up to normal temperature, condensation can form on the inside which can damage the electronic circuits.
Do not try to open the unit in any other way than that which is indicated here.
Do not drop the unit. Do not knock or shake it either. If it is treated roughly the circuits and precision mechanics can be broken.
Do not use strong chemicals to clean the unit.
Maintain the battery and phone during operation between 0 °C–40 °C. If the
phone and battery become too warm or too cold, the phone and battery may not
work temporarily, even if the battery is fully charged. Subjecting the phone and battery to excessive temperatures can create a safety hazard resulting in fire, explosion or other hazards.
Do not disassemble or open crush, bend or deform, puncture or shred.
Do not modify or remanufacture, attempt to insert foreign objects into the battery,
immerse or expose to water or other liquids, expose to fire, explosion or other
hazard.
Only use the battery for the system for which it is specified.
Only use the battery with a charging system that has been qualified with the system
per IEEE-Std-1725. Use of an unqualified battery or charger may present a risk of
fire, explosion, leakage, or other hazard.
Do not short circuit a battery or allow metallic conductive objects to contact battery
terminals.
Replace the battery only with another battery that has been qualified with the system per this standard, IEEE-Std-1725. Use of an unqualified battery may present a
risk of fire, explosion, leakage or other hazard.
Promptly dispose of used batteries in accordance with local regulations.
Battery usage by children should be supervised.
61
English
•
Avoid dropping the phone or battery. If the phone or battery is dropped, especially
on a hard surface, and the user suspects damage, take it to a service center for
inspection.
• Improper battery use may result in a fire, explosion or other hazard.
For those host devices that utilize a USB port as a charging source, the host device's
user manual shall include a statement that the device shall only be connected to CTIA
certified adapters, products that bear the USB-IF logo or products that have completed
the USB-IF compliance program.
The advice above applies to the unit, battery, AC power adapter and other accessories.
If the unit is not working as it should, please contact the place of purchase for service.
Don’t forget the receipt or a copy of the invoice.
62
®
Liberto 820 Mini (1011,1021,1035)
FCC ID: WS5DORO820M
English
Version 1.0
©2015 Doro AB. All rights reserved.
www.doro.com
0984
REV 13909 — STR 20150112