1
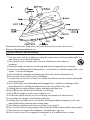
0
pr
iz
e
dr
aw
Re e R
g
co ister ew
lle o
c n ar
Se t yo line ds
e b ur n
G
de ack rew ow t all
er
tai fo ard o
ls r
y
Fr
e
£1
PL 0,
US 0
0
instructions
Read the instructions, keep them safe, pass them on if you pass the iron on.
Remove all packaging before use.
AIMPORTANT SAFEGUARDS
Follow basic safety precautions, including:
1 This iron must only be used by or under the supervision of a responsible adult. Use
and store it out of reach of children.
2 Don’t put the iron in liquid, don’t use it in a bathroom, near water, or
outdoors.
3 Route the cable so it doesn’t overhang, and can’t be tripped over or caught.
4 Don’t iron clothing while it’s being worn – you’ll burn or scald the wearer (this is not
a joke – I’ve seen it happen).
5 Don’t touch the soleplate, and keep away from the steam coming from it.
6 Don’t use the iron in the vicinity of children.
7 Use the iron, or set it on its heel, on a stable, level, heat-resistant surface, preferably
an ironing board.
8Don’t leave the iron unattended while plugged in, or while it’s standing on the
ironing board. It could be knocked over by you, by a child, or by a pet.
9 Unplug the iron before filling, before cleaning, and after use.
10 Don’t fill the iron directly from the tap, use the jug.
11 Don’t fill past max, or water may escape in use.
12 Sit the iron upright when you’re not ironing, and when you store it away.
13 Leave the iron upright to cool before cleaning.
14 Unplug the iron when not in use, before moving and before cleaning. Let it cool
down fully before cleaning and storing away.
15 Don’t fit any attachment or accessory unless we supply it.
16 Don’t use the iron for any purpose other than those described in these instructions.
17 Take care not to scratch the soleplate – avoid buttons, zips, etc.
18 Don’t use the iron if it’s dropped or damaged, or if it malfunctions or leaks.
2
19 The iron has a protective thermal fuse, which will blow if it overheats. If this happens,
the iron will stop working, and must be returned for repair.
20If the cable is damaged, return the iron, to avoid hazard.
household use only
U BEFORE USING FOR THE FIRST TIME
• Don’t worry if the iron smokes a bit at first, it’ll stop as the element cures.
• Iron an old piece of cotton fabric, to clean the soleplate.
• Press the ~ and buttons 3 or 4 times, to check them out.
CPREPARATION
1 Check for textile care symbols (i j k l).
2 Iron fabrics needing low temperatures j first, then those that need medium
temperatures k, and finish with those needing high temperatures l.
XFILLING
3 You may use the iron with tap-water, but if you live in a hard water area, you should
use distilled water (not chemically descaled or softened water).
4 If you buy distilled water, check that it’s marketed as suitable for use in irons.
5 Unplug the iron.
6 Turn the temperature control to •, turn the steam control to S (#3).
7 Lift the front of the water inlet cover to open it.
8Hold the iron with the water inlet cover vertical.
9 Pour slowly, to let the air in the reservoir escape, otherwise you’ll
cause an air lock and the water will overflow.
10 Don’t fill past max, or water will escape in use.
11 Wipe up any spillage.
CSWITCH ON
12 Set the temperature control to •, set the steam control to S.
13 Sit the iron on its heel.
14 Put the plug into the power socket (switch the socket on, if it’s switchable).
15 Turn the temperature control to bring the setting you want next to the 9 mark (#3).
16 The light will come on.
17 When the iron reaches the temperature you set, the light will go off. It’ll then cycle
on and off as the thermostat operates to maintain the temperature.
b TEMPERATURE SETTING GUIDE
label marking
temperature dot setting
j cool – nylon, acrylics, polyester
•
k warm – wool, polyester mixtures
••
l hot – cotton, linen
• • •/max
i do not iron
,If the instructions on the fabric label differ from this guide, follow the instructions
on the label.
CREDUCING TEMPERATURE
18 This takes a bit longer, as the iron has to lose the heat it has built up, so be patient.
It’s best to organise your ironing so that you don’t need to reduce the temperature.
3
S STEAM IRONING
19 When steam ironing, you must set the temperature control at S or higher.
20If you don’t, you’ll get water on your clothes, not steam.
21Turn the steam control to the setting you want, S = no steam, # = high steam.
22Wait till the light goes out, then start ironing.
*SPRAY
,Water spotting affects some fabrics. Test this out on a hidden part of the fabric.
23This works with dry or steam ironing, as long as there’s water in the reservoir.
24Check that there’s water in the reservoir.
25Lift the iron off the fabric.
26Aim the spray nozzle at the fabric.
27Press the * button – you may have to press it 2 or 3 times
to pump water through the system.
S SHOT OF STEAM
28This works with dry or steam ironing, as long as there’s water in the reservoir, and
the temperature is above S.
29Check that the temperature control is at S or higher.
30Lift the iron off the fabric.
31Press the ~ button – you may have to press it 2 or 3 times to pump
water through the system.
32Leave 4 seconds between shots, to let the temperature build up.
n DRY IRONING
33If you’re going to be dry ironing for 20 minutes or more, empty the
reservoir first, to avoid spontaneous bursts of steam.
34Turn the steam control to S.
35Wait till the light goes out, then start ironing.
l VERTICAL STEAMING
36Remove wrinkles from hanging clothes, hanging curtains, and furnishing fabrics.
37Check that there’s adequate ventilation behind the fabric, otherwise moisture may
build up, causing mildew.
38Check that there’s nothing behind the fabric that may be damaged by the steam.
39Check that pockets, turn-ups, and cuffs are empty.
40Turn the temperature control to max, turn the steam control to S.
41Hold the iron close to (but not touching) the fabric.
4
42Press the ~ button (you’re using the “shot of steam” function
vertically).
43You may have to press it 2 or 3 times to pump water through the
system.
44Leave 4 seconds between shots, to let the temperature build up.
CAFTER USE
45Turn the temperature control to •, turn the steam control to S.
46Unplug the iron.
47Lift the top of the water inlet cover to open it.
48Hold the iron over a sink, turn it upside down, and drain the water
from the reservoir.
49Sit the iron on its heel.
50Leave it to cool down completely.
51When it’s cold, wipe off any moisture, and close the water inlet cover.
52Store the iron on its heel, to avoid corrosion and damage to the soleplate.
CSELF CLEAN
53To prevent scale building up, use the self clean function regularly, at least monthly in
normal water areas, more often in hard water areas.
,Products returned under guarantee with faults due to scale will be subject to a
repair charge.
54You’ll need a basin or a large bowl to catch the water coming out of the soleplate.
55Fill the reservoir to the max mark.
56Turn the temperature control to max, turn the steam control to S.
57Sit the iron on its heel.
58Put the plug into the power socket, and wait till the light goes out.
59Now hold the iron over the basin or bowl, with the soleplate down.
60Press C, and hold it down.
61Gently move the iron to and fro, over the basin or bowl.
,Keep clear of the escaping water and steam.
62Water and steam will wash scale and dust through the soleplate,
and into the sink.
63When the reservoir is empty, release C.
64Unplug the iron, and sit it on its heel to cool.
65When it’s cold, wipe off any moisture.
66Store the iron on its heel, to avoid corrosion and damage to the soleplate.
CCLEANING
67Unplug the iron when not in use, before moving and before cleaning. Let it cool
down fully before cleaning and storing away.
68Wipe outer surfaces with a damp cloth. If necessary, use a little washing-up liquid.
69Remove spots from the soleplate with a little vinegar – take care not to scratch it.
70Don’t put the iron in water or any other liquid.
71Don’t use harsh or abrasive cleaning agents or solvents.
5
6
7
D UK WIRING INSTRUCTIONS
The product must be earthed.
It has a 13A BS1362 fuse in a 13A BS1363 plug.
To replace the plug, fit the green/yellow wire to E or E, the blue wire to N,
and the brown wire to L. Fit the cord grip.
If in doubt, call an electrician.
Don’t use a non-rewireable plug unless the fuse cover is in place.
If you remove the plug, dispose of it.
H ENVIRONMENTAL PROTECTION
To avoid environmental and health problems due to hazardous substances in
electrical and electronic goods, appliances marked with this symbol mustn’t be
disposed of with unsorted municipal waste, but recovered, reused, or recycled.
SSERVICE
If you ring Customer Service, please have the Model No. to hand, as we won’t be able
to help you without it. It’s on the rating plate (usually underneath the product).
The product isn’t user-serviceable. If it’s not working, read the instructions, check the
plug fuse and main fuse/circuit breaker. If it’s still not working, consult your retailer.
If that doesn’t solve the problem – ring Customer Service – they may be able to offer
technical advice.
If they advise you to return the product to us, pack it carefully, include a note with your
name, address, day phone number, and what’s wrong. If under guarantee, say where
and when purchased, and include proof of purchase (till receipt). Send it to:
Customer Service
Spectrum Brands (UK) Ltd
Fir Street, Failsworth, Manchester M35 0HS
email: [email protected]
telephone: 0845 658 9700 (local rate number)
EGUARANTEE
Defects affecting product functionality appearing within two years of first retail
purchase will be corrected by replacement or repair provided the product is used and
maintained in accordance with the instructions. Your statutory rights are not affected.
Documentation, packaging, and product specifications may change without notice.
JONLINE
www.russellhobbs.co.uk for more products
IREGISTRATION AND PRIZE DRAW
551-383
Collect your free reward, and a chance to win £10,000.
Visit www.productregister.co.uk/rhobbs
8