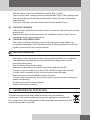
1
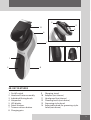
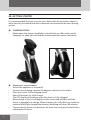
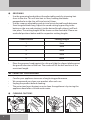
XR1390
le
u m pro
ry
us duc
t r tre
e g
of gist ister
pu er w .co
rch it .uk
as hin /re
e. 2 mi
8 d ng
ay ton
s
.
Re
g
£1 iste
0 r
EX ,0 o
TR 0 nl
FR A y 0 p ine
EE ea r
re r g ize fo
r
w ua
ar ra d
Vis
ds n ra
it w
t
ga ee w
w
Yo w.
l
Hyperflex Verso
Thank you for buying your new Remington® product. Please read these
instructions carefully and keep them safe. Remove all packaging before use.
F IMPORTANT SAFETY INSTRUCTIONS
WARNING – TO REDUCE THE RISK OF BURNS, ELECTROCUTION, FIRE, OR INJURY
TO PERSONS:
1 This appliance can be used by children aged from 8 years and above and persons with reduced physical, sensory or mental capabilities or lack of experience and knowledge if they have been supervised/instructed and understand the hazards involved. Children shall not play with the appliance. Cleaning and user maintenance shall not be done by children unless they are older than 8 and supervised. Keep the appliance and cable out of reach of children under 8 years.
2 Do not use this product if it is not working correctly, if it has been dropped or damaged, or dropped in water.
3 An appliance should never be left unattended when plugged into a power outlet, except when charging.
4 Keep the power plug and cord away from heated surfaces.
5 Make sure the power plug and cord do not get wet.
6 Do not plug or unplug the appliance with wet hands.
7 Do not use the product with a damaged cord. A replacement can be obtained via our International Service Centres.
8 Do not twist or kink the cable, or wrap it round the appliance.
9 Store the product at a temperature between 15°C and 35°C.
10 This appliance is not intended for commercial or salon use.
11 Suitable for use in a bath or shower.
2
4
2
13
3
6
7
5
9
1
8
5
C KEY FEATURES
1
2
3
4
5
6
7
8
On/off switch
Head and Cutter assembly
Individual flexing heads
Hairpocket
LED display
Detail trimmer
Trimmer release button
Charging pins
9
10
11
12
13
14
Charging stand
Adaptor (not shown)
Head guard (not shown)
Cleaning brush (not shown)
Grooming styler head
Adjustable comb for grooming styler
head (not shown)
3
C GETTING STARTED
It is recommended that you use your new shaver daily for up to four weeks to
allow time for your beard and skin to become accustomed to the new shaving
system.
, CHARGING STAND
•
Rotate open the charge stand fully to stand firmly on a flat surface while charging. For travel you can fold the stand around the shaver (see below).
,
•
•
•
•
•
•
•
4
CHARGING YOUR SHAVER
Ensure the appliance is turned off.
Connect the charging stand to the adaptor and then to the mains.
Place the shaver in the charging stand.
Allow 90 minutes for a full charge.
The LED display will indicate when the shaver is fully charged.
When charge is low ‘Lo’ will appear on the screen and will flash until the shaver is plugged in to charge. When charging, the LEDs blink in a clockwise rotation. When fully charged the minutes remaining will show ‘60’ minutes
To preserve the life of your batteries, let them run out every 6 months then recharge for 24 hours.
•
The adaptor automatically adjusts to a mains voltage between 100V and 240V.
•
This appliance should be charged by approved safety isolating adaptors PA-0510E(K) with the output capacity of 5.0 dc; 1.0A.
F INSTRUCTIONS FOR USE
,
,
•
•
•
•
•
SHAVING
Note: This shaver is for cordless use only.
Make sure your shaver is properly charged.
Switch the shaver on.
Stretch the skin with your free hand so the hairs stand upright.
Only apply light pressure on the shaving head while shaving (pressing too hard can damage the heads and make them vulnerable to breakage).
Use short, circular strokes.
,
•
,
•
SHAVING WITH SHAVING GEL
Follow the same instructions as dry shaving if using shaving gel.
CAUTION
After use with shaving gel, please rinse the head and cutters under warm water to clean away any excess gel and debris.
,
•
•
•
•
TRIMMING
Push the trimmer button to release the detail trimmer.
Hold the trimmer at a right angle to your skin.
Place the trimmer at desired trim line for a quick, easy, professional trim.
To retract the trimmer, push down until it locks into position.
E Tips for best results
•
Use moderate to slow stroking movements. The use of short circular motions in stubborn areas may obtain a closer shave, especially along the neck and chin line.
•
DO NOT press hard against the skin in order to avoid damage to the rotary heads.
,
•
•
•
CHANGING SHAVE / GROOMING HEADS
The shaver should be switched off when changing heads.
Grasp the shave head at the blue collar and pull up to unsnap the head from the handle.
Attach the interchangeable heads to the handle by aligning the hexagon shapes of the head to the handle, then pressing together to snap in place.
5
,
•
•
GROOMING
Use the grooming head without the adjustable comb for trimming hair close to the skin. This will trim hair to 1mm, holding the blades perpendicular to the skin will trim hair to 0.4mm.
Use the snap on adjustable comb to trim hair at desired length between
2mm long and 6mm long. Adjust the comb setting by pressing in the button on the rear and rotating it to the desired length where it will lock into place. The setting length will be shown on the comb dial. Please see comb dial positions below and the respective cutting lengths.
Comb Position
•
Cutting Length
1
2mm
2
3mm
3
4mm
4
5mm
5
6mm
Place the groomer head against the skin and slide the clipper blade against the growth direction of the hair. The comb will lift the hair and trim it to a consistent length.
C CARE FOR YOUR SHAVER
•
•
•
•
Care for your appliance to ensure a long lasting performance.
We recommend you clean your product after each use.
Unplug the product before cleaning.
The easiest and most hygienic way to clean the appliance is by rinsing the appliance head after use with warm water.
, CLEANING CAUTIONS
6
•
•
•
Pull the rotary shave face off the hair pocket (Fig. 1 and 2).
Tap out excess hair shavings from the hair pocket (Fig.3). Hair clippings can also be washed out of the hair pocket and or shave face by rinsing these under the tap.
Once dry, snap the shave face back onto the hair pocket (Fig. 4).
,
•
•
,
•
CLEANING TRIMMER
Lubricate the teeth of the trimmer every six months with a drop of sewing machine oil.
Replacement parts and accessories are available to buy at http://www.
remington.co.uk/ parts-accessories
CLEANING GROOMING HEAD
The easiest and most hygienic way to clean the grooming head is by rinsing the head after use with warm water. A cleaning brush can also be used to remove cut hair from the blades.
BATTERY REMOVAL
•
•
•
•
•
•
•
•
•
•
The battery must be removed from the appliance before it is scrapped.
The appliance must be disconnected from the supply mains when removing the battery.
Run shaver until the motor stops.
Remove the head from the shaver (pull the head up and off).
Using a small screwdriver, pry the ‘collar’ off of the top of the handle.
Using a small screwdriver, pry the front cover from the body.
Remove three screws located on front of shaver.
Using a small screw driver, pry up the newly unsecured inner housing to expose the battery.
Pry battery free from circuit board.
Dispose of battery properly.
H ENVIRONMENTAL PROTECTION
To avoid environmental and health problems due to hazardous
substances in electrical and electronic goods, appliances marked with
this symbol must not be disposed of with unsorted municipal waste, but
recovered, reused or recycled.
7
E SERVICE AND GUARANTEE
Defects affecting product functionality appearing within the guarantee period will
be corrected by replacement or repair at our option provided the product is used
and maintained in accordance with the instructions.
Your statutory rights are not affected.
Consumables are excluded.
Defects from repair by an unauthorized dealer are not covered.
If you call the Service Centre, please have the Model No. to hand, as we won’t be
able to help you without it. The Model No. can be found on the rating plate of the
appliance. Replacement parts and accessories are available to buy at
www.remington.co.uk/parts-accessories
E SERVICE CENTRE
United Kingdom
G Tel 0800 212 438 (free call mainland UK)
G +44 161 947 3111 (call outside the UK)
Spectrum Brands (UK) Ltd
Fir Street, Failsworth, Manchester
M35 0HS, UK
www.remington.co.uk
Ireland
G Tel 142 951 40
Remington Consumer Products,
Unit B12, Ballymount Corporate Park,
Ballymount, Dublin 12.
www.remington.co.uk
I REGISTER ONLINE FOR
£10,000 prize draw, EXTRA year guarantee, FREE rewards gallery.
Visit www.productregister.co.uk/remington. You must register within 28 days
of purchase.
8
Model No. XR1390
14/UK/ XR1390 T22-0002172 Version 03 / 14
Remington® is a Registered Trade Mark of Spectrum Brands, Inc., or one of its
subsidiaries.
Spectrum Brands (UK) Ltd
Fir Street,
Failsworth,
Manchester
M35 0HS
www.remington.co.uk
© 2014 SBI
9