1
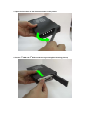
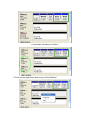
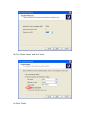
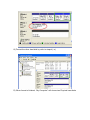
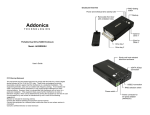
Quick Installation Guide
JJ-1225SUSRI
(A) Hardware Installation:
1. Standard packaging contains:
2. Push the ”LOCK” rightward to unlock the upper HDD door. The same for the lower
HDD door.
3. Open the front door as the direction shown on the picture
4. Put the 1st HDD and 2nd HDD inside the cage slowly(See following picture)
5.Push back the two HDD doors back until the HDD doors close to the cage(see
following picture)
6. Push the LOCK leftward to lock the two HDD doors.
7. Connect the 15pin power cable and SATA data cable to the host connections
(B) How to Configure your Raid
Raid Setting Table
Display RAI D Status
RAID Config
42
1
0
BIG (span)
OFF
OFF
OFF
1
JBOD (single)
OFF
OFF
ON
2
FAST (strip)
OFF
ON
OFF
3
SAFE (mirror)
OFF
ON
ON
4
SAFE33
ON
OFF
OFF
5
SAFE50
ON
OFF
ON
6
RESERVED
ON
ON
OFF
7
GUI ONLY
ON
ON
ON
How to Build Raid JBOD mode?
a) Set the DIP Switch as following
Display RAI D Status
1
JBOD (single)
RAID Config
42
OFF
1
OFF
ON
將 7pin 電源線和 SATA 傳輸線插入相應接口
ٛ
C) Click mouse right button on “My computer” and choose “manage” by
clicking mouse left button
D) Choose “Disk Management” by clicking mouse left button
E) the “Disk Manage shows the hard disks are “Not Install” & “Unallocated”
F) Click mouse right button over the red forbid sign and choose “Initialize
Disk ”by clicking mouse left button
G) Press ”OK”
H) Refer steps g) & h) to Initialize Disk 2
j. Hard disks will become “Online”
I) Click mouse right button and choose “New Partition”
J) Choose ”Next”
K) Choose ”Next” again. ( Suggestion: Tick “Extended partition” is
recommended if data in use only)
L) Set up partition size and click “Next”
M) Tick “Quick format” and click ”Next”
N) Click ”Finish”
O) Disk Manager shows “Formatting”
P) When format is finished , it shows “Healthy”
Q) Format the other hard disk by refer to steps k) ~s)
R) When format is finished, “My Computer” will shows two Physical hard disks
(B)How to build Raid Mode BIG or SAFE50
B-1 How to build Raid : BIG(Span)
Set the DIP Switch as following
Display RAI D Status
0
BIG (span)
RAID Config
42
OFF
1
OFF
OFF
B1-1 Set the DIP switch as above and Refer to Step C) ~ R) to build the Raid
BIG(Span) mode. This time you can see only 1 hard disk only (see following
two pictures.
B-2 How to build Raid : SAFE50
B2-1 Set the DIP switch as following and Refer to Step C) ~ R) to build the
Raid SAFE50 mode. This time you can see 2 hard disks ( one is mirror hard
disk and the other, BIG. See following two pictures.
Display RAI D Status
5
SAFE50
RAID Config
42
ON
1
OFF
ON
B-2a See two hard disks
B-2b See two healthy hard disks
After Raid SAFE50 is finished, you can see two new hard disks, one is with
Raid mirroring and the other is with Raid BIG.
Appendix
If you are using ESATA, you will have to connect both mini USB and
USBto 5v cables.
Trouble shooting
A> Can only see “8GB Unallocated”
Possible reasons are:
a-1 Does not install any hard disk.
a-2 First time installation and “Forgot to press “Change Mode” button once.
a-3 You have changed the Raid mode but forgot to press “Change Mode”
button once.
B> Indicating wrong hard disk capacity or wrong hard disk numbers
b-1 Normally, it is because you have changed Raid mode setting but does not
delete the previous Raid partition. In this case, you will have to delete the
previous Raid partition on the hard disks and then, re-organize your hard
disks again.
C> Hard disk LED indicators are blinking with green/red
c-1 This is because the Safe(Mirror) mode is under rebuilding. It usually
occurred on your first time setting the Safe(Mirror) mode or you change
the new hard disks.
c-2 The LED blinking will return to normal after rebuilding process finished.
c-3 While the Safe(Mirror) is under rebuilding or verifying, you can still use the
hard disks, only the performance will be slower than expected.
D> Hard disk LED light on Red or Red blinking
d-1 It means the this hard disk is not put in or not connected properly or the put
in hard disk is failed.
E> LED “SYS/Back up” indicating Red blinking
e-1 It means you already push the ‘Back up” button and ready to proceed the
back up.
F> LED “SYS/Back up” does not light onf-1 It means the hard drive health has
problem under Safe(Mirror) Mode.
G> When power on, hear the ‘clicker’ sound is repeatingg-1 That means you
has not connect the provided 2 USB cable connect to theports properly or the
USB power socket does not supply enough power.
H> Can not see the correct device data under “57xx SteelVine Manager”h-1
You can click the upper left icon “File” & click “Scan Drives” from
pop-upwindow to see it.