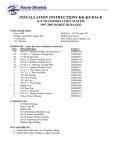
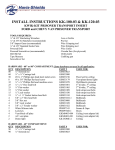
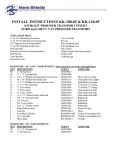
1
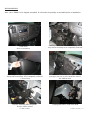
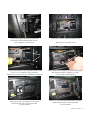
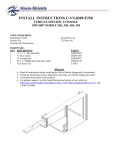
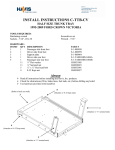
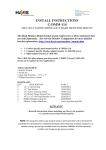
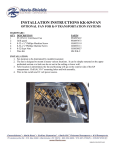
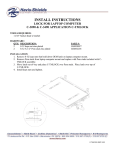
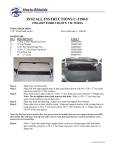
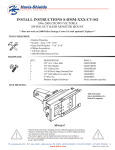
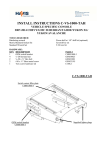
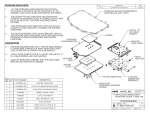
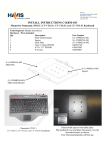
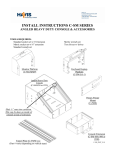
INSTALL INSTRUCTIONS
C-DMM-118
2006-2013 CHEVY VAN SWING-OUT DASH MONITOR MOUNT
The Dash Monitor Mount bracket system requires two or three main parts that
are Sold Separately. See web site Monitor Configurator for more detailed
bracket information. http://www.havis.com/monitor_mounts.htm
•
•
•
1 - Vehicle Specific dash mount bracket. (C-DMM-118)
1 - Computer Specific Monitor adaptor bracket. (C-MM-200 series)
1 - Offset adaptor bracket. (C-MM-301)
The C-MM-301 offset adaptor goes between the C-DMM-118 and C-MM-2XX.
It may not be required in some applications.
TOOLS REQUIRED:
• Ratchet Wrench
• Socket Set
• Open End Wrenches - 7/16”, 1/2”
• Phillips Screwdriver (short)
HARDWARE:
QTY:
DESCRIPTION:
4
8/32 x 1/4” Flat Head Machine Screw
4
8/32 Keps nut
4
10/32 x 1/2 Flat Head Machine Screw
4
1/4-20 Hex Flange Serrated Nut
1
Monitor Adapter Hardware
PART #:
GSM33178
GSM30027
GSM33072
GSM30023
Varies (monitor specific)
ALWAYS!
• Read all instructions before installing any Havis, Inc products.
• Use hardware provided with install kit
C-DMM-118
Assembly for Chevy Van
C-MM-301
Offset Adaptor
C-MM-201
Monitor Mount Adaptor
(VESA bracket shown)
C-DMM-118_INST_11-12
INSTALLATION
Note: The C-DMM-118 is shipped assembled. It will need to be partially un-assembled prior to installation.
OEM Dash
Prior to installation.
Carefully remove driver side lower dash panel. It
may not be necessary to be completely removed.
Carefully remove passenger side lower dash panel.
It may not be necessary to be completely removed.
(7 mm socket)
Detach center dash panel and pull out
passenger side only as far as needed to remove
the AM/FM radio.
Unscrew AM/FM radio from dash.
Screws will be reused
(7 mm socket)
Unplug and remove radio from dash.
C-DMM-118_INST_11-12
Attach side support brackets to dash with
previously removed OEM radio screws.
One each side (7 mm socket)
Insert main bracket frame into dash cavity.
Make sure not to pinch wires.
Loosely attach frame to side support brackets with
10/32 x 1/2” machine screws provided.
Tighten screws after next step. (Phillips screwdriver)
Attach main bracket frame to forward OEM support
with clamp provided. Tighten 1/4” nuts.
(7/16” socket with extension)
Attach door frame assembly to main frame
studs with four (4) 8/32 nuts provided.
(11/32 socket)
Plug wires into radio and mount radio to frame
studs with four (4) 8/32 nuts provided.
(11/32 socket)
C-DMM-118_INST_11-12
Attach Trim Bezel to frame with four (4) screws
provided.
Note: The gas spring may need to be temporarily
removed from frame in order to install Trim
Bezel properly.
(1/2 wrench and socket)
Attach C-MM-200 monitor adaptor bracket to
the back of monitor. Also attach C-MM-301
adaptor if required.
Attach Monitor / bracket assembly to swing door
with 1/4” nuts provided with the monitor adaptor
brackets.
View of completed C-DMM-118 installation
with a C-VS-1800-SAV console, C-MD-204 tilt
swivel and C-KBM-102 keyboard mount.
View of completed C-DMM-118 installation with
a DS-DA-211 docking station, C-VS-1800-SAV
console, C-MD-204 tilt swivel and C-KBM-102
keyboard mount.
C-DMM-118_INST_11-12